background image

36

2-4 Other Settings with V.Networks Setup Tool [6. Multicast]

Preparations (Step 2 Setting the Network)

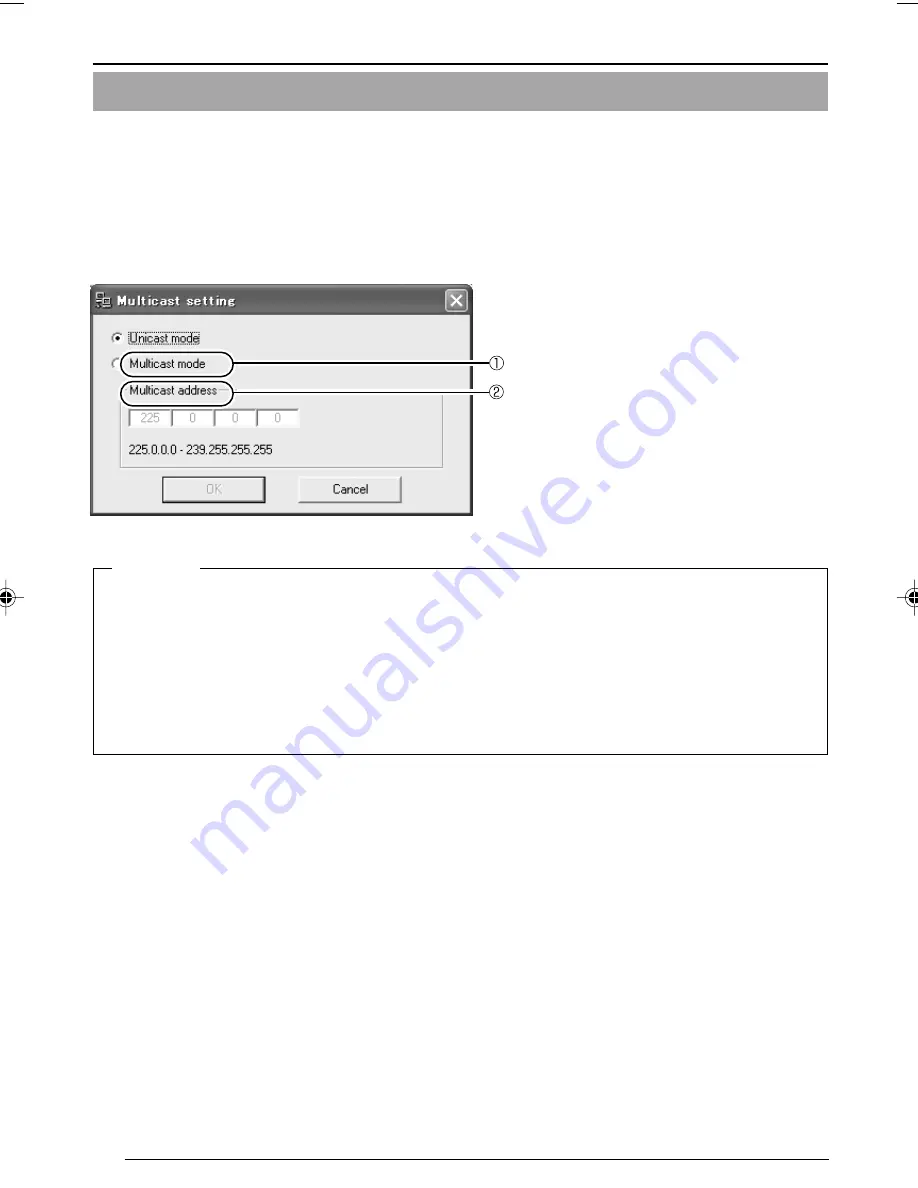
Select [Multicast Mode].

Selecting [Multicast Mode] allows VN-C10 to send the same image data to multiple recipients
on the network at one time without lowering the frame rate.
• In a narrowband environment, for example, of dial-up connection, select [Unicast Mode].
• Multicast cannot be set for MPEG4.

1.

Start up [V.Networks Setup Tool] and select [Multicast]. The [Multicast Setting] screen is
displayed.

Multicast

A multicast address can be set from 225.0.0.0 through 239.255.255.255. Do not set the
same multicast address for different devices on the same system.

To view VN-C10 images in the multicast mode through a router, an operating environment or
a router setting is required as follows:

1

The router supports IGMP Ver. 2 and is synchronized with the starting and stopping of
multicast transmission.  And the route setting can be dynamically changed.

2

If the router does not support IGMP Ver. 2, a static route for multicast must be set to the
router.

Enter a multicast address to [Multicast
address].

VN-C10_E_01-43.pm65e

08/01/03, 9:13 AM

36

Содержание V.Networks VN-C10

Страница 1: ...INSTRUCTIONS Model V NETWORKS LWT0095 001A VN C10 For Customer Use Enter below the Serial No which is located on the body Retain this information for future reference Model No VN C10 Serial No ...

Страница 2: ... If you are unable to insert the plug into the outlet contact your electrician to replace your obsolete outlet Do not defeat the safety purpose of the grounding plug 11 For added protection for this product during a lightning storm or when it is left unattended and unused for long periods of time unplug it form the wall outlet and disconnect the antenna or cable system This will prevent damage to ...

Страница 3: ...against harmful interference when the equipment is operated in a commercial environment This equipment generates uses and can radiate radio frequency energy and if not installed and used in accordance with the instruction manual may cause harmful interference to radio communications Operation of this equipment in a residential area is likely to cause harmful interference in which case the user wil...

Страница 4: ...or Windows 2000 22 2 3 Setting the IP Address for VN C10 with V Networks Setup Tool 24 2 4 Other Settings with V Networks Setup Tool 26 1 Password Setting 27 2 Alarm Setting 28 3 Motion Detection Setting 30 4 Recording Setting 32 5 FTP Client Setting 34 6 Multicast 36 7 Compression Format 38 8 Memory Capacity 38 9 Web 39 10 FTP Server 40 11 Time Setting 41 2 5 Registering the Connected Camera with...

Страница 5: ... V Networks Controller 55 5 2 Record Stop 56 5 3 Playback 57 5 4 Other Instructions on Record and Playback 59 5 5 Snapshot 60 Step 6 Operations with a Web Browser 6 1 Required Operating Environment 61 6 2 Access Authorization 62 6 3 Starting Up the Web Browser 63 6 4 Settings with a Web Browser 64 1 Other Settings 65 2 Image Settings 68 3 View Settings 69 4 Alarm Settings 70 5 FTP Settings 71 6 5 ...

Страница 6: ...uded How to Use This Manual Characters and Symbols used in this Manual Caution Operational points special attention should be paid to because of for example danger involved Note Functional or operational tips Pages or items to refer to In no case shall JVC be held liable for any loss or damage to the customer or for any claim from any third party arising from using this software For the purpose of...

Страница 7: ...city 128 MB or more Hard Disk Space 20 MB or more Display Video Card 1024 X 768 pixels or more True Color 24 bits or 32 bits LAN Specifications 10 BASE T 100 BASE TX network connected with IEEE802 3 hubs Note The PC specifications above are only for a reference purpose They are not meant to guaran tee a smooth operation of the application software Depending on the usage of the PC there may be case...

Страница 8: ...s this may cause melting or tarnishing of the unit surface If dirt is persistent use a cloth soaked with water diluted mild detergent and then wipe it with a dry cloth Because the cable holders of the terminals could come loose perform cable connection carefully and securely Insufficient dissipation of heat from the unit may cause damage Use the unit at a well ventilated location In particular do ...

Страница 9: ...ment ring 4 Bracket for camera mounting At the factory the bracket is attached on the bottom of the camera According to the instal lation condition this can be attached at the top Use the screws 7 for attaching the bracket to the camera 5 Screw hole 1 4 20UNC For attaching the camera to a fixer or a pan tilt unit The screw length must not ex ceed 7 mm If a longer screw is used the internal parts o...

Страница 10: ...ing when the power is turned on When the camera is ready for network connection this becomes steady on If the indicator blinks while the camera is in use check the camera and or the network equipment DC 12 V AC 24 V Power terminal For connecting to a DC 12V or AC 24V 50 Hz 60 Hz power source Page 14 ALARM INPUT terminals For connecting with an external alarm equip ment Page 16 ALARM OUTPUT termina...

Страница 11: ...utomatically updated at a regular interval FTP Server ALC LEVEL Av Pk L H MAC address BF LOCK ALC LEVEL Av Pk L H MAC address BF LOCK VN C10 PC ALC LEVEL Av Pk L H MAC address BF LOCK LAN Connection VN C10 VN C10 PC LAN ALC LEVEL Av Pk L H MAC address BF LOCK ALC LEVEL Av Pk L H MAC address BF LOCK Preparations ...

Страница 12: ...Networks Setup Tool and regis tration of the connected camera with V Networks Controller Step 3 Adjusting the Camera Adjust the back focus while checking images Step 5 Operations with V Networks Controller Now the camera is ready for recording and playback etc with V Networks Controller Step 6 Operations with a Web Browser The camera is ready for Web operations Step 4 Setting with V Networks Contr...

Страница 13: ...a Do not use a lens with a length longer than a as it may cause damage to the inter nal parts of the camera and proper lens at tachment would not be possible 2 Attach the lens to the camera securely by turn ing it clockwise 3 In the case of a DC IRIS lens connect the lens cable to the socket while examining the pin arrangement 4 Pin Plug 1 Damping d 2 Damping e 3 Driving e 4 Driving d Pin No DC IR...

Страница 14: ... where more than one VN C10 are used turn on the power for a VN C10 first and proceed the setting to 2 4 Other Settings with V Networks Setup Tool Only then turn on the power for a second one and go on to 2 4 Repeat the procedure for the other cameras WARNING Connect with the appropriate power supply voltage The rated voltage for VN C10 is DC 12 V or AC 24 V 50 Hz 60 Hz If a voltage exceeding the ...

Страница 15: ...PUT PUSH CLASS 2 ONLY For USA ISOLATED POWER ONLY For EUROPE 10BASE T 100BASE TX For USA DO NOT CONNECT TO THE TELEPHONE NETWORK For hub connection Use a straight cable For PC connection Use a cross over cable Caution There are a few types of LAN board for which a cross over cable cannot be used Check the specifications of the LAN board to be used before performing connection ...

Страница 16: ...R ONLY POWER G 2 2 1 1 OUT COM ALARM DC12V AC24V OUTPUT INPUT PUSH For EUROPE 10BASE T 100BASE TX For USA DO NOT CONNECT TO THE TELEPHONE NETWORK Push VN C10 Sensor Connection Example 1 Terminal 1 or 2 OUT R DC3 3V Alarm input equivalent circuit Grounding terminal GND 0 6mA R VCC Sensor Connection Example 2 OUT GND 3 3V Relay switch etc Press the buttons for connecting or disconnect ing cables as ...

Страница 17: ... voltage DC 12 V max Allowed input current 300 mA Momentary output 2 to 5000 ms The duration is set with V Networks Setup Tool VN C10 Annunciator Connection Example 1 Output terminal IN R DC 12 V Alarm output equivalent circuit COM terminal COM Grounding terminal GND MAX 300 mA MAX 12 V Annunciator Connection Example 2 IN R DC 12 V COM GND Buzzer lamp LED etc Annunciator Connection Example 3 R DC ...

Страница 18: ...ring wire use the black screw on the top side of the camera For fixing the wire a screw of M2 6 X 4mm should be used Do not use a longer screw as it may damage the internal parts of the camera 2 mm 4 mm M2 6 x 4 mm Securing wire MAX 7 mm Caution The length of the screw for mounting the camera must not exceed 7 mm Do not use a longer screw as it may damage the internal parts of the camera In the fa...

Страница 19: ...is created in Programs of the Windows Start menu vn c10u Setup Tool is displayed in V Networks Installing DirectX 8 1 and Codec DirectX 8 1 and ISO MPEG4 Codec are required for viewing MPEG4 images with VN C10 If the version currently installed in the PC is older install the version 8 1 by following the procedure below Installing Codec Select WMPCD8 exe and install Codec by following the instructi...

Страница 20: ... 2000 Page 22 Ensure that Client for Microsoft Networks is selected Note Under a DHCP environment and also if the IP address to be allotted to V Networks is already known skip 2 2 Setting the PC s IP Address Note If either Client for Microsoft Networks or Internet Protocol TCP IP is not displayed select Install 1 Click Right click My Network and select Properties 2 Select the network connected to ...

Страница 21: ...ernet Protocol TCP IP 5 Click in Local Area Connection Properties Click Properties Click Select Use the following IP address Set IP Address to 192 168 0 3 Note Before changing the IP address note down the original address Do not use the same IP address elsewhere in this network environ ment Set Subnet Mask to an appropriate value according to the operating environment Ask the network administrator...

Страница 22: ...mera proceed to set the IP address of the PC by which the camera is operated With Windows 2000 follow the procedure below to set the IP address 1 Click Select Settings and click Control Panel 2 Double click Network and Dial up Co 3 Double click Local Area Connection Select Internet Protocol TCP IP Click Properties ...

Страница 23: ...0 continued Select Use the following IP Address 4 Click IP Address in TCP IP properties 5 Click Set the IP address to 192 168 0 3 Set Subnet mask to an appropriate value according to the operating environment Ask the network administrator if necessary ...

Страница 24: ...e searched and found Reconnect the camera after changing the IP address of the PC accordingly Note For connecting VN C10 with the factory settings either one of the environments described below is required Environment where no DHCP server exists Environment where a DHCP server exists which clearly defines the allotted IP address and MAC address 1 Select Start Programs V NETWORKS and then vn c10u S...

Страница 25: ...page Click to update the values Select whether to use DHCP Note With DHCP selected the IP ad dress of the DHCP server etc can be checked Change the IP address to the one alloted or approved by the network administrator Note A new IP address becomes effective when VN C10 is automatically reset Set the subnet mask to an appropriate value according to the operating environ ment Ask the network admini...

Страница 26: ... Settings with V Networks Setup Tool Preparations Step 2 Setting the Network Set passwords alarm motion detection etc by using the installed V Networks Setup Tool Page 27 Page 40 Page 39 Page 38 Page 34 Page 38 Page 41 Page 32 Page 28 Page 30 Page 36 2 Refer to the relevant pages for these settings shown above ...

Страница 27: ...ect User Operator or Administrator 2 The following screen is displayed for confirmation Note For a password protected VN C10 the password request screen appears VN C10 cannot be set up unless the correct administrator password is entered The security level is highest for the administrator and lowest for the user If password is set only for lower security level s password protection is not effectiv...

Страница 28: ...n when alarm input is activated Output signals are sent from the output terminal located on the rear panel of the camera ALARM OUTPUT Page 17 Alarm information is reported to V Networks Controller Page 29 Alarm Images are recorded Page 32 1 Start up V Networks Setup Tool and select Alarm 2 4 Other Settings with V Networks Setup Tool 2 Alarm Setting Preparations Step 2 Setting the Network 1 4 5 6 2...

Страница 29: ...output port setting Note A second alarm input enables this relay alarm function and alarm will not be acti vated for this second input Unless the alarm output is enabled this function is not activated even if Alarm Output of the Alarm Settings screen is selected 5 Retry 1 to 3 This function sets how many times an alarm alert to V Networks Controller is repeated 1 to 3 Note Depending on the LAN env...

Страница 30: ...en is divided in 300 20x15 blocks Adjust magnification of the lens so that the monitoring area object covers more than one block Caution The motion detection function is not designed to prevent burglary or fire It may not function properly depending on the condition of the object or settings described in this document In no case shall JVC be liable for any accidents and or damage caused Select the...

Страница 31: ...object is slow moving the time should be longer to avoid detection errors Available MASK Areas outside the one already set for motion detection displayed in yellow can also be selected Reference Image For checking the reference image The screen below is displayed Refresh Press this button to refresh the reference image 3 Press Detail to display Motion Detection Setting Parameters Y Threshold A sma...

Страница 32: ...cording and set the frame rate 30 15 10 8 7 6 5 4 3 2 or 1 The default value is 30 fps For selecting the record starting trigger the alarm input signal to start local recording 2 Frame Rate For setting the recording time Up to 60 seconds can be set both before and after an alarm input Caution If the value for before a trigger is set to 0 set a different value for after the trigger Both values cann...

Страница 33: ...use of other factors such as the compression rate and the object quality Recording files A trigger recording file is created each time a trigger occurs Even if triggering keeps occur ring and recording continues only one file will be created for each trigger Caution Saving images of local recording to the PC As local recording images are saved to the VN C10 volatile memory the images are deleted i...

Страница 34: ...ling simultaneous image monitoring at many places and by many people This function cannot be set for MPEG4 1 Start up V Networks Setup Tool and select FTP Setting The FTP Setting screen is displayed 2 4 Other Settings with V Networks Setup Tool 5 FTP Client Setting Preparations Step 2 Setting the Network 9 8 7 6 4 3 5 2 1 ...

Страница 35: ...ry time is selected connection with the FTP server is cut after an image was uploaded 8 Error Recovery Connection error Specify a recovery action when an error occurred for TCP connection or FTP verification of VN C10 Retry forever Recovery attempt is repeated until the power for VN C10 is turned off min Retry Recovery attempt is repeated for a specified period 1 to 600 minutes Transfer error Sele...

Страница 36: ...cast The Multicast Setting screen is displayed Multicast A multicast address can be set from 225 0 0 0 through 239 255 255 255 Do not set the same multicast address for different devices on the same system To view VN C10 images in the multicast mode through a router an operating environment or a router setting is required as follows 1 The router supports IGMP Ver 2 and is synchronized with the sta...

Страница 37: ...ticast addresses on the network can be searched 1 Start up V Networks Setup Tool Select Search 2 The V Networks Search screen is displayed 3 The Multi Address Search screen is displayed 4 The search result is displayed To start search click Search Click Multicast search Click Search ...

Страница 38: ...smoother display of images set a larger value 2 4 Other Settings with V Networks Setup Tool 8 Memory Capacity Memory capacity can be checked 1 Start up V Networks SetupTool and for the compression format select JPEG or MPEG4 Check the free memory space The memory capacity of VN C10 is 8000 kB Set the bit rate for MPEG4 64 to 2048 For a better image quality set a larger value Caution In the MPEG4 m...

Страница 39: ...umber Caution It is possible to enhance the level of security by changing the default port number 80 of VN C10 HTTP server 1 through 65535 With this number changed it can be accessed with a Web browser by entering http 192 168 0 2 12345 or http 192 168 0 2 12345 index e html in the case of the port number 12345 If you have forgotten the port number refer to Setup Tool The default page refers to th...

Страница 40: ...func tion Note The FTP server name is fixed to Administrator and also use the password for the adminis trator For the FTP user area approximately 300 kB are allotted All uploaded folders are stored directly under the user folder It can be accessed as in http 192 168 0 2 user aaa html with a Web browser 192 168 0 2 denotes the VN C10 IP address when aaa html is refered to Folders cannot be created ...

Страница 41: ...rned on again With Windows XP Home Edition and Windows XP Professional NTP sever functions be come enabled when they are installed in the standard procedure For Windows 2000 follow the procedure below to enable NTP server functions 1 Set the value for the following registry to 1 The default value is 0 HKEY_LOCAL_MACHINE SYSTEM CurrentControlSet Services W32Time Parameters LocalNTP Registry editing...

Страница 42: ...c10u Controller to start up V Networks Controller 2 5 Registering the Connected Camera with V Networks Controller Select File and New Enter V Network Name a name under which the camera is registered Use a name that is easy to remember such as the installation location or number Note In a DHCP environment enter the IP address allotted by the DHCP server Enter 198 168 0 2 in IP Address 2 New is disp...

Страница 43: ...away from the object while checking the image on the PC screen 3 Zoom in the lens and adjust the focus by turning the focus ring 4 Zoom out the lens and adjust the focus by turning the focus ring 5 Repeat steps 3 and 4 a few times 6 Tighten the back focus locking screw securely by turning it clockwise Loosen Tighten Back focus locking screw M2 6 Back focus adjustment ring Lens focus ring Preparati...

Страница 44: ...S and then vn c10u Controller to start up V Networks Controller Live images from the camera are dis played Note If a password has been set enter the correct password This Controller can be connected to VN C1 VN C2 VN C3 VN C30 only for JPEG VN A1 and VN C10 In the pull down menu select the camera to connect Caution After the power for VN C10 is turned on there will be about 20 seconds until VN C10...

Страница 45: ...a is inversely installed Not available for MPEG4 4 2 Function Settings with V Networks Controller With V Networks Controller settings for image size alarm etc can be performed 3 Setting Quality Sets the compression rate and image qual ity Framerate Sets the number of frames transmitted per second Alarm Reg If this is selected alarm operation will be enabled Alarm Alarm actions for each alarm can b...

Страница 46: ...tion will be activated upon reception of motion detection alert from VN C10 1 Select File and then Motion Detect Standby 2 Select the camera Click 3 Click Select the camera for which you wish to enable the motion detection function Operations Step 4 Setting with V Networks Controller ...

Страница 47: ...e displayed The blocks where mo tion is detected will be displayed in red With V Networks Controller it is possible to set the size of the moving image window and invert the image 4 4 Image Size and Inversion 1 Select View 2 Select an image size and whether or not to invert the image Right click on the moving image window to change the settings This setting is not avail able for MPEG4 Set the imag...

Страница 48: ...such as the image compression rate white balance etc can be done 1 Select Setting and Quality 4 5 Setting the Image Quality 2 Change the set values For functional description next page 3 Click 1 2 3 7 4 5 6 Operations Step 4 Setting with V Networks Controller ...

Страница 49: ...where the commercial power fre quency is 50 Hz 4 Saturation Adjusts color saturation A smaller value makes colors less dense Set to 25 at the factory 5 AGC AES BLC AGC Automatically adjusts the gain in accordance with the brightness Factory Set AES Automatically adjusts the shutter speed in accordance with the brightness Only for a manual iris lens BLC Back light compensation When there is a brigh...

Страница 50: ...arly where the network traffic is always heavy reduce the number of frames to be transmitted 1 Select Setting and Framerate With V Networks Controller it is possible to set the frame rate the number of image updates per second for JPEG Frame rate setting with V Networks Controller is possible only for JPEG Frame rate for MPEG4 can be set with V Networks Setup Tool Page 38 2 Set the frame rate in t...

Страница 51: ...ignal 1 Select Setting and Alarm Setting 4 7 Alarm Setting Text box With Relay Alarm selected 1 and 2 cannot be set 2 Change the set values For functional description next page Settings are performed for Motion Detection Alarm Alarm 1 Alarm 2 and Relay Alarm 3 When the settings are complete click 1 2 3 4 ...

Страница 52: ...g in Alarm Setting of V Networks Setup Tool is enabled Page 28 Relay Alarm When the relay alarm function is enabled subsequent alarms will not be activated 3 Playing wave file When an alarm is received a specified Wave file is replayed Press the Browse button to specify a Wave file 4 Execute application file When an alarm is received a specified program is executed Press the Browse button to speci...

Страница 53: ... holding down the shift key on the moving image or playback window screen the time stamp will appear where the mouse was clicked Time stamp in the MPEG4 mode is shown in the title bar of the image window Select the display style in Style YYYY MM and DD represent year month and day respectively HH represents hour while MM minute SS second and mm millisecond Click Font to select the font 2 Proceed w...

Страница 54: ...V Networks Controller registered information on camera connection etc can be changed 1 Select Setting and Property Change the camera 2 Proceed with the setting 3 When complete click Cannot be changed Caution Information cannot be changed for a connected camera Set whether to start recording on connection ...

Страница 55: ...ull down menu 2 PLAY Select the file saved in 4 and replay Select this button too for replaying a recorded file with an alarm activated 3 STOP Stops recording 4 REC When this is selected recording starts The recorded files are saved under the name shown in 1 During recording the display Recording in progress appears in 1 The display REC will also appear on the displayed image 5 SNAPSHOT Saves only...

Страница 56: ...ing stops The Recording and REC displays disappear When the Snapshot button is clicked one single frame of the image being displayed is recorded Page 60 Note Refrain from attempting continuous recording for an extended period of time Files recorded over an extended time may not be replayed fully due to an insufficient memory space of the PC Do not change the record file name Moving image window 1 ...

Страница 57: ...ges are displayed 1 Click the PLAY button 5 3 Playback Press Refer to Local Rec to select the file 2 Select the file you wish to replay from Playback File and click To replay a local recording file click Refer to Local Rec And select the file PLAY button Click A file name is displayed as the time when re cording started to the time when it ended ...

Страница 58: ...Operations with V Networks Controller 5 3 Playback continued 3 Click Slidebar Moves toward the right as the playback time progresses Can be dragged with the mouse 4 Playback is displayed Stop button Pause button Play button ...

Страница 59: ...recording time for 2 GB JPEG data at 5 frames per second 5 4 Other Instructions on Record and Playback Image size Data size per image Approximate recording time 160 x 120 Approx 5 kB 20 hours 320 x 240 Approx 15 kB 6 hours 640 x 480 Approx 50 kB 2 hours Approximate recording time for 2 GB MPEG4 data Bit rate Approximate recording time 64 kB s 65 hours 384 kB s 10 hours 2048 kB s 2 hours ...

Страница 60: ...ayed can be saved as still image files Enter the file name Note Snapshots are saved as JPEG files in the JPEG mode and as BMP files in the MPEG mode Note Other viewer software Still image files saved with VN C10 can be viewed with general viewer software However images inverted by VN C10 will not be displayed as such Also image color may also be different Press Save to save a snapshot Operations S...

Страница 61: ...ross over cable Be sure to check your LAN board Operations Step 6 Operations with a Web Browser It is possible to view still moving images and perform various settings via not only the provided Controller software but via a Web browser as well However note that MPEG4 files cannot be viewed with a browser Also the browser does not support the image inversion function 6 1 Required Operating Environm...

Страница 62: ...below If passwords are set the User Name and Password request window appears for access authorization Top page http index e html represents the URL of VN C10 This page is intended for linkages to other VN C10 web pages Verifying access authorization Note It is recommended that you register the URL Uniform Resource Locator For speedy display of the VN C10 web pages on your web browser it is recomme...

Страница 63: ...ss can be entered 1 Start up the Web browser http 192 168 0 2 index e html Note In this instruction manual the Top page and the Home page are defined as follows Top page The index e html page Home page The specified page displayed when the default page function is enabled When the function is not enabled the Top page is displayed 2 The VN C10 top page appears Caution If the image mode of VN C10 is...

Страница 64: ...tep 6 Operations with a Web Browser 6 4 Settings with a Web Browser IP address image quality alarm FTP etc can be set with a Web browser Hyperlink to the Home page The setting page is displayed Top page Click Settings ...

Страница 65: ... the settings Other Settings http config e html represents the URL of VN C10 The settings can be changed in the Other screen They can also be changed with V Networks Setup Tool 6 4 Settings with a Web Browser 1 Other Settings ...

Страница 66: ...ds for accessing VN C10 Maximum 8 characters User Level Enter the user password Operator Level Enter the operator password Administrator Level Enter the administrator password Cache Control There are a few types of proxy server that caches CGI With a proxy server of this type select No Cache FTP Server Function Select whether to enable or disable the FTP server function With this function enabled ...

Страница 67: ...index e html If the HTTP port num ber is unknown refer to V Networks Setup Tool NTP Settings For settings of the NTP Network Time Protocol server Available Not available Select Available to enable the NTP server function or Not Available to disable it Server IP Address Enter the NTP server IP address Timezone Obtains the local time based on the Greenwich Mean Time Adjust Interval Rectifies time de...

Страница 68: ...intensity Value range 0 to 100 Factory set Auto B gain To manually adjust the white balance toward more blue intensity Value range 0 to 100 Factory set Auto AGC AES BLC AGC Automatically adjusts the gain in accordance with the bright ness Factory set AES Automatically adjusts the shutter speed in accordance with the brightness Only for a manual iris lens BLC Back light compensation When there is a...

Страница 69: ...s dependent on factors such as PC performance Web browser or LAN environment etc In cases where operation of VN C10 can be expected to cause communication trouble to other network operations particularly when the network traffic is usually heavy it is recommended to reduce the frame rate Be sure to adjust the frame rate appropriately considering the number of simultaneous ac cesses to VN C10 If VN...

Страница 70: ...hich is activated when two alarms are successively received within a certain period of time On Off Select whether to enable or disable the relay alarm function Relay Alarm Setting Sets the sequence and interval of alarm input Alarm Out If On is selected here alarm signals are output to the ALARM OUTPUT terminal located on the rear panel Alarm Out On Off Select On for alarm signals to be output to ...

Страница 71: ...This function cannot be set for MPEG4 Note FTP Client Funciton This is a function that regularly uploads VN C10 still images to the existing FTP server With this function it is possible to distribute images from the server thus greatly increasing the number of clients which receive them Click Apply to update the settings ...

Страница 72: ...image is uploaded Error Recovery Specify the action to be taken when an FTP error has oc curred On connect error Specify the action to be taken when an error with TCP con nection or FTP verification has occurred Retry forever Error recovery is attempted until the power to VN C10 is dis connected Retry for min Error recovery is attempted for a specified period of time 1 to 600 minutes On transfer e...

Страница 73: ...e URL of VN C10 This page displays only still images The initial image is the one taken in by the camera at the moment browsing starts To update the image press Refresh or Reload depending on the Web browser and to save the displayed image select Save As 6 5 Viewing Still Images ...

Страница 74: ...e http java e html represents the URL of VN C10 This page displays only moving images The images taken in by the camera are updated automati cally and displayed as moving images Note Moving image pages cannot be saved using the Save Image As function of theWeb browser Web pages cannot be saved using the Save As function ...

Страница 75: ...web browser in use Display in Serverpush By creating a web page with the following description you can display a moving image in Netscape Navigator that supports Serverpush Display in Java Applet By creating a web page with the following description you can display a moving image Java applet in Internet Explorer etc that supports Java Note The images both still and moving are displayed according t...

Страница 76: ...ected to the network Has the folder for saving images been deleted Check to see if it exists Is the disk full Check the available memory capacity Once connection is activated canceling an action is not possible Check the color adjustments of the monitor and video cards Change to the True Color 24 bits display With High Color 16 bits or lower display of natural color tones is difficult to achieve I...

Страница 77: ... 120 640 x 480 not available for MPEG4 Lens mount C CS mount Alarm input Non voltage A contact input NPN open collector input Low level latch momentary 500 ms minimum Low level circuit current 0 6 mA High level impressed voltage 3 3 V Alarm output NPN open collector output allowable impressed voltage 12 V allowable input current 300 mA Network interfaces RJ 45 Category 5 10BASE T 100BASE TX Auto N...

Страница 78: ...MITED Printed in Japan LWT0095 001A is a registered trademark owned by VICTOR COMPANY OF JAPAN LTD is a registered trademark in Japan the U S A the U K and many other countries 2003 VICTOR COMPANY OF JAPAN LIMITED VN C10 V NETWORKS ...

Отзывы: