Masterpage:Right+
EN
33
Filename [SR-MV50U_06DVD Operation1.fm]
Page 33
November 22, 2004 1:03 pm
OPERATIONS ON DVD DECK
4
Press the
number keys
to enter the desired item number, then
press
ENTER
.
●
Playback starts from the selected section.
Examples:
A
To select track 5, press the
number key “5”
.
B
To select track 15, press the
number key “1”
and
“5”
.
C
To select track 25, press the
number key “2”
, then
“5”
.
If you have specified a wrong selection
Press
CANCEL
or
CLEAR
(
8
) to clear the wrong number, then
enter the correct one before you press
ENTER
in this step.
To clear the on-screen bar
Press
ON SCREEN
.
NOTES:
●
When “
X
” is displayed on the TV screen in step
4
, the chapter you
have selected is not contained in the disc, or chapter search does not
work on the disc.
●
Before you press
ENTER
, playback may start automatically when you
enter the section’s number depending on the disc.
●
This function is not possible for a Video CD with PBC function.
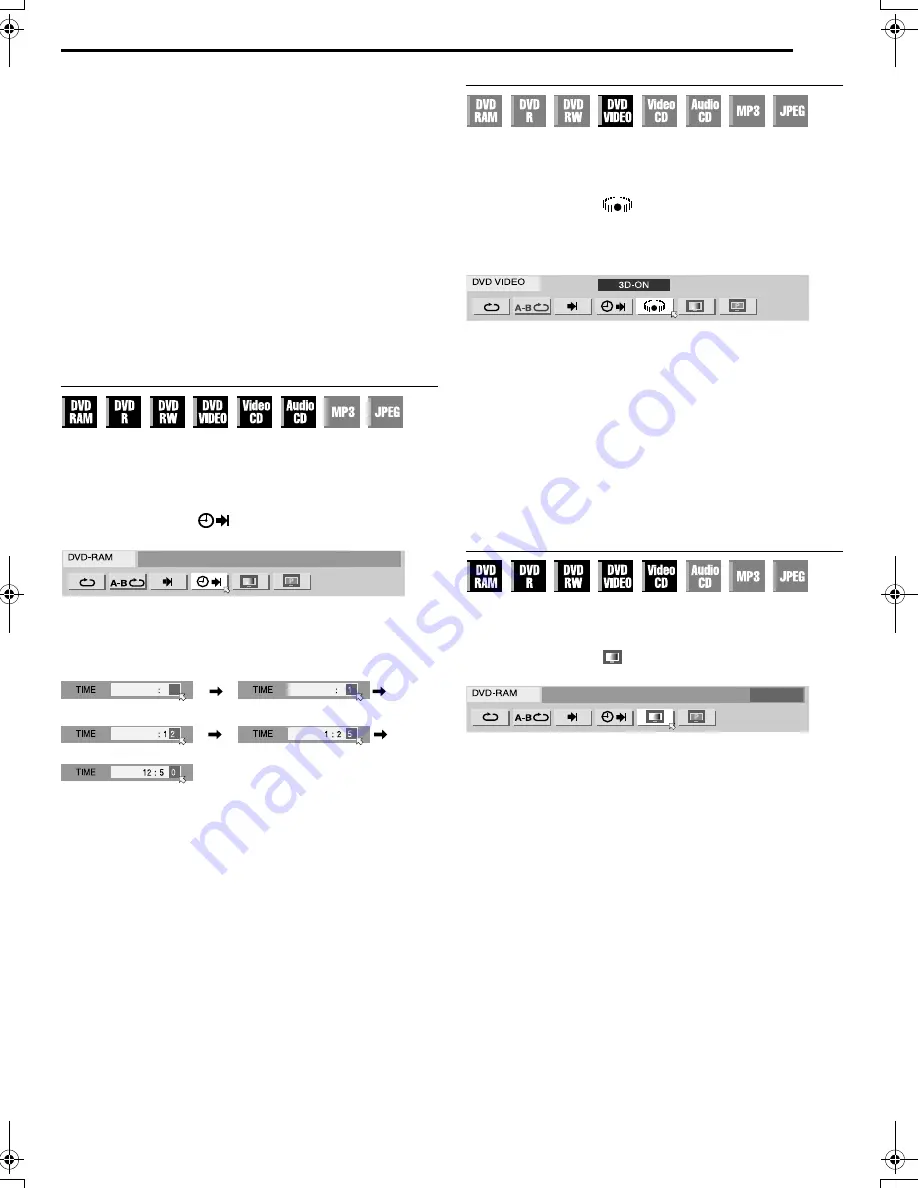
Time Search
You can play back a disc from the desired point by specifying the
elapsed playing time from the beginning of a title (DVD-RAM,
DVD-R, DVD-RW and DVD VIDEO) or a disc (Video CD and Audio
CD).
1
Press
ON SCREEN
twice to access the on-screen bar.
2
Press
w e
to select “
”, then press
ENTER
. The pop-up
window appears under the selected item.
3
Press the
number keys
to enter the time, then press
ENTER
.
Playback starts from the specified time.
Example:
To play back from a point 12 (minutes): 50 (seconds) elapsed.
If you have specified a wrong selection,
Press
CANCEL
(for the last entered number) or
CLEAR
(
8
) (for
whole numbers) to clear the wrong number, then enter the correct
one(s) before you press
ENTER
in this step.
To clear the on-screen bar
Press
ON SCREEN
.
NOTES:
●
When “
X
” is displayed on the TV screen in step
3
, you have selected
a point that exceeds the recording time of the disc.
●
Some DVD VIDEO discs do not contain time information, and it is not
possible to use the Time Search function. In such cases, “
X
” is
displayed on the TV screen as well.
●
This function is not possible for a Video CD with PBC function.
Simulated Surround Effect
It is possible to get a simulated surround effect from your stereo
system. You can enjoy the virtual surround sound with your
2-channel stereo system.
1
Press
ON SCREEN
twice to access the on-screen bar.
2
Press
w e
to select “
”, then press
ENTER
.
●
“3D-ON” appears above the selected item and Simulated Surround
Effect is activated.
●
Each time you press
ENTER
, “3D-ON” appears and disappears
alternately.
To clear the on-screen bar
Press
ON SCREEN
.
To cancel the simulated surround effect
Press
ENTER
to clear “3D-ON” from the screen.
NOTES:
●
The simulated surround effect works correctly only when playing
back a title recorded in multichannels.
●
Simulated Surround Effect does not affect the DVD VIDEO bitstream
signal from the [DIGITAL AUDIO OUTPUT] connector.
●
When Simulated Surround Effect is activated, the settings of
“ANALOG AUDIO OUT” and “D. RANGE CONTROL” are disabled.
(
墌
pg. 69)
Adjusting The Picture Quality
You can obtain optimal picture quality by selecting an appropriate
picture mode.
1
Press
ON SCREEN
twice to access the on-screen bar.
2
Press
w e
to select “
”, then press
ENTER
. The pop-up
window appears under the selected item.
3
Press
rt
to select the desired option, then press
ENTER
.
NORMAL
: Normally select this option.
CINEMA
: Suitable for a movie disc, etc.
SHARP
: Clearer, sharper-edged picture when viewing images with
lots of flat, same-colored surfaces such as cartoons.
SOFT
: Select this option when too much noise appears.
To clear the on-screen bar
Press
ON SCREEN
.
Press 1
Press 2
Press 0
Press 5
SR-MV50US.book Page 33 Monday, November 22, 2004 1:03 PM


