background image

33

Conve

n

ient

 f

unc

tions

 of disc

/f

ile

 pla

y

ba

ck


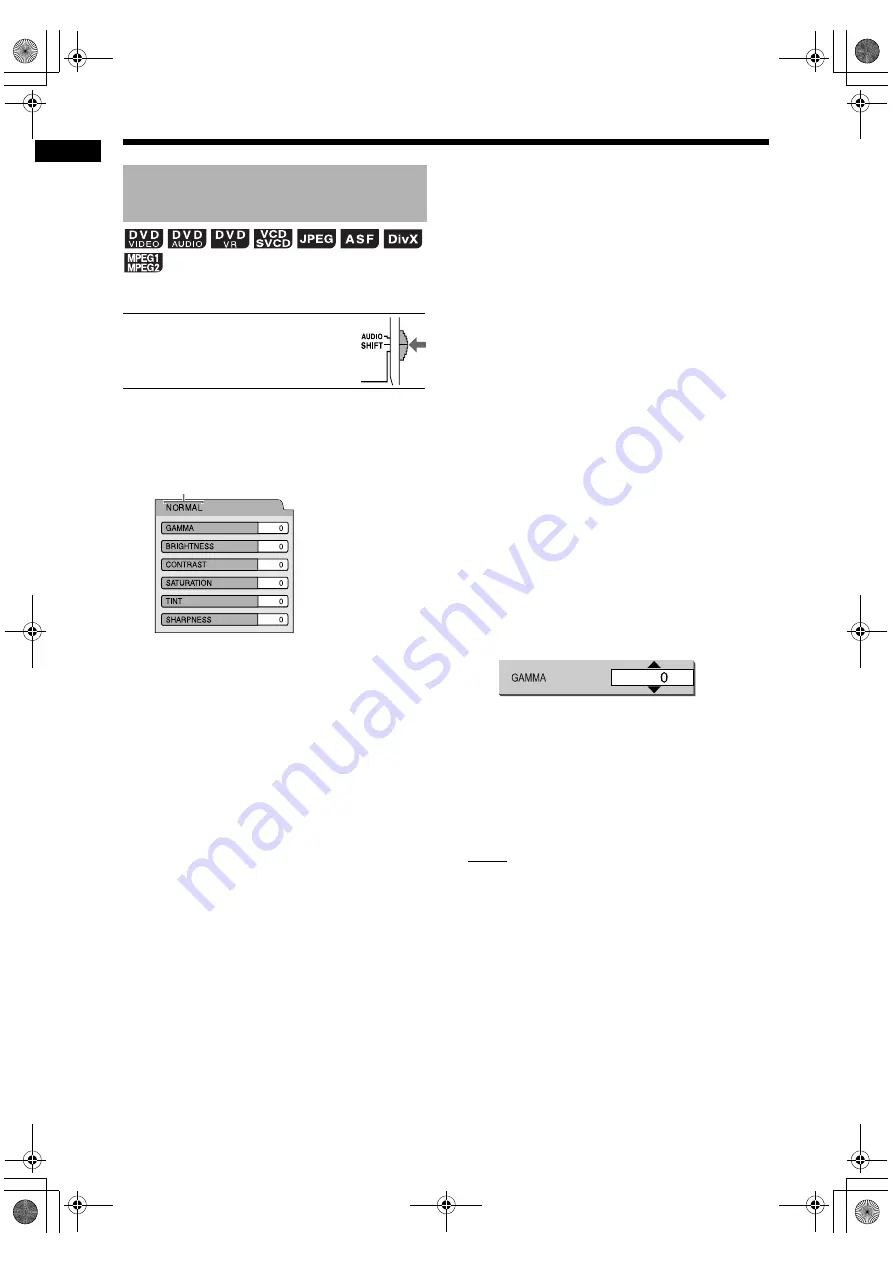
When a disc/file is played back or paused

 IMPORTANT

• Slide the remote control mode 

selector to [SHIFT].

1

Press [VFP]. 

• The current settings are displayed.

Example: TV screen for the VFP mode 

2

Press 

2

 or 

3

 (cursor) to select the 

video fine processor (VFP) mode. 

• Each time you press 

2

 or 

3

 (cursor), VFP 

mode changes on the TV screen as follows. 
- “NORMAL” 

For normal playback. (You cannot adjust 
the image quality.) Go to step 7. 

- “CINEMA” 

Suitable for viewing a movie in a dim room. 
(You cannot adjust the image quality.) 
Go to step 7. 

- “USER1/USER2” 

You can adjust the image quality. 
Go to step 3. 

3

Press 

5

 or 

/


(cursor) to select the 

item you want to adjust. 

• Each time you press 

5

 or 

/

 (cursor), the 

item changes on the TV screen as follows. 
- “GAMMA” 

Controls the brightness of neutral tints 
while maintaining the brightness of dark 
and light portions.
(Setting range: –3 to +3)

- “BRIGHTNESS” 

Controls the brightness of the display. 
(Setting range: –8 to +8) 

- “CONTRAST” 

Controls the contrast of the display. 
(Setting range: –7 to +7) 

- “SATURATION” 

Controls the saturation of the display. 
(Setting range: –7 to +7) 

- “TINT” 

Controls the tint of the display. 
(Setting range: –7 to +7) 

- “SHARPNESS” 

Controls the sharpness of the display. 
(Setting range: –8 to +8) 

4

Press [ENTER]. 

Example: TV screen for “GAMMA”

5

Press 

5

 or 

/


(cursor) to change 

the value. 

6

Press [ENTER]. 

• To adjust other items, go back to step 3. 

7

Press [VFP]. 

NOTE

• It is recommended that you slide the remote 

control mode selector to [AUDIO] after using this 
function. Most of the other functions can be used 
when the remote control mode selector is at 
[AUDIO].

• If no operation is made for several seconds dur-

ing the procedure, the settings made so far are 
automatically stored. 

• When the [HDMI MONITOR OUT] terminal is 

connected, this function does not affect the pic-
ture quality. 

Adjusting the picture quality 
(VFP)

Selected VFP mode

Convenient functions of disc/file playback (continued)

TH-F3[J_C].book  Page 33  Monday, March 17, 2008  11:45 AM

Содержание SP-THF3F

Страница 1: ...LVT1833 001A J C INSTRUCTIONS English For Customer Use Enter below the Model No and Serial No which are located either on the rear bottom or side of the cabinet Retain this information for future reference Model No Serial No TH F3 J_C book Page 1 Monday March 17 2008 11 45 AM ...

Страница 2: ... ment off and on the user is encouraged to try to correct the interference by one or more of the following measures Reorient or relocate the receiving antenna Increase the separation between the equipment and receiver Connect the equipment into an outlet on a circuit different from that to which the receiver is connected Consult the dealer or an experienced radio TV technician for help CAUTION Cha...

Страница 3: ...isconnect the mains plug to shut the power off completely the STANDBY lamp goes off When install ing the apparatus ensure that the plug is easily accessible The F button in any position does not disconnect the mains line When the system is on standby the STANDBY lamp lights red When the system is turned on the STANDBY lamp goes off The power can be remote controlled ATTENTION Touche F Déconnectez ...

Страница 4: ...d by a newspaper or cloth etc the heat may not be able to get out Do not place any naked flame sources such as lighted candles on the apparatus When discarding batteries environmental problems must be considered and local rules or laws gov erning the disposal of these batteries must be followed strictly Do not expose this apparatus to rain moisture dripping or splashing and that no objects filled ...

Страница 5: ...ions ci dessous Bas Placez l appareil sur une surface plane Maintenez une entrée d air adéquate pour la ventilation en plaçant l appareil sur un support avec une hauteur d au moins 10 cm De plus maintenez la meilleure circulation d air possible Front view of the main unit and speakers XV THF3 and SP THF3F Vue avant de l unité principale et des haut parleurs XV THF3 et SP THF3F 15cm 5 15 16 5cm 2 1...

Страница 6: ...voice sound 13 Selecting the surround volume level 13 Using the sleep timer 14 Changing the brightness of the display window 14 Locking disc ejection 14 Listening to radio broadcasts 15 Selecting a radio station 15 Tuning in to a preset radio station 16 Playing back sources from external devices 17 Playing back sources from external devices 17 Selecting the signal gain 17 Basic operations of disc ...

Страница 7: ... Operating a VCR using the remote control 48 Basic operations of HDMI CEC 50 Notes on operation 51 Suitable locations for the main unit 51 Condensation 51 Cleaning the main unit 51 Notes on handling 51 License and trademark 52 Notes on discs files 53 Playable disc file types 53 Data hierarchy 56 Handling discs 56 Troubleshooting 57 Specifications 61 Main unit XV THF3 61 Speaker SP THF3F 61 Subwoof...

Страница 8: ... refer to the pages in which the parts are explained Front view Refer to Display window shown below Remote control sensor Rear view Cooling fan Display window Part description TH F3 J_C 02 fm Page 3 Tuesday March 18 2008 1 31 PM ...

Страница 9: ...of the remote con trol decreases replace both batteries Point the remote control directly at the front of the main unit Do not block the remote control sensor on the main unit Inserting the batteries into the remote control Operating the system from the remote control R03 UM 4 AAA 24F type dry cell batteries supplied Using the remote control TH F3 J_C book Page 4 Monday March 17 2008 11 45 AM ...

Страница 10: ...hile listening to an actual radio program refer to Listening to radio broad casts on page 15 You cannot receive an FM AM radio broadcast without the antenna connection Connecting the antennas AM loop antenna supplied If insulation covers the tips of the antenna cable twist and pull off the insulation Main unit rear view FM antenna supplied Main unit rear view FM antenna Stretch out the FM antenna ...

Страница 11: ... TV so that they do not cause color irregularity on the TV 3 Wait for approximately 30 minutes before turning on the main power of the TV again CAUTION The supplied speakers are manufactured exclu sively for use with the supplied main unit as parts of this system Do not connect the supplied speakers to devices other than the supplied main unit Doing so may damage the speakers Do not connect extern...

Страница 12: ...m is designed to provide virtual surround sound by positioning the 3 speakers in front The set of the left and right speakers and the sub woofer refers to 2 1 channel The front surround function processes input signals to create a realis tic sound field CAUTION Do not touch the pins of the iPod terminal on the rear of the main unit or the pins of the dock ing station for iPod Do not carry the main...

Страница 13: ...pe on page 10 If the picture is distorted while an HDMI TV is connected turn off the main unit and turn it on again A TV compatible with HDCP High Bandwidth Digital Content Protection can also be con nected to the HDMI MONITOR OUT terminal so that the uncompressed HD video signal type can be output as well This system is compatible with some basic func tions of HDMI CEC Refer to page 50 Connecting...

Страница 14: ... external digital audio devices Output MD player or satellite receiver To an optical digital output terminal Optical digital cable not supplied Main unit rear view Input Output Optical digital cable not supplied To an optical digital input terminal Input AV amplifier with a built in decoder Connecting external analog audio devices Connecting the power cable Output Input Analog audio device Main un...

Страница 15: ...ngs differ according to the resolution of the con nected TV You can also select the video signal type by repeatedly pressing SCAN MODE NOTE 480 720 and 1080 refer to the number of the scanning lines Generally the larger the number the better picture that can be obtained I refers to the interlaced format P refers to the progressive format A better picture can be obtained in the progressive format t...

Страница 16: ...urns on the main unit DVD 3 USB 3 iPod 3 FM AM AUDIO IN DIGITAL IN 3 playback or 0 on the remote control s3 playback or 0 on the main unit The function assigned to the pressed button starts working at the same time When 3 play back is pressed DVD is selected as the source in the display window An internal cooling fan turns on when the main unit turns on This is to prevent overheating of the main u...

Страница 17: ... range is from 6 to 6 Press SURROUND Each time you press SURROUND the display changes in the display window as follows AUTO SUR When a multi channel signal is input surround sound is automatically produced MOVIE Surround sound suitable for a movie or multi channel signal is produced WIDE 2CH When a 2ch signal is input surround sound is produced The sound is broader than the one with MOVIE SUPER W ...

Страница 18: ...function select CLR OFF You can increase the surround volume level This function is effective for the following condi tions 1 When the surround mode is set to an item other than AUTO SUR Refer to page 12 2 When the surround mode is set to AUTO SUR and a DVD VIDEO DVD AUDIO or DVD VR is played back Refer to page 18 3 When the surround mode is set to AUTO SUR and the source is set to DGTL IN Refer t...

Страница 19: ...ou can lock the disc tray to prevent the disc from being ejected When the main unit is turned off Hold down 0 on the main unit for one or more seconds while holding down 7 on the main unit If you attempt to open the disc tray by pressing 0 the disc tray does not open and LOCKED appears in the display window To cancel the disc ejection lock press 0 on the main unit while holding down 7 on the main ...

Страница 20: ...n TUNING or TUNING until the frequency starts changing and then release the button When the main unit has received a broad cast the frequency automatically stops changing You can select a specific radio station while searching for a broadcast Press TUN ING or TUNING to stop automatic tuning when the desired frequency appears in the display window NOTE If an FM stereo broadcast is difficult to hear...

Страница 21: ...sing PRESET or PRESET 4 Press ENTER while the selected number is flashing STORED appears and the selected radio station is stored NOTE When you store a radio station to a preset num ber to which another radio station has previously been stored the newly set radio station replaces the previously stored radio station When an FM or AM radio broadcast is selected as the source Press the number buttons...

Страница 22: ...perate your digital broadcast sat ellite and video cassette recorder using the remote control of this system Refer to pages 47 49 You can select the gain of the signal from the AUDIO IN terminals Use the initial settings for normal operation If the sound is too small or too loud change the settings 1 Press AUDIO IN DIGITAL IN repeatedly to select AUDIO IN in the display window 2 Hold down ENTER LE...

Страница 23: ...VD 3 If DVD is selected as the source pressing 3 playback can start playback NOTE Instead of using the remote control in step 3 you can use the buttons on the main unit Repeat edly pressing SOURCE can select DVD as the source and pressing 3 playback starts playback A menu screen may appear on the TV screen after DVD playback starts In such a case oper ate the menu screen using 5 2 3 cur sor the nu...

Страница 24: ... USB device is played back the USB indicator lights up in the display window You can also use the buttons on the main unit When you repeatedly press SOURCE to select DVD or USB in the display window playback automatically starts If playback does not start press 3 playback on the main unit 3 Press 7 to stop playback The menu screen appears on the TV screen NOTE Depending on the file type the menu s...

Страница 25: ...t have to proceed to step 5 JPEG files are continuously played back begin ning with the selected file Display time for a file in slide show playback is approximately 3 seconds Press ENTER to view only the selected file When a disc is played back When a disc is stopped When RESUME is displayed in the display win dow refer to page 25 Slide show playback Display window on the main unit for disc file ...

Страница 26: ...a disc is stopped When a play list is played back PL is displayed instead of PG When RESUME is displayed in the display win dow refer to page 25 DVD AUDIO Track number Elapsed playback time DISPLAY is pressed Track number Group number Track number Group number DISPLAY is pressed Disc type DVD VR Chapter number Elapsed playback time DISPLAY is pressed Chapter number Original program number Original...

Страница 27: ...ay once Press RETURN to return to the upper layer during PBC playback When a disc is stopped When the PBC function is activated When RESUME is displayed in the display win dow refer to page 25 When a VCD is stopped VCD is displayed as shown above When an SVCD is stopped SVCD is displayed as the disc type When a disc is played back When a disc is stopped VCD SVCD Track number Playback control Total...

Страница 28: ...efers to an MPEG1 or MPEG2 file When a file is played back When a file is stopped MP3 WMA WAV ASF DivX MPEG1 MPEG2 file Track number Elapsed playback time DISPLAY is pressed Track number Group number Group number Track number DISPLAY is pressed File type JPEG file File number File type DISPLAY is pressed File number Group number File number File type DISPLAY is pressed File type Basic operations o...

Страница 29: ... DEVICE Appears when a USB device is not connected OPEN Appears when the disc tray is opening CLOSE Appears when the disc tray is closing CANNOT PLAY THIS DISC Appears when attempting to play back an unplayable disc CANNOT PLAY THIS DEVICE Appears when there are no playable files on a USB device Guide icons on the TV screen on screen guide Lights up when Dolby Digital signal comes in Lights up whe...

Страница 30: ...k or random playback The stored position is cleared if the disc tray is opened or the USB device is disconnected You can deactivate the resume playback func tion Refer to RESUME on page 40 When a file on the USB device is selected as the source this function may not work as explained above When a disc file is played back Press 8 To return to normal playback press DVD 3 USB 3 or 3 playback When a d...

Страница 31: ...k to the previous title and orig inal program play list When a disc is paused Press SLOW or SLOW Each time you press SLOW or SLOW the speed increases Press 8 to pause playback and press DVD 3 or 3 playback to return to normal playback NOTE No sound is produced The picture motion in the reverse direction may not be smooth For a VCD SVCD or DVD VR slow motion play back can be used in the forward dir...

Страница 32: ... or track number NOTE To cancel the PBC function for VCD SVCD refer to page 22 You can skip within a file at approximately 5 minute intervals This is useful especially when you want to skip within a long file When a disc file is played back Press 2 or 3 cursor Each time you press 2 or 3 cursor the play back position skips to the beginning of the previ ous or next interval Each interval is approxim...

Страница 33: ...VCD SVCD whose menu screen has a couple of pages you can change the page by pressing 4 or in step 2 When a disc is stopped or played back 1 Press TOP MENU PG to display the original program or press MENU PL to display the play list Original program Play list The play list does not appear when a play list has not been recorded to the disc 2 Press 5 or cursor to select the desired title 3 Press ENTE...

Страница 34: ...ame chapter or track can be pro grammed more than once When a disc file is stopped 1 Press PLAY MODE to display PROGRAM in the display win dow If you accidentally pressed PLAY MODE twice or more press PLAY MODE repeat edly until PROGRAM is displayed Display window Example TV screen for a DVD VIDEO Program screen Number buttons Remote control mode selector 5 2 3 cursor ENTER 3 playback Playing back...

Страница 35: ... and all the chap ters tracks in the selected title group are pro grammed Only for a DVD VIDEO DVD AUDIO MP3 WMA WAV file You can erase the programmed tracks one by one from the bottom of the list on the program screen by pressing CANCEL repeatedly You can erase the whole program by holding down CANCEL Opening the disc tray also erases the program 3 Press DVD 3 or 3 playback When a disc file is pl...

Страница 36: ... played back repeatedly by using A B repeat playback Refer to page 37 The repeat mode is automatically canceled if there is a file that cannot be played back For some discs stopping playback may auto matically cancel repeat playback To cancel the PBC function for VCD SVCD refer to page 22 Playing back a disc file in a random order Random playback only on a loaded disc This indicator lights up when...

Страница 37: ... are dis played on the TV screen When a disc file is played back or paused IMPORTANT Slide the remote control mode selector to SHIFT 1 Press ZOOM Each time you press ZOOM the picture magnification changes on the TV screen 2 Select the area of image you want to magnify by using 5 2 or 3 cursor To return to normal playback select ZOOM OFF in step 1 NOTE It is recommended that you slide the remote co...

Страница 38: ...e 3 to 3 BRIGHTNESS Controls the brightness of the display Setting range 8 to 8 CONTRAST Controls the contrast of the display Setting range 7 to 7 SATURATION Controls the saturation of the display Setting range 7 to 7 TINT Controls the tint of the display Setting range 7 to 7 SHARPNESS Controls the sharpness of the display Setting range 8 to 8 4 Press ENTER Example TV screen for GAMMA 5 Press 5 or...

Страница 39: ..._ appears on the TV screen and in the display window 3 Press the number buttons to enter the pin code four digits The method of obtaining a pin code differs depending on the disc 4 Press ENTER When the correct pin code is entered the BONUS indicator disappears in the display window and the playback of the bonus group starts If an incorrect pin code is entered try enter ing the correct pin code aga...

Страница 40: ...PEG2 file Example Status bar for a CD NOTE The playback status has the same meaning of the guide icons on the TV screen Refer to page 24 Status bar Menu bar Information displayed on the status bar DVD VIDEO DVD AUDIO Current title group number DVD VR Current original program number PG current play list number PL Current chapter track number Time Playback status DVDVIDEO DVDAUDIO DVDVR Audio encodi...

Страница 41: ...apsed playback time of the disc T REM Remaining time of the disc TIME Repeat mode Refer to page 31 For A B repeat playback refer to page 37 Time search Refer to page 37 Chapter search track search Selects a chapter track Instead of steps 4 on page 35 press the number buttons to enter the chapter track number and press ENTER Examples 5 5 24 2 4 Audio language Refer to page 32 Subtitle language Refe...

Страница 42: ...s Refer to page 35 2 Press 2 or 3 cursor to select 3 Press ENTER 4 Enter the time using the number buttons Example When you want to play back a DVD VIDEO from the position of 0 hour 23 minutes 45 seconds press the number buttons in the order of 0 2 3 4 and 5 You can skip entering the minute and sec ond settings If an incorrect value is entered press 2 cursor to delete the value and enter the corre...

Страница 43: ...nce screen NOTE It is recommended that you slide the remote control mode selector to AUDIO after using this function Most of the other functions can be used when the remote control mode selector is at AUDIO NOTE If the selected language is not recorded on the disc file the optimum language set for the disc file is displayed For a language code such as AA refer to the Language codes on page 42 Remo...

Страница 44: ...video recorded with the progressive scan method VIDEO Suitable for playing back a video SCREEN SAVER You can turn or OFF the screen saver The screen saver activates when there is no operation made for approxi mately 5 minutes since a still picture was last displayed FILE TYPE When files of different types are recorded on a loaded disc or connected USB device select the file type before play back F...

Страница 45: ...OMPRESSION function is always on HDMI AUDIO OUT You can select whether or not the audio signal from the HDMI MONITOR OUT terminal is output ON The audio signal from the HDMI MONI TOR OUT is output The audio signal from the HDMI MONI TOR OUT is not output NOTE Depending on the connected TV when HDMI AUDIO OUT is set to ON only PCM signals can be output via an HDMI cable STREAM PCM STEREO AUTO OFF O...

Страница 46: ...reo linear PCM 48 96 192 kHz 16 20 24 bit lin ear PCM DVD AUDIO 48 kHz 16 bit stereo linear PCM 44 1 88 2 176 4 kHz 16 20 24 bit linear PCM DVD AUDIO 44 1 kHz 16 bit stereo linear PCM DTS DVD VIDEO DVD AUDIO DTS bit stream 48 kHz 16 bit stereo linear PCM DOLBY DIGITAL DVD VIDEO DVD AUDIO DOLBY DIGITAL bit stream 48 kHz 16 bit stereo linear PCM CD VCD SVCD 44 1 kHz 16 bit stereo linear PCM 48 kHz 1...

Страница 47: ...ai BN Bengali Bangla IW Hebrew OC Occitan TI Tigrinya BO Tibetan JI Yiddish OM Afan Oromo TK Turkmen BR Breton JW Javanese OR Oriya TL Tagalog CA Catalan KA Georgian PA Panjabi TN Setswana CO Corsican KK Kazakh PS Pashto Pushto TO Tonga CY Welsh KL Greenlandic PT Portuguese TR Turkish DA Danish KM Cambodian QU Quechua TS Tsonga DZ Bhutani KN Kannada RM Rhaeto Romance TT Tatar EL Greek KO Korean KO...

Страница 48: ...und right after the connection is made You cannot use an iPod connected to the USB MEMORY terminal Doing so displays RESTRICT or NO USB in the display window When the main unit is turned off 1 Attach the dock adapter and iPod to the docking station for iPod The dock adapter is supplied with the iPod or sold separately NOTE To remove the dock adapter 1 lift the slot with your fingertip and then 2 p...

Страница 49: ...nit to the iPod You cannot use the main unit to control an iPod other than those listed on page 45 In this case you can operate the remote control to deactivate the iPod battery charge function so that you may be able to control the iPod Refer to page 45 The following remote control buttons are assigned to some buttons and functions on the iPod Pressing 5 cursor corresponds to turning the click wh...

Страница 50: ... the battery charging function turns on and off When you want to deactivate the battery charging function select IPod OFF JVC is not responsible for any loss of data on an iPod when used with this system This system can receive sound from the follow ing iPod models iPod touch iPod classic iPod 5th generation iPod 4th generation iPod nano 1st 2nd 3rd generation iPod mini 1st 2nd generation If conte...

Страница 51: ...e control properly The initial code setting is 01 JVC 5 Release TV F NOTE It is recommended that you slide the remote control mode selector to AUDIO after using this function Most of the other functions can be used when the remote control mode selector is at AUDIO Manufacturer codes are subject to change with out notice You may not be able to operate the TV produced by the manufacturer After repla...

Страница 52: ...perates the DBS and the remote control properly The initial code setting is 01 G I 5 Release DBS VCR F NOTE It is recommended that you slide the remote control mode selector to AUDIO after using this function Most of the other functions can be used when the remote control mode selector is at AUDIO Manufacturer codes are subject to change with out notice You may not be able to operate the DBS produ...

Страница 53: ...se 4 Press number buttons to enter the manufacturer code Examples For a Hitachi VCR Press 0 then 4 For a Mitsubishi VCR Press 1 then 3 When the manufacturer of your VCR has 2 or more codes select the manufacturer codes in turn and find the one that operates the VCR and the remote control properly The initial code setting is 01 JVC Continued on the next page Remote control button Usage DBS VCR F Tu...

Страница 54: ...ontrol by pointing it at the VCR NOTE When the remote control mode selector is slid to the lowest position and VCR is pressed some buttons may not work It is recommended that you slide the remote control mode selector to AUDIO after using this function Most of the other functions can be used when the remote control mode selector is at AUDIO Remote control button Usage DBS VCR F Turns on off the VC...

Страница 55: ...when the source is set to DVD or USB This function is available when ON 1 or ON 2 is selected for CEC in the preference screen refer to page 40 For details about the CEC function refer to the operations manuals of the connected CEC devices If the power cable is not connected to an AC outlet the CEC function does not work even when the main unit is connected to CEC devices Not all HDMI devices are ...

Страница 56: ...dirty dust it with a soft dry cloth When the operation panel is very dirty wipe it with a cloth dampened with a small amount of a neutral detergent and then wipe it with a soft dry cloth CAUTION Do not wipe the operation panel with thinners benzenes or other chemical agents Do not spray insecticides onto the operation panel These may discolor and damage the surface Installation of the system Selec...

Страница 57: ...D IN THE PICTURE IN CASE OF 525 OR 625 PROGRESSIVE SCAN PICTURE PROBLEMS IT IS RECOMMENDED THAT THE USER SWITCH THE CONNECTION TO THE STANDARD DEFINITION OUTPUT IF THERE ARE QUESTIONS REGARDING OUR TV SET COMPATIBILITY WITH THIS MODEL 525p AND 625p DVD PLAYER PLEASE CONTACT OUR CUSTOMER SER VICE CENTER USE OF THIS PRODUCT IN ANY MANNER THAT COMPLIES WITH THE MPEG 4 VISUAL STANDARD IS PROHIBITED EX...

Страница 58: ...amage or stains on them Only sounds can be played back from the following discs MIX MODE CD CD G CD EXTRA CD TEXT This system is designed for use with the NTSC standard Region code of DVD VIDEO DVD VIDEO players and DVD VIDEO discs have their own region code numbers This system can play back a DVD VIDEO whose region code num ber includes the system s region code which is indicated on the rear pane...

Страница 59: ...een Playing back an MP3 WMA file that contains a still image may take a long time The elapsed time is not displayed until playback starts This elapsed time may not be displayed correctly For an MP3 WMA file a disc with a sampling fre quency of 44 1 kHz and transmission rate of 128 kbps is recommended This system is not compatible with an MP3i or MP3PRO file This system can play back a baseline JPE...

Страница 60: ...reams should conform to MPEG1 Audio Layer 2 MPEG2 Audio Layer 2 or Dolby Digital MPEG2 files only The Non DVD side of a DualDisc does not com ply with the Compact Disc Digital Audio standard Therefore the use of Non DVD side of a DualDisc on this product is not recommended This system is compatible with USB 2 0 Full Speed This system may not play back some USB devices and some files This system do...

Страница 61: ... groups on a disc Since the system ignores the tracks files with numbers exceeding 999 and the groups with num bers exceeding 99 these cannot be played back If there are any type of files other than MP3 WMA WAV JPEG ASF DivX MPEG1 MPEG2 files on a disc those files are also counted in the total num ber of files Do not use a commercially available non stan dard shape disc like a heart flower or cred...

Страница 62: ...nect the main unit directly to the TV 8 The video signal type setting is not appropriate Select the video signal type suit able for your TV 10 The screen size is abnormal The screen size setting is not appropriate Select the display method suitable for your TV 39 The TV screen darkens The screen saver setting is acti vated Press any button 39 No picture sound is pro duced via the HDMI MONITOR OUT ...

Страница 63: ...as interference from noise The antennas are not con nected correctly Connect the antennas correctly 5 A radio broadcast can not be received A noise is produced from the rear of the main unit The internal cooling fan pro duces the noise as the fan rotates The noise is not a malfunction The cooling fan is used to prevent overheating of the main unit 11 The HDMI CEC function does not work The connect...

Страница 64: ... setting 32 and 36 No subtitles are dis played The disc file contains no subti tles If no subtitles are recorded on the disc file you cannot display subti tles 32 You have not selected the subti tle language Select the subtitle language 32 LR ONLY is displayed in the display window only for a DVD AUDIO When you play back a track for which down mixing is prohibited and with multi channel sound the ...

Страница 65: ...not be played back The connected USB device may include files of different types MP3 WMA WAV JPEG ASF DivX MPEG1 or MPEG2 Select FILE TYPE You can play back only the files of the types selected with FILE TYPE If the main unit has read the file before you make the FILE TYPE setting reset FILE TYPE to the desired file type and then discon nect the USB device and connect it again 39 Problem Possible ...

Страница 66: ...5 V 500 mA HDMI Output power DC 5 V 55 mA General Power source AC 120 V 60 Hz Power consumption in operation 90 W Power consumption on standby 0 8 W Dimensions W x H x D including projecting parts 300 mm x 95 mm x 295 mm 11 x 3 x 11 Mass 3 4 kg 7 5 Ibs Type 1 way bass reflex type Magnetically shielded type Speaker driver Front ch 5 5 cm 2 cone Surround ch 5 5 cm 2 cone Power handling capacity Fron...

Страница 67: ...62 For U S A TH F3 J_C COV fm Page 62 Monday March 17 2008 2 33 PM ...

Страница 68: ...2008 Victor Company of Japan Limited EN 0308SKMMODJMM TH F3 DVD DIGITAL THEATER SYSTEM c For U S A TH F3 J_C book Page 63 Monday March 17 2008 11 45 AM ...

Отзывы: