background image

15

Basic Settings

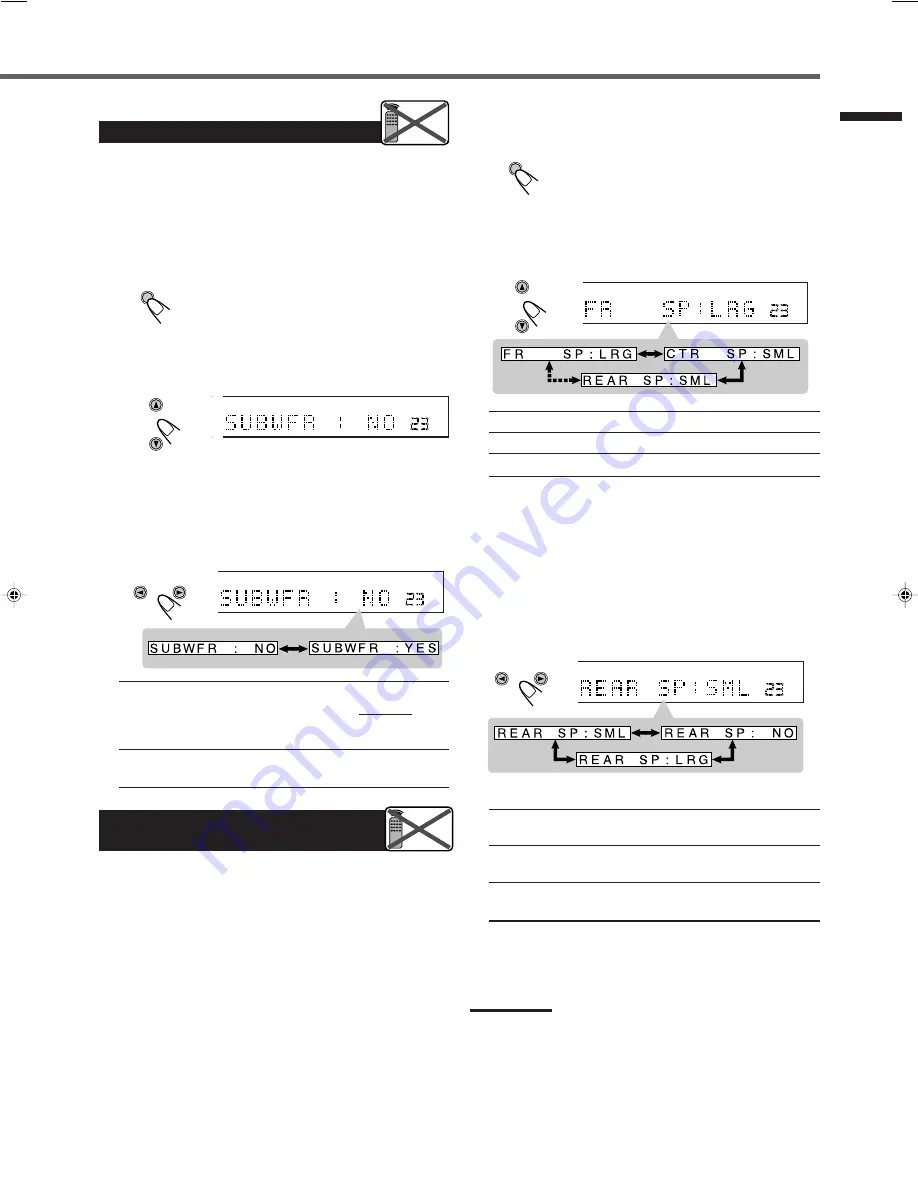
Setting the Subwoofer Information

When you have connected a subwoofer, follow the procedure below.
If you do not use a subwoofer, you can skip this setting.

Before you start, remember...
There is a time limit in doing the following steps. If the setting is
canceled before you finish, start from step 1 again.

1

Press SETTING.

The CONTROL buttons now work for basic
settings.

2

Press CONTROL 

 (or 

5

) repeatedly until

“SUBWFR (Subwoofer)” (with the current
setting)

*

 appears on the display.

* “NO” is the initial setting. If you have already changed the

setting, “YES” will be shown.

3

Press CONTROL 

3

 (or 

2

) to select “YES.”

• Each time you press the button, the subwoofer setting

alternates between “YES” and “NO.”

YES

: Select this when a subwoofer is used.

The subwoofer speaker indicator (SUBWFR) lights
up on the display (see page 11). You can adjust the
subwoofer output level (see page 22).

NO

: Select this when you have not connected or have

disconnected a subwoofer.

GIC

VOL

UTO

TT

SETTING

CONTROL

Remote

NOT

ANALOG

PRO LOGIC

SUBWFR LFE

VOL

DGTL AUTO

INPUT ATT

DSP

L

C

R

LS

S

RS

LPCM

DOLBY D

DTS

CONTROL

1

Press SETTING.

The CONTROL buttons now work for basic
settings.

2

Press CONTROL 

 (or 

5

) repeatedly until one

of the following speakers (with the current
setting)

*

 appears.

SETTING

ANALOG

PRO LOGIC

SUBWFR LFE

VOL

DGTL AUTO

INPUT ATT

DSP

L

C

R

LS

S

RS

LPCM

DOLBY D

DTS

CONTROL

FR SP 

(Front Speaker)

: To register the front speaker size.

CTR SP 

(Center Speaker) : To register the center speaker size.

REAR SP

 (Rear Speaker) : To register the rear speaker size.

* “LRG (large)” is the initial setting for the front speakers, and

“SML (small)” is for the center and rear speakers.
If you have already changed the setting, another size will be
shown.

3

Press CONTROL 

3

 (or 

2

) to select the

appropriate speaker size.

• Each time you press the button, the speaker size changes as

follows:

ANALOG

PRO LOGIC

SUBWFR LFE

VOL

DGTL AUTO

INPUT ATT

DSP

L

C

R

LS

S

RS

LPCM

DOLBY D

DTS

CONTROL

Ex.: When registering the rear speaker size

LRG 

(Large) : Select this when the speaker size is relatively

large. (See “Notes” below.)

SML 

(Small) : Select this when the speaker size is relatively

small. (See “Notes” below.)

NO

: Select this when you have not connected a

speaker. (Not selectable for the front speakers.)

4

Repeat steps 

2

 and 

3

 to select the appropriate

size for the other speakers.

Setting the Speakers for
DSP Modes

To obtain the best possible surround effect from the DSP (Digital
Signal Processor) modes (see page 32), register the following
information after all connections are completed.
• Speaker Size — FR SP, CTR SP, REAR SP
• Delay Time — CTR DL, REAR DL
• Crossover Frequency — CROSS
• Dynamic Range Compression — D.R.C.
• Low Frequency Effect Attenuator — LFE

Speaker Size — FR SP, CTR SP, REAR SP

Register the sizes of all the connected speakers.
• When you change your speakers, register the information about

the speakers again.

Before you start, remember...
There is a time limit in doing the following steps. If the setting is
canceled before you finish, start from step 1 again.

Remote

NOT

Notes:

• Use the following criteria as reference when adjusting:

– If the size of the cone speaker unit built in your speaker is

greater than 4 

3

/

4

 inches (12 cm ), select “LRG (large),” and if it

is smaller than 4 

3

/

4

 inches (12 cm ), select “SML (small).”

• If you have selected “NO” for the subwoofer, you can only select

“LRG (large)” for the front speaker size.

• If you have selected “SML (small)” for the front speaker size, you

cannot select “LRG (large)” for the center and rear speaker sizes.

EN10-19.RX-E100RSL[B]_f

01.3.8, 2:50 PM

15

Содержание RX-E100RSL

Страница 1: ...TAL TAPE FM SOUND BASS CENTER TEST BASS REAR L BASS BOOST TREBLE REAR R EFFECT TREBLE SUBWOOFER RETURN FM MODE EON ENTER DISPLAY MODE RDS MODE ON OFF AM 1 2 3 4 5 6 7 8 9 10 0 10 100 DVD MENU VCR TV STB INPUT DSP SURROUND EON SELECT PTY SEARCH PTY PTY9 AUDIO DVD MENU DVD STB VCR TV TAPE FM AM RX E100R DVD STB VCR TV TAPE FM AM HOME CINEMA CONTROL CENTER TV DIRECT DVD MEMORY CONTROL ADJUST SETTING ...

Страница 2: ...plug proceed as follows The wire which is coloured blue must be connected to the terminal which is marked with the letter N or coloured black The wire which is coloured brown must be connected to the terminal which is marked with the letter L or coloured red IF IN DOUBT CONSULT A COMPETENT ELECTRICIAN CAUTION To reduce the risk of electrical shocks fire etc 1 Do not remove screws covers or cabinet...

Страница 3: ...gements may need to be made for infirm or handicapped people DON T use equipment such as personal stereos or radios so that you are distracted from the requirements of traffic safety It is illegal to watch television whilst driving DON T listen to headphones at high volume as such use can permanently damage your hearing DON T obstruct the ventilation of the equipment for example with curtains or s...

Страница 4: ...al 20 Adjusting the Front Speaker Output Balance 20 Reinforcing the Bass 21 Adjusting the Tone 21 Adjusting the Subwoofer Output Level 22 Tuner Operations 23 Tuning in Stations Manually 23 Using Preset Tuning 24 Selecting the FM Reception Mode 25 Using the RDS Radio Data System to Receive FM Stations 26 Searching for a Program by PTY Codes 27 Switching to a Broadcast Program of Your Choice Tempora...

Страница 5: ...BY lamp 10 2 TV DIRECT button 11 3 Display 4 Source indicators 5 Remote sensor 6 SETTING button 13 15 17 19 7 ADJUST button 20 22 37 39 8 CONTROL buttons 13 25 37 39 5 2 3 9 MEMORY button 24 p Source selecting buttons 10 11 14 23 25 DVD STB VCR TV TAPE FM AM q INPUT ANALOG DIGITAL button 14 INPUT ATT button 20 w SURROUND ON OFF button 32 37 e DSP MODE button 32 38 39 r MASTER VOLUME buttons 10 Rem...

Страница 6: ...in or moisture Locations Install the unit in a location that is level and protected from moisture The temperature around the unit must be between 23 F and 95 F 5 C and 35 C Make sure there is good ventilation around the unit Poor ventilation could cause overheating and damage the unit Handling the unit DO NOT touch the power cord with wet hands DO NOT pull on the power cord to unplug the cord When...

Страница 7: ... REC IN PLAY TAPE AUDIO VCR TV DVD STB AV IN OUT AV IN ANTENNA AM LOOP FM 75 COAXIAL AM EXT Getting Started FM Antenna supplied If FM reception is poor connect outdoor FM antenna not supplied If AM MW LW reception is poor connect single vinyl covered wire not supplied AM MW LW Loop Antenna supplied Snap the tabs on the loop into the slots of the base to assemble the AM MW LW loop antenna Connectin...

Страница 8: ...ith RCA pin plugs not supplied Refer also to the manual supplied for your subwoofer Since bass sound is non directional you can place a subwoofer wherever you like Normally place it in front of you AM MW LW antenna connection Connect the AM MW LW loop antenna supplied to the AM LOOP terminals Turn the loop until you have the best reception If reception is poor connect an outdoor single vinyl cover...

Страница 9: ... To left front speaker To left rear speaker To center speaker To right front speaker To right rear speaker To subwoofer Center speaker Subwoofer Left front speaker Left rear speaker Right front speaker Right rear speaker DVD STB VCR TV TAPE FM AM RX E100R DVD STB VCR TV TAPE FM AM HOME CINEMA CONTROL CENTER TV DILECT DVD MEMORY CONTROL ADJUST SETTING STANDBY D I G I T A L D I G I T A L S U R R O U...

Страница 10: ...pliance store A B C D Optical digital cord Coaxial digital cord Audio cord SCART cable TO BE CONTINUED TO THE NEXT PAGE Before connecting an optical digital cord unplug the protective plug RX E100R Illustrations of the input output terminals are typical examples When you connect other components refer also to their manuals since the terminal names actually printed on the rear vary among the compon...

Страница 11: ...oing through the unit D AV IN OUT AV IN VCR TV STB DVD FM 75 CO AX IAL CA UT ION SP EA KE R IM PE DA NC E 8 16 AM LOOP AM EX T AN TENNA DIGITAL 2 STB DIGITAL 1 DVD DIGITAL IN CENTER SPEAKER REAR SPEAKERS RIGHT LEFT FRON T SPEAKERS RIGHT LEFT SU BW OOFE R OUT VC R TV DVD ST B AV IN OUT AV IN OU T REC IN PLA Y TA PE AU DIO RX E100R Illustrations of the input output terminals below are typical exampl...

Страница 12: ...t the analogue decoder to your VCR and select the scrambled channel on your VCR If there is not an appropriate terminal for the decoder on your VCR connect the decoder to the TV Refer also to the manuals supplied with these equipment When you connect a STB and a VCR directly with a SCART cable you can enjoy recording the pictures from the STB on VCR tapes without menu screens of STB For details se...

Страница 13: ...trols on the front panel You can also use the buttons on the remote control if they have the similar names or marks as those on the front panel If operations using the remote control are different from those using the front panel they are then explained You can also see Mastering Remote Operations on page 40 Display Source indicators MASTER VOLUME 3 Adjust the Volume To increase the volume press a...

Страница 14: ... follows The subwoofer speaker indicator SUBWFR lights up when SUBWFR is set to YES see page 15 The other speaker indicators light up only when the corresponding speaker is activated AND when the corresponding speaker is required for the DSP mode currently selected ANALOG PRO LOGIC SUBWFR LFE SLEEP DGTL AUTO INPUT ATT DSP L C R LS S RS LPCM DOLBY D DTS LFE L C R LS S RS SUBWFR L C R LS RS Activati...

Страница 15: ...ss SLEEP once The remaining time in minutes until the shut off time appears To change the shut off time press SLEEP repeatedly To cancel the Sleep Timer Press SLEEP repeatedly until SLEEP 0 appears on the display The SLEEP indicator goes off Turning off the power also cancels the Sleep Timer Remote ONLY RM SRXE100R REMOTE CONTROL HOME CINEMA CONTROL CENTER CONTROL CHANNEL VOLUME TV VOL TUNING STOP...

Страница 16: ...he display changes to show the following SETTING Remote NOT CONTROL VOL CONTROL 5 3 2 Display Basic Operations Basic Settings back to the begining ANALOG PRO LOGIC SUBWFR LFE VOL DGTL AUTO INPUT ATT DSP L C R LS S RS LPCM DOLBY D DTS CONTROL Note When shipped from the factory the DIGITAL IN terminals have been set for use with the following components DIGITAL 1 coaxial For DVD player DIGITAL 2 opt...

Страница 17: ...lect this for the digital input mode The unit automatically detects the incoming signal format The DGTL AUTO indicator lights up on the display then the digital signal indicator for the detected signals lights up ANALOGUE Select this for the analogue input mode Initial setting when shipped from the factory To play back software encoded with Dolby Digital select DGTL D D To play back software encod...

Страница 18: ...speakers If you have already changed the setting another size will be shown 3 Press CONTROL 3 or 2 to select the appropriate speaker size Each time you press the button the speaker size changes as follows ANALOG PRO LOGIC SUBWFR LFE VOL DGTL AUTO INPUT ATT DSP L C R LS S RS LPCM DOLBY D DTS CONTROL Ex When registering the rear speaker size LRG Large Select this when the speaker size is relatively ...

Страница 19: ...ar Delay with the current setting appears on the display CTR DL Center Delay To adjust the center delay time from 0 msec to 5 msec REAR DL Rear Delay To adjust the rear delay time from 0 msec to 15 msec 0 mS is the initial setting for the center delay time and 5 mS for the rear delay time If you have already changed the setting another setting will be shown 3 Press CONTROL 3 or 2 to select the del...

Страница 20: ...e speaker is about 3 15 16 inches 10 cm 120HZ Select this frequency when the cone speaker unit built in the speaker is about 3 3 16 inches 8 cm Dynamic Range Compression D R C You can compress the dynamic range difference between maximum sound and minimum sound of the reproduced sound This is useful when enjoying surround sound at night This function takes effect only when playing back a source us...

Страница 21: ... will be shown 3 Press CONTROL 3 or 2 to select the LFE attenuator level Each time you press the button the LFE attenuator level changes as follows 0dB Normally select this 10dB Select this when the bass sound is distorted SETTING CONTROL C VOL O ANALOG PRO LOGIC SUBWFR LFE VOL DGTL AUTO INPUT ATT DSP L C R LS S RS LPCM DOLBY D DTS CONTROL Setting Auto Surround Surround mode is automatically activ...

Страница 22: ...ound mode will be turned on If Dolby Digital 2 channel or DTS 2 channel signals come in STEREO will be selected If Linear PCM signals come in nothing will change OFF Select this to deactivate Auto Surround Notes This function does not take effect in the following cases While playing an analogue source While selecting DGTL D D or DGTL DTS as the fixed digital input mode see pages 13 and 14 If Surro...

Страница 23: ...A CONTROL CENTER STANDBY ON ADJUST IC VOL TO T Display CONTROL 5 3 2 INPUT ATT Attenuating the Input Signal When the input level of the analogue source is too high the sounds will be distorted If this happens you need to attenuate the input signal level to prevent the sound distortion You have to make this adjustment for each analogue source Press and hold INPUT ATT INPUT ANALOG DIGITAL so that th...

Страница 24: ...ALOG PRO LOGIC SUBWFR LFE VOL DGTL AUTO INPUT ATT DSP L C R LS S RS LPCM DOLBY D DTS Adjusting the Tone You can adjust the bass and treble sounds as you like You have to make these adjustments for each source Before you start remember There is a time limit in doing the following steps If the setting is canceled before you finish start from step 1 again 1 Press ADJUST The CONTROL buttons now work f...

Страница 25: ... RDS EON TA ST TUNED INFO HEWS MUTING MHZ KHZ VOL AUTO DGTL AUTO INPUT ATT DSP L C R LS S RS LPCM DOLBY D DTS RX E100R DVD STB VCR TV TAPE FM AM HOME CINEMA CONTROL CENTER STANDBY ON CONTROL 5 3 2 Display Sound Adjustments OGIC VOL AUTO ATT Adjusting the Subwoofer Output Level You can adjust the subwoofer output level if you have connected a subwoofer and set the subwoofer information correctly YE...

Страница 26: ...s Notes When you hold and release CONTROL 3 TUNING UP on the remote control or CONTROL 2 TUNING DOWN on the remote control the frequency keeps changing until a station is tuned in When a station of sufficient signal strength is tuned in the TUNED indicator lights up on the display When an FM stereo program is received the ST Stereo indicator also lights up Ex When selecting the FM band ST TUNED MU...

Страница 27: ...NALOG DIGITAL INPUT ATT MASTER VOLUME SURROUND ON OFF DSP MODE ANALOG PRO LOGIC SUBWFR LFE SLEEP RDS EON TA ST TUNED INFO HEWS MUTING MHZ KHZ VOL AUTO DGTL AUTO INPUT ATT DSP L C R LS S RS LPCM DOLBY D DTS RX E100R DVD STB VCR TV TAPE FM AM HOME CINEMA CONTROL CENTER STANDBY ON Source indicators MEMORY Source selecting button FM AM Tuner Operations ST TUNED MUTING MHZ VOL AUTO MEMORY 3 Press CONTR...

Страница 28: ...tion mode while receiving an FM broadcast You can store the FM reception mode for each preset station Before you start remember There is a time limit in doing the following steps If the setting is canceled before you finish start from step 1 again 1 While listening to an FM station press CONTROL or 5 repeatedly until FM MODE appears on the display 2 Press CONTROL 3 or 2 to select MONO Each time yo...

Страница 29: ... PS Program Service While searching PS appears and then the station names will be displayed NO PS appears if no signal is sent PTY Program Type While searching PTY appears and then the type of the broadcast program will be displayed NO PTY appears if no signal is sent RT Radio Text While searching RT appears and then text messages the station sends will be displayed NO RT appears if no signal is s...

Страница 30: ...ant appears on the display while PTY SELECT is flashing For details see Description of the PTY codes on page 28 4 Press PTY SEARCH again while the PTY code selected in the previous step is still on the display While searching SEARCH and the selected PTY code alternate on the display The unit searches 30 preset FM stations stops when it finds the one you have selected and tunes in that station Remo...

Страница 31: ... games and personality interviews POP M Commercial music of current popular appeal ROCK M Rock music EASY M Current contemporary music considered to be easy listening LIGHT M Instrumental music and vocal or choral works CLASSICS Performances of major orchestral works symphonies chamber music etc OTHER M Music not fitting into any of the other categories WEATHER Weather reports and forecasts FINANC...

Страница 32: ... the previously tuned station but the EON function still remains activated CASE 3 If the FM station you are listening to is broadcasting the program you have selected The unit continues to receive the station but the indicator of received PTY code starts flashing When the program is over EON END appears in the display and the indicator of received PTY code stops flashing and remains lit but the EO...

Страница 33: ... stereo and surround effects In addition Dolby Digital enables stereo rear sounds and sets the cutoff frequency of the rear treble at 20 kHz compared to 7 kHz for Dolby Pro Logic These facts enhance the sound movement and being there feelings much more than Dolby Pro Logic DTS Digital Surround Used to reproduce multichannel sound tracks of the software encoded with DTS Digital Surround To enjoy th...

Страница 34: ...the distances of the ceiling and walls see the diagram to the right These indirect sounds are important elements of the acoustic surround effects The following DAP modes are provided with this unit LIVE CLUB Gives the feeling of a live music club with a low ceiling DANCE CLUB Gives a throbbing bass beat HALL Gives clear vocal and the feeling of a concert hall PAVILION Gives the spacious feeling of...

Страница 35: ...REO TV Center speaker Front speaker Front speaker Rear speaker Rear speaker 5 Channels Front speaker TV Rear speaker Front speaker Rear speaker 4 Channels DSP mode All DSP modes cannot be used SUBWFR LFE VOL DGTL AUTO L C R LS RS DOLBY D DSP mode Each time you press DSP MODE the DSP modes Theatre Surround and DAP modes change as follows Front panel SUBWFR LFE VOL DGTL AUTO L C R LS RS DOLBY D Dolb...

Страница 36: ...ode Pro Logic Dolby Digital or DTS Digital Surround Each time you press the button Surround mode turns on and off alternately Note When playing back an analogue source SURROUND ON will not appear and PRO LOGIC appears as soon as you press SURROUND ON OFF The PRO LOGIC indicator also lights up on the display 3 Press TEST to check the speaker output balance TEST L starts flashing on the display and ...

Страница 37: ...el of the selected speaker is set at the same level as that of the front speakers SOUND To adjust the center speaker level press CENTER To adjust the left rear speaker level press REAR L To adjust the right rear speaker level press REAR R 6 Press TEST again to stop the test tone To cancel Surround Mode Press SURROUND ON OFF again so that STEREO appears on the display If Surround mode is canceled w...

Страница 38: ...S S RS LPCM DOLBY D DTS ANALOG PRO LOGIC SUBWFR LFE VOL DGTL AUTO INPUT ATT DSP L C R LS S RS LPCM DOLBY D DTS CENTER 2 3 ANALOG PRO LOGIC SUBWFR LFE VOL DGTL AUTO INPUT ATT DSP L C R LS S RS LPCM DOLBY D DTS 5 Adjust the following speaker output levels from 10 to 10 Make adjustments so that the sound level of the selected speaker is set at the same level as that of the front speakers To adjust th...

Страница 39: ...DIMMER TV VIDEO VCR MUTING REC PLAY DOWN UP DVD SLEEP TV DIRECT DVD STB VCR TV ANALOG DIGITAL TAPE FM SOUND BASS CENTER TEST BASS REAR L BASS BOOST TREBLE REAR R EFFECT TREBLE SUBWOOFER RETURN FM MODE EON ENTER DISPLAY MODE RDS MODE ON OFF AM 1 2 3 4 5 6 7 8 9 10 0 10 100 DVD MENU VCR TV STB INPUT DSP SURROUND EON SELECT PTY SEARCH PTY PTY9 AUDIO DVD MENU Using DAP Modes Remote Control A DAP mode ...

Страница 40: ...cannot be used with another DSP mode Once Surround mode is activated the other DSP mode in use will be canceled When using the buttons on the front panel no test tone is available Make adjustments while listening to the sound of the source played back You have to make this adjustment for each source 1 Select and play software encoded with Dolby Surround Dolby Digital or DTS Digital Surround If AUT...

Страница 41: ...g will be shown 5 Press CONTROL 3 or 2 to adjust the speaker output level Make adjustments so that the sound level of the selected speaker is set at the same level as that of the front speakers 6 Repeat steps 4 and 5 to adjust the other speaker levels To cancel Surround Mode Press SURROUND ON OFF again so that STEREO appears on the display If Surround mode is canceled while playing back multichann...

Страница 42: ...setting for the speaker output levels and EFFECT 3 is for the DSP effect level If you have already changed the setting another setting will be shown 5 Press CONTROL 3 or 2 to make an adjustment When adjusting the speaker output levels make adjustments so that the sound level of the selected speaker is set at the same level as that of the front speakers 6 Repeat steps 4 and 5 to make other adjustme...

Страница 43: ...Dim or brighten the display illuminations Selecting analogue or digital input ANALOG DIGITAL INPUT button see also page 13 Select either analogue input or digital input for the digital source SLEEP DIMMER ANALOG DIGITAL INPUT MUTING Creating realistic sound fields SURROUND ON OFF and DSP MODE buttons see also pages 32 36 SURROUND ON OFF Turn on or off Surround mode DSP MODE Select the DSP modes Th...

Страница 44: ... UP and TUNING DOWN buttons see also page 23 After pressing FM or AM you can change the frequencies by pressing and holding the buttons Operating other JVC s products Turning on the Power POWER buttons DVD Turn on or off a DVD player STB Turn on or off an STB VCR Turn on or off a VCR TV Turn on or off a TV Selecting the channels and operating tuner 10 keys BASS CENTER BASS REAR L TREBLE REAR R TRE...

Страница 45: ...it press PLAY FF Fast wind a tape REW Rewind a tape REC Press this button with the PLAY button to start recording pressed and hold Press this button with the PAUSE button to enter recording pause CHANNEL TUNING STOP PAUSE FF REW REC PLAY DOWN UP Mastering Remote Operations After pressing STB source selecting button you can use the following buttons for STB operations CHANNEL Change channel numbers...

Страница 46: ... Refer to the manual supplied with your STB 5 Try to operate your STB by pressing STB When your STB turns on or off you have entered the correct code If there are more than one code listed for your brand of STB try each one until the correct one is entered Manufacturer Codes JVC 01 02 AMSTRAD 03 06 33 BT 01 CANAL STELLITE 22 CANAL 22 D BOX 26 ECHOSTAR 19 21 23 FINLUX 11 FORCE 30 GALAXIS 29 GRUNDIG...

Страница 47: ...hange the channels 1 9 0 10 100 Select the channels RETURN 10 Function as the RETURN button Note Refer to the manual supplied with your TV 5 Try to operate your TV by pressing TV When your TV turns on or off you have entered the correct code If there are more than one code listed for your brand of TV try each one until the correct one is entered Manufacturers codes are subject to change without no...

Страница 48: ...es not disappear unplug the AC power cord then plug it back again If speaker wiring is not short circuited contact your dealer Press POWER on the front panel to turn off the unit After unplugging the power cord consult your dealer Press SOUND or source selecting buttons first then press the button you want to use See pages 40 and 41 Remove the obstruction Replace batteries Set RDS DVD MENU mode se...

Страница 49: ... 100 Hz 10 dB Treble 10 kHz 10 dB Bass Boost 6 dB 1 dB at 70 Hz Video Video Input Sensitivity Impedance 1 kHz Composite video DVD STB VCR TV 1 Vp p 75 Ω S VIDEO DVD STB VCR Y luminance 1 Vp p 75 Ω C chrominance 0 286 Vp p 75 Ω RGB DVD STB VCR 0 7 Vp p 75 Ω Video Output Level Impedance 1 kHz Composite video VCR TV 1 Vp p 75 Ω S VIDEO TV Y luminance 1 Vp p 75 Ω C chrominance 0 286 Vp p 75 Ω RGB TV 0...

Страница 50: ...VICTOR COMPANY OF JAPAN LIMITED EN 0301NHMMDWJEIN J VC ...

Отзывы: