background image

32

ENGLISH

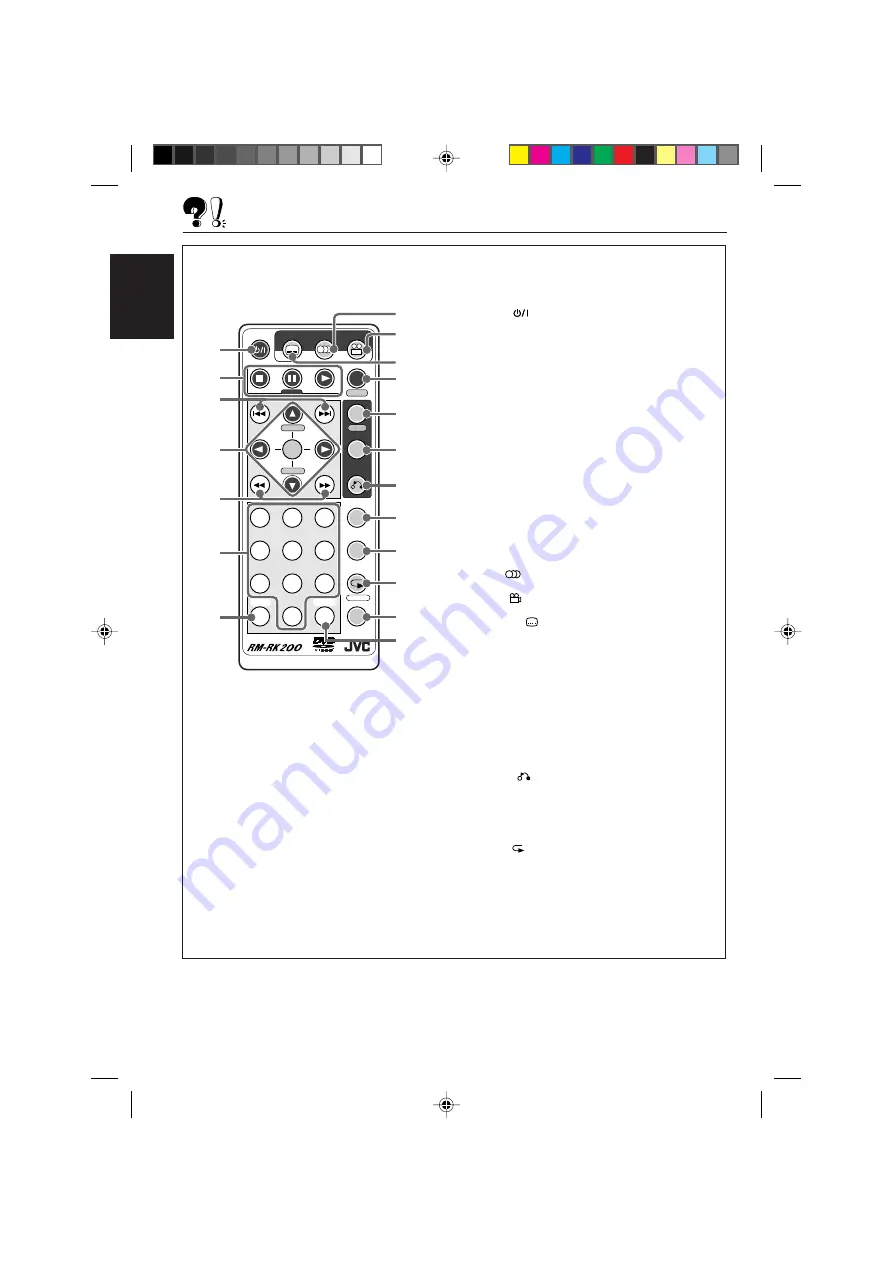
LOCATION OF THE BUTTONS

Remote controller

1

POWER 

 (standby/on) button

2

Disc operation buttons

7

 (stop), 

8

 (pause) STEP, 

3

 (play)

3

4

 / 

¢

 (reverse search/forward search)

buttons

4

Menu operation buttons

5

 / 

 / 

2

 / 

3

 (cursors), ENTER

5

 / 

 also function as H/P VOL

(headphones volume) buttons while
pressed with SHIFT (S) button.

5

1

 / 

¡

 (reverse/fast forward) buttons

6

Number buttons

7

SHIFT (S) button

8

AUDIO 

 button

9

ANGLE 

 button

p

SUBTITLE 

 button

q

DISPLAY (D) / TIME button

• Also functions as TIME button while

pressed with SHIFT (S) button.

w

MENU/SETUP button

• Also functions as SETUP button while

pressed with SHIFT (S) button.

e

TITLE button

r

RETURN 

 button

t

SLOW button

y

ZOOM button

u

REPEAT

/A-B RPT button

• Also functions as A-B RPT button while

pressed with SHIFT (S) button.

i

SEARCH MODE (M) button

o

CLEAR (C) button

1

2

3

D

MENU

TIME

DISPLAY

TITLE

SEARCH MODE

ENTER

SHIFT

CLEAR

REPEAT

RETURN

ZOOM

SLOW

A-B RPT

4

5

6

7

8

9

S

0

C

M

POWER

STEP

SUBTITLE

AUDIO

ANGLE

H/P VOL

H/P VOL

SETUP

1

2

3

4

5

6

7

8
9

p
q

w

e

r

t

y

u

i

o

EN29-35.KV-DV7[E]_f

01.2.21, 8:47 PM

32

Содержание KV-DV7

Страница 1: ...L DE INSTRUCCIONES MANUEL D INSTRUCTIONS For installation and connections refer to the separate manual Para la instalación y las conexiones refiérase al manual separado Pour l installation et les raccordements se référer au manuel séparé DVD VIDEO CD CD KV DV7 DVD CD PLAYER OPEN PHONES DVD VCD CD 1 2 3 D MENU TIME DISPLAY TITLE SEARCH MODE ENTER SHIFT CLEAR REPEAT RETURN ZOOM SLOW A B RPT 4 5 6 7 ...

Страница 2: ...r radiation however is equipped with safety switches to prevent radiation emission when unloading discs It is dangerous to defeat the safety switches 5 CAUTION Use of controls adjustments or performance of procedures other than those specified herein may result in hazardous radiation exposure WARNINGS DO NOT install any unit in locations where it may obstruct the steering wheel and gearshift lever...

Страница 3: ...initial subtitle language 21 Setting initial disc menu language 22 Setting digital audio output 22 Setting compression 23 Setting audio output during Low Speed Search 24 Setting monitor type 25 Setting closed caption 26 Changing the color of the on screen bar 26 Setting zoom preference 27 MAINTENANCE 29 Handling discs 29 LANGUAGE CODES 30 GLOSSARY 31 LOCATION OF THE BUTTONS 32 Remote controller 32...

Страница 4: ...rk Video Region Code Type Logo Format Number COMPACT DIGITAL AUDIO DVD Video NTSC 1 ALL Video CD Audio CD Discs you can play Example 1 DVD disc Example 2 Video CD Audio CD Examples Disc structure DVD Video CD VCD and Audio CD CD A DVD disc consists of Titles and each title may be divided into some Chapters See Example 1 For example if a DVD disc contains some movies each movie may have its own tit...

Страница 5: ... the remote sensor to strong light direct sunlight or artificial lighting WARNING Store the batteries in a place which children cannot reach If a child accidentally swallows the batteries immediately consult a doctor Do not recharge short disassemble or heat the batteries or dispose of in a fire Doing any of these things may cause the batteries to give off heat crack or start a fire Do not leave t...

Страница 6: ... DRIVEN PLAYBACK on page 12 The following marks used in this manual indicate the discs to be used BASIC PLAYBACK Video CD Audio CD DVD Video 1 2 3 D MENU TIME DISPLAY TITLE SEARCH MODE ENTER SHIFT CLEAR REPEAT RETURN ZOOM SLOW A B RPT 4 5 6 7 8 9 S 0 C M POWER STEP SUBTITLE AUDIO ANGLE H P VOL H P VOL SETUP H P VOL 5 H P VOL 7 SHIFT S 3 8 STEP POWER Before performing any operations make sure the f...

Страница 7: ... Each time you press the button consecutively the beginning of the previous tracks is located and played back If you press and hold the button you can fast forward by holding or fast reverse the play by holding 4 About sounds reproduced through the rear terminals Through AUDIO L R Analog stereo signals are output When playing a source encoded with Dolby Digital multichannel signals are mixed to th...

Страница 8: ...le See page 9 for more details 4 Indicates whether the disc contains multi angle views Ex When only main angle view is recorded on the disc without any multi angle views See page 11 for more details 5 Current operation mode Ex This appears while playing a disc When a DVD is loaded On screen bar goes off 1 3 1 25 1 1 00 00 01 OFF 0 ENG 1 1 OFF Digital 1 3 00 00 01 OFF PBC On screen bar goes off Whe...

Страница 9: ...ent chapter Remaining time of the current chapter Back to the beginning 00 00 01 00 00 05 01 54 01 00 34 09 When a VCD or CD is loaded 00 00 01 00 00 05 00 04 41 00 43 09 Elapsed playing time of the current track Remaining time of the current track Elapsed playing time of the current disc Remaining time of the current disc Back to the beginning To erase the on screen bar press DISPLAY D TIME twice...

Страница 10: ...number inside the mark indicates the total number of the recorded multi angle views Selecting subtitles While playing a disc containing subtitles in different languages you can select the subtitle to be displayed on the screen You can set your favorite subtitle language as the initial language shown on the screen See page 21 Select a desired subtitle language The on screen menu bar appears on the ...

Страница 11: ... on screen bar press DISPLAY D TIME Selecting multi angle views While playing a disc containing multi angle views you can view the same scene at different angles Select a desired view angle The on screen menu bar appears on the screen Each time you press the button the view angle changes ANGLE To erase the on screen bar press DISPLAY D TIME twice Ex When the disc has 3 multi angle views Ex When th...

Страница 12: ...Cursor buttons 5 3 2 and ENTER The unit starts playback of the selected item On some discs you can also select items by pressing the Number buttons corresponding to the item numbers listed To erase the menu or title list Press RETURN until it goes off from the screen If appears on the screen when pressing MENU in step 1 the disc does not have a menu If appears on the screen when pressing TITLE in ...

Страница 13: ...start playback PBC operation concept How to select items using the Number buttons To select number 5 press 5 then ENTER To select number 10 press 1 0 then ENTER To select number 23 press 2 3 then ENTER To cancel a mis entry press CLEAR C Each time you press the button the last entry will be erased To return to the previous menu Press RETURN To cancel the PBC playback You can cancel the menu driven...

Страница 14: ...e out during Low Speed Search See page 24 Reverse Search To reverse the chapter or track press 1 while playing a disc Each time you press the button the search speed changes as follows When playing a DVD or VCD No sound comes out during Reverse Search 1 2 3 D MENU TIME DISPLAY TITLE SEARCH MODE ENTER SHIFT CLEAR REPEAT RETURN ZOOM SLOW A B RPT 4 5 6 7 8 9 S 0 C M POWER STEP SUBTITLE AUDIO ANGLE H ...

Страница 15: ...ss 1 0 then ENTER To select number 23 press 2 3 then ENTER How to input the playing time Press the Number buttons to input the playing time then press ENTER to start playback at the selected elapsed playing time To input time 00 45 23 press 4 5 2 3 then ENTER To input time 01 23 45 press 1 2 3 4 5 then ENTER To cancel a mis entry press CLEAR C Each time you press the button the last entry will be ...

Страница 16: ...ITLE AUDIO ANGLE H P VOL H P VOL SETUP SHIFT S REPEAT A B RPT When a DVD is playing Chapter repeat Current chapter will be repeated Title repeat Current title will be repeated Repeat OFF Repeat play is canceled Chapter repeat Repeat OFF C T OFF Title repeat On some DVDs repeat play may be canceled by the disc itself When a VCD is playing Track repeat Track repeat Current track will be repeated Dis...

Страница 17: ...e chapter This is due to their disc structures and not a malfunction of the unit REPEAT A B RPT AB Ex When viewing a picture A AB SHIFT S T D Track repeat Disc repeat Disc repeat All the tracks in the disc will be repeated Track repeat Current track will be repeated When you start playing back a CD Disc repeat is always activated first To erase the on screen bar press DISPLAY D TIME A B Repeat Whi...

Страница 18: ...You can advance the picture frame by frame 1 Press 8 STEP once during play A still picture appears on the screen 2 Press 8 STEP repeatedly to advance the picture frame by frame Each time you press the button the picture advances frame by frame To resume normal play Press 3 SLOW Normal play 1 2 1 4 1 8 1 16 STEP STEP 1 2 3 D MENU TIME DISPLAY TITLE SEARCH MODE ENTER SHIFT CLEAR REPEAT RETURN ZOOM S...

Страница 19: ...ress ZOOM to zoom in to the picture Each time you press the button the picture is enlarged as follows When playing a VCD You can only select 2x Zoom ZOOM 2x Zoom 4x Zoom Canceled 2 4 2x Zoom 4x Zoom 2 Ex When 2x Zoom is selected 2 Move the enlarged portion on the screen using Cursor buttons 5 3 2 To cancel Zoom press ZOOM repeatedly until normal size screen appears 2 EN12 19 KV DV7 J _f 01 2 21 8 ...

Страница 20: ... must be selected highlighted 2 Press ENTER Language menu appears AUDIO must be selected highlighted 3 Press ENTER again Audio Language selecting screen appears ENTER ENTER 1 2 3 D MENU TIME DISPLAY TITLE SEARCH MODE ENTER SHIFT CLEAR REPEAT RETURN ZOOM SLOW A B RPT 4 5 6 7 8 9 S 0 C M POWER STEP SUBTITLE AUDIO ANGLE H P VOL H P VOL SETUP Cursors 5 Numbers ENTER MENU SETUP SHIFT S CLEAR C LANGUAGE...

Страница 21: ... previous screen during the procedure press RETURN 1 While holding SHIFT S press MENU SETUP Setup Menu appears on the screen LANGUAGES must be selected highlighted 2 Press ENTER Language menu appears 3 Press Cursor or 5 to select SUBTITLE then press ENTER Subtitle Language selecting screen appears 4 Press Cursor or 5 to select a desired language then press ENTER To use the same language as the ini...

Страница 22: ...ng digital audio output When connecting an amplifier or a decoder to the DIGITAL OUT terminal set it as recommended STREAM LPCM or OFF see step 3 To go back to the previous screen during the procedure press RETURN 1 While holding SHIFT S press MENU SETUP Setup Menu appears on the screen 2 Press Cursor or 5 to select AUDIO then press ENTER Audio menu appears DIGITAL OUT must be selected highlighted...

Страница 23: ...P VOL H P VOL TO BE CONTINUED ENTER H P VOL H P VOL DIGITAL OUT STREAM STREAM LPCM LPCM OFF OFF RETURN SELECT OK ENTER COMPRESSION FULL FULL STNDARD STNDARD NIGHT NIGHT RETURN SELECT OK ENTER AUDIO DIGITAL OUT DIGITAL OUT STREAM STREAM COMPRESSION STANDARD COMPRESSION STANDARD AUDIO DURING AUDIO DURING ON ON RETURN SELECT OK ENTER Setting compression You can compress the dynamic range difference b...

Страница 24: ... NIGHT Select this to apply compression fully useful at a low volume To erase the Setup Menu screen press MENU SETUP while holding SHIFT S Setting audio output during Low Speed Search You can turn on or off the sound during Low Speed Search on a DVD and VCD Regardless of this setting sound always comes out during Low Speed Search on a CD To go back to the previous screen during the procedure press...

Страница 25: ...tio is 4 3 While viewing a wide screen picture the black bars do not appear however the left and right edge sides of the pictures will not be shown on the screen 16 9 WIDE Select this when viewing on TV whose aspect ratio is 16 9 Even if 4 3 PAN SCAN is selected the screen size may become 4 3 LETTERBOX while playing some DVDs This depends on how the DVD is programed and recorded If a disc or some ...

Страница 26: ...ring the procedure press RETURN 1 While holding SHIFT S press MENU SETUP Setup Menu appears on the screen 2 Press Cursor or 5 to select DISPLAY then press ENTER Display menu appears 3 Press Cursor or 5 to select CLOSE CAPTION then press ENTER Closed caption on off selecting screen appears 4 Press Cursor or 5 to select a desired setting then press ENTER ON Select this to display the close captions ...

Страница 27: ...t be selected highlighted DISPLAY MONITOR TYPE 4 3 LB CLOSE CAPTION OFF COLOR SCHEME YELLOW ZOOM SETUP RETURN SELECT OK ENTER ZOOM SETUP START POINT CENTER PAN SCALE NORMAL RETURN SELECT OK ENTER ENTER H P VOL H P VOL ENTER H P VOL H P VOL TO BE CONTINUED 3 Press Cursor or 5 to select COLOR SCHEME then press ENTER 4 Press Cursor or 5 to select a desired color then press ENTER To erase the Setup Me...

Страница 28: ...ecting screen appears 7 Press Cursor or 5 to select a desired setting then press ENTER You can select the movement amount speed of the zoomed up portion NORMAL Select this to move at normal speed to another portion of the picture ROUGH Select this to move faster to another portion of the picture Rough movement FINE Select this to move slower to another portion of the picture Fine movement To erase...

Страница 29: ...e discs When removing a disc from its case press down the center holder of the case and lift the disc out holding it by the edges Always hold the disc by the edges Do not touch its recording surface When storing a disc into its case gently insert the disc around the center holder with the printed surface facing up Make sure to store discs into the cases after use To keep discs clean A dirty disc m...

Страница 30: ...hkir 6669 Byelorussian 6671 Bulgarian 6672 Bihari 6673 Bislama 6678 Bengali Bangla 6679 Tibetan 6682 Breton 6765 Catalan 6779 Corsican 6783 Czech 6789 Welsh 6865 Danish 6869 German 6890 Bhutani 6976 Greek 6978 English 6979 Esperanto 6983 Spanish 6984 Estonian 6985 Basque 7065 Persian 7073 Finnish 7074 Fiji 7079 Faeroese 7082 French 7089 Frisian 7165 Irish 7168 Scots Gaelic 7176 Galician 7178 Guara...

Страница 31: ...er Systems Inc Compared to Dolby Digital audio compression rate is relatively low This fact allows DTS Digital Surround format to add breadth and depth to the reproduced sounds As a result DTS Digital Surround features natural solid and clear sound To reproduce these surround signals you need to connect an amplifier or a decoder compatible with DTS Digital Surround Linear PCM This is a digital rec...

Страница 32: ...button q DISPLAY D TIME button Also functions as TIME button while pressed with SHIFT S button w MENU SETUP button Also functions as SETUP button while pressed with SHIFT S button e TITLE button r RETURN button t SLOW button y ZOOM button u REPEAT A B RPT button Also functions as A B RPT button while pressed with SHIFT S button i SEARCH MODE M button o CLEAR C button 1 2 3 D MENU TIME DISPLAY TITL...

Страница 33: ... the disc loaded 9 Remote signal reception lamp This lamp flashes when receiving the remote control signals p 3 play button and lamp The lamp lights up when the power is on q 7 stop button and lamp The lamp lights up when the power is on w 4 reverse search button and lamp The lamp lights up when the power is on e forward search button and lamp The lamp lights up when the power is on r Reset button...

Страница 34: ... compatible with DTS Digital Surround Connect the video cord correctly Select a correct input on the TV or monitor Select 4 3 LETTERBOX LB See page 25 Some DVDs are programed to always display no subtitle initially If this happens press SUBTITLE after starting play Some DVDs are programed to always use the original language initially If this happens press AUDIO after starting play Turn off the pow...

Страница 35: ...n measurable limit Audio output level Analog AUDIO L R 1 5 Vrms Digital DIGITAL OUT Signal wave length 660 nm Output level 21 dBm to 15 dBm VIDEO SECTION Color system NTSC Video output composite 1 Vp p 75 Ω SPECIFICATIONS If a kit is necessary for your car consult a telephone directory for the nearest car audio speciality shop Output signals through the DIGITAL OUT terminal They differ depending o...

Страница 36: ...t Refer to page of How to Reset Still having trouble USA ONLY Call 1 800 252 5722 http www jvcservice com We can help you http www jvcmobile com Visit us on line for Technical Support Customer Satisfaction Survey US RESIDENTS ONLY Printed in Japan 0201MNMMDWOZK EN00 00 KV DV7 J _f 01 2 22 5 37 PM 2 ...

Страница 37: ...f the supplied wire to the center hole on KV DV7 s rear panel using a screw M5 x 6 mm supplied 2 Remove one screw from the side panel of KV M700 s controller unit and attach the other terminal small of the supplied wire using the removed screw DEUTSCH 1 Befestigen Sie das größere Ende des mitgelieferten Drahts an der mittleren Bohrung auf der Rückseite des KV DV7 Verwenden Sie hierzu die zum Liefe...

Страница 38: ... button on the front panel using a ball point pen or a similar tool This will reset the built in microcomputer NOTE If you reset the unit during play the playback mode selections e g repeat play mode setting you have selected for the current disc will be reset to the initial settings During DVD playback the disc menu selection will be also reset to the initial disc settings IMPORTANT LV42512 001A ...

Страница 39: ...sc einlegen FRANÇAIS N INTRODUISEZ PAS de disque si le témoin de charge de disque clignote ou reste éteint Quand le témoin de charge de disque n est pas allumé appuyez sur 0 pour vérifier si un disque se trouve dans la fente d insertion de disque Si un disque se trouve dans la fente il est éjecté et vous pouvez le remplacer par un autre Si aucun disque ne se trouve dans la fente le témoin de charg...

Страница 40: ...erkeerd type voertuig wordt gebruikt kan dit tot brand of een ongeval lijden Ter voorkoming van kortsluiting raden we aan dat u de negatieve aansluiting van de accu losmaakt en daarna alle benodigde verbindingen tot stand brengt alvorens de eenheid te installeren Als u niet zeker weet hoe u de eenheid moet installeren kunt u dit beter door een erkend vakman laten doen Installeer de eenheid niet op...

Страница 41: ...abs to hold the sleeve firmly in place as illustrated 3 Fix the mounting bolt to the rear of the unit s body and place the rubber cushion over the end of the bolt 4 Do the required electrical connections 5 Slide the unit into the sleeve until it is locked by pressing the four corners of the trim plate En cas d installation de cet appareil sur le tableau de bord 1 Fixez la plaque d assemblage 2 Ins...

Страница 42: ...sproblemen hebt De krachtschakeling van dit apparaat heeft een ingebouwd geluidsfilter In sommige voertuigen zijn tikgeluiden of andere ongewenste geluiden te horen Als dit gebeurt moet u de massaklem aan de achterkant zie aansluitingsschema aan het chassis van de auto vastmaken met behulp van een kortere en dikkere kabel zoals kopermanteldraad of tellerkabel Als het geluid niet verdwijnt moet u c...

Страница 43: ...licence de DigitalTheater Systems Inc No de brevet aux Etats Unis 5 451 942 5 956 674 5 974 380 5 978 762 et brevets mondiaux émis ou en cours d homologation DTS est une marque de fabrique de Digital Theater Systems Inc Copyright 1996 2000 Digital Theater Systems Inc Tous droits réservés Toenjoytheoriginal5 1channelsoundsencoded with Dolby Digital or with DTS Digital Surround ZumGenießendesOrigina...

Страница 44: ...H P VOL H P VOL SETUP NEDERLANDS For installation and connections refer to the separate manual Angaben zu Einbau und Verkabelung entnehmen Sie bitte der gesonderten Anleitung Pour l installation et les raccordements se référer au manuel séparé Zie de afzonderlijke handleiding voor details aangaande het installeren en verbinden van het toestel LVT0631 001A E For customer Use Enter below the Model N...

Страница 45: ...the unit while driving be sure to look ahead carefully or you may be involved in a traffic accident DV7 DVD CD PLAYER OPEN IMPORTANT FOR LASER PRODUCTS Precautions 1 CLASS 1 LASER PRODUCT 2 CAUTION Invisible laser radiation when open and interlock failed or defeated Avoid direct exposure to beam 3 CAUTION Do not open the top cover There are no user serviceable parts inside Leave all servicing to q...

Страница 46: ...initial subtitle language 21 Setting initial disc menu language 22 Setting digital audio output 22 Setting compression 23 Setting audio output during Low Speed Search 24 Setting monitor type 25 Setting closed caption 26 Changing the color of the on screen bar 26 Setting zoom preference 27 MAINTENANCE 29 Handling discs 29 LANGUAGE CODES 30 GLOSSARY 31 LOCATION OF THE BUTTONS 32 Remote controller 32...

Страница 47: ...ark Video Region Code Type Logo Format Number COMPACT DIGITAL AUDIO DVD Video PAL 2 ALL Video CD Audio CD Discs you can play Disc structure DVD Video CD VCD and Audio CD CD A DVD disc consists of Titles and each title may be divided into some Chapters See Example 1 For example if a DVD disc contains some movies each movie may have its own title number and it may be further divided into some chapte...

Страница 48: ... the remote sensor to strong light direct sunlight or artificial lighting WARNING Store the batteries in a place which children cannot reach If a child accidentally swallows the batteries immediately consult a doctor Do not recharge short disassemble or heat the batteries or dispose of in a fire Doing any of these things may cause the batteries to give off heat crack or start a fire Do not leave t...

Страница 49: ... DRIVEN PLAYBACK on page 12 The following marks used in this manual indicate the discs to be used BASIC PLAYBACK Video CD Audio CD DVD Video 1 2 3 D MENU TIME DISPLAY TITLE SEARCH MODE ENTER SHIFT CLEAR REPEAT RETURN ZOOM SLOW A B RPT 4 5 6 7 8 9 S 0 C M POWER STEP SUBTITLE AUDIO ANGLE H P VOL H P VOL SETUP H P VOL 5 H P VOL 7 SHIFT S 3 8 STEP POWER Before performing any operations make sure the f...

Страница 50: ...tracks is located and played back If you press and hold the button you can fast forward by holding or fast reverse the play by holding 4 About sounds reproduced through the rear terminals Through AUDIO L R Analog stereo signals are output When playing a source encoded with Dolby Digital or with MPEG Audio multichannel signals are mixed to the left and right front channel signals then output You ca...

Страница 51: ...le See page 9 for more details 4 Indicates whether the disc contains multi angle views Ex When only main angle view is recorded on the disc without any multi angle views See page 11 for more details 5 Current operation mode Ex This appears while playing a disc When a DVD is loaded On screen bar goes off 1 3 1 25 1 1 00 00 01 OFF 0 ENG 1 1 OFF Digital 1 3 00 00 01 OFF PBC On screen bar goes off Whe...

Страница 52: ...ent chapter Remaining time of the current chapter Back to the beginning 00 00 01 00 00 05 01 54 01 00 34 09 When a VCD or CD is loaded 00 00 01 00 00 05 00 04 41 00 43 09 Elapsed playing time of the current track Remaining time of the current track Elapsed playing time of the current disc Remaining time of the current disc Back to the beginning To erase the on screen bar press DISPLAY D TIME twice...

Страница 53: ...number inside the mark indicates the total number of the recorded multi angle views Selecting subtitles While playing a disc containing subtitles in different languages you can select the subtitle to be displayed on the screen You can set your favorite subtitle language as the initial language shown on the screen See page 21 Select a desired subtitle language The on screen menu bar appears on the ...

Страница 54: ... on screen bar press DISPLAY D TIME Selecting multi angle views While playing a disc containing multi angle views you can view the same scene at different angles Select a desired view angle The on screen menu bar appears on the screen Each time you press the button the view angle changes ANGLE To erase the on screen bar press DISPLAY D TIME twice Ex When the disc has 3 multi angle views Ex When th...

Страница 55: ...Cursor buttons 5 3 2 and ENTER The unit starts playback of the selected item On some discs you can also select items by pressing the Number buttons corresponding to the item numbers listed To erase the menu or title list Press RETURN until it goes off from the screen If appears on the screen when pressing MENU in step 1 the disc does not have a menu If appears on the screen when pressing TITLE in ...

Страница 56: ...starts from the selected track You can also turn on and off the PBC playback by pressing MENU SETUP repeatedly PBC operation concept While playing a VCD The Playback Control function PBC allows you to operate the VCD using menus When you start playback a menu will automatically appear on the screen A menu may be a list of items divided screens or some moving pictures See PBC operation concept to t...

Страница 57: ...e out during Low Speed Search See page 24 Reverse Search To reverse the chapter or track press 1 while playing a disc Each time you press the button the search speed changes as follows When playing a DVD or VCD No sound comes out during Reverse Search 1 2 3 D MENU TIME DISPLAY TITLE SEARCH MODE ENTER SHIFT CLEAR REPEAT RETURN ZOOM SLOW A B RPT 4 5 6 7 8 9 S 0 C M POWER STEP SUBTITLE AUDIO ANGLE H ...

Страница 58: ...ss 1 0 then ENTER To select number 23 press 2 3 then ENTER How to input the playing time Press the Number buttons to input the playing time then press ENTER to start playback at the selected elapsed playing time To input time 00 45 23 press 4 5 2 3 then ENTER To input time 01 23 45 press 1 2 3 4 5 then ENTER To cancel a mis entry press CLEAR C Each time you press the button the last entry will be ...

Страница 59: ...ITLE AUDIO ANGLE H P VOL H P VOL SETUP SHIFT S REPEAT A B RPT When a VCD is playing Track repeat Track repeat Current track will be repeated Disc repeat All the tracks in the disc will be repeated Repeat OFF Repeat play is canceled T D OFF Disc repeat Repeat OFF While playing back a VCD using the PBC function Repeat play cannot be used When a DVD is playing Chapter repeat Current chapter will be r...

Страница 60: ...e chapter This is due to their disc structures and not a malfunction of the unit and REPEAT A B RPT AB Ex When viewing a picture A AB SHIFT S T D Track repeat Disc repeat Disc repeat All the tracks in the disc will be repeated Track repeat Current track will be repeated When you start playing back a CD Disc repeat is always activated first To erase the on screen bar press DISPLAY D TIME A B Repeat...

Страница 61: ...You can advance the picture frame by frame 1 Press 8 STEP once during play A still picture appears on the screen 2 Press 8 STEP repeatedly to advance the picture frame by frame Each time you press the button the picture advances frame by frame To resume normal play Press 3 SLOW Normal play 1 2 1 4 1 8 1 16 STEP STEP 1 2 3 D MENU TIME DISPLAY TITLE SEARCH MODE ENTER SHIFT CLEAR REPEAT RETURN ZOOM S...

Страница 62: ...ress ZOOM to zoom in to the picture Each time you press the button the picture is enlarged as follows When playing a VCD You can only select 2x Zoom 2x Zoom 4x Zoom Canceled 2 4 2x Zoom 4x Zoom 2 Ex When 2x Zoom is selected 2 Move the enlarged portion on the screen using Cursor buttons 5 3 2 To cancel Zoom press ZOOM repeatedly until normal size screen appears 2 ZOOM EN12 19 KV DV7 E _f 01 2 21 8 ...

Страница 63: ... must be selected highlighted 2 Press ENTER Language menu appears AUDIO must be selected highlighted 3 Press ENTER again Audio Language selecting screen appears ENTER ENTER 1 2 3 D MENU TIME DISPLAY TITLE SEARCH MODE ENTER SHIFT CLEAR REPEAT RETURN ZOOM SLOW A B RPT 4 5 6 7 8 9 S 0 C M POWER STEP SUBTITLE AUDIO ANGLE H P VOL H P VOL SETUP Cursors 5 Numbers ENTER MENU SETUP SHIFT S CLEAR C LANGUAGE...

Страница 64: ... previous screen during the procedure press RETURN 1 While holding SHIFT S press MENU SETUP Setup Menu appears on the screen LANGUAGES must be selected highlighted 2 Press ENTER Language menu appears 3 Press Cursor or 5 to select SUBTITLE then press ENTER Subtitle Language selecting screen appears 4 Press Cursor or 5 to select a desired language then press ENTER To use the same language as the ini...

Страница 65: ...ng digital audio output When connecting an amplifier or a decoder to the DIGITAL OUT terminal set it as recommended STREAM LPCM or OFF see step 3 To go back to the previous screen during the procedure press RETURN 1 While holding SHIFT S press MENU SETUP Setup Menu appears on the screen 2 Press Cursor or 5 to select AUDIO then press ENTER Audio menu appears DIGITAL OUT must be selected highlighted...

Страница 66: ...L ENTER H P VOL H P VOL TO BE CONTINUED ENTER H P VOL H P VOL DIGITAL OUT STREAM STREAM LPCM LPCM OFF OFF RETURN SELECT OK ENTER COMPRESSION FULL FULL STNDARD STNDARD NIGHT NIGHT RETURN SELECT OK ENTER AUDIO DIGITAL OUT DIGITAL OUT STREAM STREAM COMPRESSION STANDARD COMPRESSION STANDARD AUDIO DURING AUDIO DURING ON ON RETURN SELECT OK ENTER Setting compression You can compress the dynamic range di...

Страница 67: ...P Setup Menu appears on the screen ENTER H P VOL H P VOL ENTER H P VOL H P VOL 2 Press Cursor or 5 to select AUDIO then press ENTER Audio menu appears 3 Press Cursor or 5 to select AUDIO DURING then press ENTER Sound on off selecting screen appears 4 Press Cursor or 5 to select a desired setting then press ENTER ON Sounds come out during Low Speed Search OFF No sounds come out during Low Speed Sea...

Страница 68: ...tio is 4 3 While viewing a wide screen picture the black bars do not appear however the left and right edge sides of the pictures will not be shown on the screen 16 9 WIDE Select this when viewing on TV whose aspect ratio is 16 9 Even if 4 3 PAN SCAN is selected the screen size may become 4 3 LETTERBOX while playing some DVDs This depends on how the DVD is programed and recorded If a disc or some ...

Страница 69: ... you start playback To erase the Setup Menu screen press MENU SETUP while holding SHIFT S Changing the color of the on screen bar You can change the color of the on screen bar displayed on the top of the screen by selecting the color yellow green blue or red To go back to the previous screen during the procedure press RETURN 1 While holding SHIFT S press MENU SETUP Setup Menu appears on the screen...

Страница 70: ...t be selected highlighted DISPLAY MONITOR TYPE 4 3 LB CLOSE CAPTION OFF COLOR SCHEME YELLOW ZOOM SETUP RETURN SELECT OK ENTER ZOOM SETUP START POINT CENTER PAN SCALE NORMAL RETURN SELECT OK ENTER ENTER H P VOL H P VOL ENTER H P VOL H P VOL TO BE CONTINUED 3 Press Cursor or 5 to select COLOR SCHEME then press ENTER 4 Press Cursor or 5 to select a desired color then press ENTER To erase the Setup Me...

Страница 71: ...ecting screen appears 7 Press Cursor or 5 to select a desired setting then press ENTER You can select the movement amount speed of the zoomed up portion NORMAL Select this to move at normal speed to another portion of the picture ROUGH Select this to move faster to another portion of the picture Rough movement FINE Select this to move slower to another portion of the picture Fine movement To erase...

Страница 72: ...e discs When removing a disc from its case press down the center holder of the case and lift the disc out holding it by the edges Always hold the disc by the edges Do not touch its recording surface When storing a disc into its case gently insert the disc around the center holder with the printed surface facing up Make sure to store discs into the cases after use To keep discs clean A dirty disc m...

Страница 73: ...hkir 6669 Byelorussian 6671 Bulgarian 6672 Bihari 6673 Bislama 6678 Bengali Bangla 6679 Tibetan 6682 Breton 6765 Catalan 6779 Corsican 6783 Czech 6789 Welsh 6865 Danish 6869 German 6890 Bhutani 6976 Greek 6978 English 6979 Esperanto 6983 Spanish 6984 Estonian 6985 Basque 7065 Persian 7073 Finnish 7074 Fiji 7079 Faeroese 7082 French 7089 Frisian 7165 Irish 7168 Scots Gaelic 7176 Galician 7178 Guara...

Страница 74: ... fact allows DTS Digital Surround format to add breadth and depth to the reproduced sounds As a result DTS Digital Surround features natural solid and clear sound To reproduce these surround signals you need to connect an amplifier or a decoder compatible with DTS Digital Surround Linear PCM This is a digital recording format that is used for audio CDs MPEG Audio Audio coding format used for PAL S...

Страница 75: ...button q DISPLAY D TIME button Also functions as TIME button while pressed with SHIFT S button w MENU SETUP button Also functions as SETUP button while pressed with SHIFT S button e TITLE button r RETURN button t SLOW button y ZOOM button u REPEAT A B RPT button Also functions as A B RPT button while pressed with SHIFT S button i SEARCH MODE M button o CLEAR C button 1 2 3 D MENU TIME DISPLAY TITL...

Страница 76: ... the disc loaded 9 Remote signal reception lamp This lamp flashes when receiving the remote control signals p 3 play button and lamp The lamp lights up when the power is on q 7 stop button and lamp The lamp lights up when the power is on w 4 reverse search button and lamp The lamp lights up when the power is on e forward search button and lamp The lamp lights up when the power is on r Reset button...

Страница 77: ...ecting a decoder compatible with DTS Digital Surround Connect the video cord correctly Select a correct input on the TV or monitor Select 4 3 LETTERBOX LB See page 25 Some DVDs are programed to always display no subtitle initially If this happens press SUBTITLE after starting play Some DVDs are programed to always use the original language initially If this happens press AUDIO after starting play ...

Страница 78: ...4 4 V 11 V to 16 V allowance Grounding System Negative ground Allowable Operating Temperature 0 C to 40 C Dimensions W x H x D Unit Size 178 mm x 50 5 mm x 167 mm 7 1 16 x 2 x 6 5 8 Installation Size 182 mm x 52 mm x 150 mm 7 3 16 x 2 1 16 x 5 15 16 Panel Size 188 mm x 58 mm x 13 4 mm 7 7 16 x 2 5 16 x 9 16 Mass 1 4 kg 3 1 lbs excluding accessories Design and specifications subject to change witho...

Страница 79: ...rät zurück Siehe Seite Zurücksetzen des Geräts Vous avez des PROBLÈMES de fonctionnement Réinitialisez votre appareil Référez vous à la page intitulée Comment réinitialiser votre appareil Hebt u PROBLEMEN met de bediening Stel het apparaat terug Zie de pagina met de paragraaf Het apparaat terugstellen EN GE FR NL Printed in Japan 0201MNMMDWOZK COVER KV DV7 E 001 f 01 2 22 5 38 PM 2 ...

Страница 80: ...f the supplied wire to the center hole on KV DV7 s rear panel using a screw M5 x 6 mm supplied 2 Remove one screw from the side panel of KV M700 s controller unit and attach the other terminal small of the supplied wire using the removed screw DEUTSCH 1 Befestigen Sie das größere Ende des mitgelieferten Drahts an der mittleren Bohrung auf der Rückseite des KV DV7 Verwenden Sie hierzu die zum Liefe...

Страница 81: ...sc einlegen FRANÇAIS N INTRODUISEZ PAS de disque si le témoin de charge de disque clignote ou reste éteint Quand le témoin de charge de disque n est pas allumé appuyez sur 0 pour vérifier si un disque se trouve dans la fente d insertion de disque Si un disque se trouve dans la fente il est éjecté et vous pouvez le remplacer par un autre Si aucun disque ne se trouve dans la fente le témoin de charg...

Страница 82: ...erkeerd type voertuig wordt gebruikt kan dit tot brand of een ongeval lijden Ter voorkoming van kortsluiting raden we aan dat u de negatieve aansluiting van de accu losmaakt en daarna alle benodigde verbindingen tot stand brengt alvorens de eenheid te installeren Als u niet zeker weet hoe u de eenheid moet installeren kunt u dit beter door een erkend vakman laten doen Installeer de eenheid niet op...

Страница 83: ...abs to hold the sleeve firmly in place as illustrated 3 Fix the mounting bolt to the rear of the unit s body and place the rubber cushion over the end of the bolt 4 Do the required electrical connections 5 Slide the unit into the sleeve until it is locked by pressing the four corners of the trim plate En cas d installation de cet appareil sur le tableau de bord 1 Fixez la plaque d assemblage 2 Ins...

Страница 84: ...sproblemen hebt De krachtschakeling van dit apparaat heeft een ingebouwd geluidsfilter In sommige voertuigen zijn tikgeluiden of andere ongewenste geluiden te horen Als dit gebeurt moet u de massaklem aan de achterkant zie aansluitingsschema aan het chassis van de auto vastmaken met behulp van een kortere en dikkere kabel zoals kopermanteldraad of tellerkabel Als het geluid niet verdwijnt moet u c...

Страница 85: ...licence de DigitalTheater Systems Inc No de brevet aux Etats Unis 5 451 942 5 956 674 5 974 380 5 978 762 et brevets mondiaux émis ou en cours d homologation DTS est une marque de fabrique de Digital Theater Systems Inc Copyright 1996 2000 Digital Theater Systems Inc Tous droits réservés Toenjoytheoriginal5 1channelsoundsencoded with Dolby Digital or with DTS Digital Surround ZumGenießendesOrigina...

Отзывы: