


26
LAN card
Sending video using LAN card while recording on a DV cassette tape
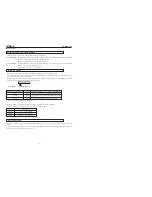
W
T
ST
AR
T/
STOP
POWER
OFF
ON
MODE
CAM-B
VTR
SHUTTER
GAIN
CAM-A
BAR
REC START/STOP button
REC START/STOP button
POWER
switch
MODE
switch
Handle
Set to TRIG
1.
Insert a LAN card into the Network Pack.
2.
Turn on the GY-DV300 power.
Check to see that the LAN card display is showing on the LCD screen/viewfinder
screen.
3.
Set the MODE switch to “CAM-A” or “CAM-B”.
4.
Insert a recordable DV cassette tape.
●
GY-DV300 will be in the standby mode.
5.
Set the NETWORK PACK CONFIG menu screen.
q
Set MPEG REC to “TRIG”.
w
Set the video/audio compress in the ENCODE SET menu screen. (
☞
page 6)
e
When completed, press the MENU button to return to the normal screen.
6.
When pressing the REC START/STOP button of GY-DV300 while Streamproducer
is in operation*, transmission of video/audio streaming data from the LAN card is
started simultaneously with recording to DV cassette tape.
●
The LAN card display on the LCD screen/viewfinder screen will be as follows:
e
: Yellow display during data transmission.
Displayed in red when the media operating Streamproducer* at the des-
tination of transmission starts recording.
* Perform setting described in “5-2 Operating video from DV camcorder • Trigger
mode function” of network distribution software “Streamproducer” User’s Guide.
7.
To stop transmission or recording, press the REC START/STOP button.
●
GY-DV300 will be in the standby mode.
8.
To resume transmission or recording, press the REC START/STOP button once
more.
9.
To end, press the REC START/STOP button to stop transmission and recording
and turn off the power.
Lastly, remove the LAN card.
Memo
●
Streaming data will be sent from the LAN card even when a DV cassette tape is
not inserted.
●
When the DV cassette tape reaches the end during recording, the transmission
of streaming data from the LAN card is also stopped.
LCD screen
LAN card display
e
No LAN card is inserted when the
display
appears. Turn off the power and insert a LAN
card. Then, turn the power back on.
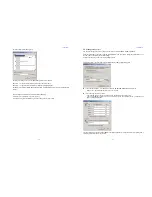
NETWORK PACK CONFIG
menu screen
NE T WOR K
T . .
. .
. .
S E
OR
T W
E
N
K
A CK
P
ON
C
I G
F
E N CO DE S E T
MPE G R EC
T R G
I
MOV I E CL I P S E T
MENU R E S E T
PAGE B ACK
ENCODE SET menu screen
27
NE T WOR K
T . .
. .
. .
S E
OR
T W
E
N
K
A CK
P
ON
C
I G
F
E N CO DE S E T
MPE G R EC
S P I T
L
MOV I E CL I P S E T
MENU R E S E T
PAGE B ACK
Set to SPLIT
LCD screen
LAN card display
e
No LAN card is inserted when the
display
appears. Turn off the power and insert a LAN
card. Then, turn the power back on.
NETWORK PACK CONFIG
menu screen
ENCODE SET menu screen
POWER
OFF
ON
MODE
CAM-B
VTR
SHUTTER
MENU
GAIN
CAM-A
BAR
AW
FWD
REV
LAN card
Sending video using a LAN card (no DV cassette tape recording)
SELECT
dial
1.
Insert a LAN card into the Network Pack.
2.
Turn on the GY-DV300 power.
Check to see that the LAN card display is showing on the LCD screen/viewfinder
screen.
3.
Set the MODE switch to “CAM-A”.
4.
Set the NETWORK PACK CONFIG menu screen.
q
Set MPEG REC to “SPLIT”.
w
Set the video/audio compress in the ENCODE SET menu screen. (
☞
page 6)
e
When completed, press the MENU button to return to the normal screen.
5.
When turning the SELECT dial of GY-DV300 while Streamproducer is in opera-
tion*, transmission of video/audio streaming data from the LAN card is started.
●
The LAN card display on the LCD screen/viewfinder screen will be as follows:
e
: Yellow display during data transmission.
Displayed in red when the media operating Streamproducer* at the des-
tination of transmission starts recording.
* Perform setting described in “5-2 Operating video from DV camcorder • Trigger
mode function” of network distribution software “Streamproducer” User’s Guide.
6.
To stop transmission, press the SELECT dial.
7.
To resume transmission, press the SELECT dial once more.
8.
To end, press the SELECT dial to stop transmission and turn off the power.
Lastly, remove the LAN card.
Memo
●
When using the SELECT dial for GAIN or SHUTTER operation, no operation on
the SELECT dial will be accepted for about 3 seconds after the operation is com-
pleted.
●
Recording will not be made on the DV cassette tape even if a tape is inserted.
POWER switch
MODE switch
MENU
button
<GY-DV300 rear panel>