background image

5

HV-29VH73/29VH74/29WH24 / GGT0059-001A-H / English

Setting up your TV

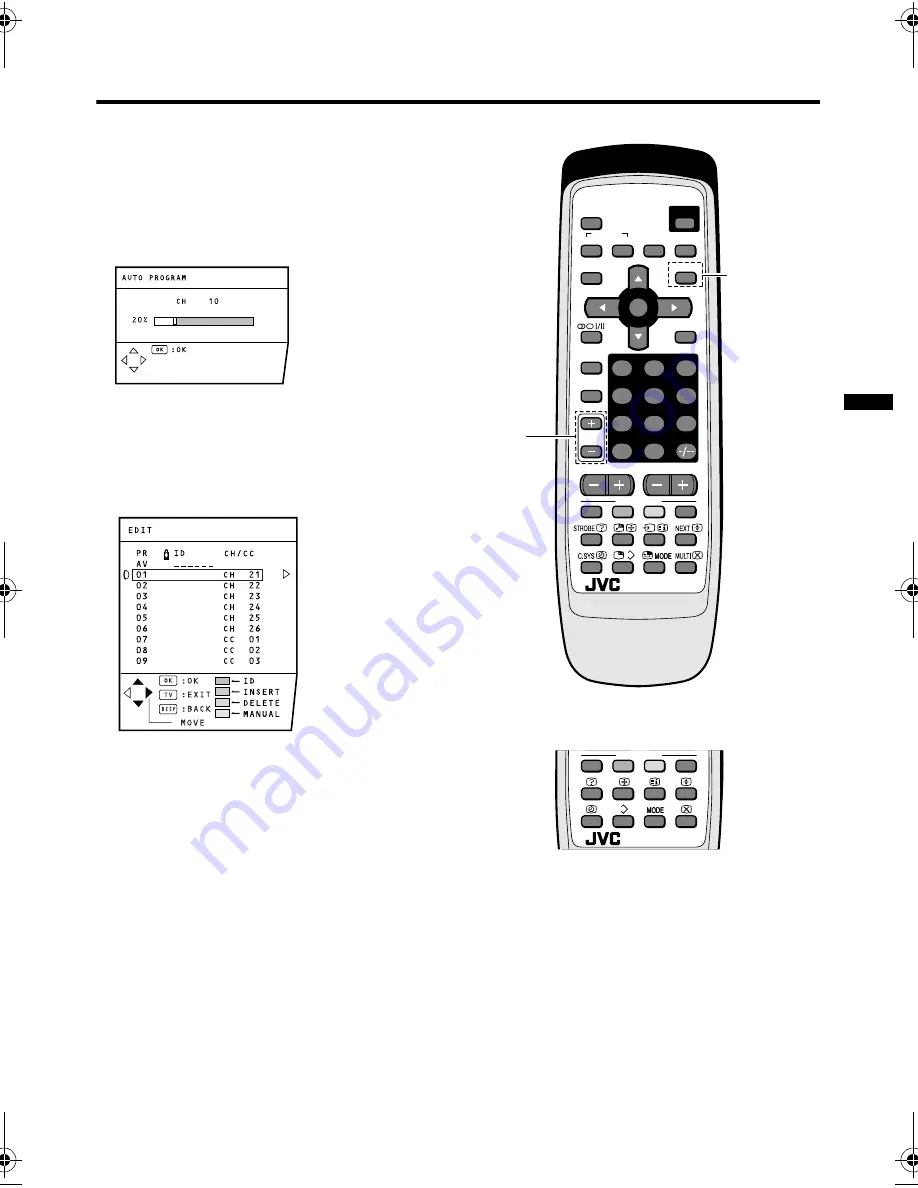
3 Press the 

6

 buttons to choose 

ENGLISH. Then press the MENU/ OK 

button.

The AUTO PROGRAM function starts. 

The TV channels you receive are 
automatically stored in the PR 

(programme numbers) LIST.

• To stop the AUTO PROGRAM 

function, press the MENU/OK button.

4 After the TV channels have been 

stored in the programme numbers 

(PR) list, the EDIT menu appears.

• You can proceed to edit the 

programme numbers list using the 
EDIT/MANUAL function. For details, 
see “EDIT/MANUAL” on page 30.

• If a TV channel you want to view is not 

stored in the programme numbers list, 
you can register it using the MANUAL 
function. For details, see “EDIT/
MANUAL” on page 30.

• The AUTO PROGRAM function does 

not store a TV channel to the 
programme number 0 (AV).

• If you do not need to use the EDIT/ 

MANUAL function, press the MENU/
OK button to close the EDIT menu.

Now, setting up is complete. Please 

enjoy your new JVC TV!

7

4

1

MENU

0

8

5

2

9

6

3

MUTING

COLOUR

SYSTEM

SOUND

CINEMA

SURROUND

DISPLAY

ZOOM

TV/TEXT

TV/VIDEO

PICTURE

MODE

CHANNEL

VOLUME

RM-C1350

TV

FAVORITE CH

POWER

OK

PIP

SUB-P

RM-C1351

TV

FAVORITE CH

Except
HV-29WH24

HV-29WH24

Except
HV-29WH24

HV-29VH73 / HV-29VH74

GGT0059.book.fm  Page 5  Friday, August 6, 2004  8:51 AM

Содержание HV-29JH24

Страница 1: ...on of the functions Setting up your TV TV buttons and functions Remote control buttons and functions Using the TV s menu Basic operation PICTURE SETTING menu PICTURE FEATURES menu SOUND SETTING menu FEATURES menu INSTALL menu Additional preparation Troubleshooting Specification 2 3 6 8 19 19 20 21 25 26 29 35 37 40 ...

Страница 2: ...ry careful with it when handling the TV Should the TV screen become soiled wipe it with a soft dry cloth Never use rub it forcefully Never use any cleaner or detergent on it 7 If you are not going to use this TV for a long period of time be sure to disconnect the AC plug from the AC socket 8 The apparatus shall not be exposed to dripping or splashing and that no objects filled with liquids such as...

Страница 3: ... TV s VIDEO jack with a video cable To connect a VCR to the TV with an S VIDEO cable Connect the VCR s S VIDEO OUT S VIDEO output connector and TV s S connector with an S VIDEO cable A instead of connecting with a video cable 3 Connect the VCR s AUDIO OUT audio L R output jacks and the TV s AUDIO jacks L MONO and R with an audio cable If the VCR s audio output is in mono connect the VCR s AUDIO OU...

Страница 4: ... JVC logo is displayed 1 Press the main power button on the TV The TV is turned on and the JVC logo appears If the POWER lamp on the TV lights red and does not change to green your TV is in the standby mode Press the POWER button on the remote control to turn the TV on If the JVC logo does not appear your TV has already been turned before In this case use the LANGUAGE and AUTO PROGRAM functions to...

Страница 5: ...ed in the programme numbers list you can register it using the MANUAL function For details see EDIT MANUAL on page 30 The AUTO PROGRAM function does not store a TV channel to the programme number 0 AV If you do not need to use the EDIT MANUAL function press the MENU OK button to close the EDIT menu Now setting up is complete Please enjoy your new JVC TV 7 RETURN 4 1 MENU 0 8 5 2 9 6 3 MUTING COLOU...

Страница 6: ...NNEL buttons 5 Adjust the volume Press the VOLUME buttons 4 The volume level indicator appears MENU button 6 Press to open the menu For details see Operation with the buttons on the TV on page 20 Remote control sensor 7 Behind the cover VIDEO 4 terminal 8 See page 35 Headphone jack 9 Connect the headphones with a stereo mini jack 3 5mm in diameter S IN VIDEO 4 V R MENU OK L MONO OVER CHANEL VOLUME...

Страница 7: ...es 28 and 35 OUTPUT terminal See page 35 Aerial socket Connect the aerial cable See page 3 S VIDEO VIDEO 1 VIDEO 2 VIDEO 3 COMPONENT OUTPUT Y VIDEO VIDEO L MONO AUDIO OVER R L MONO AUDIO R L AUDIO R 0 S VIDEO VIDEO 1 VIDEO 2 VIDEO 3 COMPONENT OUTPUT Y VIDEO CB CR VIDEO L MONO AUDIO OVER R L MONO AUDIO R L AUDIO R P C R R P C B B ...

Страница 8: ...m the PR LIST For details see DISPLAY button on page 11 If you do not have a clear picture or no colour appears follow the operation procedure COLOUR SYSTEM button on page 11 Adjust the volume Press the VOLUME buttons Watch images from an external device Choose a VIDEO terminal to which the external device has been connected Press the TV VIDEO button You can choose a VIDEO terminal with the CHANNE...

Страница 9: ... button You can enjoy an enhanced sound for a wider audience by using CINEMA SURROUND function Press the CINEMA SURROUND button to select one of CINEMA SURROUND modes HIGH LOW When you listen to the stereo sound please select HIGH or LOW mode You can enjoy the sound for a wider audience similar to the experience at the theatre In case that you setting up the CINEMA SURROUND function to HIGH mode t...

Страница 10: ...ther than the Return Channel And then press the RETURN button to change the channel to the Return Channel In this way you can view two channels alternately by pressing the RETURN button RETURN function The TV temporarily memorises the TV channel that was chosen right before the current TV channel as the Last Channel By pressing the RETUTN button you can alternately view the current TV channel and ...

Страница 11: ...ear or no colour appears choose the colour system manually Press the COLOUR SYSTEM button to choose the appropriate colour system AUTO This function detects a colour system from the input signal The AUTO mode may not function properly if you have poor signal quality If the picture is abnormal in the AUTO mode choose another colour system manually The AUTO mode detects a colour system from the inpu...

Страница 12: ...ion the registration made here will not be changed For AUTO PROGRAM see page 29 Recalling the favorite channel Press the colour button then the registered favorite channel will be displayed You cannot recall the favorite channel in the Text mode Menu mode where an on screen menu is displayed or while multiple screens are displayed Area Country or Region System Asia Middle East Bahrain Kuwait Oman ...

Страница 13: ...on icon at the right of the channel number Viewing a teletext programme Except HV 29JH54 HV 29VH14 HV 29VH54 1 Choose a TV channel with a teletext broadcast 2 Press the TV TEXT button Pressing the TV TEXT button changes the mode as follows 3 Choose a teletext page by pressing the CHANNEL buttons number buttons or colour buttons To return to the TV mode Press the TV TEXT button or TV VIDEO button I...

Страница 14: ...xt page while watching TV 1 Press the number button to enter a page number or press the colour button The TV searches for a teletext page 2 Press the Cancel button The TV programme appears When the TV finds the teletext page its page number appears in the upper left of the screen 3 Press the Cancel button to return to a teletext page when the page number is on the screen You cannot return to the T...

Страница 15: ...29JH24 HV 29VH14 You can display two different pictures the main picture and sub picture at a time In Twin mode both pictures are equal in size In PIP mode the small sub picture appears at a corner of the screen You can swap the main picture and sub picture instantly Note that the main and sub pictures use different input sources each other For example if the main picture s source is TV the sub pi...

Страница 16: ...DEO 1 VIDEO 2 VIDEO 3 VIDEO 4 TV For the sub picture Press the Input button Each time you press the button the input source changes as follow the one used for the main picture will be skipped VIDEO 1 VIDEO 2 VIDEO 3 VIDEO 4 TV Swapping the pictures Press the Swap button Each time you press the button the main picture and the sub picture will be swapped Changing the sub picture position in PIP mode...

Страница 17: ... in the Multi display mode If you press the MULTI button when receiving the Progressive video signal 525P or 625P signal 525P or 625P appears on the screen and the MULTI function does not operate Returning to the normal screen Press the MULTI button or MENU OK button or choose a TV channel with the number buttons The moving picture with the blue frame will be displayed in the normal screen Pressin...

Страница 18: ...525P or 625P appears on the screen and the FREEZE function does not operate Strobe function Except HV 29JH24 HV 29VH14 You can display eight consecutive still pictures and one moving picture at a time They are the pictures of the same source Press the STROBE button Eight consecutive still pictures which are captured at intervals of about 0 2 second are displayed in the order of 1 to 9 These number...

Страница 19: ...ndicates buttons on the remote control you can use when you operate a chosen function 2 Press the 6 buttons or 5 to choose a menu title and press the MENU OK button The menu appears To return to the previous menu Press the DISPLAY button To exit a menu instantly Press the TV VIDEO button 3 Press the 6 buttons to choose a function For details of the functions in the menus see the following pages 7 ...

Страница 20: ...ation PICTURE SETTING menu PICTURE MODE You can choose one of three PICTURE MODEs to adjust the picture settings automatically BRIGHT Heightens contrast and sharpness STANDARD Standardizes picture adjustment SOFT Softens contrast and sharpness You can also operate the PICTURE MODE function with the PICTURE MODE button on the remote control For details see PICTURE MODE button on page 9 Adjusting th...

Страница 21: ...radish white Using this mode when watching films allows you to enjoy colours that are characteristic of films You cannot select the WHITE BALANCE function in the 16 9 mode of the ZOOM function PICTURE FEATURES menu DIGITAL VNR The DIGITAL VNR function cuts down the amount of noise in the original picture AUTO The TV will be automatically adjust the level of the DIGITAL VNR effect to match the amou...

Страница 22: ...f the DigiPure effect is set to the maximum If you set the DigiPure function to AUTO but feel that the original picture quality has not been reproduced fully change the setting from AUTO to MAX The MAX setting is not suitable for low quality pictures which contain a lot of noise OFF The DigiPure function is turned off MIN The level of the DigiPure effect is set to the minimum When you set the Digi...

Страница 23: ... ZOOM You can change the screen size according to the picture aspect ratio Choose the optimum one from three ZOOM modes 1 Choose ZOOM then press the MENU OK button 2 Press the 6 buttons to choose a ZOOM mode Then press the MENU OK button You can choose a ZOOM mode from REGULAR ZOOM or 16 9 modes For details see ZOOM button on page 9 PICTURE TILT There are cases where the Earth s magnetic force may...

Страница 24: ...he 5 button to choose one of options As explained in the table if PICTURE EFFECT is set to OFF the dedicated picture effect for the favorite channel is not used In this case normal picture effect is used For details of each item see PICTURE MODE on page 20 DIGITAL VNR on page 21 WHITE BALANCE on page 21 DigiPure on page 22 When shipped 4 Press the MENU OK button to complete the setting VIDEO SETTI...

Страница 25: ...ereo broadcasting is received poorly you can change from stereo to mono sound so that you can hear the broadcast more clearly and easily s Stereo sound v mono sound t Bilingual I sub I u Bilingual II sub II MONO Cancels the Multi Sound function and the sound becomes monaural The sound mode you can choose differs depending on the TV programme This function does not work in the VIDEO modes You can a...

Страница 26: ... HIGH LOW MONO and OFF modes For details see CINEMA SURROUND button on page 9 You can also operate the CINEMA SURROUND function with the CINEMA SURROUND button For details see CINEMA SURROUND button on page 9 FEATURES menu SLEEP TIMER You can set the TV to automatically turn off after a set time 1 Choose SLEEP TIMER then press the MENU OK button 2 Press the 5 buttons to set the period of time The ...

Страница 27: ...t channel the screen will change to blue and display n so the channel cannot be viewed To set this function 1 Choose CHANNEL GUARD then press the number 0 AV button 2 Set the ID number you want To choose a number Press the 6 buttons To move a cursor Press the 5 buttons 3 Press the MENU OK button 4 Press the 6 buttons to choose a TV channel The TV shows the TV programme which the chosen TV channel ...

Страница 28: ...l composite video signal is input COMPONENT If a Component video signal Y CB CR signals is input For detailed connecting methods see Additional preparation on page 35 This Television is compatible with the Progressive video signal 525P signal and 625P signal only when the component video signal is input PIP Except HV 29JH24 HV 29VH14 You can enter the Twin or PIP mode from the menu without using t...

Страница 29: ...e AUTO PROGRAM function starts The TV channels you receive are automatically stored in the programme numbers list To stop the AUTO PROGRAM function press the MENU OK button 2 After the TV channels have been stored in the programme number list the EDIT menu appears You can proceed to edit the programme numbers list using the EDIT MANUAL function For details see EDIT MANUAL on page 30 If a TV channe...

Страница 30: ... the MENU OK button 2 Follow the operation description of a function you want to use and operate the function MOVE This function changes a programme number of a TV channel ID This function registers a Channel name ID to a TV channel INSERT This function adds a new TV channel in the current programme numbers list by using the CH CC number DELETE This function deletes an unnecessary TV Channel MANUA...

Страница 31: ...C number the SYSTEM sound system of the TV channel appears To cancel the MANUAL function Press the DISPLAY button 3 Press the 3 button to choose the system sound system for a TV channel you want to register For the sound systems in each country or region see the table BROADCASTING SYSTEMS on page 12 4 Press the green or red button to search for a TV channel Scanning stops when the TV finds a TV ch...

Страница 32: ...button to start the INSERT function 3 Press the 6 buttons to choose CC or CH according to the CH CC number of the TV channel To cancel the INSERT function Press the DISPLAY button 4 Press the Number buttons to enter the remaining CH CC number The TV shifts to registration mode When the registration is completed the picture of the TV channel appears on the screen The CH CC number is a number indica...

Страница 33: ...16 CC 53 W 17 CC 54 W 18 CC 55 W 19 CC 56 W 20 CC 57 W 21 CC 58 W 22 CC 59 W 23 CC 60 W 24 CC 61 W 25 CC 62 W 26 CC 63 W 27 CC 64 W 28 CC 75 X CC 76 Y R3 CC 77 Z R4 AU 3 CC 78 Z 1 R5 CC 79 Z 2 AU 4 CC 95 A 5 CC 96 A 4 CC 97 A 3 CC 98 A 2 CC 99 A 1 CH US CCIR OIRT AUSTRALIA CH 02 US 2 E2 R1 AU 0 CH 03 US 3 E3 AU 1 CH 04 US 4 E4 R2 AU 2 CH 05 US 5 E5 R6 AU 6 CH 06 US 6 E6 R7 AU 7 CH 07 US 7 E7 R8 AU...

Страница 34: ...e teletext language group that you select the sub titles of the teletext program will not be displayed properly Group Languages GROUP 1 Turkish Hungarian English German French Italian Spanish Portuguese Greek Swedish Finnish GROUP 2 Polish Serbian Croatian Slovenian Czech Slovak Rumanian Hungarian Ger man French Italian Swedish Finnish GROUP 3 Russian Bulgarian Lettish Lithuanian Estonian Ukrain a...

Страница 35: ...he best VIDEO terminal Note that connecting cables are not supplied 1 VCR composite signal 2 VCR S VIDEO signal Y C 3 VCR for recording composite signal 4 DVD player composite signal 5 DVD player S VIDEO signal Y C 6 DVD player component video signals Y PB CB PR CR 7 TV game composite signal 8 TV game S VIDEO signal Y C 9 Camcorder composite signal 0 Camcorder S VIDEO signal Y C Headphones V R L M...

Страница 36: ...f connecting a device to the VIDEO 3 COMPONENT terminal with a video cable Connect the TV s Y VIDEO jack and the device s VIDEO OUT video output jack with a video cable Then set the VIDEO 3 SETTING to VIDEO according to VIDEO 3 SETTING on page 28 In the VIDEO 4 terminal the VIDEO jack is indicated by V 2 Connect the TV s AUDIO jacks L MONO and R and the device s AUDIO OUT audio L R output jacks wi...

Страница 37: ...iption BLUE BACK on page 27 to try to change the BLUE BACK function setting to OFF Are your SOUND SYSTEM settings for the TV channels correct Follow the description SOUND SYSTEM button on page 11 to try to solve the trouble Poor picture If noise totally obscures the picture snow the aerial or aerial cable may have trouble Check the following to try to solve the trouble Has the TV and aerial been c...

Страница 38: ...ters apart from the TV location Operate the remote control in the front of your TV or a location less than seven meters from your TV to try to solve the problem When you are viewing a teletext programme you cannot operate the menus Press the TV VIDEO button to return the teletext programme to the ordinary TV programme to try operating the menus Is the CHILD LOCK function set to ON If the CHILD LOC...

Страница 39: ... be displayed The TV may emit a crackling sound due to a sudden change in temperature It does not matter if a picture or sound does not show any abnormality If you hear crackling sounds frequently while you are viewing the TV other causes may be assumed For precautionary purposes request your service technician to inspect it Touching the screen may cause you feel a slight electric shock due to its...

Страница 40: ...y teletext Please see the table in the description TELETEXT LANGUAGE on page 34 Except HV 29JH54 HV 29VH54 HV 29VH14 Power requirements AC 110 to 240V 50 60Hz Audio output Rated Power output 10W 10W VIDEO 1 terminal RCA connector 3 S VIDEO connector 1 Video input S VIDEO Y C input and Audio L R inputs are available VIDEO 2 terminal RCA connector 3 Video input and Audio L R inputs are available VID...

Страница 41: ...Setting up your TV TV buttons and functions Remote control buttons and functions Using the TV s menu Basic operation PICTURE SETTING menu PICTURE FEATURES menu SOUND SETTING menu FEATURES menu INSTALL menu Additional preparation Troubleshooting Specification 2 3 6 8 14 14 15 16 20 21 23 28 30 32 ...

Страница 42: ...ry careful with it when handling the TV Should the TV screen become soiled wipe it with a soft dry cloth Never use rub it forcefully Never use any cleaner or detergent on it 7 If you are not going to use this TV for a long period of time be sure to disconnect the AC plug from the AC socket 8 The apparatus shall not be exposed to dripping or splashing and that no objects filled with liquids such as...

Страница 43: ...TV s VIDEO jack with a video cable To connect a VCR to the TV with an S VIDEO cable Connect the VCR s S VIDEO OUT S VIDEO output connector and TV s S connector with an S VIDEO cable A instead of connecting with a video cable 3 Connect the VCR s AUDIO OUT audio L R output jacks and the TV s AUDIO jacks L MONO and R with an audio cable If the VCR s audio output is in mono connect the VCR s AUDIO OUT...

Страница 44: ...it enters the initial setting mode and the JVC logo is displayed 1 Press the main power button on the TV The TV is turned on and the JVC logo appears If the POWER lamp on the TV lights red and does not change to green your TV is in the standby mode Press the POWER button on the remote control to turn the TV on If the JVC logo does not appear your TV has already been turned before In this case use ...

Страница 45: ... using the EDIT MANUAL function For details see EDIT MANUAL on page 24 If a TV channel you want to view is not stored in the programme numbers list you can register it using the MANUAL function For details see EDIT MANUAL on page 24 The AUTO PROGRAM function does not store a TV channel to the programme number 0 AV If you do not need to use the EDIT MANUAL function press the MENU OK button to close...

Страница 46: ...e CHANNEL buttons 5 Choose a VIDEO terminal Press the TV VIDEO button 3 or CHANNEL buttons 5 Adjust the volume Press the VOLUME buttons 4 The volume level indicator appears MENU button 6 Press to open the menu For details see Operation with the buttons on the TV on page 15 Remote control sensor 7 Behind the cover VIDEO 4 terminal 8 See page 28 Headphone jack 9 Connect the headphones with a stereo ...

Страница 47: ...es 22 and 28 OUTPUT terminal See page 28 Aerial socket Connect the aerial cable See page 3 S VIDEO VIDEO 1 VIDEO 2 VIDEO 3 COMPONENT OUTPUT Y VIDEO VIDEO L MONO AUDIO OVER R L MONO AUDIO R L AUDIO R 0 S VIDEO VIDEO 1 VIDEO 2 VIDEO 3 COMPONENT OUTPUT Y VIDEO CB CR VIDEO L MONO AUDIO OVER R L MONO AUDIO R L AUDIO R P C R R P C B B ...

Страница 48: ... two digit channel into the TV press the button to change to the two digit entry system You can select a channel from the PR LIST For details see DISPLAY button on page 11 If you do not have a clear picture or no colour appears follow the operation procedure COLOUR SYSTEM button on page 11 Adjust the volume Press the VOLUME buttons Watch images from an external device Choose a VIDEO terminal to wh...

Страница 49: ... button You can enjoy an enhanced sound for a wider audience by using CINEMA SURROUND function Press the CINEMA SURROUND button to select one of CINEMA SURROUND modes HIGH LOW When you listen to the stereo sound please select HIGH or LOW mode You can enjoy the sound for a wider audience similar to the experience at the theatre In case that you setting up the CINEMA SURROUND function to HIGH mode t...

Страница 50: ...ther than the Return Channel And then press the RETURN button to change the channel to the Return Channel In this way you can view two channels alternately by pressing the RETURN button RETURN function The TV temporarily memorises the TV channel that was chosen right before the current TV channel as the Last Channel By pressing the RETUTN button you can alternately view the current TV channel and ...

Страница 51: ...ear or no colour appears choose the colour system manually Press the COLOUR SYSTEM button to choose the appropriate colour system AUTO This function detects a colour system from the input signal The AUTO mode may not function properly if you have poor signal quality If the picture is abnormal in the AUTO mode choose another colour system manually The AUTO mode detects a colour system from the inpu...

Страница 52: ...g the favorite channel Press the colour button then the registered favorite channel will be displayed You cannot recall the favorite channel in the Menu mode where an on screen menu is displayed The picture effect dedicated for the colour button applies For details see Setting the picture effect on page 13 Area Country or Region System Asia Middle East Bahrain Kuwait Oman Qatar United Arab Emirate...

Страница 53: ...fect is used When shipped the factory set picture effect is used for this purpose However you can set this picture effect as required For details see FAVORITE CH SETTING on page 18 Showing the favorite channels Press the DISPLAY button to display the PR LIST You can see the favorite channel that has the registered colour button icon at the right of the channel number ZDF BBC1 ...

Страница 54: ...an use when you operate a chosen function 2 Press the 6 buttons or 5 to choose a menu title and press the MENU OK button The menu appears To return to the previous menu Press the DISPLAY button To exit a menu instantly Press the TV VIDEO button 3 Press the 6 buttons to choose a function For details of the functions in the menus see the following pages 7 RETURN 4 1 MENU 0 8 5 2 9 6 3 MUTING COLOUR ...

Страница 55: ...utton on the front panel of the TV which will be used for menu operation PICTURE SETTING menu PICTURE MODE You can choose one of three PICTURE MODEs to adjust the picture settings automatically BRIGHT Heightens contrast and sharpness STANDARD Standardizes picture adjustment SOFT Softens contrast and sharpness You can also operate the PICTURE MODE function with the PICTURE MODE button on the remote...

Страница 56: ...radish white Using this mode when watching films allows you to enjoy colours that are characteristic of films You cannot select the WHITE BALANCE function in the 16 9 mode of the ZOOM function PICTURE FEATURES menu DIGITAL VNR The DIGITAL VNR function cuts down the amount of noise in the original picture AUTO The TV will be automatically adjust the level of the DIGITAL VNR effect to match the amou...

Страница 57: ...reproduced fully change the setting from AUTO to MAX The MAX setting is not suitable for low quality pictures which contain a lot of noise OFF The DigiPure function is turned off MIN The level of the DigiPure effect is set to the minimum When you set the DigiPure function to AUTO and notice some noise change the setting from AUTO to MIN The MIN setting is not suitable for high quality pictures whi...

Страница 58: ...SETTING You can set a dedicated picture effect for the favorite channels registered to the colour buttons Red Green Yellow and Blue For favorite channel registration see Favorite channel registration on page 12 1 Choose FAVORITE CH SETTING then press the MENU OK button 2 Press the 6 button to choose FAVORITE CHANNEL then press the 5 button to choose the registered favorite channel Each time you pr...

Страница 59: ...CTURE EFFECT for the video inputs is set to OFF when shipped To use it you need to set it ON When shipped For details of each item see PICTURE MODE on page 15 DIGITAL VNR on page 16 WHITE BALANCE on page 16 DigiPure on page 17 Pressing the number button 0 will return the picture effect to the factory set value 4 Press the MENU OK button to complete the setting Item Options PICTURE MODE BRIGHT STAN...

Страница 60: ...the sound 2 weaker 3 stronger TREBLE You can adjust the high tone of the sound 2 weaker 3 stronger BALANCE You can adjust the volume balance between the left and right speakers 2 turn the left speaker s volume level up 3 turn the right speaker s volume level up AI VOLUME You can prevent the sudden increase or decrease of sound that occurs when changing the channel to another channel or switching t...

Страница 61: ...TV to automatically change to a blue screen and mute the sound if the signal is weak or absent or when there is no input from an external device ON This function is turned on OFF This function is turned off CHILD LOCK You can disable the front control buttons of the TV When this function is set to ON the TV can be operated only by using the remote control Use this function to prevent children from...

Страница 62: ... have forgotten the ID number Perform step 1 of To set this function on page 21 After confirming the ID number press the TV VIDEO button to exit the menu When you would like to cancel the CHANNEL GUARD function you must perform the operation To set this function again AUTO SHUTOFF You can set your TV to turn off if no signal is received for about 15 minutes or longer after the end of a broadcast O...

Страница 63: ...e AUTO PROGRAM function starts The TV channels you receive are automatically stored in the programme numbers list To stop the AUTO PROGRAM function press the MENU OK button 2 After the TV channels have been stored in the programme number list the EDIT menu appears You can proceed to edit the programme numbers list using the EDIT MANUAL function For details see EDIT MANUAL on page 24 If a TV channe...

Страница 64: ... the MENU OK button 2 Follow the operation description of a function you want to use and operate the function MOVE This function changes a programme number of a TV channel ID This function registers a Channel name ID to a TV channel INSERT This function adds a new TV channel in the current programme numbers list by using the CH CC number DELETE This function deletes an unnecessary TV Channel MANUA...

Страница 65: ...C number the SYSTEM sound system of the TV channel appears To cancel the MANUAL function Press the DISPLAY button 3 Press the 3 button to choose the system sound system for a TV channel you want to register For the sound systems in each country or region see the table BROADCASTING SYSTEMS on page 12 4 Press the green or red button to search for a TV channel Scanning stops when the TV finds a TV ch...

Страница 66: ...button to start the INSERT function 3 Press the 6 buttons to choose CC or CH according to the CH CC number of the TV channel To cancel the INSERT function Press the DISPLAY button 4 Press the Number buttons to enter the remaining CH CC number The TV shifts to registration mode When the registration is completed the picture of the TV channel appears on the screen The CH CC number is a number indica...

Страница 67: ...16 CC 53 W 17 CC 54 W 18 CC 55 W 19 CC 56 W 20 CC 57 W 21 CC 58 W 22 CC 59 W 23 CC 60 W 24 CC 61 W 25 CC 62 W 26 CC 63 W 27 CC 64 W 28 CC 75 X CC 76 Y R3 CC 77 Z R4 AU 3 CC 78 Z 1 R5 CC 79 Z 2 AU 4 CC 95 A 5 CC 96 A 4 CC 97 A 3 CC 98 A 2 CC 99 A 1 CH US CCIR OIRT AUSTRALIA CH 02 US 2 E2 R1 AU 0 CH 03 US 3 E3 AU 1 CH 04 US 4 E4 R2 AU 2 CH 05 US 5 E5 R6 AU 6 CH 06 US 6 E6 R7 AU 7 CH 07 US 7 E7 R8 AU...

Страница 68: ...agram see the Specifications to choose the best VIDEO terminal Note that connecting cables are not supplied 1 VCR composite signal 2 VCR S VIDEO signal Y C 3 VCR for recording composite signal 4 DVD player composite signal 5 DVD player S VIDEO signal Y C 6 DVD player component video signals Y PB CB PR CR 7 TV game composite signal 8 TV game S VIDEO signal Y C 9 Camcorder composite signal 0 Camcord...

Страница 69: ...f connecting a device to the VIDEO 3 COMPONENT terminal with a video cable Connect the TV s Y VIDEO jack and the device s VIDEO OUT video output jack with a video cable Then set the VIDEO 3 SETTING to VIDEO according to VIDEO 3 SETTING on page 22 In the VIDEO 4 terminal the VIDEO jack is indicated by V 2 Connect the TV s AUDIO jacks L MONO and R and the device s AUDIO OUT audio L R output jacks wi...

Страница 70: ...V channels correct Follow the description SOUND SYSTEM button on page 11 to try to solve the trouble Poor picture If noise totally obscures the picture snow the aerial or aerial cable may have trouble Check the following to try to solve the trouble Has the TV and aerial been connected properly Has the aerial cable been damaged Is the aerial pointed to the right direction Is the aerial itself fault...

Страница 71: ...n becomes disabled suddenly press the Main power button on the TV and turn off the main power Try to press the Main power button again to turn on the main power If the TV returns to a normal state it is not a failure The following functions do not operate when receiving Progressive video signal 525P and 625P signals MENU function TINT and PULL DOWN Other concerns When the AUTO SHUTOFF function ope...

Страница 72: ...HF channel U 471 25 to 863 25 MHz Receives cable channels in mid band X to Z 2 S1 to S10 super band S11 to S20 and hyper band S21 to S41 Sound multiplex systems A2 B G NICAM B G I D K system Power requirements AC 110 to 240V 50 60Hz Audio output Rated Power output 10W 10W VIDEO 1 terminal RCA connector 3 S VIDEO connector 1 Video input S VIDEO Y C input and Audio L R inputs are available VIDEO 2 t...

Страница 73: ...functions Setting up your TV TV buttons and functions Remote control buttons and functions Using the TV s menu Basic operation PICTURE SETTING menu PICTURE FEATURES menu SOUND SETTING menu FEATURES menu INSTALL menu Additional preparation Troubleshooting Specification 2 3 6 8 19 19 20 21 25 26 29 35 37 40 ...

Страница 74: ...ry careful with it when handling the TV Should the TV screen become soiled wipe it with a soft dry cloth Never use rub it forcefully Never use any cleaner or detergent on it 7 If you are not going to use this TV for a long period of time be sure to disconnect the AC plug from the AC socket 8 The apparatus shall not be exposed to dripping or splashing and that no objects filled with liquids such as...

Страница 75: ...TV s VIDEO jack with a video cable To connect a VCR to the TV with an S VIDEO cable Connect the VCR s S VIDEO OUT S VIDEO output connector and TV s S connector with an S VIDEO cable A instead of connecting with a video cable 3 Connect the VCR s AUDIO OUT audio L R output jacks and the TV s AUDIO jacks L MONO and R with an audio cable If the VCR s audio output is in mono connect the VCR s AUDIO OUT...

Страница 76: ... on it enters the initial setting mode and the JVC logo is displayed 1 Press the main power button on the TV The TV is turned on and the JVC logo appears If the POWER lamp on the TV lights red and does not change to green your TV is in the standby mode Press the POWER button on the remote control to turn the TV on If the JVC logo does not appear your TV has already been turned before In this case ...

Страница 77: ... on page 30 If a TV channel you want to view is not stored in the programme numbers list you can register it using the MANUAL function For details see EDIT MANUAL on page 30 The AUTO PROGRAM function does not store a TV channel to the programme number 0 AV If you do not need to use the EDIT MANUAL function press the MENU OK button to close the EDIT menu Now setting up is complete Please enjoy your...

Страница 78: ...s the CHANNEL buttons 5 Choose a VIDEO terminal Press the TV VIDEO button 3 or CHANNEL buttons 5 Adjust the volume Press the VOLUME buttons 4 The volume level indicator appears MENU button 6 Press to open the menu For details see Operation with the buttons on the TV on page 20 Remote control sensor 7 Behind the cover VIDEO 4 terminal 8 See page 35 Headphone jack 9 Connect the headphones with a ste...

Страница 79: ...es 28 and 35 OUTPUT terminal See page 35 Aerial socket Connect the aerial cable See page 3 S VIDEO VIDEO 1 VIDEO 2 VIDEO 3 COMPONENT OUTPUT Y VIDEO VIDEO L MONO AUDIO OVER R L MONO AUDIO R L AUDIO R 0 S VIDEO VIDEO 1 VIDEO 2 VIDEO 3 COMPONENT OUTPUT Y VIDEO CB CR VIDEO L MONO AUDIO OVER R L MONO AUDIO R L AUDIO R P C R R P C B B ...

Страница 80: ...o the two digit entry system You can select a channel from the PR LIST For details see DISPLAY button on page 11 If you do not have a clear picture or no colour appears follow the operation procedure COLOUR SYSTEM button on page 11 Adjust the volume Press the VOLUME buttons Watch images from an external device Choose a VIDEO terminal to which the external device has been connected Press the TV VID...

Страница 81: ... button You can enjoy an enhanced sound for a wider audience by using CINEMA SURROUND function Press the CINEMA SURROUND button to select one of CINEMA SURROUND modes HIGH LOW When you listen to the stereo sound please select HIGH or LOW mode You can enjoy the sound for a wider audience similar to the experience at the theatre In case that you setting up the CINEMA SURROUND function to HIGH mode t...

Страница 82: ...ther than the Return Channel And then press the RETURN button to change the channel to the Return Channel In this way you can view two channels alternately by pressing the RETURN button RETURN function The TV temporarily memorises the TV channel that was chosen right before the current TV channel as the Last Channel By pressing the RETUTN button you can alternately view the current TV channel and ...

Страница 83: ...ear or no colour appears choose the colour system manually Press the COLOUR SYSTEM button to choose the appropriate colour system AUTO This function detects a colour system from the input signal The AUTO mode may not function properly if you have poor signal quality If the picture is abnormal in the AUTO mode choose another colour system manually The AUTO mode detects a colour system from the inpu...

Страница 84: ...ion the registration made here will not be changed For AUTO PROGRAM see page 29 Recalling the favorite channel Press the colour button then the registered favorite channel will be displayed You cannot recall the favorite channel in the Text mode Menu mode where an on screen menu is displayed or while multiple screens are displayed Area Country or Region System Asia Middle East Bahrain Kuwait Oman ...

Страница 85: ...istered colour button icon at the right of the channel number Viewing a teletext programme 1 Choose a TV channel with a teletext broadcast 2 Press the TV TEXT button Pressing the TV TEXT button changes the mode as follows 3 Choose a teletext page by pressing the CHANNEL buttons number buttons or colour buttons To return to the TV mode Press the TV TEXT button or TV VIDEO button If you have trouble...

Страница 86: ...xt page while watching TV 1 Press the number button to enter a page number or press the colour button The TV searches for a teletext page 2 Press the Cancel button The TV programme appears When the TV finds the teletext page its page number appears in the upper left of the screen 3 Press the Cancel button to return to a teletext page when the page number is on the screen You cannot return to the T...

Страница 87: ...t HV 29WH24 You can display two different pictures the main picture and sub picture at a time In Twin mode both pictures are equal in size In PIP mode the small sub picture appears at a corner of the screen You can swap the main picture and sub picture instantly Note that the main and sub pictures use different input sources each other For example if the main picture s source is TV the sub picture...

Страница 88: ...DEO 1 VIDEO 2 VIDEO 3 VIDEO 4 TV For the sub picture Press the Input button Each time you press the button the input source changes as follow the one used for the main picture will be skipped VIDEO 1 VIDEO 2 VIDEO 3 VIDEO 4 TV Swapping the pictures Press the Swap button Each time you press the button the main picture and the sub picture will be swapped Changing the sub picture position in PIP mode...

Страница 89: ...he Multi display mode If you press the MULTI button when receiving the Progressive video signal 525P or 625P signal 525P or 625P appears on the screen and the MULTI function does not operate Returning to the normal screen Press the MULTI button or MENU OK button or choose a TV channel with the number buttons The moving picture with the blue frame will be displayed in the normal screen Pressing the...

Страница 90: ...525P or 625P appears on the screen and the FREEZE function does not operate Strobe function Except HV 29WH24 You can display eight consecutive still pictures and one moving picture at a time They are the pictures of the same source Press the STROBE button Eight consecutive still pictures which are captured at intervals of about 0 2 second are displayed in the order of 1 to 9 These numbers are not ...

Страница 91: ...ndicates buttons on the remote control you can use when you operate a chosen function 2 Press the 6 buttons or 5 to choose a menu title and press the MENU OK button The menu appears To return to the previous menu Press the DISPLAY button To exit a menu instantly Press the TV VIDEO button 3 Press the 6 buttons to choose a function For details of the functions in the menus see the following pages 7 ...

Страница 92: ...utton on the front panel of the TV which will be used for menu operation PICTURE SETTING menu PICTURE MODE You can choose one of three PICTURE MODEs to adjust the picture settings automatically BRIGHT Heightens contrast and sharpness STANDARD Standardizes picture adjustment SOFT Softens contrast and sharpness You can also operate the PICTURE MODE function with the PICTURE MODE button on the remote...

Страница 93: ...radish white Using this mode when watching films allows you to enjoy colours that are characteristic of films You cannot select the WHITE BALANCE function in the 16 9 mode of the ZOOM function PICTURE FEATURES menu DIGITAL VNR The DIGITAL VNR function cuts down the amount of noise in the original picture AUTO The TV will be automatically adjust the level of the DIGITAL VNR effect to match the amou...

Страница 94: ...f the DigiPure effect is set to the maximum If you set the DigiPure function to AUTO but feel that the original picture quality has not been reproduced fully change the setting from AUTO to MAX The MAX setting is not suitable for low quality pictures which contain a lot of noise OFF The DigiPure function is turned off MIN The level of the DigiPure effect is set to the minimum When you set the Digi...

Страница 95: ... ZOOM You can change the screen size according to the picture aspect ratio Choose the optimum one from three ZOOM modes 1 Choose ZOOM then press the MENU OK button 2 Press the 6 buttons to choose a ZOOM mode Then press the MENU OK button You can choose a ZOOM mode from REGULAR ZOOM or 16 9 modes For details see ZOOM button on page 9 PICTURE TILT There are cases where the Earth s magnetic force may...

Страница 96: ...he 5 button to choose one of options As explained in the table if PICTURE EFFECT is set to OFF the dedicated picture effect for the favorite channel is not used In this case normal picture effect is used For details of each item see PICTURE MODE on page 20 DIGITAL VNR on page 21 WHITE BALANCE on page 21 DigiPure on page 22 When shipped 4 Press the MENU OK button to complete the setting VIDEO SETTI...

Страница 97: ...ereo broadcasting is received poorly you can change from stereo to mono sound so that you can hear the broadcast more clearly and easily s Stereo sound v mono sound t Bilingual I sub I u Bilingual II sub II MONO Cancels the Multi Sound function and the sound becomes monaural The sound mode you can choose differs depending on the TV programme This function does not work in the VIDEO modes You can a...

Страница 98: ... HIGH LOW MONO and OFF modes For details see CINEMA SURROUND button on page 9 You can also operate the CINEMA SURROUND function with the CINEMA SURROUND button For details see CINEMA SURROUND button on page 9 FEATURES menu SLEEP TIMER You can set the TV to automatically turn off after a set time 1 Choose SLEEP TIMER then press the MENU OK button 2 Press the 5 buttons to set the period of time The ...

Страница 99: ...t channel the screen will change to blue and display n so the channel cannot be viewed To set this function 1 Choose CHANNEL GUARD then press the number 0 AV button 2 Set the ID number you want To choose a number Press the 6 buttons To move a cursor Press the 5 buttons 3 Press the MENU OK button 4 Press the 6 buttons to choose a TV channel The TV shows the TV programme which the chosen TV channel ...

Страница 100: ...signal composite video signal is input COMPONENT If a Component video signal Y CB CR signals is input For detailed connecting methods see Additional preparation on page 35 This Television is compatible with the Progressive video signal 525P signal and 625P signal only when the component video signal is input PIP Except HV 29WH24 You can enter the Twin or PIP mode from the menu without using the re...

Страница 101: ...e AUTO PROGRAM function starts The TV channels you receive are automatically stored in the programme numbers list To stop the AUTO PROGRAM function press the MENU OK button 2 After the TV channels have been stored in the programme number list the EDIT menu appears You can proceed to edit the programme numbers list using the EDIT MANUAL function For details see EDIT MANUAL on page 30 If a TV channe...

Страница 102: ... the MENU OK button 2 Follow the operation description of a function you want to use and operate the function MOVE This function changes a programme number of a TV channel ID This function registers a Channel name ID to a TV channel INSERT This function adds a new TV channel in the current programme numbers list by using the CH CC number DELETE This function deletes an unnecessary TV Channel MANUA...

Страница 103: ...C number the SYSTEM sound system of the TV channel appears To cancel the MANUAL function Press the DISPLAY button 3 Press the 3 button to choose the system sound system for a TV channel you want to register For the sound systems in each country or region see the table BROADCASTING SYSTEMS on page 12 4 Press the green or red button to search for a TV channel Scanning stops when the TV finds a TV ch...

Страница 104: ...button to start the INSERT function 3 Press the 6 buttons to choose CC or CH according to the CH CC number of the TV channel To cancel the INSERT function Press the DISPLAY button 4 Press the Number buttons to enter the remaining CH CC number The TV shifts to registration mode When the registration is completed the picture of the TV channel appears on the screen The CH CC number is a number indica...

Страница 105: ...16 CC 53 W 17 CC 54 W 18 CC 55 W 19 CC 56 W 20 CC 57 W 21 CC 58 W 22 CC 59 W 23 CC 60 W 24 CC 61 W 25 CC 62 W 26 CC 63 W 27 CC 64 W 28 CC 75 X CC 76 Y R3 CC 77 Z R4 AU 3 CC 78 Z 1 R5 CC 79 Z 2 AU 4 CC 95 A 5 CC 96 A 4 CC 97 A 3 CC 98 A 2 CC 99 A 1 CH US CCIR OIRT AUSTRALIA CH 02 US 2 E2 R1 AU 0 CH 03 US 3 E3 AU 1 CH 04 US 4 E4 R2 AU 2 CH 05 US 5 E5 R6 AU 6 CH 06 US 6 E6 R7 AU 7 CH 07 US 7 E7 R8 AU...

Страница 106: ... group that you select the sub titles of the teletext program will not be displayed properly Group Languages GROUP 1 Turkish Hungarian English German French Italian Spanish Portuguese Greek Swedish Finnish GROUP 2 Polish Serbian Croatian Slovenian Czech Slovak Rumanian Hungarian Ger man French Italian Swedish Finnish GROUP 3 Russian Bulgarian Lettish Lithuanian Estonian Ukrain an Czech Slovak Engl...

Страница 107: ...llowing connection diagram see the Specifications to choose the best VIDEO terminal Note that connecting cables are not supplied 1 VCR composite signal 2 VCR S VIDEO signal Y C 3 VCR for recording composite signal 4 DVD player composite signal 5 DVD player S VIDEO signal Y C 6 DVD player component video signals Y PB CB PR CR 7 TV game composite signal 8 TV game S VIDEO signal Y C 9 Camcorder compo...

Страница 108: ...f connecting a device to the VIDEO 3 COMPONENT terminal with a video cable Connect the TV s Y VIDEO jack and the device s VIDEO OUT video output jack with a video cable Then set the VIDEO 3 SETTING to VIDEO according to VIDEO 3 SETTING on page 28 In the VIDEO 4 terminal the VIDEO jack is indicated by V 2 Connect the TV s AUDIO jacks L MONO and R and the device s AUDIO OUT audio L R output jacks wi...

Страница 109: ...iption BLUE BACK on page 27 to try to change the BLUE BACK function setting to OFF Are your SOUND SYSTEM settings for the TV channels correct Follow the description SOUND SYSTEM button on page 11 to try to solve the trouble Poor picture If noise totally obscures the picture snow the aerial or aerial cable may have trouble Check the following to try to solve the trouble Has the TV and aerial been c...

Страница 110: ...om the TV location Operate the remote control in the front of your TV or a location less than seven meters from your TV to try to solve the problem When you are viewing a teletext programme you cannot operate the menus Press the TV TEXT button to return the teletext programme to the ordinary TV programme to try operating the menus Is the CHILD LOCK function set to ON If the CHILD LOCK function is ...

Страница 111: ...The TV may emit a crackling sound due to a sudden change in temperature It does not matter if a picture or sound does not show any abnormality If you hear crackling sounds frequently while you are viewing the TV other causes may be assumed For precautionary purposes request your service technician to inspect it Touching the screen may cause you feel a slight electric shock due to its static electr...

Страница 112: ...nguages displayed by teletext Please see the table in the description TELETEXT LANGUAGE on page 34 Power requirements AC 220 to 240V 50 60Hz Audio output Rated Power output 10W 10W VIDEO 1 terminal RCA connector 3 S VIDEO connector 1 Video input S VIDEO Y C input and Audio L R inputs are available VIDEO 2 terminal RCA connector 3 Video input and Audio L R inputs are available VIDEO 3 COMPONENT RCA...

Отзывы: