JVC HR-V210E Скачать руководство пользователя страница 5

April 20, 2004 9:28 am

Page 5

— 5 —

Master Page: Right

After the 

1

 is pressed for the first time to power on the recorder, 

the recorder starts Auto Set Up or Preset Download.

ATTENTION:

If you have connected the recorder to a TV offering T-V Link via a 
fully-wired 21-pin SCART cable and if the TV is turned on, the 
recorder automatically performs the Preset Download (

6) even 

if you perform Auto Set Up.

Before starting:

Perform “Basic Connections” (

4).

Set the TV to its AV mode (with AV connection) or UHF 
channel 36 (with RF connection).
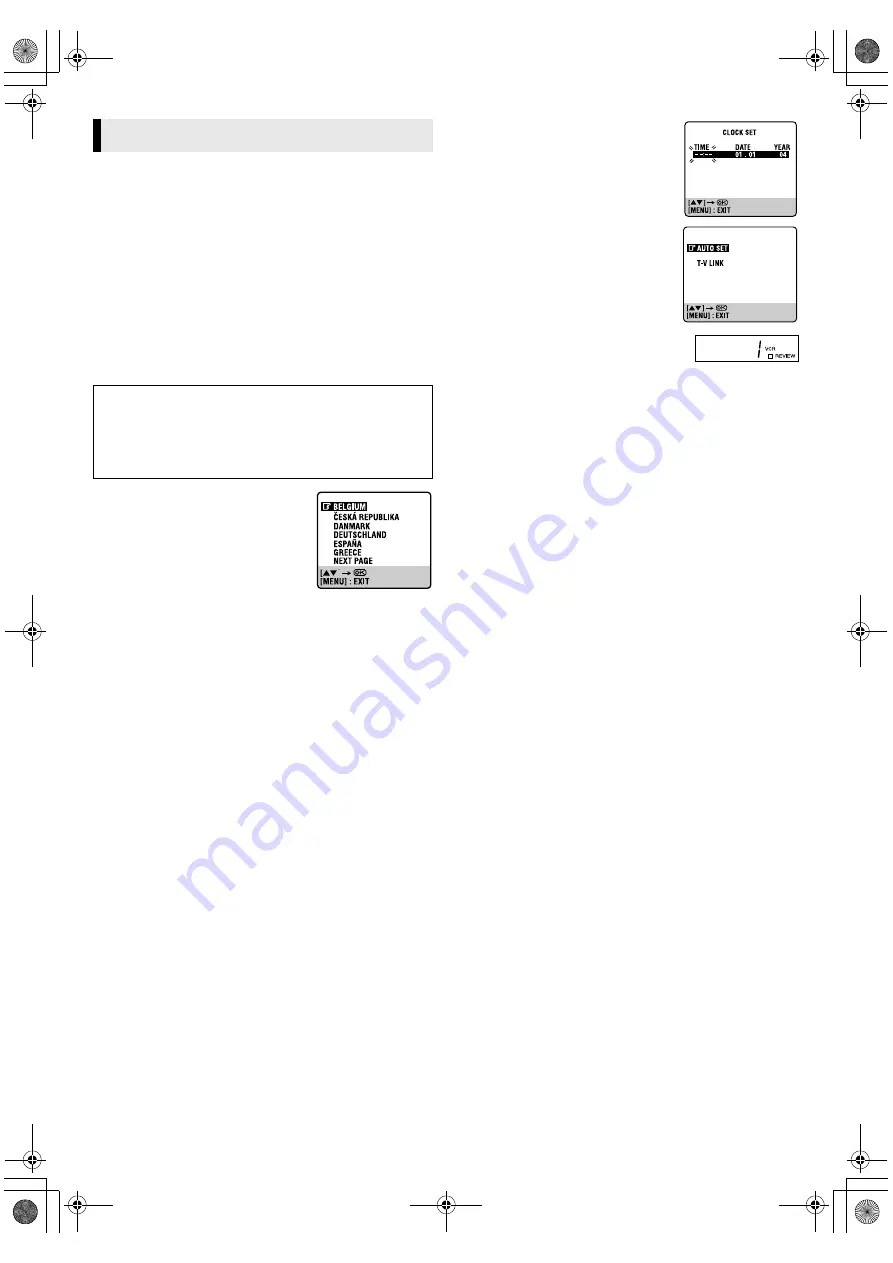
Auto Set Up

— Auto Channel Set

A

Turn on recorder

Press 

1

. The Country Set screen appears 

on the screen.

If you have connected your TV to the 
recorder with RF connection and the on-
screen display appearing on UHF 
channel 36 looks distorted, perform 
“Video Channel Set” (

15).

B

Select your country

Press 

rt

 to place the pointer next to your country, then press 

OK

. The language is automatically selected for the on-screen 

display depending on the country you have selected. The Clock 
Set screen appears.

If you have selected BELGIUM or SUISSE, the Language Set 
screen appears. Press 

rt

 to place the pointer next to the 

desired language, then press 

OK

.

C

Set time, date and year.

Press 

rt

 until the desired time appears, 

then press 

OK

 or 

e

.

Set the date and year in the same way. 
(Holding 

rt

 changes the time in 

30-minute intervals, or changes the date 
in 15-day intervals.) Then press 

MENU

.

D

Perform Auto Set Up

Press 

rt

 to place the pointer next to 

“AUTO SET” and press 

OK

 or 

e

.

Do NOT

 press any button during Auto 

Set Up.

E

Check results

If Auto Channel Set has been performed 
successfully

Turn on the TV and select its video channel 
or AV mode. Then make sure that all necessary stations have been 
stored in the recorder’s memory by using the 

PR

 button(s).

If Auto Channel Set has failed,

Make sure the cables are connected properly. Press 

OK

 to retry or 

turn off the recorder once, then turn the recorder back on again. The 
Country Set screen appears on the screen. Perform “Auto Set Up” or 
“Preset Download” (

6) again.

Initial Settings

ATTENTION:

While performing Auto Set Up for the first time,

do NOT

 disconnect the recorder from the power supply (AC)

do NOT

 press any button unless instructed

ensure that Auto Set Up is not interrupted while the operation 
is still in progress

HR-V210_001EN.fm  Page 5  Tuesday, April 20, 2004  9:28 AM

Содержание HR-V210E

Страница 1: ...d SECAM West and SECAM B used in Eastern European countries also called SECAM East 1 This recorder can also receive SECAM B colour television signals for recording and playback 2 Recordings made of SECAM B television signals produce monochrome pictures if played back on a video recorder of SECAM L standard or do not produce normal colour pictures if played back on a PAL video recorder with SECAM B...

Страница 2: ...n for a few hours to let the moisture dry How to use the remote control Before use insert the lithium battery CR2032 correctly with the plus side up into the battery compartment To open it press the release tab and carefully pull the compartment out The remote control can operate most of your recorder s functions as well as basic functions of JVC TVs Point the remote control towards the remote sen...

Страница 3: ...pe remaining time F Tape position The position of q in relation to 0 Beginning or End shows the current position on the tape G Current day month year H Clock I Channel and auxiliary input J Cassette loaded mark Buttons Connectors and Indicators Cassette loading slot Display panel Play indicator Record indicator Timer mode indicator Channel and auxiliary input Clock time Infrared beam receiving win...

Страница 4: ...rial connector AV Connection If your TV is equipped with a 21 pin SCART connector perform AV connection to improve picture quality during tape playback A Connect the aerial recorder and TV as shown in the illustration B Connect an optional 21 pin SCART cable between the L 1 IN OUT connector on the rear of the recorder and the TV s 21 pin SCART connector D Connect recorder to mains Plug the mains p...

Страница 5: ...Language Set screen appears Press rt to place the pointer next to the desired language then press OK C Set time date and year Press rt until the desired time appears then press OK or e Set the date and year in the same way Holding rt changes the time in 30 minute intervals or changes the date in 15 day intervals Then press MENU D Perform Auto Set Up Press rt to place the pointer next to AUTO SET a...

Страница 6: ...f necessary Video Channel Set 墌 15 Language Set You can change the language setting manually as required A Access Main Menu screen then Auto Channel Set screen Press MENU Press rt to place the pointer next to AUTO CH SET then press OK or e B Select your country Press rt to place the pointer next to your country then press OK or e C Select language Press rt to place the pointer next to the desired ...

Страница 7: ...back Stop playback Press 8 on the remote control OR Press 0 on the recorder Pause playback and view still picture Press 9 Press 4 to resume normal playback If there is vertical jitter press PR r t on the remote control or PR on the recorder to correct the picture Pause and Frame by Frame playback Press 9 to pause then press e or 9 repeatedly Press 4 to resume normal playback Picture Search Press 3...

Страница 8: ... function can also operate if the recorder is turned on Skipping unwanted portions Skip Search Press 30 SEC once to 4 times during playback Each press initiates a 30 second period of high speed playback up to 2 minutes When the specified portion of the tape is skipped normal playback resumes automatically To return to normal playback during Skip Search press 4 Accidental erasure prevention To prev...

Страница 9: ...king Each time you press the button recording length increases in 30 minute intervals up to 6 hours The recorder turns off after recording is finished To cancel an ITR press 8 on the remote control or 0 on the recorder Up to 8 timer recording programmes can be made Before starting Set the clock properly 墌 13 Set COLOUR SYSTEM to the appropriate mode 墌 12 Load a cassette with the record safety tab ...

Страница 10: ...n appears and conflicting programs will start blinking Example Program 1 you have just made and Program 4 overlap each other A Select program to modify Press rt then press OK or e You can only select one of the overlapping programs If you do not mind this overlap press PROG to finish the timer program setting The program starting earlier or program with the lower program number will be recorded B ...

Страница 11: ... press AUX or PR r t on the remote control or PR on the recorder Select L 1 for the L 1 IN OUT connector D Select edit mode Select the appropriate edit mode for the components if such a mode is equipped On this recorder set PICTURE CONTROL to EDIT 墌 12 E Start playback Engage the Play mode of the source player F Start recording Engage the Record mode of the recording deck Mode Set You can change v...

Страница 12: ...rmation will be recorded on the edited tape 䡵 DIRECT REC ON OFF When this function is set to ON you can easily start recording the programme that you are watching on your TV Press and hold 7 and press 4 on the remote control or press 7 on the recorder NOTE When you use this function be sure to use a TV offering T V LINK etc and connect a fully wired 21 pin SCART cable between the recorder and the ...

Страница 13: ...hannel position begins blinking then press OK The Manual Channel Set screen appears C Select band Press rt to select CH regular or CC cable then press e D Input channel Press the number keys to input the channel number you want to store Input 0 before any single number entries You can set the desired station name maximum of 4 letters To input the station name press e until the first letter of the ...

Страница 14: ... Access Confirmation screen Perform step 1 of Manual Channel Set 墌 13 B Select position Press rt w e until the desired channel begins blinking then press OK twice The Manual Channel Set screen appears C Input station name Press e until the first letter of the station name ID begins blinking Press rt to cycle through the characters then press e Enter the remaining characters the same way maximum of...

Страница 15: ...ess OK 1 B G 2 D K C Set video channel With AV connection Press PR until the display panel shows 1 or 2 Now the video channel is set to off With RF connection Press PR or to set the video channel to a vacant position between 22 and 69 which is not occupied by any local station in your area Example If channel 50 is available in your area set the video channel to 50 Then set your TV to UHF channel 5...

Страница 16: ...te VIDEO AUDIO Signal system PAL type colour signal and CCIR monochrome signal 625 lines 50 fields Recording system Rotary 2 head helical scan system Signal to noise ratio 45 dB Horizontal resolution 250 lines Frequency range Normal audio 70 Hz to 10 000 Hz Input Output 21 pin SCART connector IN OUT x 1 TUNER TIMER TV channel storage capacity 99 positions AUX position Tuning system Frequency synth...

Отзывы: