background image

Page 2

May 7, 2004 1:51 pm

    — 2 —

Cassettes marked “VHS” (or “S-VHS”) can be used with this 
video cassette recorder. However, S-VHS recordings is not 
possible with this model. 

This model is equipped with SQPB (S-VHS QUASI PLAYBACK) 
that makes it possible to play back S-VHS recordings with 
regular VHS resolution.

HQ VHS is compatible with existing VHS equipment.

When the equipment is installed in a cabinet or a shelf, make sure 
that it has sufficient space on all sides to allow for ventilation 
(10 cm or more on both sides, on top and at the rear).

When discarding batteries, environmental problems must be 
considered and the local rules or laws governing the disposal of 
these batteries must be followed strictly.

Failure to heed the following precautions may result in damage 
to the VCR, Remote or video cassette.

1. DO NOT place the VCR ...

... in an environment prone to extreme temperatures or 
humidity.
... in direct sunlight.
... in a dusty environment.
... in an environment where strong magnetic fields are 
generated.
... on a surface that is unstable or subject to vibration.

2. DO NOT block the VCR’s ventilation openings or holes.

(If the ventilation openings or holes are blocked by a 
newspaper or cloth, etc., the heat may not be able to get out.)

3. DO NOT place heavy objects on the VCR or Remote.
4. DO NOT place anything which might spill on top of the VCR 

or Remote.
(If water or liquid is allowed to enter this equipment, fire or 
electric shock may be caused.)

5. DO NOT expose the apparatus to dripping or splashing.
6. DO NOT use this equipment in a bathroom or places with 

water. Also DO NOT place any containers filled with water or 
liquids (such as cosmetics or medicines, flower vases, potted 
plants, cups, etc.) on top of this unit.

7. DO NOT place any naked flame sources, such as lighted 

candles, on the apparatus.

8. AVOID violent shocks to the VCR during transport.

MOISTURE CONDENSATION

Moisture in the air will condense on the VCR when you move it 
from a cold place to a warm place, or under extremely humid 
conditions—just as water droplets form on the surface of a glass 
filled with cold liquid. Moisture condensation on the head drum 
will cause damage to the tape. In conditions where condensation 
may occur, keep the VCR’s power turned on for a few hours to let 
the moisture dry.

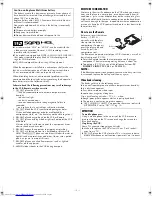
How to use the Remote

Before use, insert the lithium 
battery — CR2032 — 
correctly, with the plus(+) 
side up into the battery 
compartment. To open it, 
press the release tab and 
carefully, pull the 
compartment out.
The Remote can operate most of your VCR’s functions, as well as 
basic functions of JVC TVs.

Point the Remote towards the remote sensor on the target 
component. The maximum operating distance is about 8 m.

To operate a JVC TV, use any of the following buttons: 

TV 

POWER

TV INPUT

TV CH+/–

 or 

TV VOL +/–

.

NOTE:

If the Remote does not work properly, remove its battery, wait for a 
few seconds, replace the battery and then try again.

Video heads cleaning

The heads get dirty in the following cases:

in an environment prone to extreme temperature or humidity.

in a dusty environment

flaw, dirt or mold on video tapes

continuous usage for a long time

Use a dry cleaning cassette — TCL-2 — when:

Rough, poor picture appears while a tape is played back.

The picture is unclear or no picture appears.

“USE CLEANING CASSETTE” appears on the screen (only with 
“SUPERIMPOSE” set to “ON”) (

pg. 14).

Caution on Replaceable lithium battery

The battery used in this device may present a fire or chemical 
burn hazard if mistreated. Do not recharge, disassemble, heat 
above 100°C or incinerate.
Replace battery with CR2032. Panasonic (Matsushita Electric) 
or Maxell is recommended. 
Danger of explosion or Risk of fire if the battery is incorrectly 
replaced.

Dispose of used battery promptly.

Keep away from children.

Do not disassemble and do not dispose of in fire.

ATTENTION

To mobile phone user:

Using a mobile phone in the vicinity of the VCR may cause 
picture vibration on the TV screen or change the screen to a 
blue back display.

On placing the VCR:

Some TVs generate strong magnetic fields.

Make sure to place the VCR at least 20 cm (7 or 8 inches) 
away from a TV.

DO NOT place the VCR close to a TV as it may cause noise, 
picture disturbance or malfunctions (power off, etc.) to occur.

Release

tab

HR-J7020UM_EN.fm  Page 2  Friday, May 7, 2004  1:52 PM

Содержание HR-J7020UA

Страница 1: ...E WARNING TO PREVENT FIRE OR SHOCK HAZARD DO NOT EXPOSE THIS UNIT TO RAIN OR MOISTURE ATENCION Antes de operar su equipo lea cuidadosamente este instructivo The POWER 1 button does not completely shut off mains power from the unit but switches operating current on and off shows electrical power standby and shows ON This unit is produced to comply with Standard IEC 60065 POWER SYSTEM This set opera...

Страница 2: ...rm on the surface of a glass filled with cold liquid Moisture condensation on the head drum will cause damage to the tape In conditions where condensation may occur keep the VCR s power turned on for a few hours to let the moisture dry How to use the Remote Before use insert the lithium battery CR2032 correctly with the plus side up into the battery compartment To open it press the release tab and...

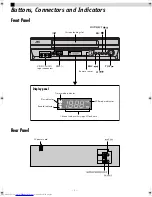
Страница 3: ...el Rear Panel CH REC STOP EJECT REW FF PLAY Cassette loading slot VIDEO AUDIO input connectors Display panel VCR mode indicator Play indicator Record indicator Timer mode indicator Channel and auxiliary input Clock time Remote sensor AC power cord ...

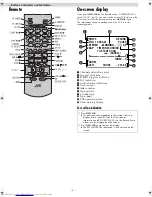
Страница 4: ...pe position I Cassette mark J Tape speed K VCR operation mode L Timer warning display To recall an indication TIMER CANCEL Number keys A Press OSD OK All indications corresponding to the current status are displayed for 5 seconds After that the counter information and RECORD PAUSE if in the Record Pause mode are left displayed on the screen B Press OSD OK again to clear the display The RECORD PAUS...

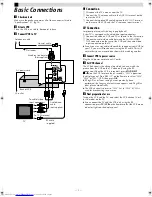
Страница 5: ... one show while watching another D Connect VCR to power source Plug the AC power cord into an AC outlet E Set VCR channel The VCR channel is the channel on which you can watch the picture from the VCR on the TV when only using the RF connection When the VCR is turned off press STOP EJECT 0 on the VCR for more than 5 seconds CH3 appears on the display panel Press CH r t on the Remote to select CH3 ...

Страница 6: ...as not been set correctly by the Plug Play setting A Access Main Menu screen then Initial Set screen Press MENU on the Remote Press rt to move the highlight bar arrow to INITIAL SET then press OK or e B Access Clock Set screen Press rt to move the highlight bar arrow to CLOCK SET then press OK or e C Set time date and year Press rt until the desired time appears then press OK or e Set the date and...

Страница 7: ...hannel Set is complete SCAN COMPLETED appears on screen If the scan was unsuccessful SCAN COMPLETED NO SIGNAL appears on screen Check the connections and start again Press MENU to return to normal screen Setting channels manually Manual Channel Set You can add the channels you want or delete the channels you do not want manually A Access Main Menu screen then Tuner Set screen Press MENU on the Rem...

Страница 8: ... set to ON 墌 pg 14 though the monitor sound changes in sequence Turn on the VCR and TV and select the VCR channel or AV mode During playback Stop playback Press STOP 8 on the Remote OR Press STOP EJECT 0 on the VCR Pause playback and view still picture Press PAUSE 9 Press PLAY 4 to resume normal playback NOTE During still picture vertical vibration may appear on the TV screen Press CH r t on the R...

Страница 9: ...index codes away press w or e 2or 6 repeatedly until the correct number is displayed on the screen only if SUPERIMPOSE is set to ON 墌 pg 14 Playback begins automatically when the desired recording is located Locating beginning of timer recordings Instant Review After ensuring that the VCR is turned off and that the timer mode is disengaged press REVIEW on the Remote The VCR turns on and rewinds to...

Страница 10: ...ant Timer Recording ITR During recording press REC 7 on the VCR repeatedly until the recording length you want appears on the display panel The record indicator 䡬 on the display panel starts blinking Each time you press the button recording length increases in 30 minute intervals up to 6 hours The VCR shuts off after recording is finished To cancel an ITR press STOP 8 on the Remote or STOP EJECT 0...

Страница 11: ...ically A Press PROG on the Remote to access the Program screen B Press START Number keys 1 and or 4 STOP Number keys 2 and or 5 DATE Number keys 3 and or 6 or CH repeatedly to enter the start time stop time date or channel Press and hold START or STOP to increase the time in 30 minute intervals To set the tape speed press SP EP To timer record daily Monday Friday or weekly serials press DAILY M F ...

Страница 12: ...am 1 you have just made and Program 4 overlap each other A Select program to modify Press rt then press e You can only select one of the overlapping programs If you do not mind this overlap press PROG to finish the timer program setting The program starting earlier or program with the lower program number will be recorded B Cancel or change program setting To cancel a program press CANCEL when the...

Страница 13: ...E S T takes place whenever you play back a tape or start recording after inserting a cassette NOTE The recorder checks the tape condition for about 7 seconds then starts recording To make sure you record the desired scene or programme completely perform the following steps A Press and hold 9 and press 7 After about 7 seconds the recorder re enters Record Pause mode B Press 4 to start recording 䡵 P...

Страница 14: ...rded on both the normal and Hi Fi tracks The main audio is not recorded If a non SAP program is received the main audio is recorded on both the Hi Fi and normal tracks When this function is set to OFF the SAP audio cannot be recorded NOTES When the channel is changed on the VCR The STEREO indication appears on the screen for about 5 seconds if the program is a stereo broadcast The SAP indication a...

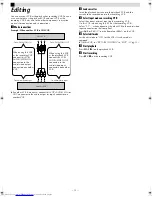
Страница 15: ...recording VCR On this VCR when using this VCR as the recording VCR Select F 1 when connecting the other VCR to the audio video input connectors on the front panel Press AUX or CH r t on the Remote or CH on the VCR D Select edit mode Set the edit mode to ON for the VCRs if such a mode is equipped On this VCR set PICTURE CONTROL to EDIT 墌 pg 13 E Start playback Press PLAY 4 on the playback VCR F Sta...

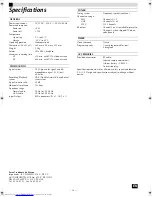
Страница 16: ... min with T 210 video cassette EP 630 min with T 210 video cassette VIDEO AUDIO Signal system NTSC type color signal and EIA monochrome signal 525 lines 60 fields Recording Playback system DA 4 Double Azimuth head helical scan system Signal to noise ratio 45 dB Horizontal resolution 230 lines Frequency range Normal audio 70 Hz to 10 000 Hz Hi Fi audio 20 Hz to 20 000 Hz Input Output RCA connectors...

Отзывы: