background image

Page 3-3

Getting Started

Using the Remote Control

3

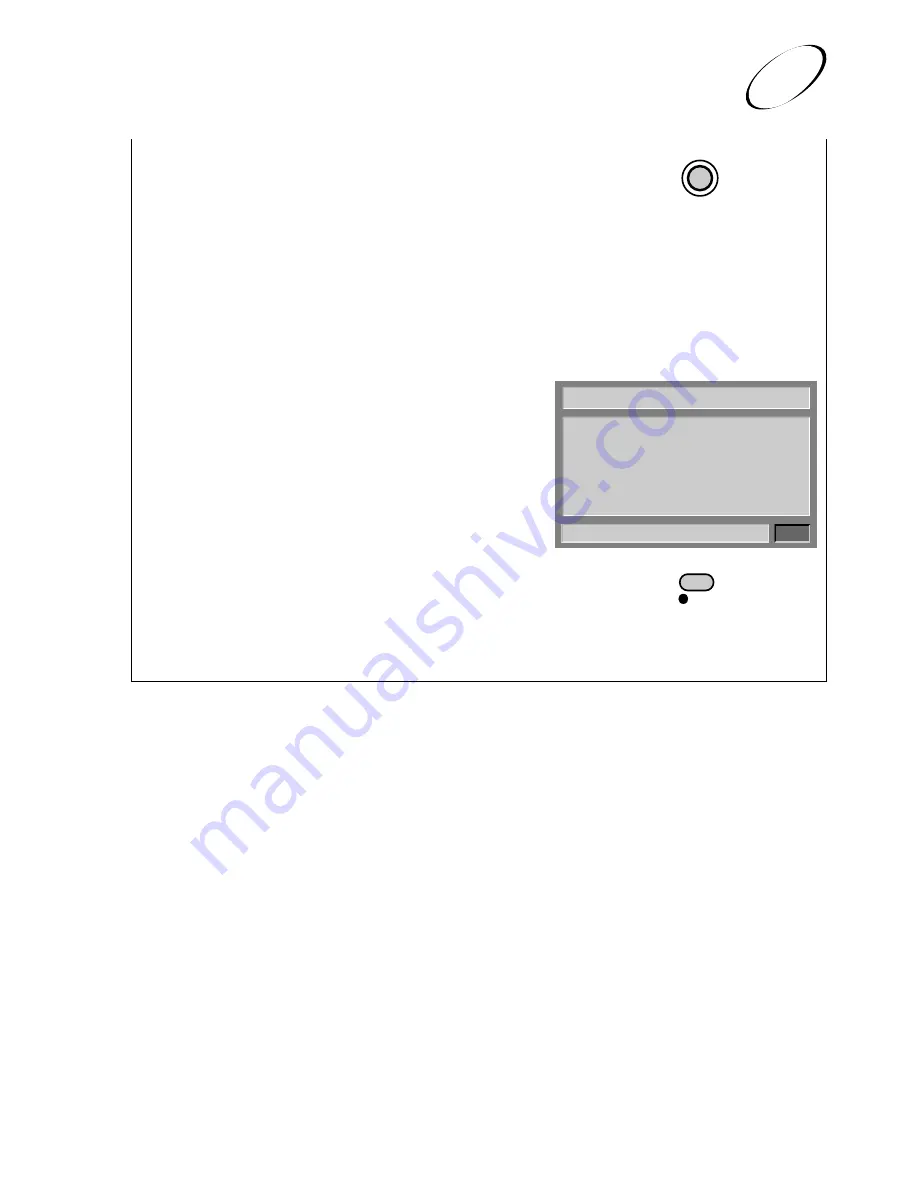
5. Press the 

Address

 button to save the new address in

the remote memory.  If the address you entered is
valid for your remote, the SAT mode light blinks
three times.

6. If the recorder is ON, turn it OFF using the

recorder 

Power

 button.

7. Wait for 15 seconds to allow the recorder

to reset.

8. Press the 

Info

 button on the recorder.

This will display the 

Important System

Information

 menu.

9. Press the 

Rec

(ord)

 button on the remote.

The remote address displayed on the 

Important

System Information

 menu will change to indicate

that the recorder address now matches the remote
address.

ADDRESS

Important System Information

OK

Copyright © 1996, EchoStar Communications

Corporation. All Rights Reserved.

Model ID:

IRR

Receiver CA ID:

R0016825089-94

Smart Card CA ID:

S0000278950-56
DNASP002 Rev052

Software Version:

205PBTAA-F

Boot Strap Version :

100BBTAA

Customer Service:

1-800-333-DISH (3474)

Internet Address:

http://www.dishnetwork.com

Remote Address:

9

REC

Содержание HM-DSR100RU - Digital VCR And Satellite Dish Combo

Страница 1: ...n this information for future reference Model No Serial No 2 Ä 6 q 5 3 PLAY STOP PAUSE REC POWER REC PAUSE TIMER EP SELECT MENU CH INFO CH REW FF POWER TV VCR VIDEO MONO L AUDIO R EJECT D VHS TM 8 MTP NTSC VOLUME 1 2 3 4 5 6 7 8 0 9 TV VCR MUTE MENU MODE SELECT VIEW AUTOTRACK POWER GUID E IN FO CANCE L INDEX INDEX SKIP SKIP REW BROWSE ADDRESS RECALL COUNTER RESET FF BROWSE REC SAT TV D VHS AUX B R...

Страница 2: ... Insert a D VHS tape to confirm picture and sound quality 3 If deterioration in either picture or sound quality remains repeat the cleaning process CAUTIONS n Use only head cleaning cassettes marked with a mark on this unit n Do not rewind the head cleaning cassette halfway through the cleaning process rewind only after it has reached the end n Do not use the head cleaning cassette for longer than...

Страница 3: ...wer outlet only one way This is a safety feature If you are unable to insert the plug fully into the outlet try reversing the plug If the plug should still fail to fit contact your electrician to replace your obsolete outlet Do not defeat the safety purpose of the polarized plug B Your product may be equipped with a 3 wire grounding type plug a plug having a third grounding pin This plug will only...

Страница 4: ... Use this when searching for information on a specific procedure or feature The Index on pages I 1 lists frequently used terms and the number of the page on which they are used or explained in the manual BEFORE YOU INSTALL YOUR NEW VCR please read the sections literature listed below Cautions Important Products Safety Instructions on the previous pages USE 1 Accessories To avoid personal injury Do...

Страница 5: ... Remote Control 3 1 Turning On the System 3 4 Changing Channels 3 4 Canceling a Procedure 3 5 About Menus and Other Multiple Choice Screens 3 6 The Main Menu 3 10 The System Setup Menu 3 10 Local TV Link 3 13 Chapter 4 Using the System 4 1 About the Program Banner 4 1 About the Browse Banner 4 3 About the Program Guide 4 6 About Themes 4 11 Ordering Pay Per View Programs 4 13 Favorites Lists 4 14 ...

Страница 6: ... 6 6 Optional Installation Kit 6 7 Finding the Satellites 6 9 Discussion of Potential Mounting Sites 6 13 Chapter 7 Installing and Wiring Your System 7 1 Installing the Satellite Antenna 7 1 Grounding and Wiring the Satellite Antenna 7 8 Aiming the Antenna For the Strongest Signal 7 12 Connecting the Recorder to a Telephone Line 7 15 Ordering Your Programming 7 17 Wiring Your System Together 7 18 ...

Страница 7: ... today Here is a list of some of the features that make this system powerful yet simple enough for anyone to use l Bit Stream D VHS Recording The recorder features the new D VHS format which records digital satellite broadcasts as digital signals so programs can be recorded as is with no loss of quality l IRR Integrated Receiver Recorder This HM DSR100 which is commonly referred to as recorder in ...

Страница 8: ...a facility on the ground called the Uplink Center The satellites then transmit the signal to your antenna The signal your system receives is customized for you based on the programming or information services you have ordered To receive network services you must have a satellite antenna and receiver installed that are compatible with the network To order pay per view programs using your system you...

Страница 9: ...ording on Super VHS tape Make sure you turn the D VHS recording mode off if you intend to record a digital satellite recording on a S VHS cassette We recommend that you only record digital bit stream signals on D VHS cassettes l Playing back D VHS recording made on other D VHS VCRs D VHS recordings made on other VCRs may not playback on your JVC VCR This is because other D VHS VCRs may record sate...

Страница 10: ...or sports l Favorites Lists Favorites Lists let you set up a list of your favorite channels for faster channel selection l System Parental Locks Prevent your kids from viewing programs you deem unsuitable l Electronic Mail Occasionally you may receive electronic mail regarding new features or services l Audio only Programming A number of channels feature commercial free audio only programs l CD Qu...

Страница 11: ...ts and other purchases you use once they include pay per view programs installation and repair charges and merchandise purchases n A Pay Per View program is one that you buy once and that is billed once on your account for a single viewing the fee varies depending on the specific program you purchase and is added to your next invoice n Installation Activation and Repair Services are one time non b...

Страница 12: ...ased Press the Theme button or if the on a theme Main Menu is open select the Themes option Select the theme Select the program See information about Press the Info button while using the a program Program Guide Browse Banner Themes or while viewing a program 1 Press the Menu button 2 Select the Mail option 3 Select the mail message 4 Delete the mail message after reading 1 Press the Guide button ...

Страница 13: ... Smart Cards that you lose or damage CASSETTE LOADING SLOT A VHS or D VHS video cassette is loaded into or ejected from this slot D VHS INDICATOR The D VHS indicator illuminates when a digital satellite broadcast is being received and a D VHS cassette is loaded and when playing back a tape that has been recorded in the D VHS mode TM LIGHT The dish light illuminates when a digital satellite broadca...

Страница 14: ... record a program automatically EP LIGHT The EP light illuminates during recording or playback in the EP Extended Play mode INFO BUTTON The Info button displays information about a program or about the system depending on what you are currently viewing MENU Press the Menu button to open the Main Menu UP DOWN LEFT RIGHT ARROW BUTTONS These buttons change the channel numbers move the highlight when ...

Страница 15: ...h FF BUTTON Press the FF Fast Forward button to move the tape forward at high speed Also during playback of a VHS recording press this button to view the picture in rapid forward visual search PAUSE BUTTON Press the PAUSE button once to temporarily stop the tape during recording During playback press this button to freeze the playback picture and press again to advance the picture by one frame STO...

Страница 16: ...ng a wrench may over tighten the connections causing damage Such damage is not covered by the Limited Warranty SATELLITE ANT IN Connect the coaxial cable from the satellite antenna to the recorder using this connection VHF UHF ANT IN RF OR VHF CONNECTION Connect your broadcast TV antenna or cable TV connection here ACCESSORY JACK The Accessory Jack is reserved for future use ANT IN 13 18V 400mA SA...

Страница 17: ...he highest quality video available If you use this connector you still need to connect the audio using the phono RCA audio outputs UHF REMOTE ANTENNA The recorder uses the UHF antenna to receive commands from the remote Note Place the antenna vertically for maximum remote range If necessary for space you can place the antenna horizontally but this may reduce the range Make sure that the UHF antenn...

Страница 18: ...high speed data port under the cover plate This port is reserved for use with new technologies such as high speed data networks as they become available Do not remove the plate covering the High Speed Data Port until you need to use the port Damage to an exposed port is not covered by the Limited Warranty TELEPHONE JACK Connect a telephone line with a standard RJ 11 telephone connector to the reco...

Страница 19: ... using the menu system and operating the built in VCR You can program your remote to control your TV audio amplifier and other equipment See Programming the Remote Control on page 4 39 for this procedure VOLUME 1 2 3 4 5 6 7 8 0 9 TV VCR MUTE MENU MODE SELECT VIEW AUTOTRACK POWER GUIDE INFO CANCE L INDEX INDEX SKIP SKIP REW BROWSE ADDRESS RECALL COUNTER RESET FF BROWSE REC SAT TV D VHS AUX B R O W...

Страница 20: ...he recorder so that it looks for that address when it receives a signal and ignores any signals that do not have that address If you do this the recorder recognizes signals only from the correct remote You may choose from 15 different addresses You can also install an attenuator at the UHF Remote Antenna connection on the recorder back panel This reduces the sensitivity of the recorder to UHF sign...

Страница 21: ... the Mode button to set the remote to control the recorder its built in satellite tuner and other various electronic components such as TVs VCRs Stereo Amplifiers and Cable Boxes If you press the Mode button once a mode light flashes rapidly to indicate which mode the remote is using Press the Mode button again to change the mode to the next mode setting See Programming the Remote Control on page ...

Страница 22: ...of the Volume button to reduce the sound volume Note This button works only if you have programmed the remote to control the TV or a stereo amplifier The Volume button changes the volume at that TV or amplifier GUIDE BUTTON Press the Guide button to open the Program Guide UP DOWN LEFT RIGHT ARROW BUTTONS You can use the arrow buttons for several purposes l When you are using a menu press the Up Do...

Страница 23: ...ption in a menu or screen and perform the function INFO BUTTON You can use the Info button several ways l Press the Info button for information about a program when n You have the Program Guide or a Browse Banner open n You have highlighted the program while selecting programs using a Theme Categories menu or n You are viewing the program n You are palying back a bit stream D VHS recording of the ...

Страница 24: ...umber of hours Note You cannot display a time period earlier than the present INDEX BUTTONS Press the Index buttons to use the built in VCR s Index Search function See Index Search on page 5 8 SKIP BUTTONS Press the Skip buttons to use the built in VCR s Skip Search function See Skip Search on page 5 7 AUTO TRACK BUTTON Press the Auto Track button to turn the built in VCR s automatic tracking func...

Страница 25: ...e 3 2 FAST FORWARD BUTTON With the remote in D VHS mode press the Fast Forward button to rapidly advance the tape During playback of an analog VHS recording press this button to rapidly view the video as a forward visual search In SAT mode press this button to page up through the Program Guide or a Themes list REWIND BUTTON With the remote in D VHS mode press the Rewind button to rewind the tape D...

Страница 26: ... hardware including the mast assembly the support arm and the LNBF See Components of the Satellite Antenna on page 6 4 PROVIDED ACCESSORIES RF cable F type Power cord S Video cable 4 pin Smart card pre installed in recorder Telephone cord Audio Video cable VOLUME 1 2 3 4 5 6 7 8 0 9 TV VCR MUTE MENU MODE SELECT VIEW AUTOTRACK POWER GUID E IN FO CANCE L INDEX INDEX SKIP SKIP REW BROWSE ADDRESS RECA...

Страница 27: ...the procedure to reprogram your remote 1 Press down on the slot in the battery case cover on the back of the remote and remove the cover 2 If you are replacing old batteries remove and replace all four batteries 3 Insert the new batteries making sure to match the plus ends with the plus indicators on the remote The batteries alternate plus and minus ends when properly seated 4 Replace the cover by...

Страница 28: ...may be responding to signals from another nearby remote control To prevent undesired operation of your recorder by a neighbor s remote you can address your remote to the recorder You may choose from 15 different addresses Note If your remote is addressed to the recorder you may need to reprogram this address when you change the batteries in the remote MODE TV VCR POWER SAT TV D VHS AUX Remote Butt...

Страница 29: ...lay the Important System Information menu 9 Press the Rec ord button on the remote The remote address displayed on the Important System Information menu will change to indicate that the recorder address now matches the remote address ADDRESS Important System Information OK Copyright 1996 EchoStar Communications Corporation All Rights Reserved Model ID IRR Receiver CA ID R0016825089 94 Smart Card C...

Страница 30: ...em password to view it Remote Menu Options Buttons Either Press the Up or Down arrow button to change channels All unpurchased channels are automatically skipped You will see only the channels in the active Favorites List or Enter the desired three digit channel number using the number pad buttons Note When changing channels to a channel number that has fewer than three digits for example channel ...

Страница 31: ...ss the Cancel or View button before you select the OK or Save option in the last step of the process If selecting Cancel or View does not exit from the current screen you must finish the current procedure by selecting one of the available menu options or choices Remote Menu Options Buttons To cancel the procedure and return immediately to watching your program press the View button or To return to...

Страница 32: ...allation Guide Main Menu Return from this menu 1 Program Guide 2 Themes 0 Cancel 3 Mail 4 Favorites 5 Locks 6 System Setup 7 Timers 8 VCR Setup Installation and Setup Menu Return from this menu 1 Point Dish Signal 2 Add Local Chan 0 Cancel 3 System Info 4Telephone System 5 Factory Defaults User Preferences Menu Return from this menu 1 Alternate Audio 2 Picture Size 0 Cancel 3 Channel Order 4 Syste...

Страница 33: ...a little darker than the other options and it will look pushed in A typical highlighted menu option looks like this or this Once you have highlighted a menu option you can select it SELECTING A MENU OPTION When you select a menu option that menu function is immediately performed You press the Select button once the menu option is highlighted A SHORTCUT An easier way to select a menu option is just...

Страница 34: ...To select a choice in a list highlight the choice and then press the Select button Make sure you select the Save or OK option to save your selection Select the Cancel option to discard your selection User and Installation Guide Single selection allows only one choice to be selected at one time If you select another choice the previous choice is deselected The single choice list uses a circle to id...

Страница 35: ...shown below When you select a choice in a single selection list the choice is marked as shown below When you select choices in a multiple selection list the choices are marked as shown below English Spanish French German Italian Japanese Languages English Spanish French German Italian Japanese Languages FOX 247 HBO E 300 CNN 206 SHO E 310 MAX E 320 NBC 241 CBS 243 Channels FOX 247 HBO E 300 CNN 20...

Страница 36: ...creen The following list describes how these options work User and Installation Guide Main Menu 1 Program Guide 2 Themes 3 Mail 4 Favorites 5 Locks 6 System Setup 7 Timers 8 VCR Setup 0 Cancel Return from this menu Name of Menu Opens Program Guide Screen Opens Theme Categories Menu Opens Mail Menu Opens Favorite Lists Menu Exit Viewed Program Opens Parental and System Locks Menu Opens System Setup...

Страница 37: ...STICS A set of diagnostic functions allow you to test your system These functions are in the System Diagnostic Tests menu You can perform these functions yourself to verify that your system is in working order or a Service Center Representative may ask you to perform some of these functions 3 NEW FEATURES Occasionally the Service Center may send via the satellite signal a list of new features avai...

Страница 38: ...playing the Program Guide You can display the channel numbers in ascending or descending order l Set up the system upgrade authorization You can either have system upgrades loaded automatically or you can specify that you want to authorize each upgrade before it is loaded l Set up your system to display caller identification the name and telephone number of the caller for your incoming telephone c...

Страница 39: ...d your local channels whether they are network channels or cable channels yourself assign the network affiliations and then access them via the Program Guide and via other channel selection methods YOUR BROADCAST TV ANTENNA If you do not have a broadcast TV antenna installed and wish to do so there are a number of options You can receive a limited number of channels via a rabbit ears type antenna ...

Страница 40: ...the Up or Down arrow button to highlight either the Broadcast Channels option or the appropriate Cable Channels option Standard HRC or IRC Contact your cable TV provider for information on whether you have a standard HRC or IRC cable system Press the Select button to choose the channel option Note You can add either cable Standard HRC or IRC or broadcast channels not both If you add one type of ch...

Страница 41: ...ed channel in the Channels list Either Use the Up or Down arrow button to highlight the desired channel number or Use the number pad buttons to enter the channel number Note When entering a channel number that has fewer than three digits for example channel number 2 or 10 you must enter zeros to make these channel numbers three digits for example 002 or 010 11 Press the Select button This will dis...

Страница 42: ...not use any channel name more than once If you try to do this the recorder will display an error message 15 Select the Save option This will display the Select Network Affiliation screen 16 Press the Left arrow button to move the highlight into the Network Affiliation list 17 Use the Up and Down arrow buttons to highlight the network affiliation associated with the station you set up 18 Press Sele...

Страница 43: ... local broadcast or cable channel from the Selected Local Channels list so it no longer appears in the Program Guide do the following Note You cannot delete Ch 000 since it is reserved for input via the Auxiliary Phono RCA Audio Video Input Remote Menu Options Buttons 1 Press the Mode button until the remote is in SAT mode 2 Press the Menu button to open the Main Menu 3 Select the System Setup opt...

Страница 44: ... option the recorder will display a warning message indicating that you will be erasing the local channels list completely Select the Yes option to erase the local channels list or select the No option to keep the list 8 Select the Save option to save the new list SELECT USING CH 000 IN THE CHANNELS LIST Ch 000 in the Channels list appears as the default channel name AUXIN in the Selected Local Ch...

Страница 45: ...nel number in the Channels list or On the remote control number pad press the desired channel number This will move the highlight to that channel number 8 Press the Select button This will display the Edit Local Channel Name screen Use this screen to enter the new channel name Getting Started Local TV Link 3 EDITING THE NAME OF A CHANNEL If you have entered the wrong channel name or want to add a ...

Страница 46: ...recorder will display an error message 11 Select the Save option The recorder will display the Select Network Affiliation screen If desired you can change the network affiliation at this time See step 16 in Adding Local or Cable Channels on page 3 14 12 Select the Save option The recorder will return to the Choose Local Channel screen The new channel name will appear in the Selected Local Channels...

Страница 47: ...hannels and your local broadcast or cable channels The information varies depending on the specific pro gram but may include any or all of the items in the following figures PROGRAM BANNER FOR SATELLITE CHANNELS PROGRAM BANNER FOR LOCAL BROADCAST TV OR CABLE TV CHANNELS Using the System Current Program Title Channel Number Channel Name Current Date Current Time Raging Bull Tue 10 11 10 13 am HBO E...

Страница 48: ...ec FF REW 5 sec when engaged from stop mode RECORD PAUSE for as long as Pause is engaged and RECORD TIMER 5 sec 11 Recording Mode 12 Audio Mode Indicators 13 AC3 Indication 14 Tape Position Indicator 15 Tape in indicator When a cassette is loaded the message is displayed for 5 seconds 16 Index Indication 1 Current Date Time 2 Remaining Time of Program Displayed when a satellite channel is received...

Страница 49: ...owse Banner 4 Active Favorites List Current Program Title Current Channel Number Current Channel Name Current Date Current Time Local Programming Local Programming Tue 10 11 10 13 am KNBC 9 WGPR 20 Tue10 11 10 00 am List MOM New Channel Name New Channel Number New Program Date Time Rating and Content Codes Active Favorites List color coded Current Program Title Current Channel Number Current Chann...

Страница 50: ...her Enter the desired 3 digit channel number using the number pad buttons Note When changing channels to a channel number that has fewer than three digits for example channel number 2 or 10 you must enter zeros to make these channel numbers three digits for example 002 or 010 or Press the Up or Down arrow button to display the desired channel in the bottom part of the Browse Banner The Browse Bann...

Страница 51: ...rtion of the Browse Banner 2 Press the Select button to change to the new channel The Browse Banner automatically closes Remote Menu Options Buttons SELECT CLOSING THE BROWSE BANNER To close the Browse Banner do the following Press the Cancel button Your recorder remains tuned to the channel you are viewing Or you can wait a few minutes and the Browse Banner automatically closes CANCE L Using the ...

Страница 52: ...e Available Services on page 1 5 for more information about subscription channels and adding channels The Program Guide may contain any or all of the items shown below Favorite List Each Favorites List name is shown in a different color Indicates that this program began or will end in a time period that is not in view Indicates that the current time period available is in view you cannot display a...

Страница 53: ...e control number pad To skip to the program listing for a channel enter the channel number and press the Select button Note The Program Guide can display programs scheduled for a limited time beyond the present OPENING THE PROGRAM GUIDE To open the Program Guide and view a listing of available channels and programs do the following Using the System About the Program Guide 4 1 Press the Mode button...

Страница 54: ...am Guide If desired press the Info button for more information about the highlighted program Press the Select button to change to the new program Note Only the channels on the active Favorites List are displayed User and Installation Guide SCANNING THROUGH CHANNELS You can scan through the available channels in the Program Guide to see what program ming is available To do this do the following Rem...

Страница 55: ...its for example channel number 2 or 10 you must enter zeros to make these channel numbers three digits for example 002 or 010 or Press the Up or Down arrow button to highlight the desired channel Then press Select to change to the new program Note Only the channels in the active Favorites List are displayed Remote Menu Options Buttons GUIDE Using the System About the Program Guide 4 MODE 1 2 3 4 5...

Страница 56: ...el and other information about the program 5 Press the Cancel button to return to the Program Guide User and Installation Guide VIEWING INFORMATION ABOUT PROGRAMS If you want more information about a program listed in the Program Guide do the following Remote Menu Options Buttons CLOSING THE PROGRAM GUIDE To close the Program Guide do the following Press the Cancel button The recorder returns to t...

Страница 57: ... Categories menu which lists the available themes 3 Select the theme you want This displays the list of events with that theme For example if you select the Movies theme you will see a list of upcoming movies as shown here Programs on channels to which you have not subscribed are shown with a red background Remote Menu Options Buttons Using the System About Themes 4 T H E M E MENU 2 2 Themes 1 Mov...

Страница 58: ... Page Down options or the Fast Forward and Rewind buttons to speed your search for the desired program 3 Press the Left arrow button to move the highlight to the program list 4 Press the Up or Down arrow button to highlight the desired program 5 Press the Select button to view the program or press Cancel to close the Themes list without selecting a program Remote Menu Options Buttons MODE Page Up ...

Страница 59: ...iew program do the following Your recorder must be connected to an active telephone line at all times in order to purchase pay per view programs using the recorder Using the System Ordering Pay Per View Programs 4 1 Select the desired pay per view program using the Program Guide 2 If the system is locked enter the system password using the number pad buttons Select the OK option to accept the pass...

Страница 60: ...s Lists are lists of your favorite channels that you create and change adding or deleting channels as you wish When you make a Favorites List active the recorder displays only the channels in that list l You can still view a channel not on the list by entering the 3 digit channel number using the remote number pad buttons or by selecting a program on that channel using the Theme Categories menu l ...

Страница 61: ...y 5 Select the Modify List option This displays the channels in the Favorites List 6 At any time you can select the Clear option to immediately remove all channels from the current list CREATING OR MODIFYING A FAVORITES LIST You can add channels to and remove channels from a Favorites List Remote Menu Options Buttons MODE Using the System Favorites Lists 4 MENU 4 4 Favorites ALL CHAN LIST 1 LIST 2...

Страница 62: ...these channel numbers three digits for example 002 or 010 Press the Select button 8 Repeat step 7 until all desired channels are added 9 To delete a channel from your Favorites List highlight the channel in the Favorites List Press the Select button 10 Repeat step 9 until all desired channels are deleted 11 Select the Save option to save all changes to the Favorites List or press Cancel to discard...

Страница 63: ...e Edit List Name option 6 At any time you can select the Clear option to immediately remove all characters from the name 7 Use the arrow buttons to highlight a letter Press Select Repeat to spell out the desired name If necessary select the space option to insert a space in the channel name or the back option to correct a letter You can enter up to eight characters including spaces 8 Select the Sa...

Страница 64: ...st option You must add at least one channel to this Favorites List before you select it User and Installation Guide MAKING A FAVORITES LIST ACTIVE When a Favorites List is active the recorder displays only the channels in that list However you can still view a channel not on the list by entering the 3 digit channel number using the remote number pad buttons or by selecting a program on that channe...

Страница 65: ...tent codes l Purchasing additional cost services such as pay per view programs l Using the recorder front panel buttons To set locks you must do the following 1 Create the channel or program locks you do not need to do this if you wish to lock only pay per view services 2 Lock the recorder front panel buttons if you wish 3 Lock the system This puts the locks you have created into effect and also a...

Страница 66: ...er the correct password in three tries the system does not allow more tries for several minutes l If you enter the correct password you can then access the locked item or the Parental and System Locks menu l If you exit a locked item or the locks menu you must reenter the password to access the item or menu again If you forget your password you will need to speak with a Service Center Representati...

Страница 67: ... each channel number directly using the number pad buttons Press the Select button to lock or unlock the channel If the checkbox next to the channel shows a checkmark in it it is locked If there is no checkmark the channel is not locked 7 Press the Right arrow button to move the highlight to the options Select the Save option to save the changes 8 If the system is not already locked lock it to put...

Страница 68: ...n until the remote is in SAT mode 2 Press the Menu button to open the Main Menu 3 Select the Locks option 4 If the system is locked enter the system password using the number pad buttons As soon as you enter the fourth digit of the password the system highlights the OK option Press the Select button 5 Select the Ratings Locks option 6 Highlight the rating that corresponds to the lowest desired aud...

Страница 69: ... is locked enter the system password using the number pad buttons As soon as you enter the fourth digit of the password the system highlights the OK option Press the Select button Remote Menu Options Buttons MODE MENU 5 1 2 3 4 5 6 7 8 0 9 LOCKING THE RECORDER FRONT PANEL BUTTONS Do this procedure to set up the system to ignore all recorder front panel buttons except the Power button This is usefu...

Страница 70: ... the system highlights the OK option Press the Select button 5 Select the Front Panel Lock option 6 Select the Yes option Remote Menu Options Buttons MODE MENU 5 1 2 3 4 5 6 7 8 0 9 ACCESSING A LOCKED ITEM Do the following to view a locked channel or program when the system is locked See Ordering Pay Per View Programs on page 4 13 for the procedure to order a pay per view program when the system i...

Страница 71: ...6 7 8 0 9 OK LOCKING THE SYSTEM Lock your system to put any channel program rating and front panel button locks you have created into effect Locking your system will automatically lock the purchase of additional cost services such as pay per view programs If you forget your password you will need to speak with a Service Center Representative You may need to provide the following information 1 your...

Страница 72: ...ord using the number pad buttons Write down the password and put it in a safe place From this time on you must enter this password to unlock the system 6 Select the OK option All the locks you have created are now in effect UNLOCKING THE SYSTEM After you do this procedure all locks are turned off until you lock the system again 1 Press the Mode button until the remote is in SAT mode 2 Press the Me...

Страница 73: ... button until the remote is in SAT mode 2 Press the Menu button to open the Main Menu 3 Select the Locks option 4 If the system is locked enter the system password using the number pad buttons As soon as you enter the fourth digit of the password the system highlights the OK option Press the Select button 5 Select the Change Password option 6 Enter the current password using the number pad buttons...

Страница 74: ... 1 2 3 4 5 6 7 8 0 9 DISCARDING ALL SETUP INFORMATION If you want to discard changes using the system menus and reset the recorder to be the same as when it was shipped from the factory do the following When you reset the recorder to default settings all event timers and settings that enable the recorder to control a VCR will be discarded If you have defined security locks on the recorder and the ...

Страница 75: ...ether speaking with a Service Center Representative or using the Service Center automatic telephone assistance system This includes purchasing services making account inquiries and overriding the system password When you call the Service Center to authorize your service you can set up a PIN You may call the Service Center at any later time to set up a PIN If you forget your PIN you will need to sp...

Страница 76: ...ormation on a program the Info menu displays an envelope l The Power light on the recorder front panel flashes It is important that you read and then delete the mail messages that you receive The recorder memory can store only a limited number of messages If it receives more messages than it can hold it deletes the oldest messages as necessary to make room If this happens you may miss important in...

Страница 77: ...t system upgrades via satellite You can set up your system to automatically install these system upgrades or you can have the system notify you before installing them To set up your system to either notify you about new upgrades or to automatically install new upgrades do the following 1 Press the Mode button until the remote is in SAT mode 2 Press the Menu button to open the Main Menu 3 Select th...

Страница 78: ...es automatically downloaded to your system or the Ask before downloading option to have upgrades downloaded with your authorization first If you select the Ask before downloading option the recorder will display a message to notify you when an upgrade is available Note With either option the download will occur only when the recorder is off 8 Select the Save option T H E M E Without my permission ...

Страница 79: ...l the remote is in SAT mode 2 Press the Menu button to open the Main Menu 3 Select the System Setup option 4 Select the Preferences option 5 Select the Alternate Audio option 6 Press the Left arrow button to move the highlight to the list of languages 7 Use the Up or Down arrow button to highlight the desired language and press Select Note If the program is being transmitted in a language not list...

Страница 80: ...e Cancel button to cancel any changes you have made in the Alternate Audio menu The recorder displays a confirmation screen At the Confirmation Screen Either Select the Yes option to abandon any language changes you have made or Select the No option to save any language changes you have made The recorder returns to the System Setup menu CANCE L Save Yes No ...

Страница 81: ...l the remote is in SAT mode 2 Press the Menu button to open the Main Menu 3 Select the System Setup option 4 Select the Preferences option 5 Select the Channel Order option This displays the Program Guide Channel Ordering menu 6 Press the Left arrow button to move the highlight to the Ascending option 7 Press the Up or Down arrow button to select either the Ascending or Descending option 8 Select ...

Страница 82: ...iagnostic test of your system do the following 1 Press the Mode button until the remote is in SAT mode 2 Press the Menu button to open the Main Menu 3 Select the System Setup option 4 Select the Diagnostics option 5 From the Diagnostics menu select the diagnostic test that you would like to perform Note See the following procedures for the specific test you choose Remote Menu Options Buttons START...

Страница 83: ...OL DIAGNOSTIC TEST This test verifies that the buttons on your remote control are working correctly 1 Select the Remote Control option 2 Press any remote control button except the Power the Cancel the Address or the VCR buttons If the remote control is working correctly the recorder briefly displays a message that says Remote Control button If the remote control is not working correctly the record...

Страница 84: ...you to wait until the test is completed If the telephone connection is correct the recorder displays a message that says Phone Connection OK If the telephone is not connected properly the recorder displays a failure message In this case see the Diagnostic Test section of the Problems and Solutions Tables on page A 18 MAIN UNIT DIAGNOSTIC TEST This test verifies that the recorder is working correct...

Страница 85: ...owever if you have multiple receivers and remotes you may need to set a unique address for the receiver recorder to prevent interference Before beginning the following procedures make sure that all electronic components are powered ON Make sure that there are fresh batteries installed in the remote Then do the following Using the System Programming the Remote Control 4 1 Turn ON the piece of equip...

Страница 86: ...F 8 Turn the equipment back ON and try some other functions to make sure you have the correct code Occasionally the Power button may work when others do not If the code works then you can stop here Write all the codes you programmed into the remote on the sticker on the inside of the remote battery cover and on the inside back cover of this Guide Note When you change the batteries in the remote yo...

Страница 87: ...ator to the UHF Remote Antenna connection 3 Attach the UHF Antenna to the attenuator THE POWER SCAN IF YOUR BRAND IS NOT LISTED If your equipment brand is not listed in the equipment codes or if the listed codes do not work you can set up the remote to scan through all the codes testing each one Once the remote reaches a possible correct code the equipment whether VCR TV or other powers ON or OFF ...

Страница 88: ...nks three times 6 Power the equipment back ON 7 Try some other functions to make sure you have the correct code Occasionally the Power function may work when others do not 8 If the other buttons work do the procedure in the following section 9 If the other buttons do not work power the equipment back on and repeat steps 2 through 7 The scan resumes from the last code stored The mode light flashes ...

Страница 89: ...e number of times to indicate each digit of the current code There will be a pause between the flash sequences for the digits A quick flash indicates zero 0 For example for an AUX code of 0136 the mode light flashes once quickly for zero then once three times and six times Note Remember that the AUX mode has a 4 digit code 3 Write all the codes you programmed into the remote on the sticker on the ...

Страница 90: ...97 National Quenties 197 NEC 005 006 007 017 023 127 Nikkai 112 113 118 Nikko 195 Normande 051 217 Onwa 041 Optonica 105 107 Orion 194 Osaki 112 Osume 091 Panasonic 008 009 010 011 012 066 074 075 197 200 206 Penney 003 005 006 014 016 026 043 096 Philco 005 006 025 064 065 068 110 Philips 066 088 Pioneer 002 048 051 076 Portland 005 026 Proton 013 019 026 124 195 Pulsar 001 Quasar 008 009 077 200...

Страница 91: ... Portland 046 093 Proscan 105 Pulsar 033 Quartz 081 Quasar 054 077 078 Radio Shack 107 108 109 110 RCA 025 026 027 028 029 037 091 105 106 115 130 131 Realistic 049 054 080 081 084 085 088 Ricoh 002 Saisho 006 007 Salora 067 081 Samsung 017 034 079 080 091 Sansui 032 044 062 100 121 Sanyo 049 081 082 083 108 SBR 065 Schneider 089 Scott 008 059 090 Sears 048 049 081 084 Sentra 046 Sharp 085 107 109...

Страница 92: ...Page 4 46 User and Installation Guide NOTES ...

Страница 93: ...ssettes can damage the recorder and or the cassette being used COMPATIBILITY OF CASSETTES AND RECORDING MODES Recording Mode Bit Stream Recording Analog Recording D VHS VHS Yes Yes No Yes No Yes No Yes No Yes No Yes Channel Satellite Channel Local Channel AUX Cassette D VHS VHS D VHS VHS D VHS VHS The recording time when the provided DF 180 cassette is used D VHS 180 min SP 90 min EP 270 min You c...

Страница 94: ... Stop button to stop winding 4 Press the Play button to start tape playback l When playing back a tape recorded in the EP mode the EP indicator on the front panel will light 5 Press the Stop button to stop the tape and then press the Eject button on the recorder s front panel to eject the tape Remote Menu Options Buttons Notes l Compact VHS camcorder tapes recorded in normal VHS mode can be played...

Страница 95: ...ad a cassette into the cassette loading slot l Make sure the record safety tab is intact l If the tab is missing cover the hole with adhesive tape before inserting the cassette 3 Either Enter the desired 3 digit channel number or Press the Up or Down arrow button to highlight the desired channel or Press the CH or button on the recorder s front panel l If you use the RF connection you can select t...

Страница 96: ...emains unchanged regardless of this setting 6 Press the Rec ord button l The REC indicator on the front panel lights during recording 7 If you wish to pause recording at any time press the Pause button Pressing the Play button will resume recording l The REC and PAUSE indicators on the front panel both remain lit while recording is paused l While recording is paused neither the channel nor the rec...

Страница 97: ...the Tape Speed SP EP and then press the Select button 5 Press the arrow buttons to move the highlight to Save 6 Press the Select button to save all changes SETTING THE BIT STREAM D VHS RECORDING AND TAPE SPEED Remember that a D VHS tape can record both bit stream and analog signals while a VHS tape can record only analog signals To record on a D VHS or VHS tape do the following Remote Menu Options...

Страница 98: ...with SP recordings and 21 times normal with EP recordings l When this function is used while playing back a bit stream recorded tape the search speed will be 14 times normal but no playback picture will appear l For short searches during playback or still press and hold the Fast Forward or Rewind button for over 2 seconds When released normal playback resumes REW BROWSE AND FF BROWSE Best with Bit...

Страница 99: ...g recordings This function lets you skip over commercials while watching recorded programs or quickly zoom back to a scene that has just been played Do the following 1 Press the Mode button until the remote is in the D VHS mode 2 During playback press the Skip or button 1 to 4 times Each press initiates a 30 second period of fast motion or reverse motion playback Normal playback resumes automatica...

Страница 100: ...e is stopped press the Index or button To access a recording 2 9 index codes away press the Index or button repeatedly until the correct number is displayed on screen only if Superimpose is set to ON see pg 5 12 Playback begins automatically when the desired recording is located Remote Menu Options Buttons MODE 1 INDEX 3 INDEX Notes l If necessary press the Rewind or Fast Forward button when play ...

Страница 101: ...am recorded tapes 4 To resume normal playback press the Play button Remote Menu Options Buttons MODE 1 Press the Mode button until the remote is in the D VHS mode 2 During playback or still press and hold the Pause button for over 2 seconds 3 To resume normal playback press the Play button Remote Menu Options Buttons MODE SLOW MOTION Only with Analog recordings To view the playback picture at a sl...

Страница 102: ...racking adjustment 3 Press the Up or Down arrow button on the remote to adjust the tracking l Press briefly for fine adjustments or press and hold for substantial adjustment Watch the screen and continue adjusting until optimum picture and sound quality are achieved 4 To re engage automatic tracking press the Auto Track button on the remote again Remote Menu Options Buttons MODE 5 AUTOTRACK 5 AUTO...

Страница 103: ...O STABILIZER Only with Playback of analog recorded tapes You can correct vertical vibration when playing back unstable EP recordings that were made on another VCR To turn this function on for automatic correction of vertical vibration do the following Remote Menu Options Buttons MENU MODE 8 VCR Setup 8 SELECT Video stabilizer SELECT Save Notes l Video Stabilizer does not operate during recording d...

Страница 104: ...n 4 Press the arrow buttons to move the highlight to Superimpose in the Options list 5 Press the Select button to remove the checkmark from the checkbox next to Superimpose Pressing the Select button again will put a checkmark there again 6 Press the arrow buttons to move the highlight to Save 7 Press the Select button to save all changes Remote Menu Options Buttons MENU MODE 8 VCR Setup 8 SELECT ...

Страница 105: ...n Menu 3 Select the VCR Setup option 4 Press the arrow buttons to move the highlight to the Audio list 5 Press the Up or Down arrow button to move the highlight to the audio track you wish to hear Hi Fi Normal or Mixed 6 Press the arrow buttons to move the highlight to Save 7 Press the Select button to save all changes Remote Menu Options Buttons MENU MODE 8 VCR Setup 8 Audio Mixed Normal HI FI Sa...

Страница 106: ...the Superimpose function see Superimpose on page 5 12 COUNTER MEMORY When the Rewind or Fast Forward button is pressed with the Counter Memory function activated the tape will return to the counter position zero and automatically stop To activate do the following 1 Press the Menu button to open the Main Menu 2 Select the VCR Setup option 3 Press the arrow buttons to move the highlight to Counter M...

Страница 107: ...e same tape 20 times consecutively unattended do the following 1 During playback press and hold the Play button for longer than 5 seconds l R Play is displayed on the View screen and repeated playback begins 2 To stop Repeat Playback at any time press the Stop button Remote Menu Options Buttons Notes l Pressing the Play Rewind Fast Forward or Pause button also stops Repeat Play l Even though the C...

Страница 108: ...atic Power Off after Tape Rewind press the Rewind button then press the Power button within 2 seconds c For Automatic Eject after Tape Rewind press the Rewind button then press the Eject button within 2 seconds l This function is not available from the remote control Front Panel Menu Options Buttons Note l If you want the next function to automatically start when the counter reads 00 00 00 instead...

Страница 109: ...nected the recorder to your TV via RF connection and the picture being received appears distorted press the Mode button until the remote is in the SAT mode and then press the TV VCR button l It is not possible to view one satellite channel while watching another satellite channel Remote Menu Options Buttons TV VCR DISPLAY ELAPSED RECORDING TIME To see the elapsed time of a recording that is taking...

Страница 110: ...ark in the checkbox next to Second audio Pressing the Select button again will remove the checkmark 6 Press the arrow buttons to move the highlight to Save 7 Press the Select button to save all changes User and Installation Guide STEREO AND SAP SECOND AUDIO PROGRAM The recorder s built in MTS decoder enables reception of local broadcasts with Multi channel TV Sound Remote Menu Options Buttons MODE...

Страница 111: ...nt to record for more than 30 minutes press Rec ord again to extend the time Each press extends recording time by 30 minutes INSTANT TIMER RECORDING ITR This on the fly timer lets you record from 30 minutes to 6 hours selectable in 30 min increments and shuts the recorder off after recording is finished To activate do the following Recorder Menu Options Buttons VCR Features Recording Features 5 No...

Страница 112: ...e turned ON and your recorder is connected to an active telephone connection Some telephone calls will not show the caller name and telephone number The caller may have blocked Caller ID or the call may be from an area that does not have the technology 1 Press the Mode button until the remote is in SAT mode 2 Press the Menu button to open the Main Menu 3 Select the System Setup option 4 Select the...

Страница 113: ...To clear either of these messages from your TV screen press the Select button on the remote control or press the Cancel button If you wish you may simply wait a few sec onds for the recorder to remove the message The recorder will not display a Caller ID message on the screen while you are recording a program for which you set up a VCR Event Timer However it will display such a message if you are ...

Страница 114: ...HS tape will automatically record the program in the analog VHS mode If an event time changes by more than twenty four hours from the originally scheduled time the event timer does not execute In general you cannot set an Event Timer for a program on channels 000 through 099 Channel 000 is reserved for input from another auxiliary device Channels 001 through 099 are reserved for your local broadca...

Страница 115: ...formation about the scheduled event timer The recorder displays a screen showing the title the time and the channel of the event You will have the following choices n Continue with the event timer the timer will execute as scheduled or n Stop the event timer Note This stops only this occurrence of a Mon Fri Daily or Weekly timer The timer still executes the next time it is scheduled To stop all ex...

Страница 116: ...hoose through the Program Guide 1 Select the desired program using one of the procedures in Changing Channels via The Program Guide on page 4 9 Go to step 2 To choose through the Theme Categories screen 1 Select the desired program using one of the procedures in Selecting a Program in the Themes List on page 4 12 Go to step 2 Note This program cannot be running currently it must begin sometime in ...

Страница 117: ...in early if you want to begin recording one minute prior to the program s scheduled starting time Pressing the Select button will remove the checkmark Then press the Right arrow button 8 Either Select the Create option to save the event timer Note Pressing the Info button will display the program s contents and the timer icon or If you want to return to the previous menu without creating an event ...

Страница 118: ...ers option and press Select The Event Timer Management screen will be displayed 5 Press the Up or Down arrow button to highlight the Create option Then press the Select button The Create a Manual Event Timer screen will be displayed 6 Press the arrow buttons to highlight the desired type of event timer VCR Auto Tune or Reminder Then press the Select button 7 Press the Up or Down arrow button to hi...

Страница 119: ...creen will be displayed 11 After pressing the Left arrow button press the number buttons to set the Start Time To input a one digit number be sure to insert a zero first 12 Press the Up or Down arrow button to select AM or PM and then press the Select button 13 Press the arrow buttons to highlight End Time and set the End Time using the number buttons To input a one digit number be sure to insert ...

Страница 120: ...e Day and press the Select button 16 Either Select the Create Timer option to save the event timer and press the Select button The Event Timer Management screen will be displayed To program two or more event timers repeat steps 5 through 16 or If you want to return to the previous menu without creating an event timer press the Cancel button 17 Press the Power button to turn the recorder off The TI...

Страница 121: ...e Delete This Timer option that corresponds to the event timer you want to delete 2 Press the Select button SELECT MAXIMUM NUMBER OF EVENT TIMERS ALLOWED The system allows you to create a maximum number of event timers If you try to create more than that number of event timers the recorder displays a menu giving you the option to delete a previously set up event timer first Note Once one time only...

Страница 122: ...want to delete more than one event timer repeat steps 5 and 6 for each event timer that you want to delete 8 Press the Right arrow button then the Up or Down arrow button to highlight the Delete option 9 Either Press the Select button to delete the event timer s or To return to the Main Menu without deleting any event timers press the Cancel button 7 7 Timers T H E M E SELECT Event Timer Managemen...

Страница 123: ...ns to select Set Date Time and then press the Select button The Set Date Time For Manual Timer screen will be displayed 6 Press the arrow buttons to highlight the item you wish to change 7 Use the number buttons to change the Start Time Stop Time Date To change AM or PM make sure your selection with the Up or Down arrow button and then press the Select button VCR Features Event Timers 5 TO MAKE CH...

Страница 124: ...D EVENT TIMERS You must enter the system password before you can create a timer for a locked program and order a pay per view program before you can create a timer for it If you do not or if the program is blacked out in your area when the timer executes the recorder may display an error message instead of the program POWER OFF AND EVENT TIMERS If your recorder is OFF at the time an Auto Tune or V...

Страница 125: ...to minimize picture degradation while editing l When using the recorder as the recording unit and a monaural VCR as the playback unit connect the VCR s AUDIO OUT connector to the AUDIO IN L connector on the recorder 2 Load the cassette to be played into the playback unit and load the cassette to be recorded into the recording unit 3 Set the recording unit s input mode to AUX l With this recorder p...

Страница 126: ...O IN L connector on the recorder 2 Load the cassette to be played into the camcorder and load the cassette to be recorded into the recorder 3 Set the recorder s input mode to AUX by pressing the number button 000 AUX will appear in the on screen display instead of a channel number l Select the SP or EP tape speed see page 5 5 4 Start tape playback at the camcorder l If you do not want superimposed...

Страница 127: ... by step procedures for mounting the antenna to a surface and drilling holes in the building for cable The optional Installation Kit provides such detailed instructions You may also choose to have a licensed professional perform the installation It is very important that you carefully follow all local building and electrical codes especially the latest revision of the National Electrical Code and ...

Страница 128: ...lid surface see pages 7 1 through 7 7 6 Ground the satellite antenna and wire it to the recorder see pages 7 8 through 7 11 7 Aim the satellite antenna for the strongest possible signal see pages 7 12 through 7 14 8 Connect the recorder to an active telephone connection see pages 7 15 through 7 16 With the recorder wired to the TV and the antenna properly installed you will be able to see the Prev...

Страница 129: ...l Satellite antenna assembly this includes the LNBF the support arm the dish the mounting bracket the mast and related hardware see Components of the Satellite Antenna on page 6 4 supplied with HM DSR100DU l Recorder with built in receiver l Remote control with four 4 AAA batteries packaged separately l Cables n 25 foot RJ 11 telephone cable n 8 foot phono RCA 3 connector cord n 6 foot RF or VHF c...

Страница 130: ...lifies the signals converts the whole block or range of signals to a lower frequency and feeds the signals into the coaxial cable s connected to your recorder s LNBF SINGLE OUTPUT If you purchased the single output LNBF to use with the recorder your package contains this LNBF Note that this LNBF has only one coaxial cable connection LNBF DUAL OUTPUT The dual output LNBF supplied with the HM DSR100...

Страница 131: ...to the top of the support arm bracket MOUNTING BRACKET AND MAST ASSEMBLY The mast assembly attaches the support arm which holds the dish and the LNBF to the mounting surface Note If you are planning to use a pole to mount the satellite antenna you will not need the mast assembly In this case the pole instead of the mast fits into the support arm bracket However you should keep the mast assembly in...

Страница 132: ...o install your system properly and take full advantage of the available features Note Items marked with an asterisk are included in the optional Installation Kit For the complete list of Installation Kit contents see page 6 7 l 8 triple phono RCA audio video cord l Copper clad grounding rod at least eight feet in length l Grounding rod clamp l Dual grounding block l 30 Grounding wire either 8 gaug...

Страница 133: ... location where your system was purchased or call the Service Center If you did not purchase the Installation Kit but still plan to install your system yourself you should gather the appropriate materials such as those listed below before beginning instal lation The Installation Kit contains the following l Installation Kit Guide l Installation video tape with step by step demonstrations l 25 tele...

Страница 134: ... remote or a UHF remote being used in another room of your building l There is another satellite receiver and remote being used in the vicinity Note In either of the above situations you may need to assign an address to your remote and recorder so that the recorder responds only to that remote l Your recorder does not respond to the remote You must match the addresses to be able to use the remote ...

Страница 135: ...you must aim the dish to get the strongest signal See Aiming the Antenna for the Strongest Signal on page 7 12 for this procedure WHERE ARE THEY You must know where the satellites are to choose a good location to mount the antenna The satellites orbit the Earth together over the equator For everyone in the United States this means that the satellites are south of your location The satellites are a...

Страница 136: ...on of the satellites you need to find the azimuth South Southeast or Southwest direction to the satellites and elevation angle up to the satellites from your location Azimuth is also called direction This Guide uses the term direction Finding the satellites is easy You first need to connect the recorder to your TV and turn on the recorder and TV Tune your TV to channel 3 or 4 See Wiring Setups on ...

Страница 137: ... compass is at least a foot away from other metal objects and that there are no magnetic objects or electronic devices nearby Holding the compass so the needle can swing freely turn the compass until the dark end of the compass needle is aligned on the N This points to magnetic North The compass face is divided into 360 degrees From your location North is zero degrees 0 East is 90 South is 180 and...

Страница 138: ...proximate location of the satellites 4 Note whether there are any obstructions between you and the satellites Leave a wide margin for adjustment since you have not yet aimed the antenna exactly If there are obstructions you will have to find a new location or remove the obstruction if pos sible Also make sure that the antenna is accessible for removing snow and other debris If necessary repeat ste...

Страница 139: ...in and heavy cloud cover DO S You should always follow these instructions to help ensure against injury to yourself and damage to your equipment or mounting surface See Important Product Safety Instructions on page ii for further safety instructions l Assemble the satellite antenna in a safe location before climbing up to the mounting location Use caution when climbing and when working at the moun...

Страница 140: ...nds Do not try to install the satellite antenna in windy or stormy weather particularly if there is a chance of lightning l Do not attempt to fasten the satellite antenna to the mortar between bricks or cinder blocks l Do not mount the satellite antenna on vinyl or aluminum siding These materials are structurally too weak to securely hold the satellite antenna even with a building stud underneath ...

Страница 141: ...ll put heavy pressure several hundred pounds on those bricks in different directions Loose or weakened mortar may allow the bricks to shift changing the dish angle and reception quality and possibly damaging the satellite antenna and the building The installed satellite antenna could also hasten the deterioration of old mortar l To mount the satellite antenna on brick make sure that all of the fas...

Страница 142: ... even You may need to use a separator or shim between the shingles to even the siding surface l Mount the foot on the foundation material beneath the siding surface This may be a building stud cinder block or other solid material To locate the studs find the vertical line of nails where the siding is attached to the building or use a stud finder Materials Required l 2 lag screws 1 4 x 3 l 4 lag sc...

Страница 143: ... the satellite antenna on block facing see Mounting the Antenna on Siding on page 6 16 l Make sure that the cinder block and mortar is in good to excellent condition l Use toggle anchors and machine bolts inserted into the hollow of the block as fasten ers Other types of anchors may not have the required strength Materials Required l 4 toggle anchors 1 4 l 4 machine bolts 1 4 x 3 Tools Required l ...

Страница 144: ...t the roof from leaking you should caulk the holes or use silicone sealant around the holes and at the bottom of the satellite antenna foot where it contacts the surface Apply the sealant before you bolt the foot down tight l Place the antenna so it is not directly downwind from a chimney or furnace vent Soot can gather on the dish surface weakening the reception If practical locate the antenna so...

Страница 145: ... is secured It should be a strong piece that cannot be moved or jiggled l Do not mount the satellite antenna on a railing l Do not mount the satellite antenna in a tree Materials Required l 4 lag screws 5 16 x 2 Tools Required l drill l 1 8 twist drill bit l 3 16 twist drill bit l 7 16 socket or box end wrench l bubble level or plumb line l pencil 6 Starting Your Installation Discussion of Potenti...

Страница 146: ...Page 6 20 User and Installation Guide NOTES ...

Страница 147: ...art of the mast or the mounting pole whichever you use be truly plumb that is vertical If not the elevation provided by the recorder for your location will be inaccurate This will make it more difficult for you to aim the antenna for the strongest signal Pole Mounting Surfaces Vertical Mounting Surfaces Horizontal Mounting Surfaces The figure above shows how you should orient the mast on the foot ...

Страница 148: ...ore you attach the satellite antenna to a mounting surface you should make sure that you can route the cable from your chosen location into the building drilling holes where necessary to the recorder 1 Gather all the items you will need for the assembly 2 If the dish support arm and the bracket that holds it came separately attach the arm to the bracket with the supplied bolts 3 Mount the foot on ...

Страница 149: ...and secure it by threading a lock nut and washer onto the bolt on the back side Do this for all the flathead bolts 7 Tighten the bolts so that they are snug This is a picture of the support arm and bracket with the dish attached 8 Tilt the support bracket to the approximate elevation of the satellites Use the elevation you found earlier using the Point Dish and Signal Strength menu If you have the...

Страница 150: ...arlier using the Point Dish and Signal Strength menu Tighten the mast clamp bolts so that the clamp is snug but can still be moved back and forth You may have either one or two LNBF cables to attach depending on which type of LNBF you purchased single or dual output Note If you have to attach two cables to the LNBF the following instructions apply to both cables Use only RG 6 coaxial cables with F...

Страница 151: ...nd out the end of the arm 16 Adjust the cable so that there are about 2 inches of cable out the end of the arm 17 Attach the LNBF to the coaxial cable s 18 Fit the LNBF into the dish support arm sliding it in until it is inserted firmly You may have to adjust the cable pulling it back gently through the support arm 19 Attach the LNBF to the support arm using the LNBF screw and washer 2 Pivot Bolt ...

Страница 152: ...the satellite antenna pole and cables in accordance with the National Electrical Code and local electrical codes You can also mount the satellite antenna on a metal pole installed in the ground as long as the soil provides a firm foundation that is the soil is not so rocky as to prevent digging a hole nor so moist as to prevent proper curing of cement in the hole Take extreme care to avoid contact...

Страница 153: ...Having the pole plumb allows you to accurately aim the antenna If the pole is slightly off plumb you can still aim the antenna for good reception but it is very difficult Typically the cable is routed down outside the pole However if you want to route the LNBF cable up through the pole in the same manner as you would through the mast you will need to drill a hole in the pole big enough to do this ...

Страница 154: ...ntended as a guideline only See page A 3 for applicable sections of the National Electrical Code as of the publication date of this Guide For more information refer to the National Electrical Code and local electrical codes The National Electrical Code and some local electrical codes permit the use of types of grounding other than those discussed in this Guide Follow the National Electrical Code a...

Страница 155: ...l Silicone sealant Before drilling any holes in the wall or roof of your building make sure there are no wires or pipes in the area of the holes If you are not comfortable doing this contact a professional in your area Make sure that you follow all safety instructions and building code regulations The main objective of routing the cable is to secure it in place where it will not be dislodged by pe...

Страница 156: ...ng or on some other sturdy structure near the satellite antenna Make sure that the location is stable and that you bolt the grounding block down securely Locate the grounding block as close to the grounding rod as possible ATTACHING THE CABLE TO THE GROUNDING BLOCK 1 Using the shortest path possible route the coaxial cable from the LNBF to the coaxial terminal on one side of the grounding block If...

Страница 157: ...test possible path WIRING FROM THE ANTENNA TO THE RECORDER l Use the shortest route possible to run the coaxial cable from the grounding block into the building and to your recorder Do not kink or pinch the cable This may damage it l Locate your recorder inside the building against or near an outside wall Then drill a 1 2 inch hole through the outer wall to pass the cable inside the building l If ...

Страница 158: ...ayed until you aim the satellite antenna at the satellites and until you receive a strong enough signal to see a picture Once this happens the Signal Strength bar turns green and the word Locked is displayed You can then fine tune the aim of the antenna to gain the strongest possible signal FINE TUNING THE AIM OF THE SATELLITE ANTENNA If practical try to keep the TV in view while doing the followi...

Страница 159: ...s as the signal gets stronger and lowers as the signal strength drops Avoid positioning yourself directly in front of the satellite antenna while aiming it as your body may block much or all of the satellite signal 7 Loosen the mast clamp bolts just enough to be able to move the support bracket Slowly move the dish from side to side until you find the strongest signal Tighten the mast clamp bolts ...

Страница 160: ...n is complete Select the Yes option The recorder will display a Warning message during satellite transmission down load of important system information to the recorder Follow the direction in the message not to disturb or unplug the recorder during the download When the download is done the recorder will briefly display an Attention Acquiring Satellite Signal message Then the recorder should displ...

Страница 161: ...programs using the recorder If you use a wireless telephone jack be aware that some such jacks do not support all the features of this recorder You must also set up the recorder for the type of telephone system you have touchtone or rotary pulse and specify a telephone number prefix if such a prefix is required to place an outside call Note A prefix is usually required only for business installati...

Страница 162: ...Up or Down arrow button to highlight the No prefix needed the One digit code or the Two digit code option Press the Select button If you selected the One digit code option the recorder displays a box where you must enter the digit To do this press the appropriate number pad button If you selected the Two digit code option the recorder displays boxes where you must enter the digits To do this press...

Страница 163: ...elow To exit this menu press the Select button on the recorder or remote Note The recorder is still OFF You will have to press the Power button on either the remote or the recorder to turn the recorder back ON SERVICE CENTER PIN As an option the Service Representative will ask you if you want to set up a Service Center Personal Identification Number PIN See Service Center Security on page 4 29 for...

Страница 164: ...iring setups assume installation of a single receiver If you are installing multiple receivers modify your wiring accordingly ABOUT CABLING AND CONNECTIONS The way in which you wire your system and the kinds of cabling you choose can make a noticeable difference in the quality of the picture and sound No doubt you will want to wire your system to take advantage of the highest quality supported by ...

Страница 165: ...as using the RF Out RF or VHF Connection will not provide the best quality video on broadcast or cable channels This is the simplest cabling scheme and many people prefer it because of its ease of installation and use The RF or VHF connections require that you keep the TV tuned to either channel 3 or 4 to view satellite channels You also need to set the Channel 3 4 switch on the recorder s back pa...

Страница 166: ...If you use the phono RCA audio video connections then depending on the type of equipment that you connect to the recorder you may need to use the menus displayed by each piece of equipment to change the input from local to satellite TV See the product documentation that came with your other electronic equipment for more information S VIDEO CONNECTIONS BEST PICTURE S VIDEO also called super video o...

Страница 167: ...tups assume the following l You have a broadcast TV antenna or a cable TV box that you want to connect to the system l You want to optimize your system to carry the best picture and sound quality that it can support The wiring setups presented here range from easiest RF or VHF connections only with the fewest electronic components to the most advanced with multiple electronic components All connec...

Страница 168: ...satellite as well as obtaining a signal from it Quality l Good picture l Good non stereo sound Equipment l Recorder l TV l Cable TV box or broadcast antenna UHF REMOTE ANTENNA VHF UHF ANT IN AC 3 AC IN ANT IN 13 18V 400mA HIGH SPEED DATA PORT DC OUT 5V AUDIO S VIDEO SATELLITE ACCESSORY VIDEO R 1 2 OUT L RF OUT CH3 CH4 PHONE JACK Broadcast TV Antenna or Cable Antenna Grounding Block Grounding Wire ...

Страница 169: ...nt l Recorder l TV l Cable TV box or broadcast antenna UHF REMOTE ANTENNA VHF UHF ANT IN AC 3 AC IN ANT IN 13 18V 400mA HIGH SPEED DATA PORT DC OUT 5V AUDIO S VIDEO SATELLITE ACCESSORY VIDEO R 1 2 OUT L RF OUT CH3 CH4 PHONE JACK R L AUDIO IN Broadcast TV Antenna or Cable Antenna UHF Remote Antenna Audio Amplifier Telephone Connection RF or VHF INPUT AUDIO IN R L VIDEO IN S VIDEO IN TV Recorder Gro...

Страница 170: ...TV box or broadcast antenna l Audio amplifier optional User and Installation Guide UHF REMOTE ANTENNA VHF UHF ANT IN AC 3 AC IN ANT IN 13 18V 400mA HIGH SPEED DATA PORT DC OUT 5V AUDIO S VIDEO SATELLITE ACCESSORY VIDEO R 1 2 OUT L RF OUT CH3 CH4 PHONE JACK R L AUDIO IN Broadcast TV Antenna or Cable Antenna Audio Amplifier Telephone Connection RF or VHF INPUT AUDIO IN R L VIDEO IN S VIDEO IN TV Rec...

Страница 171: ...ttons to move the highlight to Set Date Time 5 Press the Select button to open the Time and Date Setup screen 6 Press the Left or Right arrow button to move the highlight to Daylight Savings 7 Press the Select button to place a checkmark in the checkbox next to Daylight Savings Pressing the Select button again will remove the checkmark l Turn the Daylight Savings function to let the recorder autom...

Страница 172: ...the highlight to Save 12 Press the Select button to start the clock User and Installation Guide 1 2 3 4 5 6 7 8 0 9 SELECT PM AM Save DAYLIGHT SAVINGS This function enables automatic adjustment of the recorder s clock at the start and end of Daylight Savings Time With Daylight Savings activated on the first Sunday of April at 2 00 AM the clock is adjusted to 3 00 AM on the last Sunday of October a...

Страница 173: ...s RJ 11C An FCC compliant telephone cord and modular plug is provided with this equipment This equipment is designed to be connected to the telephone network or premises wiring using a compatible modular jack which is Part 68 compliant This equipment cannot be used on telephone company provided coin service Connection to Party Line Service is subject to state tariffs If this equipment causes harm ...

Страница 174: ...ich this device is connected This is to avoid damage to the equipment caused by local lightning strikes and other electrical surges RADIO INTERFERENCE The recorder complies with the limits for a Class B digital device as specified in Part 15 of the FCC Rules This compliance helps ensure against radio interference with other equipment in a typical residential location Except for the telephone cable...

Страница 175: ...specific requirements in a through f below a Systems circuits and equipment required permitted or not permitted to be grounded b Circuit conductors to be grounded on grounded systems c Location of grounding connections d Types and sizes of grounding and bonding conductors and electrodes e Methods of grounding and bonding f Conditions under which guards isolation or insulation may besubstituted for...

Страница 176: ...evel Made electrodes shall be free from nonconductive coatings such as paint or enamel Where more than one electrode is used each electrode of one grounding system including that used for lightning rods shall not be less than 6 feet 1 83m from any other electrode of another grounding system a Rod and Pipe Electrodes Rod and pipe electrodes shall not be less than 8 feet 2 44m in length and shall co...

Страница 177: ... type ground clamp having a rigid metal base that seats on the electrode and having a strap of such material and dimensions that it is not likely to stretch during or after installation 810 15 GROUNDING Masts and metal structures supporting antennas shall be grounded in accordance with Section 810 21 810 21 GROUNDING CONDUCTORS RECEIVING STATIONS Grounding conductors shall comply with a through j ...

Страница 178: ...l electrodes described in Section 250 81 or 3 If the building or structure served has no grounding means as described in f 1 or f 2 to 1 an effectively grounded metal structure or 2 to any of the individual electrodes described in Section 250 83 g Inside or Outside Building The grounding conductor shall be permitted to be run either inside or outside the building h Size The grounding conductor sha...

Страница 179: ...e number pad Channel Surfing See Changing Channels Composite Video See Video Connection Direction Also called azimuth Refers to the left or right positioning of your satellite antenna Direction is noted on the compass in the form of numbers indicating degrees When you are adjusting the antenna you can enter your ZIP code into the Point Dish and Signal Strength menu The menu will display the direct...

Страница 180: ...itional fee to view once Program Program A TV show movie or pay per view event Program Guide An on screen guide to all the programs that are currently being shown and all the programs that will be shown for the next week You can select current and future programs and purchase pay per view events in the Program Guide Rating Codes Codes have been assigned to the program to indicate content and sugge...

Страница 181: ...der This refers to the entire antenna assembly whether it is mounted on the mast or on a pole S VIDEO or Super Highest quality video connection If used the audio VHS connections must also be used UHF Ultra high frequency Some remote controls use UHF to control equipment Some remotes that come with the recorder use UHF to control the recorder and infra red IR to control other equipment UHF signals ...

Страница 182: ...ns usually with a simple solution for each one Do the following to solve your particular problem 1 Review the section in this Guide that relates to your problem 2 If you cannot find a solution then find the section of the following tables that relates to your problem Look down the What Is Happening column until you find your problem 3 If you are interested read the information in the Possible Why ...

Страница 183: ... the signal strength to 100 Cable connectors may have loosened or have moisture inside There may be interference with the satellite signal The recorder may have just been plugged in and is acquiring the satellite signal The satellite antenna may have been moved out of alignment with the satellite signal Connecting cables may have loosened or have moisture inside There may be interference with the ...

Страница 184: ...der until you find the remote If the remote control is permanently lost or too damaged to use call the Service Center to order a replacement If the batteries are missing or dead insert four fresh AAA size batteries Make sure to re initialize and reprogram the remote including resetting the remote address if necessary If the remote has fresh batteries check whether they are placed according to the ...

Страница 185: ...es with fresh ones Reprogram the recorder and remote to the same address Check that the electrical power is on in your building and that it has the voltage and current specified for the recorder Check that the electrical outlet you are using is in good condition and has power for example check that a fuse has not blown Check that the recorder power cord is not damaged and that the plug is inserted...

Страница 186: ...he Chan 3 4 Setup is set to the same channel as the TV Make sure that the TV brightness and contrast are adjusted correctly Make sure that the TV is connected properly to the recorder Check that your system has been installed correctly Verify that all required coaxial cables are in place and check that all cable connectors are firmly connected Make sure that your satellite antenna is aimed at the ...

Страница 187: ...udes all the channels CHANGING CHANNELS What Is Happening You enter the channel number you want The channel changes but the new channel is not exactly the channel you entered You are channeling up or down through the channels and the system is skipping channels that you know you have purchased You can t change channels even though you enter the channel number you want or use the Up Down buttons Po...

Страница 188: ...ck to take effect Call the Service Center You may need to provide the Service Center Representative with the following information 1 your name 2 your address 3 your telephone number 4 your recorder serial identification number and 5 your Service Center Personal Identification Number PIN if used FAVORITES LISTS What Is Happening You highlight the ALL CHAN list and then highlight either the Modify L...

Страница 189: ...nd the fax or modem call Have the sender resend the fax or modem call What Is Happening You see an ERROR message on your TV screen ERROR message text The number of password entry retries has been exceeded Please try again later ERROR message text The front panel buttons are locked ERROR message text Unable to acquire signal or Unable to acquire program guide information ERROR MESSAGES IN THE MENUS...

Страница 190: ...rol Diagnostic Test and the recorder displays the Diagnostics menu You are doing a Remote Control Diagnostic Test and the recorder displays a failure message Possible Why You pressed the Power button on either the front panel or the remote control The front panel buttons are not working correctly Note The front panel button lock has no effect on this test You pressed the Address button or any of t...

Страница 191: ... message You are doing a Telephone Connection Diagnostic Test and the recorder displays a failure message You are doing a Main Unit Diagnostic Test and the recorder displays a failure message CALLER ID What Is Happening You receive a telephone call but your recorder does not display a Caller ID message on your TV screen Your recorder displays a Caller ID message with the caller s telephone number ...

Страница 192: ... changed so that the event timer conflicted with another event timer The event time may have changed by more than twenty four hours The event time changed Stopping the event timer applies only to the current showing of the event There may have been a power outage during recording What to Do To be able to set up an event timer for the event first enter the system password To be able to set up an ev...

Страница 193: ...ld not be correct for the option you selected Whenever you change the option you should edit the Selected Local Channels list Contact your cable TV provider for information on the Standard HRC and IRC cable systems and for help in choosing the appropriate Cable Channels option Make sure that your TV is working properly and that the brightness contrast and tuning are adjusted correctly Make sure th...

Страница 194: ...ape was reached during timer recording What to Do Load a cassette with the record safety tab intact or with its record safety hole covered with adhesive tape Remove the cassette and cover the safety tab hole with adhesive tape or load a cassette with its record safety tab intact The program may not have been recorded in its entirety Next time make sure you have enough time on the tape to record th...

Страница 195: ...n operational indicators sometimes jitter Why does this happen A If the condition of the tape being played back is not good jittering of the video including on screen indicators may occur RECORDING Q When I pause and then resume a recording the end of the recording before the pause is overlapped by the new recording Why does this happen A This is normal It reduces distortion at the pause and resum...

Страница 196: ... Power requirement AC 120 V 60 Hz Power consumption 50 W Temperature Operating 5 C to 40 C 41 F to 104 F Storage 20 C to 60 C 4 F to 140 F Operating position Horizontal only Dimensions W x H x D 400 x 142 x 350 mm 15 3 4 x 5 5 8 x 13 13 16 Weight 7 9 kg 17 5 lbs Maximum recording time D VHS 420 min with DF 420 video cassette VHS SP 210 min with T 210 video cassette VHS EP 630 min with T 210 video ...

Страница 197: ...324 4611 South San Francisco CA 94080 1804 508 881 5923 954 472 1960 415 871 2666 Sophisticated electronic products may require occasional service Just as quality is a keyword in the engineering and production of the wide array of JVC products service is the key to maintaining the high level performance for which JVC is world famous The JVC service and engineering organization stands behind our pr...

Страница 198: ...ovided with the products or if the model or serial number has been altered tampered with defaced or removed 2 Initial installation and installation and removal for repair 3 Operational adjustments covered in the Owner s Manual normal maintenance video and audio head cleaning 4 Damage that occurs in shipment due to act of God and cosmetic damage 5 Signal reception problems and failures due to line ...

Страница 199: ...for Other Channels 4 4 Buttons Address 2 12 Auto Track 2 12 Cancel 2 12 Counter Reset 2 13 Fast Forward 2 13 FF Browse 2 12 Guide 2 10 Index 2 12 Info 2 2 2 11 Locking the Receiver Buttons 4 23 Menu 2 2 2 10 Mode 2 9 Mute 2 10 Number Pad 2 12 Pause 2 13 Play 2 13 Power 2 1 2 9 Recall 2 13 Record 2 13 Remote Control 2 7 Rewind 2 13 Rew Browse 2 12 Select 2 2 2 11 Skip 2 12 Stop 2 13 TV VCR 2 3 2 9 ...

Страница 200: ...r Off and Event Timers 5 32 Reminder Event Timers 5 22 Restricted Programs and Event Timers 5 32 Reviewing Event Timers 5 32 Scheduling Conflicts 5 29 Types of Event Timers 5 22 VCR Event Timers 5 22 Weekly Event Timers 5 25 5 26 F Factory Default Settings 4 28 Fast Forward Button 2 3 2 13 Favorites Lists 1 4 4 14 Changing the Name of a Favorites List 4 17 Creating or Modifying a Favorites List 4 ...

Страница 201: ... 2 Summary 6 2 Unpacking and Checking Contents 6 3 Weather and Wind Considerations 6 13 What You Need 6 6 What You Need to Have 6 6 What You Need to Know 6 6 Wiring from the Antenna to the Recorder 7 11 Wiring Your System Together 7 18 Your Broadcast TV Antenna 3 13 Installation and Setup 6 1 Installation Kit 6 7 Installing and Wiring Your System 7 1 Installing Batteries in the Remote 6 8 Installi...

Страница 202: ...10 Programming the Remote Control 4 39 Programming the Remote for Other Equipment 4 39 Programs A 8 Available Services 1 5 Blacked Out A 7 Event Timers 5 22 On Screen Program Guide 1 4 Ordering Pay Per View 4 13 Ordering Your Programming 7 17 Select Using Themes 4 12 Themes 1 4 Type 5 22 Viewing in Other Languages 4 33 Mode Button 2 9 Modes Changing on the Remote 3 2 Programming the Remote Control...

Страница 203: ...wn Left Right Arrow Buttons 2 2 Wiring from the Antenna 7 11 Wiring to Other Equipment 7 18 Record Button 2 3 2 13 Record Safety Tab 5 4 Recording 5 3 Reducing UHF Remote Control Range 4 41 Remote Control 1 4 2 7 About the IR Remote 2 8 About the UHF Remote 2 8 Address Button 2 12 Auto Track Button 2 12 Buttons 2 9 Cable TV Box Codes 4 45 Cancel Button 2 12 Changing Modes 3 2 Counter Reset Button ...

Страница 204: ...owed 5 29 Mon Fri Event Timers 5 28 S Safety Instructions ii Recommendations 6 13 6 14 SAP Second Audio Program 5 18 Satellite Antenna 2 14 A 9 Aiming for the Strongest Signal 7 12 Cable Clip Optional 6 5 Components 6 4 Dish 6 5 Dual Output LNBF 6 4 Finding the Satellites 6 9 Fine Tuning the Aim 7 12 Grounding and Wiring 7 8 Installation 7 1 Installing on a Metal Pole 7 6 LNBF 6 4 Mast Assembly 6 ...

Страница 205: ...requency UHF A 9 Unlocking the Recorder Buttons 4 24 Unlocking the System 4 26 Unpacking and Checking Contents 6 3 Up Down Left Right Arrow Buttons 2 2 2 10 Uplink Center 1 2 Uplink Center Mail 1 4 User Preferences 3 11 Using Favorites Lists 4 14 Using the System 4 1 V VCR Codes 4 45 VCR Features 5 1 Very High Frequency VHF A 9 VHF A 9 Video Connection A 9 Video Stabilizer 5 11 View Button 2 11 Vi...

Страница 206: ...Page I 8 User and Installation Guide NOTES ...

Страница 207: ...he World Wide Web For warranty service or for information about the features and operation of the HM DSR100U call JVC at 1 800 252 5722 For more information on JVC products see JVC s home page at http www jvc com on the World Wide Web HM DSR100U COPYRIGHT 1997 VICTOR COMPANY OF JAPAN LTD U Printed in Japan 0997MNV UN YP JVC COMPANY OF AMERICA DIVISION OF US JVC CORP 41 Slater Drive Elmwood Park N ...

Отзывы: