INDOOR MONITORING
o
Setting (Once setting is done, start from the “Regular
Operation” below)
Creating a QR Code
o
Enter values in the required items for indoor monitoring.
0
For indoor monitoring, it is not necessary to perform settings other than
the password and HTTP port.
Items other than the above mentioned are used for “OUTDOOR
MONITORING”. When using outdoor monitoring, enter each item and
perform the settings again.
If connection fails, check that the contents entered for each item are
correct, regenerate the QR code and set the camera.
0
Password: set a password to connect this camera to the device via an
access point. (Not more than 8 characters)
0
DDNS: Set the connection environment to the internet. Set to OFF when
outdoor monitoring is not used.
0
User name (DDNS): set an user name for the obtained DDNS account.
0
Password (DDNS): set a password for the obtained DDNS account.
0
UPnP: Set to “ON” if the UPnP protocol may be used to connect the device
to the network.
0
HTTP Port: Set the port number for connecting to the internet. Normally
set to “80”.
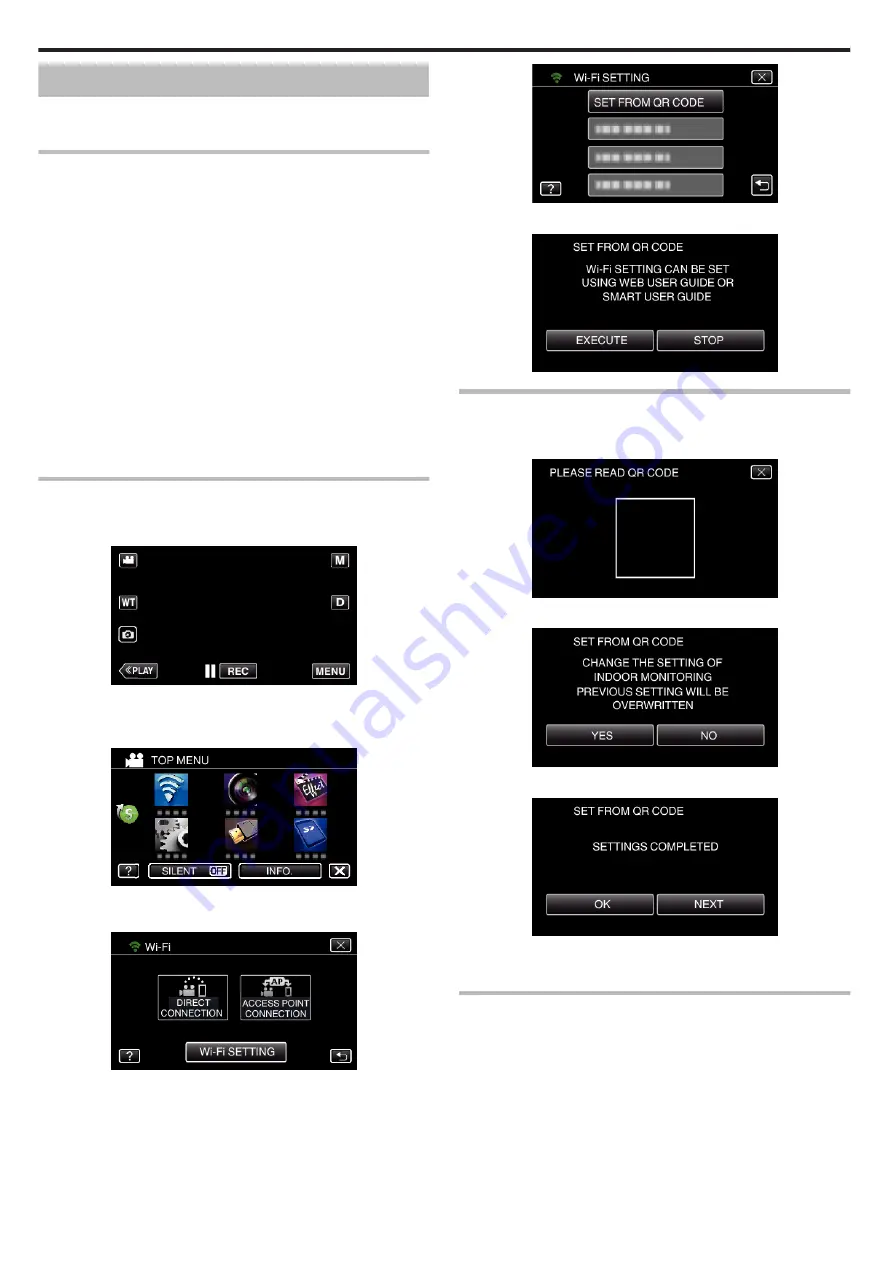
Display the screen for reading the QR code.
1
Tap “MENU”.
(Operation on this camera)
.
0
The top menu appears.
2
Tap the “Wi-Fi” (
Q
) icon.
(Operation on this camera)
.
3
Tap “Wi-Fi SETTING”.
(Operation on this camera)
.
4
Tap “SET FROM QR CODE”.
.
5
Tap “EXECUTE”.
.
Read a QR code.
1
Read a QR code.
(Operation on this camera)
.
2
Tap “YES”.
.
3
Tap “OK”.
.
0
Tap “NEXT” to return to the screen to read the QR code.
0
Set contents are saved.
Registering the access points (wireless LAN router) to this
unit
o
Wi-Fi Protected Setup (WPS) Registration
1
Tap “MENU”.
(Operation on this camera)
Using Wi-Fi by Creating a QR Code
118
Содержание GZ-RX110
Страница 1: ...CAMCORDER LYT2730 005A Detailed User Guide GZ RX110 GZ RX115 ...
Страница 164: ......


