Getting Star
ted
EN
I
15
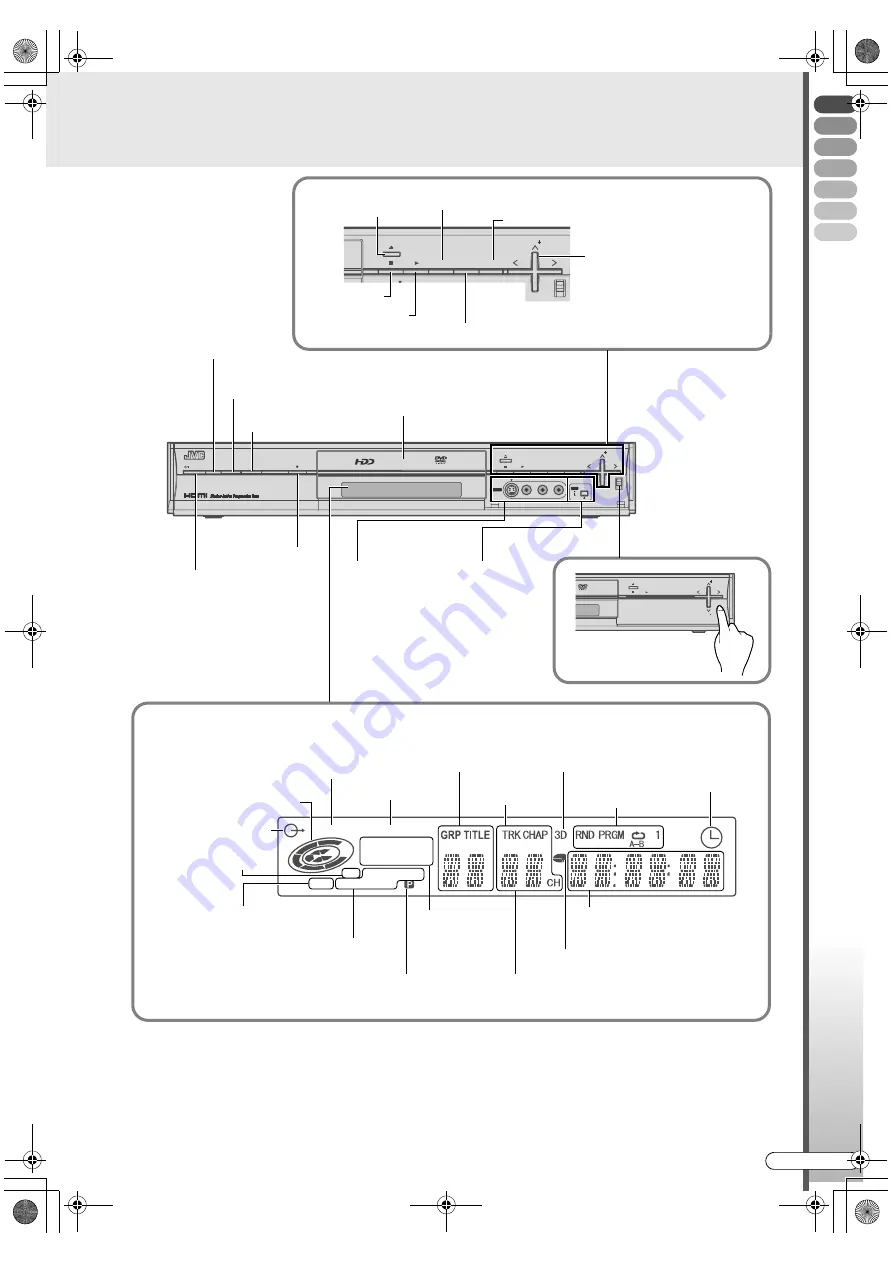
Functions of Each Part
0
There are 4 levels of brightness that can be set for the front display panel.
Setup Menu
A
DIMMER (DURING POWER
ON)
B
[
P102]
c
0
Messages may be displayed depending on the operation.
•
When the power plug is inserted: Alternating display of
A
PLEASE
B
and
A
WAIT
B
.
•
When a disc is loaded:
A
READING
B
HDD DVD
VR
-RAM
LPCM
VPS/PDC
FR
XP SP LP EP
+-RW VCD
F-1
DV
DV IN
PR
ENTER
NAVIGATION GUIDE
F-1
S-VIDEO
VIDEO L(MONO) AUDIO
R
DV
DV
IN/OUT
STANDBY/ON
PR
HDD
DVD
RAM/RW
ENTER
NAVIGATION GUIDE
F-1
S-VIDEO
VIDEO L(MONO) AUDIO
R
DV
DV IN
PR
RAM/RW
ENTER
NAVIGATION GUIDE
PR
PUSH-OPEN
Open/Close
Confirm
Stop
Play
Show programme listing
Change channels
(Up/Down)
Select
(Up/Down/Left/Right)
Operate HDD
Disc tray
Power (On/Off)
Infrared receptor
Dubbing
Connect video
cassette
recorder, etc.
[
P23]
Connect DV
camcorder
[
P23]
Press at PUSH - OPEN
to open the cover.
Disc operation indicator
Linear PCM indicator
Information Display during Disc Playback
Group
Title
Track
Chapter
Surround indicator
Playback mode indicator
Recording mode
indicator
Indicates the rate
during FR.
Image output indicator
Progressive Output
Disc type indicator
Recording/Playback time/Clock
display
With information display in alphabet.
Disc remaining time indicator
Recording
Front View
Front Display Panel
Display the Library Database Navigation screen
Operate DVD
VR mode disc
indicator
HDD mode indicator
Receiving channel display
CH lights up.
VPS/PDC reception indicator
VPS/PDC recording indicator
Video indicator
DR-MH300SE.book Page 15 Thursday, November 24, 2005 9:12 AM


