background image

35

Operating the Main Menu

ENGLI

S

H

DEUTSH

FRAN

Ç

AIS

ITALIANO

ESPA

Ñ

OL

DLA-M5000CLE (Re)/ LCT0979-002A / ENGLISH

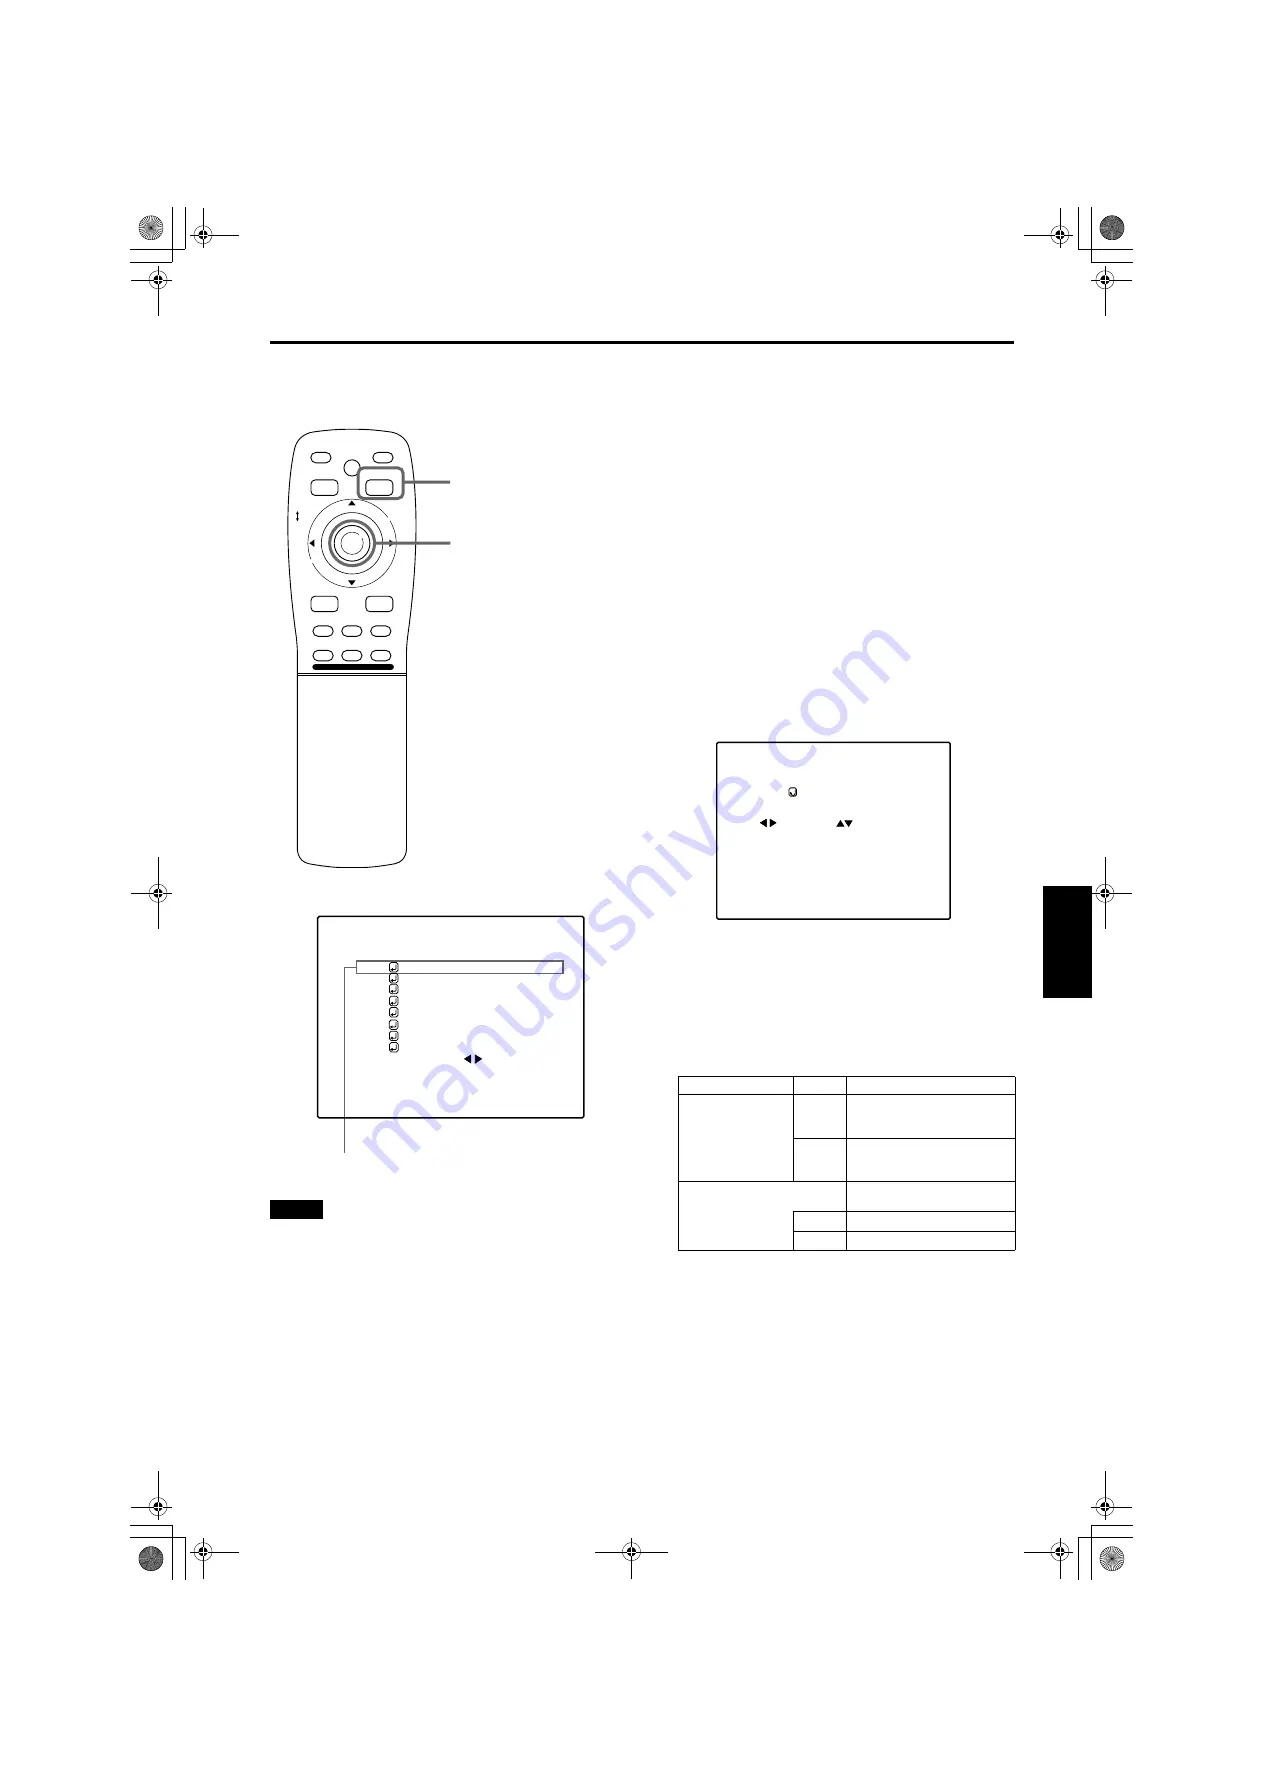
Adjusting the Pixel Clock

Remote control unit

Main menu

Notes

• The selected item is shown in magenta color. Items shown 

in gray color cannot be operated or set in the current mode. 

• A dim screen could be caused by insufficient adjustment of 

brightness and contrast. Before adjusting phase, make 
sure that brightness and contrast are correctly adjusted.

The pixel clock should be adjusted mainly for computer-
related inputs. (Normally, it does not need to be adjusted for 
video inputs.) If a wide stripe appears on the screen, adjust 
the lateral size of video image and the display area (tracking 
adjustment) so the stripe disappears.
Also, if text on the video screen appears flickering or dim, 
make adjustment so it becomes clear (phase adjustment).

1

Press the MENU/ENTER button.

• The main menu appears on the screen.

2

Press MENU/ENTER toward the 

5

 or 


mark to select a submenu item, “PIXEL 
CLOCK”.

• The selected item (displayed in text) is shown in 

magenta color on the screen.

3

Press the MENU/ENTER button.

• The submenu items of the PIXEL CLOCK menu 

appears on the screen.

4

Press MENU/ENTER toward the 

2

3

5

 or 

 mark to adjust “TRACKING” 

and “PHASE”.

• Adjust the tracking and phase of the video screen 

being projected. To adjust the phase, first check for 
correct tracking adjustment.

* To reset to the factory-set adjustment values, press the 

remote control’s PRESET button. 
Tracking and phase are reset to the factory-set 
adjustment values.

To return to the main menu, press the PAGE 
BACK button. To finish the main menu, 
press PAGE BACK again.

• To finish the menu display from the submenu display 

(PIXEL CLOCK menu), press PAGE BACK twice.

PAGE BACK button

MENU/ENTER button

MEN

U/E

N

T

E

R

QUICK

ALIGN.

AV HIDE

OPERATE

PRESET

AV

SHIFT

ZOOM

FOCUS

LENS

U

T

+

D

W

RGB/COMPUTER

LENS

LOCK

UNLOCK

PAGE BACK

N T S C ( 4 8 0 i )
E N G L I S H

                P I X E L   C L O C K
                P O S I T I O N
                P I C T U R E
                O P T I O N S
                S O U R C E
                C H A N N E L
                U S E R   S O U R C E   S E T   U P
                D I S P L A Y   S I Z E

D E C O D E R
L A N G U A G E

Y P B P R

                  C H :     1
H D T V ( 1 0 8 0 i )

Submenu item (PIXEL CLOCK)

Adjustment item

Button

Adjustment content

TRACKING

2

The screen shrinks laterally 
(right-to-left). 
(–255 

+

 0 

+

 +255)

3

The screen extends laterally 
(right-to-left). 
(–255 

=

 0 

=

 +255)

PHASE

Set to a position where text 
appears clear.

5

(–127 

=

 0 

=

 +127)

(–127 

+

 0 

+

 +127)

                      P I X E L   C L O C K

T R A C K I N G             P H A S E
                              0                             0

(PIXEL CLOCK menu)

DLA-M5000LE&SCE Eng Re.book  Page 35  Tuesday, March 12, 2002  3:59 PM

Содержание DLA-M5000LE

Страница 1: ...V SHIFT ZOOM FOCUS RM M4100G REMOTE CONTROL UNIT LENS U T D W RGB COMPUTER LENS LOCK UNLOCK PAGE BACK SUPER PROJECTOR MANUEL D INSTRUCTIONS SUPER PROJECTEUR DLA M5000LE DLA M5000SCE INSTRUCTIONS LCT0979 002B LCT0979 002B_Cover fm Page 1 Tuesday September 10 2002 3 55 PM ...

Страница 2: ...LCT0979 002A_Cover fm Page 2 Tuesday March 12 2002 4 03 PM ...

Страница 3: ...moving from a low temperature to high temperature as this causes condensation which may result in fire electric shock or other hazards Do not place this product on an unstable cart stand or table The product may fall causing serious injury to a child or adult and serious damage to the product The product should be mounted according to the manufacturer s instructions and should use a mount recommen...

Страница 4: ...nce this indicates a need for service When replacement parts are required be sure the service technician has used replacement parts specified by the manufacturer or with same characteristics as the original part Unauthorized substitutions may result in fire electric shock or other hazards Upon completion of any service or repairs to this product ask the service technician to perform safety checks ...

Страница 5: ... not correspond with the coloured making identifying the terminals in your plug proceed as follows The wire which is coloured green and yellow must be connected to the terminal which is marked with the letter E or the safety earth or coloured green or green and yellow The wire which is coloured blue must be connected to the terminal which is marked with the letter N or coloured black The wire whic...

Страница 6: ...Main Menu AV Input 30 Configuration of the Main Menu Computer related input 31 Operating the Main Menu Basic Operation of the Main Menu 32 Changing the Color System 33 Changing the Language Display 34 Adjusting the Pixel Clock 35 Adjusting the Screen Position 36 Adjusting Picture Quality 37 Setting and Adjusting Other Functions OPTIONS 40 Changing Setting the Source 43 Setting Up Channels 46 Setti...

Страница 7: ...ter on page 58 Deposition of dirt on the filter works to reduce the cooling effect causing heat to build up inside which could cause a fire or malfunction 4 AC IN power input terminal This is the power input terminal where the supplied power cord is connected For details refer to page 22 5 MAIN POWER switch This is the main power switch When it is turned on the projector goes into stand by state a...

Страница 8: ...additional remote sensor is provided on the front of the projector The effective operating distance of the remote control is 10 m from each of the sensors The effective operating range of angles is 50 left and right and 15 up and down q Exhaust vent for the light source lamp power supply Warm air comes out of this vent from the cooling fan for the light source lamp power supply This fan continues ...

Страница 9: ... indicator blinking 6 EMERGENCY indicator Memo About the emergency mode The emergency mode is shown when the following anomalies have occurred with the projector the EMERGENCY indicator blinks In the emergency mode projection is automatically interrupted and the cooling fans operate for about 10 minutes except the cooling fan for the light source lamp power supply which continues running as long a...

Страница 10: ...hown When no menu is shown Press the button and button at the same time QUICK ALIGNMENT Quick Alignment is displayed on the screen and the quick alignment function works TRACKING PHASE H POS and V POS are automatically adjusted When the adjustment is finished the display goes off automatically Memo The quick alignment function Works for computer input RGB 1 and 2 input terminals signals Does not w...

Страница 11: ...xternally 6 RGB OUT RGB output terminal D sub 3 row 15 pin The computer input signal projected on the screen is output A display unit can be used by connecting it to this terminal 7 RGB IN RGB input 2 terminal BNC These are input terminals for analog RGB signals vertical sync V signals and horizontal sync H signals composite signals CS Devices which have analog RGB signal output terminals can be c...

Страница 12: ... buttons see page 12 5 RGB COMPUTER button Use this button to select the devices connected to the projector s RGB IN RGB input 1 and 2 input terminals Each time you press the button the selection changes as follows 6 FOCUS button Use these buttons to adjust the focus of the projected picture 7 REMOTE terminal Use a remote control cable to connect between the projector and the remote control For de...

Страница 13: ... button Use this button to automatically adjust TRACKING PHASE H POS and V POS of the projected video During the automatic adjustment QUICK ALIGNMENT Quick Alignment appears on the screen and disappears after it is finished Memo Quick alignment function Does not work for video input EXT IN input terminal signals Works only for computer related RGB 1 and 2 input terminals signals CAUTION Automatic ...

Страница 14: ...ries AA R6 size supplied in the remote control as illustrated below 3 Close the back cover First fit the claw on the back cover into the case then close the back cover in the direction of the arrow Precautions for using batteries If batteries are used incorrectly they may crack or leak liquid This could cause a fire burn malfunction or staining or damaging the surrounding Beware of the following D...

Страница 15: ...nditioner so the temperature inside becomes equal to the outside temperature Allowable minimum space required CAUTION Since the projector weighs approx 70 kg 154 lbs be sure to use four or more people when lifting or moving it otherwise the projector could possibly drop causing personal injury and or damage to the projector Do not install the projector in the following places There is much water h...

Страница 16: ...urning it is recommended that the projector be fixed to its stand with bolts When mounting the projector to the ceiling first install a special shelf and then set the projector on it securely For safety and maintenance purposes a suitable facility is necessary to easily lift and lower the projector from the shelf for maintenance access 305 mm or more DLA M5000LE SCE Eng Re book Page 14 Tuesday Mar...

Страница 17: ...revent damage to the projector during shipment a shift center lock pin was used to fix the lens mechanism when the projector was shipped out the factory If you implement SHIFT LENS on the setting menu and the lens does not either move up or down the shift center lock pin may not have been removed Consult your dealer or service center CAUTIONS and NOTES When installing the screen use a 4 3 aspect r...

Страница 18: ...000 30 901 13 000 26 762 23 000 21 606 33 000 15 192 43 000 7 096 4 000 30 528 14 000 26 295 24 000 21 026 34 000 14 467 44 000 6 167 5 000 30 146 15 000 25 818 25 000 20 434 35 000 13 725 45 000 5 213 6 000 29 756 16 000 25 331 26 000 19 828 36 000 12 966 46 000 4 231 7 000 29 356 17 000 24 833 27 000 19 209 37 000 12 189 47 000 3 221 8 000 28 948 18 000 24 324 28 000 18 577 38 000 11 392 48 000 ...

Страница 19: ...e Projection Distance m Remarks GL M4023SZ zoom lens 80 300 80 600 5 06 18 65 5 06 37 19 3 1 wide 60 200 60 300 8 65 28 56 8 65 42 79 7 1 tele GL M4015S fixed focus lens 69 208 65 250 2 09 6 50 1 97 7 83 500 600 400 300 200 100 5 10 0 15 20 25 30 35 40 45 Relationship of screen size vs projection distance Screen Size Type Projection Distance m WIDE 3 1 Fixed Focus Lens 1 5 1 In the shaded areas in...

Страница 20: ...ignals are not handled Some signals other than listed above can be displayed But they require adjustment Even some of the signals listed above may require adjustment depending on the video board used When a signal other than listed above is input the screen could be partially erased or an unneeded fold over screen could appear Even signals in the frequency range that can be input may not be displa...

Страница 21: ...sk the dealer where you purchased the projector or a local service center to adjust the projector It is recommended that you use a video deck that is equipped with an image signal correction function such as time base corrector or frame synchronizer R RGB Y C VIDEO G H CS B V PR R Y PB B Y Y RGB OUT RS 232C REMOTE RGB IN 2 CONTROL EXT IN RGB IN 1 Example of a basic system By connecting an RGB swit...

Страница 22: ...e There are some note types which do not allow the computer s LCD to work if an external display is connected With such a note type the LCD display and external display output need to be switched To monitor connector RGB output devices Laser video disc player etc Computer cable available separately To RGB IN 2 Separate cable available separately To RGB IN 1 To RGB OUT Cable supplied with the displ...

Страница 23: ...ter If you connect the cable terminal of the remote control and the REMOTE terminal of the projector with a remote control cable you can use the remote control in a place or at an angle from which the infrared beam cannot reach the projector R RGB Y C VIDEO G H CS B V PR R Y PB B Y Y RGB OUT RS 232C REMOTE RGB IN 2 CONTROL EXT IN RGB IN 1 Desktop type Note type To RS 232C connector Remote control ...

Страница 24: ...firmly After that turn the ring on the plug in the direction of the arrow to fix 2 Insert the plug of the supplied power cord into a wall outlet CAUTIONS Since the power requirement of the projector is high be sure to insert the power plug directly into a wall outlet This projector requires a single phase 3 wire 200V 240V wall outlet To use the projector Remove the lens cap CAUTION Be sure to remo...

Страница 25: ...y cut off and the projector s EMERGENCY indicator blinks goes into an emergency mode When the EMERGENCY indicator blinks turn off the main power switch after the fans have stopped running If the following abnormality occur to the projector it goes into an emergency mode the EMERGENCY indicator blinks When the projector goes into an emergency mode it stops projecting automatically and the cooling f...

Страница 26: ...l down mode the STAND BY indicator blinking About 10 minutes after the STAND BY indicator comes on steady stand by mode the cooling fans except the one for the light source lamp power supply will stop and then turn off the MAIN POWER switch Caution on extended projection When projection continues for an extended amount of time be sure to allow the lamp to be turned off for at least two minutes for...

Страница 27: ...n size Press the ZOOM W button To reduce the screen size Press the ZOOM T button Notes The adjustment of the screen size zoom adjustment can also be made on the setting menu For operating the setting menu refer to Making Basic Settings on page 29 When a fixed focus lens is used you cannot operate the setting menu ATTENTIONS DO NOT give any shock to this projector while operating it otherwise the l...

Страница 28: ...ojector s QUICK ALIGN and buttons at the same time During the automatic adjustment QUICK ALIGNMENT Quick Alignment appears on the screen and disappears automatically after the adjustment is completed Note This function works only for computer system inputs CAUTION When performing automatic adjustment using the quick alignment function Use a bright still picture screen It may not function correctly...

Страница 29: ...creen Note To change the menu language displayed English is set when the projector is shipped from the factory The language displayed can be selected from the following six languages N N N N Japanese ENGLISH DEUTSCH German ESPAÑOL Spanish ITALIANO Italian and FRANÇAIS French However some words such as QUICK ALIGNMENT Quick Alignment are displayed only in English Pronouns such as line display and s...

Страница 30: ...ears from the screen To use the remote control s PRESET button The PRESET button is used for adjustments made on the main menu or setting menu When resetting only the selected settings to the factory set values press the remote control s PRESET button Only the selected item s setting is reset to the factory set value Notes This button works only for numeric values It does not work for switching be...

Страница 31: ...UICK ALIGN buttons or To adjust and set multiple items repeat steps 2 and 3 To reset the adjustment value of the selected item TRACKING PHASE H POS or V POS to the factory set value press the remote control s PRESET button This button does not work for focus and zoom Memo To adjust and set items using the remote control unit Items can be adjusted or set by pressing the MENU ENTER button toward the...

Страница 32: ...kground color can be selected from BLUE CYAN BLACK GREEN MAGENTA RED and YELLOW COLOR TEMP Adjusts the color temperature of the image being projected Make adjustment when the image becomes reddish or bluish Color temperature can be set to LOW MIDDLE or HIGH ASPET CHANGE Selects the vertical to horizontal ratio of the image projected The factory set ratio is 4 3 When projecting high vision video im...

Страница 33: ...LA device the video image is then enlarged to a virtually full screen size of D ILA device and projected Resizing indication BACK COLOR Specifies the background color when there is no image signal Background color can be selected from BLUE CYAN BLACK GREEN MAGENTA RED and YELLOW COLOR TEMP Adjusts the color temperature of the video image being projected Make adjustment when the video image becomes...

Страница 34: ...SET UP DISPLAY SIZE DECODER LANGUAGE YPBPR CH 1 HDTV 1080i Submenu items Input line Source Channel Decoder color system Language Line display The selected input mode designation is displayed For input mode designation Y C VIDEO YPBPR RGB 1 and RGB 2 are available Source display The type of signal being input is displayed With this projector unique designations are previously given to specific hori...

Страница 35: ...anges as follows 3 Forward 2 Backward Memo About automatic signal identification AUTO is selected when shipped from the factory In AUTO the color system DECODER of the signal being input is automatically identified and indicated in Refer to the main menu display If operation in AUTO is unstable such as with color not being shown set to a dedicated color system in accordance with the color system o...

Страница 36: ...emo About language display English is selected when the projector is shipped from the factory The languages in the menu display are the following six N N N N Japanese ENGLISH English DEUTSCH German ESPAÑOL Spanish ITALIANO Italian and FRANÇAIS French However some text such as QUICK ALIGNMENT Quick Alignment is displayed only in English Unique designations such as line display and source display ar...

Страница 37: ...he submenu items of the PIXEL CLOCK menu appears on the screen 4 Press MENU ENTER toward the 2 3 5 or mark to adjust TRACKING and PHASE Adjust the tracking and phase of the video screen being projected To adjust the phase first check for correct tracking adjustment To reset to the factory set adjustment values press the remote control s PRESET button Tracking and phase are reset to the factory set...

Страница 38: ...t to the factory set adjustment values press the remote control s PRESET button H POS and V POS are reset to the factory set adjustment values To return to the main menu press the PAGE BACK button To finish the main menu press PAGE BACK again To finish the menu display from the submenu display POSITION menu press PAGE BACK twice PAGE BACK button MENU ENTER button MENU E N T E R QUICK ALIGN AV HIDE...

Страница 39: ...color on the screen 3 Press the MENU ENTER button The submenu items of the PICTURE menu appear on the screen When AV signals are input When computer related signals are input 4 Press MENU ENTER toward the 5 or mark to select the item to adjust The selected item displayed in text is shown in magenta color PAGE BACK button MENU ENTER button MENU E N T E R QUICK ALIGN AV HIDE OPERATE PRESET AV SHIFT ...

Страница 40: ... terminal adjustment items COLOR and TINT are indicated but cannot be adjusted For computer system input To adjust multiple items repeat steps 4 and 5 To reset all items to factory set adjustment values 0 press MENU ENTER toward the 5 or mark to select ALL RESET and press MENU ENTER To reset only the selected items ALL RESET excluded to the factory set adjustment value press the remote control s P...

Страница 41: ...N 25 G GAIN 30 and B GAIN 25 then CONTRAST becomes 25 and cannot be adjusted to any higher value To return to the main menu press the BACK COLOR button To finish the main menu press PAGE BACK again To finish the menu display from the submenu display PICTURE menu press PAGE BACK twice PAGE BACK button MENU ENTER button MENU E N T E R QUICK ALIGN AV HIDE OPERATE PRESET AV SHIFT ZOOM FOCUS LENS U T D...

Страница 42: ...ess the MENU ENTER button The submenu items of the options menu are displayed 4 Press MENU ENTER toward the 5 or mark to select an item to set adjust The selected item displayed in text is shown in magenta color PAGE BACK button MENU ENTER button MENU E N T E R QUICK ALIGN AV HIDE OPERATE PRESET AV SHIFT ZOOM FOCUS LENS U T D W RGB COMPUTER LENS LOCK UNLOCK PAGE BACK N T S C 4 8 0 i E N G L I S H ...

Страница 43: ...ES LINE DISPLAY 2 3 Sets whether to show the line display Y C VIDEO etc at the top of the projected screen or not Factory setting ON OFF Does not show the line display ON Shows the line display The line display disappears about 5 seconds after it is shown OFF j ON RIGHT LEFT REV 2 3 Reverses video image right to left Factory setting OFF OFF For the front method ON For upside hanging from the ceili...

Страница 44: ...C K C O L O R C O L O R T E M P A S P E C T C H A N G E S L E E P T I M E L A M P T I M E N O O N O F F O F F B P O N B L U E M I D D L E 4 3 0 M i n 1 0 H OPTIONS menu Adjustment item Button Adjustment content BACK COLOR 2 3 Sets background color when there is no input signal Factory setting BLUE COLOR TEMP 2 3 Sets the color temperature of the video image being projected Make adjustment when the...

Страница 45: ...is performed on a video deck etc the picture may be disturbed or intermitted depending on the device When inputting 480p or 720p DTV format signal in RGB 2 input mode use the dedicated source cannot be detected 1 Press the MENU ENTER button The main menu appears on the screen 2 Press MENU ENTER toward the 5 or mark to select SOURCE The selected item displayed in text is shown in magenta color 3 Pr...

Страница 46: ... procedure is finished To finish the menu display press PAGE BACK twice The display goes back to the main menu with the first press and the main menu is cleared with the second press PAGE BACK button MENU ENTER button MENU E N T E R QUICK ALIGN AV HIDE OPERATE PRESET AV SHIFT ZOOM FOCUS LENS U T D W RGB COMPUTER LENS LOCK UNLOCK PAGE BACK SOURCE HDTV 1080i A UTO NTSC 480i S DTV 480p HDTV 720p HDTV...

Страница 47: ...n in magenta color 2 Press MENU ENTER down to set a source By having a source set the source for the projector switches to the setting registered to the user source Pressing PAGE BACK twice will bring you back to the main menu To finish the main menu press PAGE BACK again PAGE BACK button MENU ENTER button MENU E N T E R QUICK ALIGN AV HIDE OPERATE PRESET AV SHIFT ZOOM FOCUS LENS U T D W RGB COMPU...

Страница 48: ... MENU ENTER button to set A submenu item CHANNEL setup selection menu appears on the screen If no LINE SOURCE or SW No item is registered unregistered characters are displayed on the screen 4 Press MENU ENTER toward the 5 or mark to select the channel CH whose contents you want to change The selected CH is shown in magenta color 5 Press MENU ENTER toward the 2 or 3 mark to select the item to set L...

Страница 49: ...k to the CHANNEL setup selection menu If the NONE of LINE items is selected and MENU ENTER is pressed all the settings LINE SOURCE and SW No of the CH already selected will be cleared erased If the selected channel is the same with the one in under the CHANNEL display at the top of the CHANNEL setup selection menu the registration or settings cannot be cleared Pressing PAGE BACK twice will bring y...

Страница 50: ...annel is the same with the one in under the CHANNEL display at the top of the CHANNEL setup selection menu the registration or settings cannot be cleared When USER is selected from SOURCE registration menu The USER SOURCE registration menu appears Registered user sources are indicated with check marks 1 Press MENU ENTER toward the 5 or mark to select a source from the SOURCE items The selected ite...

Страница 51: ... to its user name which is registered as a SOURCE If you place the cursor on a SOURCE item with a check mark attached and press MENU ENTER down straight the check mark will disappear making the item unregistered as a SOURCE item Pressing PAGE BACK twice will bring you back to the main menu To finish the main menu press PAGE BACK again PAGE BACK button MENU ENTER button MENU E N T E R QUICK ALIGN A...

Страница 52: ...tion or settings cannot be cleared 2 Press the PAGE BACK button to set When you press PAGE BACK the switcher number is set and the display returns to the CHANNEL setup selection menu Be careful that if you set the same switcher number to a few channels and operate using the switcher number the youngest number channel is switched to because channels are read in the order of channel numbers Note You...

Страница 53: ...d the 5 or mark to select a channel number The numbers that you can select from are from 1 to 10 and AUTO If you press MENU ENTER toward the mark the number becomes smaller and pressing the button toward 5 makes the number larger Pressing PAGE BACK cancels the selection 3 Press the MENU ENTER button to set The screen switches automatically to the line and source which are set for the channel PAGE ...

Страница 54: ...cted CH is shown in magenta color 5 Press the MENU ENTER button to set The line input source and switcher number registered to the channel are selected To be able to select a channel line input and sources need to be already registered PAGE BACK button MENU ENTER button MENU E N T E R QUICK ALIGN AV HIDE OPERATE PRESET AV SHIFT ZOOM FOCUS LENS U T D W RGB COMPUTER LENS LOCK UNLOCK PAGE BACK N T S ...

Страница 55: ...RCE SET UP menu appears on the screen is displayed for Nos which have no user source registered 4 Press MENU ENTER toward the 5 or mark to select a No where no user registration has been made The selected item text display is shown in magenta color 5 Press the MENU ENTER button to set The source data of the line now selected is registered as a user source and a temporary user name is displayed If ...

Страница 56: ...text display is shown in magenta color 5 Press MENU ENTER toward the 3 mark to select the USER NAME The selected item text display is shown in magenta color To be able to select a USER NAME a source needs to be already registered PAGE BACK button MENU ENTER button MENU E N T E R QUICK ALIGN AV HIDE OPERATE PRESET AV SHIFT ZOOM FOCUS LENS U T D W RGB COMPUTER LENS LOCK UNLOCK PAGE BACK A U T O E N ...

Страница 57: ... 5 or mark to select positions where to enter characters The display returns to the USER SOURCE SET UP screen To delete a user name overwrite the user name with spaces However if this user name area is registered as a source to any other channel on the CHANNEL setup selection menu or if this user name area is selected in AUTO mode or dedicated forced mode the user name cannot be deleted The user n...

Страница 58: ...button The main menu appears on the screen 2 Press MENU ENTER toward the 5 or mark to select a submenu item DISPLAY SIZE The selected item text display is shown in magenta color 3 Press the MENU ENTER button to set A submenu item DISPLAY SIZE adjustment menu appears on the screen 4 Press MENU ENTER toward the 5 or mark to select H PIXEL then press MENU ENTER toward the 2 or 3 mark to set the numbe...

Страница 59: ... MENU ENTER button toward the 2 or 3 mark to set the horizontal position 12 Press MENU ENTER toward the 5 or mark to select V CENTER then press MENU ENTER button toward the 2 or 3 mark to set the vertical position To return to the main menu press PAGE BACK To finish the main menu press PAGE BACK again Display size setting menu Range of settings MENU E N T E R QUICK ALIGN AV HIDE OPERATE PRESET AV ...

Страница 60: ...indicator is lit then tun off the MAIN POWER switch After that disconnect the power cord from the wall outlet and the projector For detailed procedures refer to Turning off the power page 24 2 Remove the filter cover screws Using a Phillips screwdriver remove the six screws fixing each filter Two filters are used one on the right side and the other on the back of the projector 3 Remove the filters...

Страница 61: ...LAMP indicator comes on Also at the start of projection lamp energized the message REPL LAMP appears on the projection screen for about two minutes Then the light source lamp needs to be replaced When lamp s service has reached 1000 hours the projector s LAMP indicator starts blinking The specified lamp replacement period is 1000 hours but depending on use conditions the replacement period may var...

Страница 62: ...urn off the MAIN POWER switch remove any blocking objects and turn on the MAIN POWER switch again 7 8 15 Video image does not appear Is the correct input selected Select the correct inputs with the AV and RGB buttons 25 Are connected devices connected correctly Connect connected devices correctly 19 20 Are signals being supplied from the connected devices Set connected devices correctly Are input ...

Страница 63: ...r G on sync being input Input separate sync signals for vertical sync V and horizontal sync H signals 9 Isn t signal with much jitter or skew distortion being input to a video deck Input signals with little jitter or distortion Is the source setting correctly selected Isn t a wrong source forced mode selected Set the source setting to AUTO If the problem still persists set it to the correct dedica...

Страница 64: ... turning on and off the power see page 24 Remote control unit does not work Are batteries installed correctly Match the polarities of batteries correctly to and to 12 Are batteries exhausted Replace with new batteries 12 Is there a shielding object between the remote control unit and the remote sensor Remove any shielding objects Is the distance too long Use the remote control unit at a nearer poi...

Страница 65: ...AV IN input The Y C S video and VIDEO composite video signals can be input with the video board installed Y C 1 line mini DIN 4 pin 1 With the video board separately available installed Y luminance signal 1V p p 75Ω negative sync C chroma signal 0 286V p p burst signal 75Ω NTSC 0 3V p p burst signal 75Ω PAL VIDEO 1 line BNC 1 With the video board separately available installed Composite video sign...

Страница 66: ...gative polarity CS 1V p p to 5V p p high impedance positive negative polarity Vertical sync signal V V 1V p p to 5V p p high impedance positive negative polarity Some connected devices may not correspond to composite sync CS or G on sync signal RGB OUT RGB OUTPUT RGB OUT 1 line D sub 3 row 15 pin 1 Analog RGB signal R 0 7V p p 75Ω B 0 7V p p 75Ω G 0 7V p p 75Ω G on sync 1V p p 75Ω negative sync Ho...

Страница 67: ...GB IN 2 CONTROL EXT IN RGB IN 1 230 30 30 688 793 42 42 18 18 59 59 DTV Formats 480i 480p 720p 1080i 1080 24sF Signal Standard ITU R BT 601 4 SMPTE 293M SMPTE 296M SMPTE 274M SMPTE 274M Scanning Line Frame 525 525 750 1125 1125 Effective Samples Scanning Lines 720 485 720 483 1280 720 1920 1080 1920 1080 Field Frequency Hz 59 94 59 94 60 59 94 60 59 94 48 Line Frequency Hz 15734 31468 5 45000 4495...

Страница 68: ...used for adding composite video signal input and Y C S Video function to the projector 1 2 3 4 Pin number Signal name 1 GND Y 2 GND C 3 Y 4 C 3 5 6 9 4 8 2 1 7 Pin number Signal name Pin number Signal name 1 N C 6 N C 2 RD 7 N C 3 TD 8 N C 4 N C 9 N C 5 GND 1 2 3 4 5 6 7 8 9 10 11 12 13 14 15 Pin number Signal name Pin number Signal name 1 Red 9 N C 2 Green 10 GND SYNC 3 Blue 11 GND 4 N C 12 N C 5...

Страница 69: ...érature à une température élevée Cela produit une condensation d humidité qui peut entraîner un incendie une électrocution ou d autres dangers Ne placez pas cet appareil sur un chariot une table ou tout autre support instable L appareil pourrait tomber et ainsi blesser gravement un enfant ou un adulte ainsi qu être lui même sérieusement endommagé L appareil doit être monté conformément aux instruc...

Страница 70: ...s ses performances cela indique qu il doit être réparé Quand le remplacement des pièces est nécessaire assurez vous que le réparateur a utilisé les pièces de rechange spécifiées par le fabricant ou possédant les mêmes caractéristiques que la pièce originale Un remplacement non autorisé peut entraîner in incendie une électrocution ou autres dangers Après que cet appareil a subi une réparation ou un...

Страница 71: ...ndent peut être pas avec les couleurs identifiant les bornes de votre fiche Procédez comme suit Le fil coloré en vert et jaune doit être connecté à la borne marquée par la lettre E ou le symbole de terre ou de couleur vert et jaune Le fil qui est coloré en bleu doit être connecté à la borne qui est marqué par la lettre N ou de couleur noire Le fil qui est coloré en marron doit être connecté à la b...

Страница 72: ...e d ordinateur 31 Utilisation du menu principal Utilisation de base du menu principal 32 Changement du système de couleur 33 Changement de l affichage de la langue 34 Ajustement de l horloge de pixels 35 Réglage de la position de l écran 36 Ajustement de la qualité de l image 37 Réglage et ajustement d autres fonctions OPTIONS 40 Modification définition de la source 43 Configuration des canaux 46 ...

Страница 73: ...de poussière sur le filtre peut être la cause d une surchauffe interne avec un risque d incendie ou de mauvais fonctionnement de l appareil 4 Prise AC IN d entrée d alimentation C est la prise d entrée d alimentation où le cordon d alimentation est connecté Pour plus de détails référez vous à page 22 5 Commutateur MAIN POWER C est l interrupteur d alimentation principal Lorsque le projecteur est m...

Страница 74: ...existe un autre capteur de télécommande à l avant de l appareil La distance de fonctionnement effective de la télécommande est de 10 m à partir de chacun des capteurs La plage de fonctionnement effective des angles est de 50 à droite et à gauche et de 15 vers le haut et vers le bas q Évents de sortie d air pour l alimentation de la lampe L air chaud du ventilateur de refroidissement de l alimentat...

Страница 75: ...asse en mode d alerte l indicateur EMERGENCY clignote 6 Indicateur EMERGENCY Mémo À propos du mode d alerte Le mode d alerte est activé lorsque les anomalies suivantes se sont produites l indicateur EMERGENCY clignote En mode d alerte la projection est automatiquement interrompue et les ventilateurs de refroidissement tournent pendant environ 10 minutes sauf le ventilateur de refroidissement de l ...

Страница 76: ...nu est affiché Lorsqu aucun menu n est affiché Appuyez sur les boutons et simultanément QUICK ALIGNMENT Alignement rapide est affiché à l écran et la fonction d alignement rapide est appliquée TRACK PHASE POSITION H et POSITION V sont ajustés automatiquement Une fois l ajustement terminé l affichage disparaît automatiquement Mémo La fonction d alignement rapide Fonctionne pour les signaux d entrée...

Страница 77: ...e d ordinateur projeté à l écran est sorti à cet endroit Une unité d affichage peut être raccordée à cette prise 7 Prise RGB IN entrée RGB 2 BNC Ce sont des prises d entrée pour les signaux RGB analogiques les signaux de synchronisation verticale V et les signaux de synchronisation horizontale H signaux composites CS Les appareils possédant des bornes de sortie de signal analogique RVB peuvent êtr...

Страница 78: ...t des touches voir page 12 5 Touche RGB COMPUTER Utilisez cette touche pour sélectionner les appareils raccordés aux prises d entrée RGB IN entrée RGB 1 et 2 du projecteur À chaque pression sur cette touche la sélection change comme suit 6 Touche FOCUS Utilisez ces touches pour régler la mise au point de l image projetée 7 Prise REMOTE Uilisez un câble de télécommande pour raccorder le projecteur ...

Страница 79: ... pour ajuster automatiquement les paramètres TRACK PHASE POSITION H et POSITION V de la vidéo projetée Pendant l ajustement automatique QUICK ALIGNMENT Alignement rapide apparaît à l écran puis disparaît une fois l alignement terminé Mémo La fonction d alignement rapide Ne fonctionne pas pour les signaux d entrée vidéo prise d entrée EXT IN Fonctionne uniquement pour les signaux d entrée de type o...

Страница 80: ...couvercle arrière Placez tout d abord l excroissance du couvercle arrière dans le boîtier puis fermez le couvercle arrière dans le sens de la flèche Précautions pour l utilisation des piles Si les piles sont incorrectement utilisées elles peuvent se fissurer ou fuir Ceci peut être la cause d un feu d une brûlure un mauvais fonctionnement une salissure ou un endommagement de l environnement Faites ...

Страница 81: ...z une climatisation pour que la température à l intérieur de l espace soit égale à la température extérieure Espace minimum requis PRECAUTION Le projecteur pesant environ 70 kg veillez à employer au moins quatre personnes pour le soulever ou le déplacer dans le cas contraire vous risqueriez de le faire tomber et de provoquer des blessures corporelles et ou des dommages au projecteur N installez pa...

Страница 82: ...areil il est recommandé de fixer le projecteur à son support à l aide de boulons Lors de la fixation du projecteur au plafond installez d abord une étagère spéciale puis fixez y le projecteur À des fins de maintenance et de sécurité un mécanisme doit être mis en place afin de permettre de soulever et de descendre facilement le projecteur de son étagère 305 mm ou plus DLA M5000LE SCE Fre Re book Pa...

Страница 83: ...er un projecteur industriel PRECAUTION Pour prévenir tout dommage au projecteur lors de l expédition une broche de verrouillage centrale a été utilisée pour fixer le mécanisme de l objectif lors de l expédition de l appareil depuis l usine Si vous mettez en œuvre SHIFT LENS sur le menu de réglage et que l objectif ne se déplace ni vers le haut ni vers le bas il se peut que la broche de verrouillag...

Страница 84: ...00 22 173 32 000 15 900 42 000 8 000 3 000 30 901 13 000 26 762 23 000 21 606 33 000 15 192 43 000 7 096 4 000 30 528 14 000 26 295 24 000 21 026 34 000 14 467 44 000 6 167 5 000 30 146 15 000 25 818 25 000 20 434 35 000 13 725 45 000 5 213 6 000 29 756 16 000 25 331 26 000 19 828 36 000 12 966 46 000 4 231 7 000 29 356 17 000 24 833 27 000 19 209 37 000 12 189 47 000 3 221 8 000 28 948 18 000 24 ...

Страница 85: ...bjectif Taille de l écran Type Distance de projection m Remarques Objectif zoom GL M4023SZ 80 300 80 600 5 06 18 65 5 06 37 19 Largeur 3 1 60 200 60 300 8 65 28 56 8 65 42 79 Télé 7 1 Objectif à mise au point fixe GL M4015S 69 208 65 250 2 09 6 50 1 97 7 83 500 600 400 300 200 100 5 10 0 15 20 25 30 35 40 45 Rapport entre la taille de l écran et la distance de projection Taille de l écran Type Dis...

Страница 86: ...CS V Les signaux suivants sont présélectionnés Remarques Les signaux entrelacés ne sont pas pris en charge Certains signaux autres que ceux listés peuvent être affichés Mais ils nécessitent un ajustement Même certains des signaux listés ci dessus peuvent demander un réglage suivant le type de carte vidéo utilisée Lorsqu un signal autre que ceux listés est entré l écran peut être en partie effacé o...

Страница 87: ...ns ce cas demandez à votre revendeur ou au centre de service local de régler le projecteur Nous vous conseillons d utiliser un magnétoscope équipé d une fonction de correction de signal image par exemple un synchronisateur de trames ou un correcteur de base de temps R RGB Y C VIDEO G H CS B V PR R Y PB B Y Y RGB OUT RS 232C REMOTE RGB IN 2 CONTROL EXT IN RGB IN 1 Exemple de système de base En racc...

Страница 88: ... portables qui ne permettent pas un fonctionnement de l écran LCD si un moniteur externe est raccordé Avec ce type d ordinateur il est nécessaire de basculer la sortie du moniteur LCD avec la sortie du moniteur externe Vers le connecteur du moniteur Appareils avec sortie RGB Lecteur de laser vidéo disque etc Câble d ordinateur disponible séparément Vers RGB IN 2 Câble séparé disponible séparément ...

Страница 89: ...gréé Si vous raccordez la prise du câble de télécommande et la prise REMOTE du projecteur avec un câble de télécommande vous pouvez utiliser la télécommande à un endroit ou selon un angle dans lequel le rayon infrarouge ne peut pas atteindre le projecteur R RGB Y C VIDEO G H CS B V PR R Y PB B Y Y RGB OUT RS 232C REMOTE RGB IN 2 CONTROL EXT IN RGB IN 1 Type bureau Type portable Vers le connecteur ...

Страница 90: ...sur la prise dans le sens de la flèche afin de la fixer en place 2 Insérez la prise du cordon d alimentation fourni dans une prise murale PRECAUTIONS Etant donné que le projecteur consomme beaucoup d électricité veillez à brancher directement sa prise d alimentation dans une prise murale Ce projecteur exige une prise d alimentation 200V 240V une phase 3 fils Pour utiliser le projecteur Enlevez le ...

Страница 91: ...CY du projecteur clignote il passe en mode alerte Lorsque l indicateur EMERGENCY clignote éteignez l interrupteur d alimentation principal après l arrêt des ventilateurs Si l anormalité suivante se produit le projecteur passe en mode alerte l indicateur EMERGENCY clignote Lorsque le projecteur passe en mode alerte il interrompt automatiquement la projection et les ventilateurs de refroidissement c...

Страница 92: ...as couper le commutateur MAIN POWER pendant le mode de refroidissement l indicateur STAND BY clignote Environ 10 minutes après l allumage de l indicateur STAND BY mode d attente les ventilateurs de refroidissement sauf celui de la lampe s arrêtent et l interrupteur MAIN POWER s éteint Avertissement relatif aux projections prolongées Lorsque vous effectuez une projection prolongée assurez vous d ét...

Страница 93: ...ran Appuyez sur la touche ZOOM W Pour réduire la taille de l écran Appuyez sur la touche ZOOM T Remarques Le réglage de la taille de l écran réglage du zoom peut aussi s effectuer par l intermédiaire du menu de réglage Pour plus d informations sur l utilisation de ce menu voir Réglages de base à la page 29 Lorsque vous utilisez un objectif à mise au point fixe vous ne pouvez pas utiliser le menu d...

Страница 94: ...z l affichage du menu puis appuyez simultanément sur les touches QUICK ALIGN et du projecteur Pendant l ajustement automatique QUICK ALIGNMENT Alignement rapide apparaît à l écran puis disparaît automatiquement une fois l alignement terminé Remarque Cette fonction n est valable que pour les entrées de système informatique PRECAUTION Lors de l ajustement automatique avec la fonction d alignement ra...

Страница 95: ... Remarque Pour modifier la langue du menu affiché A la sortie d usine c est l anglais qui est la langue définie La langue d affichage peut être choisie parmi les six langues suivantes N N N N japonais ENGLISH DEUTSCH allemand ESPAÑOL espagnol ITALIANO italien et FRANÇAIS français Cependant certains termes tels que QUICK ALIGNMENT Alignement rapide ne sont affichés qu en anglais Les pronoms tels qu...

Страница 96: ...t temporairement de l écran Pour utiliser la touche PRESET de la télécommande La touche PRESET est utilisée pour les réglages effectués dans le menu principal ou le menu de réglage Lorsque vous souhaitez restaurer uniquement les paramètres sélectionnés sur leurs valeurs d usine appuyez sur la touche PRESET de la télécommande Seul l élément sélectionné est restauré sur sa valeur d usine Remarques C...

Страница 97: ...ches QUICK ALIGN ou Pour ajuster et définir plusieurs éléments répétez les étapes 2 et 3 Pour restaurer la valeur d usine de l élément sélectionné TRACK PHASE POSITION H ou POSITION V appuyez sur la touche PRESET de la télécommande Cette touche ne fonctionne pas pour la mise au point ni le zoom Mémo Pour ajuster et définir des éléments à l aide de la télécommande Les éléments peuvent être ajustés ...

Страница 98: ...pour la couleur de l arrière plan sont BLEU CYAN NOIR VERT MAGENTA ROUGE et JAUNE TEMP COULEUR Ajuste la température de couleur de l image projetée Effectuez cet ajustement lorsque l image est trop rouge ou trop bleue La température de couleur peut être réglée sur BASSE NORMAL ou HAUTE CHG FORMAT Sélectionne le rapport vertical horizontal de l image projetée Le rapport réglé en usine est 4 3 Lors ...

Страница 99: ...in écran de périphérique D ILA puis projetée Indication de redimensionnement COULEUR FOND Spécifie la couleur de l arrière plan lorsqu il n y a aucun signal image Les différents choix possibles pour la couleur de l arrière plan sont BLEU CYAN NOIR VERT MAGENTA ROUGE et JAUNE TEMP COULEUR Ajuste la température de couleur de l image vidéo projetée Effectuez cet ajustement lorsque l image vidéo est t...

Страница 100: ...HANNEL USER SOURCE SET UP DISPLAY SIZE DECODUER LANGUAGE YPBPR CH 1 HDTV 1080i Eléments de sous menu Ligne d entrée Source Canal Décodeur système de couleur Langue Affichage Ligne La désignation du mode d entrée sélectionné est affichée Pour la désignation du mode d entrée Y C VIDEO YPBPR RGB 1 et RGB 2 sont disponibles Affichage de la source Le type de signal entré est affiché ici Avec ce project...

Страница 101: ...s la marque 2 ou 3 le système de couleur change comme suit 3 Avant 2 Arrière Mémo A propos de l identification automatique de signal AUTO est sélectionné à la sortie d usine Avec AUTO le système de couleur DECODUER du signal entré est identifié automatiquement et indiqué entre Consultez l affichage du menu principal Si le fonctionnement en mode AUTO est instable couleurs qui n apparaissent pas par...

Страница 102: ... de la langue A la sortie d usine c est l anglais qui est la langue sélectionnée Les langues disponibles pour les menus sont les six langues suivantes N N N N japonais ENGLISH anglais DEUTSCH allemand ESPAÑOL espagnol ITALIANO italien et FRANÇAIS français Cependant certains termes tels que QUICK ALIGNMENT Alignement rapide ne sont affichés qu en anglais Les désignations uniques telles que l affich...

Страница 103: ...s éléments de sous menu du menu HORLOGE PIXCEL apparaissent à l écran 4 Appuyez sur MENU ENTER vers la marque 2 3 5 ou pour ajuster TRACK et PHASE Ajustez l alignement et la phase de l écran vidéo en cours de projection Pour ajuster la phase vérifiez d abord que l alignement est correct Pour restaurer les valeurs d usine appuyez sur la touche PRESET de la télécommande L alignement et la phase sont...

Страница 104: ...PRESET de la télécommande POSITION H et POSITION V sont réinitialisés sur les valeurs d usine Pour revenir au menu principal appuyez sur la touche PAGE BACK Pour quitter le menu principal appuyez de nouveau sur PAGE BACK Pour quitter l affichage de menu à partir de l affichage de sous menu menu POSITION appuyez deux fois sur la touche PAGE BACK Touche PAGE BACK Touche MENU ENTER MENU E N T E R QUI...

Страница 105: ...hé en magenta à l écran 3 Appuyez sur la touche MENU ENTER Les éléments de sous menu du menu IMAGE apparaissent à l écran Lorsque des signaux AV sont entrés Lorsque des signaux d ordinateur sont entrés 4 Appuyez sur MENU ENTER vers la marque 5 ou pour sélectionner l élément à ajuster L élément sélectionné texte affiché est affiché en magenta Touche PAGE BACK Touche MENU ENTER MENU E N T E R QUICK ...

Страница 106: ...o sont entrés sur la prise COMPUTER IN 2 les éléments d ajustement COULEUR et TEINTE sont indiqués mais ne peuvent pas être ajustés Pour l entrée de système d ordinateur Pour ajuster plusieurs éléments répétez les étapes 4 et 5 Pour réinitialiser tous les éléments sur les valeurs d usine 0 appuyez sur MENU ENTER vers la marque 5 ou pour sélectionner RAZ puis appuyez sur MENU ENTER Pour restaurer u...

Страница 107: ...leurs d ajustement jusque GAIN R 25 GAIN V 30 et GAIN B 25 puis le CONTRASTE devient 25 et ne peut pas être réglé sur une valeur supérieure Pour revenir au menu principal appuyez sur la touche COULEUR FOND Pour quitter le menu principal appuyez de nouveau sur PAGE BACK Pour quitter l affichage de menu à partir de l affichage de sous menu menu IMAGE appuyez deux fois sur la touche PAGE BACK Touche ...

Страница 108: ...ionné texte affiché est affiché en magenta à l écran 3 Appuyez sur la touche MENU ENTER Les éléments de sous menu du menu d options sont affichés 4 Appuyez sur MENU ENTER vers la marque 5 ou pour sélectionner un élément à définir ajuster L élément sélectionné texte affiché est affiché en magenta Touche PAGE BACK Touche MENU ENTER MENU E N T E R QUICK ALIGN AV HIDE OPERATE PRESET AV SHIFT ZOOM FOCU...

Страница 109: ... en haut de l écran de projection Réglage d usine ON OFF Ne montre pas l affichage ligne ON Montre l affichage ligne L affichage ligne disparaît au bout de 5 secondes environ OFF j ON INVERS D G 2 3 Inverse l image vidéo de droite à gauche Réglage d usine OFF OFF Pour la méthode avant ON Lorsque l appareil est accroché au plafond OFF j ON INVERS H B 2 3 Inverse l image vidéo de haut en bas Réglage...

Страница 110: ... O N C O U L E U R F O N D T E M P C O U L E U R C H G F O R M A T V E I L L E T E M P S L A M P E N O N O N O F F O F F B P O N B L E U N O R M A L 4 3 0 M i n 1 0 H r s Menu OPTIONS Elément d ajustement Touche Contenu de l ajustement COULEUR FOND 2 3 Définit la couleur de l arrière plan lorsqu il n y a aucun signal d entrée Réglage d usine BLEU TEMP COULE UR 2 3 Définit la température de couleur...

Страница 111: ...e vitesse triple vitesse est effectuée sur un magnétoscope etc il se peut que l image soit intermittente ou perturbée selon le périphérique Lors de l entrée d un signal au format DTV 480p ou 720p en mode d entrée RGB2 la source dédiée ne peut pas être détectée 1 Appuyez sur la touche MENU ENTER Le menu principal apparaît à l écran 2 Appuyez sur MENU ENTER vers la marque 5 ou pour sélectionner SOUR...

Страница 112: ...édiée est affiché entre et la procédure de configuration est terminée Pour quitter le menu appuyez deux fois sur PAGE BACK L affichage revient au menu principal à la première pression et la seconde pression efface ce menu Touche PAGE BACK Touche MENU ENTER MENU E N T E R QUICK ALIGN AV HIDE OPERATE PRESET AV SHIFT ZOOM FOCUS LENS U T D W RGB COMPUTER LENS LOCK UNLOCK PAGE BACK SOURCE HDTV 1080i A ...

Страница 113: ... sélectionné texte affiché est affiché en magenta 2 Appuyez sur MENU ENTER pour sélectionner une source Lorsqu une source est définie la source du projecteur bascule sur le paramètre enregistré sur la source utilisateur Deux pressions sur la touche PAGE BACK vous ramènent au menu principal Pour quitter le menu principal appuyez de nouveau sur PAGE BACK Touche PAGE BACK Touche MENU ENTER MENU E N T...

Страница 114: ...r définir le paramètre Un élément de sous menu menu de configuration sélection CHANNEL apparaît à l écran Si aucun élément LINE SOURCE ou SW No n est enregistré des caractères non enregistrés sont affichés à l écran 4 Appuyez sur MENU ENTER vers la marque 5 ou pour sélectionner le canal CH dont vous souhaitez modifier le contenu Le CH sélectionné est affiché en magenta 5 Appuyez sur MENU ENTER ver...

Страница 115: ...nné et l affichage revient au menu Configuration de CHANNEL sélection Si le NONE des éléments LINE est sélectionné et que vous appuyez surMENU ENTER tous les paramètres LINE SOURCE et SW No du CH déjà sélectionné seront effacés Si le canal sélectionné est le même que celui entre sous l affichage CHANNEL en haut du menu Configuration de CHANNEL sélection menu l enregistrement ou les paramètres ne p...

Страница 116: ...le canal sélectionné est le même que celui entre sous l affichage CHANNEL en haut du menu Configuration de CHANNEL sélection menu l enregistrement ou les paramètres ne peuvent pas être effacés Lorsque USER est sélectionné dans Menu d enregistrement de SOURCE Le Menu d enregistrement de USER SOURCE apparaît Les sources utilisateur enregistrées sont indiquées par des coches 1 Appuyez sur MENU ENTER ...

Страница 117: ...he est placée à côté de son nom d utilisateur qui est enregistré comme SOURCE Si vous placez le curseur sur un élément de SOURCE associé à une coche et que vous appuyez sur MENU ENTER la coche disparaît et l élément est désenregistré comme élément de SOURCE Deux pressions sur la touche PAGE BACK vous ramènent au menu principal Pour quitter le menu principal appuyez de nouveau sur PAGE BACK Touche ...

Страница 118: ...être effacés 2 Appuyez sur la touche PAGE BACK pour définir le paramètre Lorsque vous appuyez sur PAGE BACK le numéro de commutateur est défini et l affichage revient au Configuration de CHANNEL sélection menu Attention si vous définissez le même numéro de commutateur sur plusieurs canaux et utilisez le numéro de commutateur le basculement s effectuera sur le canal au chiffre le plus petit car les...

Страница 119: ...nné 2 Appuyez sur MENU ENTER vers la marque 5 ou pour sélectionner un numéro de canal Vous pouvez sélectionner un numéro compris entre 1 et 10 ainsi que AUTO Si vous appuyez sur MENU ENTER vers la marque le numéro décroît et si vous appuyez vers 5 le numéro augmente Une pression sur PAGE BACK annule la sélection 3 Appuyez sur la touche MENU ENTER pour définir le paramètre L écran bascule automatiq...

Страница 120: ...haitez basculer Le CH sélectionné est affiché en magenta 5 Appuyez sur la touche MENU ENTER pour définir le paramètre L entrée de ligne la source et le numéro de commutateur enregistrés sur le canal sont sélectionnés Pour pouvoir sélectionner un canal l entrée de ligne et les sources doivent déjà être enregistrées Touche PAGE BACK Touche MENU ENTER MENU E N T E R QUICK ALIGN AV HIDE OPERATE PRESET...

Страница 121: ...T UP apparaît à l écran est affiché pour les numéros n ayant pas de source utilisateur enregistrée 4 Appuyez sur MENU ENTER vers la marque 5 ou pour sélectionner un No pour lequel aucun enregistrement d utilisateur n a été effectué L élément sélectionné texte affiché est affiché en magenta 5 Appuyez sur la touche MENU ENTER pour définir le paramètre Les données de source de la ligne maintenant sél...

Страница 122: ...ur à modifier L élément sélectionné texte affiché est affiché en magenta 5 Appuyez sur MENU ENTER vers la marque 3 pour sélectionner le USER NAME L élément sélectionné texte affiché est affiché en magenta Pour pouvoir sélectionner un USER NAME il faut qu une source soit déjà enregistrée Touche PAGE BACK Touche MENU ENTER MENU E N T E R QUICK ALIGN AV HIDE OPERATE PRESET AV SHIFT ZOOM FOCUS LENS U ...

Страница 123: ... caractères 4 Appuyez sur MENU ENTER vers la marque 5 ou pour sélectionner les positions où entrer les caractères L affichage revient à l écran USER SOURCE SET UP Pour supprimer un nom d utilisateur remplacez le par des espaces Toutefois si cette zone de nom d utilisateur est déjà enregistrée comme source sur un autre canal dans le menu configuration de CHANNEL sélection ou si elle est sélectionné...

Страница 124: ...l écran 1 Appuyez sur la touche MENU ENTER Le menu principal apparaît à l écran 2 Appuyez sur MENU ENTER vers la marque 5 ou pour sélectionner DISPLAY SIZE L élément sélectionné texte affiché est affiché en magenta 3 Appuyez sur la touche MENU ENTER pour définir le paramètre Un élément de sous menu menu de réglage DISPLAY SIZE apparaît à l écran 4 Appuyez sur MENU ENTER vers la marque 5 ou pour sé...

Страница 125: ...NU ENTER vers la marque 2 ou 3 pour régler la position horizontale 12 Appuyez sur MENU ENTER vers la marque 5 ou pour sélectionner V CENTER puis appuyez sur MENU ENTER vers la marque 2 ou 3 pour régler la position verticale Pour revenir au menu principal appuyez sur PAGE BACK Pour quitter le menu principal appuyez de nouveau sur PAGE BACK Menu de réglage de la taille d affichage Plage de valeurs M...

Страница 126: ... STAND BY est allumé puis éteignez l interrupteur MAIN POWER Après cela débranchez le cordon d alimentation de la prise de courant et du projecteur Pour des procédures détaillées consultez Mise hors tension page 24 2 Retirez les vis du couvercle du filtre A l aide d un tournevis Phillips retirez les six vis qui retiennent chaque filtre Deux filtres sont utilisés l un sur le côté droit et l autre à...

Страница 127: ...apide Lorsque le nombre d heures d utilisation de la lampe dépasse 900 l indicateur LAMP du projecteur s allume et au début de la projection le message CHG LAMPE apparaît sur l écran de projection pendant environ deux minutes La lampe doit alors être remplacée Une fois les 1000 heures de service atteintes l indicateur LAMP du projecteur commence à clignoter La période de remplacement spécifiée de ...

Страница 128: ... de la fin préparez une nouvelle lampe ou remplacez la en avance 40 58 Le projecteur a t il été déplacé de son lieu d installation Vérifiez la position d installation L appareil étant alimenté le fonctionnement commence puis s arrête après quelques minutes Les prises ou évents d air sont ils bloqués Eteignez l interrupteur MAIN POWER enlevez tout objet qui bloque et rallumez l interrupteur MAIN PO...

Страница 129: ...ifiez les spécifications du signal entré et de la carte d entrée vidéo Le câble d entrée est il raccordé correctement Vérifiez les raccordements du câble 20 La durée de vie de la lampe est elle écoulée Vérifiez le nombre d heures d utilisation de la lampe dans le menu et si la durée de vie de la lampe est presque écoulée consultez le revendeur chez qui vous avez acheté le projecteur ou un centre d...

Страница 130: ...ez les signaux et les raccordements 18 22 Le réglage du déplacement d objectif est impossible La broche de verrouillage centrale mise en place pour l expédition a t elle bien été enlevée Retirez la broche de verrouillage centrale puis effectuez les réglages nécessaires Pour des instructions sur l enlèvement de la broche de verrouillage centrale consultez le revendeur chez qui vous avez acheté le p...

Страница 131: ...78 Hz EXT IN entrée AV IN Les signaux Y C S vidéo et VIDEO vidéo composite peuvent être entrés avec la carte vidéo installée Y C 1 ligne mini DIN 4 broches 1 Avec la carte vidéo disponible séparément installée Y signal de luminance 1V p p 75Ω synchro négative C signal de chroma 0 286V p p salve 75Ω NTSC 0 3V p p salve 75Ω PAL VIDEO 1 ligne BNC 1 Avec la carte vidéo disponible séparément installée ...

Страница 132: ...rité positif négatif CS 1V p p à 5V p p haute impédance polarité positif négatif Signal de synchro verticale V V 1V p p à 5V p p haute impédance polarité positif négatif Certains périphériques raccordés peuvent ne pas correspondre à la synchro de composante CS ou au signal de G sur synchro RGB OUT SORTIE RGB RGB OUT 1 ligne D sub 3 rangées 15 broches 1 Signal RGB analogique R 0 7V p p 75Ω B 0 7V p...

Страница 133: ...CONTROL EXT IN RGB IN 1 230 30 30 688 793 42 42 18 18 59 59 Formats DTV 480i 480p 720p 1080i 1080 24sF Norme de signal ITU R BT 601 4 SMPTE 293M SMPTE 296M SMPTE 274M SMPTE 274M Trame Ligne de balayage 525 525 750 1125 1125 Echantillons effectifs Lignes de balayage 720 485 720 483 1280 720 1920 1080 1920 1080 Fréquence de champ Hz 59 94 59 94 60 59 94 60 59 94 48 Fréquence de ligne Hz 15734 31468 ...

Страница 134: ... 2 3 4 5 6 7 8 9 10 11 12 13 14 15 Numéro de broche Nom du signal Numéro de broche Nom du signal 1 Rouge 9 N C 2 Vert 10 GND SYNC 3 Bleu 11 GND 4 N C 12 N C 5 N C 13 H SYNC 6 GND Rouge 14 V SYNC 7 GND Vert 15 N C 8 GND Bleu Informations sur les articles vendus séparément Objectif de projection GL M4023SZ GL M4015S Objectif zoom 3 1 7 1 Objectif à mise au point fixe 1 5 1 Carte vidéo PK G1101D Cart...

Страница 135: ...LCT0979 002A_Cover fm Page 3 Tuesday March 12 2002 4 03 PM ...

Страница 136: ...VICTOR COMPANY OF JAPAN LIMITED 0902 HY CR VP 2002 VICTOR COMPANY OF JAPAN LIMITED DLA M5000LE DLA M5000SCE SUPER PROJECTOR LCT0979 002B_Cover fm Page 4 Tuesday September 10 2002 3 56 PM ...

Отзывы: