background image

99

Quilting (straight stitch) / Matelassage (point droit) 

Acolchado (pespunte recto) / Квилтинг (прямая строчка)

Quilting is the process of sewing the top layer of fabric, with quilting cotton in between and a bottom layer of fabric underneath.

By using the walking foot, the machine feeds both top and bottom fabrics together at the same time, so fabric shifting is eliminated. 

Le matelassage est l'opération de coudre un tissu, sur une couche de coton à matelasser avec en dessous une autre couche de tissu.

En utilisant le pied entraineur, l'ouvrage sera entrainé en même temps par dessus et par dessous, ce qui évitera aux différentes couches 

de tissus de se décaler l'une par rapport à l'autre.

Acolchar es el proceso de coser una capa superior de tejido, con fibr

a de acolchar en medio y una capa de tejido inferior debajo de ésta. 

Con el prensatelas de doble arrastre, la máquina recibe los tejidos superior e inferior al mismo tiempo, de modo que el desplazamiento 

de tejido se elimina.

Квилтинг – процесс стачивания верхнего слоя ткани, промежуточного хлопчатобумажного и нижнего слоя.

При помощи шагающей лапки машина перемещает сразу верхний и нижний слой ткани и смещения одного слоя относительно 

другого не происходит.

 Pattern No. / Prog. No.

 Nº de patrón / Обpaзец №

 Practical 00 / Practical 00 

 Práctico 00 / прaктичеcкий 00

 Presser foot / Pied presseur

 Prensatelas / Прижимнaя лапкa

 Walking foot (N) / Pied entraineur (N)

 De doble arrastre (N)

 шагающая прижимная лапка (N)


 Attention

 Turn OFF the power switch before replacing the presser foot.


 Attention

 Eteindre la machine avant de remplacer le pied presseur.


 Atención

 Apague la máquina antes de sustituir el prensatelas.


 Внимание

 Перед заменой прижимной лапки отключите машину от электросети.

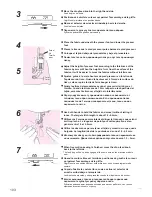
1

 Put top layer of fabric with patchwork and/or appliqué, quilting 

    cotton and bottom fabric together by using pin or basting 

    stitches.

 Assemblez le couche supérieure, le coton à matelasser et la 

    couche inférieur de tissu avec des épingles ou des points de 

    bâti.

 Una la capa superior de tejido con patchwork y/o aplicaciones, 

    la fibra de acolchar y el tejido inferior con alfileres o hilván.

 Сложите вместе и скрепите булавкой или наметкой 

    верхний слой ткани, промежуточный хлопчатобумажный и 

    нижний слой.

Setscrew for presser foot holder

Vis de fixation du support de pied presseur

Tornillo de ajuste del soporte de prensatelas

Установoчный винт для держателя 

прижимной лапки

Presser bar
Barre du pied
Barra del 

prensatelas

прижимнaя 

планкa

Presser foot holder

Support pied presseur

Soporte del prensatelas

держатель прижимной лапки

Optional accessory part / Accessoire en option / Accesorios opcionales / Дополнительные аксессуары

100

Содержание HZL-G Series

Страница 1: ...ile operating the machine ВНИМАНИЕ Перед началом работы внимательно прочитайте эту инструкцию по эксплуатации так как она содержит важную информацию по работе с машиной а также по технике безопасности 英 露 西 仏 Attention Avant de mettre la machine en marche lire attentivement et assimiler les règles de securité de ce manuel Conserver le manuel afin de pouvoir le consulter ultérieurement Atención Lea ...

Страница 2: ...Do not use bent needles 8 Do not pull or push fabric while stitching It may deflect the needle causing it to break 9 Switch the sewing machine off O when making any adjustments in the needle area such as threading needle changing needle threading bobbin or changing presser foot and the like 10 Always unplug sewing machine from the electrical outlet when removing covers lubricating or when making an...

Страница 3: ... properly This sewing machine will stop due to safety mechanism to prevent the machine from overheating when it sews slowly and for a long time In this event Start and Stop button will not light The sewing machine will return to working condition after about 10 minutes 2 Thank you for purchasing our products To safely and properly use this product please read the instruction manual carefully and u...

Страница 4: ...e pas utiliser d aiguilles courbes 8 Ne pas tirer ou pousser le tissu lorsque vous cousez cela pourrait abîmer voire casser l aiguille 9 Mettre l interrupteur de la machine en position O lorsque vous manipulez l aiguille ou l enfilez De même lorsque vous changez le pied presseur ou la canette such as threading 10 Débranchez toujours votre machine lorsque vous ôtez le capot lorsque vous la nettoyez ...

Страница 5: ...toyer la machine Ne pas exposer la machine directement au soleil ou dans une atmosphère humide Parce qu il y a des composants électronique et électrique dans la machine il convient donc de bien suivre ces recommandations afin d éviter toute détérioration de votre machine Utilisez ce produit dans une température comprise entre 5 et 40 degrés Celsius Si la température est extrêmement basse la machine...

Страница 6: ...ire de la ropa ni la empuje cuando esté cosiendo Puede deformar la aguja y acabar por romperla 9 Apague la máquina O cuando realice ajustes en el área de la aguja como al enhebrar y cambiar la aguja al enhebrar la canilla al cambiar el prensatelas etc 10 Desenchufe siempre la máquina de coser de la toma de corriente cuando retire cubiertas la lubrique o realice cualquier otro ajuste de servicio me...

Страница 7: ...ponga la máquina a la luz del sol directa ni a ambientes húmedos Puesto que esta máquina de coser incorpora microordenadores semiconductores y placas de circuito precisas preste atención a las situaciones siguientes Utilice este producto a una temperatura entre 5 y 40 ºC Si la temperatura es demasiado baja es posible que esta máquina coser no funcione correctamente El mecanismo de seguridad detend...

Страница 8: ...на может сломать иглу 7 Не пользуйтесь гнутыми иглами 8 При работе на машине не тяните и не толкайте ткань это может привести к поломке иглы 9 Выключайте машину 0 перед регулировкой в зоне действия иглы а также перед такими операциями как заправка нитки замена иглы намотка шпульки замена нажимной лапки и т п 10 Всегда отключайте швейную машину от электросети перед снятием крышек смазкой или любыми...

Страница 9: ...корректно Для предотвращения перегрева когда машина работала в медленном режиме длительное время срабатывает предохранительный механизм и машина останавливается В этом случае кнопка Start Пуск Stop Останов не подсвечена Швейная машина вернется к рабочему режиму примерно через 10 минут Спасибо за покупку швейной машины Для надежной и безопасной работы машины пожалуйста внимательно прочтите это руко...

Страница 10: ...itch 59 60 Buttonhole stitches 61 68 Standard buttonholing Keyhole buttonholing Buttonhole with gimp When changing the width of the buttonhole When changing the density of the seam Bartacking 69 70 Shirring and gathering 71 72 Pintucking 73 Welt seam 74 Decorative stitches and one point pattern 75 Scallop stitches 76 Contents Patchwork quilt Applique 77 78 Quilt 78 Decorative stitches Sewing lette...

Страница 11: ...rammes point droit Point zigzag 58 Surfilage 59 60 Boutonnières 61 68 Boutonnière standard Boutonnière à oeillet Boutonnière avec fil cordonnet Changement de la largeur de la boutonnière Changement de la densité du point Point d arrêt 69 70 Fronçage et bouillonné 71 72 Pintucking 73 Bordage 74 Points décoratif et programme un point 75 Point feston 76 Patchwork matelassage Motifs Appliqués 77 78 Quil...

Страница 12: ...Puntada en zig zag 58 Sobrehilado 59 60 Puntada para ojales 61 68 Ojales normales Ojales especiales Ojal con refuerzo Cambiar la anchura del ojal Cambiar la densidad de la puntada Presellado 69 70 Fruncido y fruncido elástico 71 72 Lorzas 73 Costura de refuerzo 74 Puntadas decorativas y una puntada de punto 75 Puntadas con festones 76 Colchas de patchwork Aplicación 77 78 Acolchado 78 Puntadas dec...

Страница 13: ...ания пуговичных петель 61 68 Стандартная пуговичная петля Пуговичная петля в форме замочной скважины Пуговичная петля с каркасной нитью Изменение ширины пуговичной петли Изменение плотности шва Выполнение закрепки 69 70 Сборки и буфы 71 72 Защипы 73 Обтачка каймой 74 Декоративные стежки и точечные рисунки 75 Фестоны 76 ПЭЧВОРК Аппликация 77 78 Выход 78 ДЕКОРАТИВНЫЕ СТРОЧКИ Буквы для вышивки и точе...

Страница 14: ...and wide table Ne mettre aucun objet lourd sur la boite et sur la rallonge de table No coloque objetos pesados en la maleta rígida y la mesa extensible Не размещайте тяжелые предметы на твердом ящике и широком столе 5 15 1 3 10 Principal parts Principaux éléments Componentes principales Главные детали 21 22 23 13 ...

Страница 15: ... 30 Needle setscrew 31 Needle 32 Presser foot 33 Hook cover release button 1 Variateur de vitesse 2 Carter avant 3 Position de l aiguille 4 Levier relevage pied 5 Coupe fil 6 Bouton coupe fil 7 Bouton Marche Arrêt 8 Bras libre Boite accessoires 9 Escamotage griffe 10 Touche réglage de tension du fil 11 Coiffe de la bobine grande 12 Porte bobine de fil 13 Dévidoir de canette 14 Ecran LCD 15 Bouton marc...

Страница 16: ... de T 4 Juego de agujas HA X 1 nº 11 1 nº 14 1 nº 16 1 para punto nº 11 1 5 Prensatelas para ojales manuales I 6 Canilla 3 7 Descosedor Cepillo de limpieza 8 Tapa para bobina de hilo pequeña 9 Prensatelas estándar A 10 Canilla 1 11 Tapa para bobina de hilo grande 12 Pedal el modelo JC 001 13 Manual de instrucciones este manual 14 Cable de alimentación 1 Pied presseur pour boutonnière E 2 Pied pres...

Страница 17: ...e Rouge Pas prêt à démarrer En appuyant sur le bouton rouge l aiguille avance point par point Orange La machine est en position de bobinage Botón de marcha parada Cuando pulse este botón la máquina empezará a coser lentamente hasta alcanzar la velocidad establecida en el regulador de velocidad Si pulsa de nuevo este botón la máquina se detendrá con la aguja en posición bajada El color del botón in...

Страница 18: ...tch Interrupteur Interruptor de alimentación Выключатель WARNING For U S A Canada only This appliance has a polarized plug one blade wider than the other To reduce the risk of electric shock this plug is intended to fit in a polarized outlet only one way If the plug does not fit fully in the outlet reverse the plug If it still does not fit contact a qualified electrician to install the proper outlet D...

Страница 19: ...a la máquina posición I Cuando el pedal esta conectado el pulsador de start stop no funciona para iniciar la máquina El pulsador Start no funciona para que la máquina empiece a coser El pulsador Stop no funciona para parar la máquina Использование ножной педали 1 Переведите переключатель питания в положение О 2 Вставьте вилку соединительного шнура педали в разъем педали на машине 3 Вставьте соедин...

Страница 20: ...ing button Pattern select mode Practical patterns One point patterns Letters 7 Memory button 8 Clear button 9 Pattern adjustment button Presser foot to be used marking Zigzag width Stitch length 3 Stitch length adjusting button 4 Automatic lock stitch button 5 Needle stop position switching button 1 Pattern selection button 2 Zigzag width adjusting button Pattern number G110 Needle stop position N...

Страница 21: ...usly it is programmable and you can choose the needle stop position either up or down When it is pressed either symbol or will be shown on the screen When sewing with symbol the needle stops at its highest position When sewing with the symbol the needle stops at its lowest position Needle stop position switching button When it is pressed either symbol or will be shown on the screen When sewing wit...

Страница 22: ...élection des programmes Programmes usuels Programmes un point Lettres 7 Touche de mémoire 8 Bouton annulation 9 Touche de réglage de programme Type de pied presseur à utiliser Largeur Zigzag Longueur du point 3 Touche de réglage de la longueur de point 4 Point de sécurité automatique 5 Bouton inversement position de l aiguille 1 Bouton sélection prog 2 Touche de réglage du zig zag Numéro du progra...

Страница 23: ...ersement Lorsque que l on appui de façon continue sur cette touche elle est programmable et vous pouvez choisir la position d arrêt de l aiguille soit haute soit basse En appuyant soit le symbolee ou s affichera à l écran Quand on coud avec le symbole l aiguille s arrête en position haute Quand on coud avec le symbole l aiguille s arrête en position basse Bouton inversement position de l aiguille E...

Страница 24: ...ión de patrón Modo de selección de patrón Patrones prácticos Patrones de un punto Letras 7 Pulsador de memoria 8 Botón Borrar 9 Pulsador de puntada Prensatelas que debe utilizarse marca Ancho de zigzag Longitud de la puntada 3 Pulsador de ajuste de longitud de puntada 4 Rematado automático 5 Botón conmutador de posición de parada de aguja 1 Botón de selección de patrón 2 Pulsador de ajuste de anch...

Страница 25: ...pulsador entonces la aguja se desplaza hacia arriba Si presiona el pulsador constante mente entonces se programará la posición de la aguja según usted decida la posición arriba o abajo Al pulsarlo se verá o bien el símbolo o bien en pantalla Si se cose con el símbolo la aguja se detendrá en su posición más alta Si se cose con el símbolo la aguja se detendrá en su posición más baja Botón conmutador...

Страница 26: ...чения выбора образца Режим выбора образца Используемые образцы Вышивание Буквы 7 Копка памяти 8 Кнопка сброса 9 Кнопка регулировки программы шитья Требуемая прижимная лапка маркировка Ширина зигзага Длина стежка 3 Кнопка регулировки длины стежка 4 Aвтоматическая закрепка 5 Кнопка переключения точки останова иглы 1 Кнопка выбора образца 2 Кпопка регулировки ширины зигзага Номер образца G110 Положен...

Страница 27: ...непрерывно это программируемая функция и вы можете выбрать где остановить иглу в позиции вверх или вниз При нажатии кнопки на экране отображается символ или При выполнении строчки с отображаемым символом игла останавливается в крайней верхней точке При выполнении строчки с отображаемым символом игла останавливается в крайней нижней точке Кнопка переключения точки останова иглы При нажатии кнопки н...

Страница 28: ...njury to the user and may cause malfunctions 27 Ножной регулятор Для запуска машины нажмите на ножной регулятор Чем больше нажим тем быстрее работает машина Регулятор скорости установит максимальную скорость выполнения строчки Нажим сильнее скорость выше нажим слабее скорость ниже Всегда содержите ножной регулятор в чистоте Важно не размещать какие либо предметы на ножном регуляторе так как это мо...

Страница 29: ...on extra haute El prensatelas puede colocarse en posición elevada o bajada por medio de la palanca de elevación del prensatelas 1 Posición bajada El prensatelas debe estar bajado al coser 2 Posición elevada normal Esta posición se utiliza para extraer el tejido o cambiar el prensatelas 3 Posición elevada adicional Esta posición se utiliza para colocar material pesado debajo del prensatelas Procure...

Страница 30: ... pied à un marquage Utilisez le pied approprié pour chaque programme de couture Instalación del prensatelas Alinee el pivote del prensatelas y la ranura en el soporte del prensatelas A continuación baje el soporte el prensatelas con la palanca de elevación del prensatelas Cada prensatelas posee una marca Utilice el prensatelas apropiado para el patrón de costura que deba coserse Установка прижимно...

Страница 31: ... Tornillo de ajuste del soporte del prensatelas установочный винт держателя лапки Presser foot holder Support du pied presseur Soporte del prensatelas деpжaтeль прижимной лапки Installing presser foot holder Align the screw hole at the presser bar with the hole of presser foot holder long groove Tighten the setscrew firmly by turning it to the right side Installation du support du pied presseur Ali...

Страница 32: ...олнения прямой строчки и строчки зигзаг Используйте эту лапку особенно для стачивания плотных тканей Overcasting presser foot Pied presseur surjet Prensatelas para sobrehilado Лапка для подрубки края C This presser foot is used exclusively for overcasting to prevent the cut edge of fabrics from fraying Ce pied est utilisé exclusivement pour surjeter le bord d un tissu pour éviter l éfilochage Este ...

Страница 33: ...ción abierto Открытая лапка только O This is used for the applique and decorative stitches Front part of the presser foot is open for better visibility Pour réaliser des coutures décoratives La partie avant du pied est ouverte pour une meilleure visibilité Se utiliza para aplicaciones y puntadas decorativas La parte frontal del prensatelas está abierto para facilitar la visibilidad Эта лапка испол...

Страница 34: ...33 ...

Страница 35: ... bobbin on the bobbin winding shaft 4 Installez la canette sur l axe de l enrouleur de canette 4 Coloque la canilla en el eje de bobinado de la canilla 4 Установите шпульку на ось для намотки шпульки 4 3 4 Press the bobbin winding regulator 5 towards the bobbin Start stop button now becomes orange When start stop button is pressed machine starts to wind the bobbin thread Appuyez le regulateur de l...

Страница 36: ...Enhebre la ranura A y B tirando del extremo del hilo Протяните конец нити через пазы A и B Setting the bobbin Installation de la canette Ajuste de la canilla Установка шпульки 1 3 2 Close the hook cover Start to sew after pulling up the bobbin thread After threading to the needle refer to Pulling up the bobbin thread page 40 Fermez la trappe du crochet Commencer à coudre après avoir relevé le fil d...

Страница 37: ...filage automatique du fil de l aiguille ne peut pas être utilisé Use una aguja del nº 11 16 e hilo del nº 30 90 Cuando se utilice aguja doble no puede utilizarse el enhebrador automático de agujas Используйте иглу 11 16 и нить 30 90 При работе с двойной иглой нельзя использовать устройство для автоматической заправки Align the marking at the hand wheel with the one on the machine body Alignez la mar...

Страница 38: ...37 ...

Страница 39: ...a Asegúrese de que el prensatelas esté levantado De lo contrario la máquina no se enhebrará correctamente Возьмите конец нити и направляйте нить по стрелке Убедитесь что прижимная лапка поднята В противном случае заправка нити в машину произведена неправильно Thread the guide 6 from the right hand side Enfilez le guide 6 à partir du côté droit Pase el hilo por la guía 6 desde el lado derecho Протян...

Страница 40: ...е нитезаправщик иглы наполовину Пока он не станет тяжелым и нить закрепите в фиксаторе нити A 39 Lower the needle threader fully Then thread the thread between the guides completely Needle threader will catch the thread through needle eye Abaisser totalement l enfileur d aiguille Ensuite enfiler complètement le fil entre les guides L enfileur attrapera le fil à travers le chas de l aiguille Baje el enh...

Страница 41: ...and lightly hold the end of the needle thread Relevez le pied presseur et tenez légèrement l extrémité du fil de l aiguille Levante el prensatelas y sostenga suavemente el extremo del hilo de la aguja Поднимите прижимную лапку и слегка придерживайте конец верхней нити Turn the hand wheel towards you to move the needle up and down Loop of bobbin thread will be pulled out when you will pull the needl...

Страница 42: ...и опустите прижимную лапку 2 Поверните винт для установки иглы на себя на 1 2 оборота и демонтируйте иглу Attaching the needle The needle cannot be inserted unless it is correctly positioned Hold the needle with its flat part facing away from you and insert it fully until it touches the stopper pin Securely tighten the needle setscrew Fixation de l aiguille l aiguille ne peut pas être insérée si el...

Страница 43: ...nt needle is used It will cause damage to the machine Contrôle de l aiguille Contrôlez de temps en temps que l aiguille est bien droite Une aiguille tordue provoquera des points de manque une casse de fil ou détériorera votre machine Attention La machine ne pourra pas coudre correctement si l aiguille n est pas bien installée et ou si elle est tordue Cela peut endommager la machine Comprobación de ...

Страница 44: ...s or letters Page 50 use knit needle for better finish Matière fil et aiguille Tissu Fil Aiguille HA 1 Tissus fins Lin Fil de soie No 80 90 Fil synthétique No 80 90 No 11 Crêpe Tricot Fil synthétique No 60 90 Aiguille jersey No 11 Laine et matières synthétiques Fil de soie No 80 Fil synthétique No 60 90 No 11 14 Tissus moyens Coton et matières synthétiques Fil synthétique No 50 60 No 11 14 Jersey lég...

Страница 45: ... рукой При выполнении декоративных строчек или вышивании букв стр 50 используйте иглу для трикотажа для выполнения более качественной отделки Tabla de tejidos hilos y agujas Tejido Hilo Aguja HA 1 Materiales finos Lino Hilo de seda No 80 90 Hilo normal No 80 90 Nº 11 Crespón Malla tricot Hilo normal No 60 90 Aguja para punto Nº 11 Lana y fibra sintética Hilo de seda No 80 Hilo normal No 60 90 Nº 11 ...

Страница 46: ...ormation du point fronçage et ou casse de fil Tensión del hilo equilibrada Pespunte recto los hilos de la aguja y de la canilla se entrelazan en la mitad del grosor del tejido A Puntada en zig zag el hilo de la aguja entra un poco más en el revés del tejido La máquina programada en 4 es para la mayoría de telas No obstante puede ser necesario un ajuste de acuerdo con el tejido y las aplicaciones de...

Страница 47: ...e Si la bonne tension n est pas obtenu contrôlez l enfilage du fil de l aiguille et de la canette Cuando el hilo de la aguja está poco tenso El hilo de la aguja se dirigirá hacia el lado del revés del tejido Gire el dial de ajuste de la tensión del hilo para escoger un número superior En caso de que no se obtenga un ajuste de tensión correcto compruebe el enhebrado de los hilos de la aguja y de la c...

Страница 48: ...r de arrastre arriba abajo hacia la izquierda después de coser Los dientes se engranarán automáticamente cuando la máquina vuelva a coser Переместите ручку для регулирования зубчатого двигателя ткани вправо если упор для изменения скорости подачи находится внизу чтобы выполнить строчки со свободным движением ткани квилтинга пришивания пуговиц и т д Переместите ручку зубчатой рейки влево по окончан...

Страница 49: ...iones аппликация Over casting stitch Surfilage Puntada de sobrehilado шов через край Blind stitch Point invisible Puntada invisible потайная строчка Straight reinforced stitch Point droit renforcé Pespunte recto reforzado прямая усиленная строчка Standard buttonholes Boutonnière Buttonhole выметание пуговичных петель Straight stitch Point droit Pespunte recto прямая строчка Refer to page Voir page ...

Страница 50: ...ck Point feston Puntada de lencería подгибочный шов Bar tack Point d arrêt Presillado короткая фигурная строчка Eyelet Oeillet Ojal петельный шов Darning Reprisage Zurcido скрепляющий шов Lock stitch stay stitches Point noué point de sécurité Puntada de seguridad fija закрытый стежок Zigzag stitch Point zigzag Puntada en zigzag строчка зигзаг Refer to page Voir page Vea la pág см стр 57 58 59 60 89...

Страница 51: ...елаемый номер рисунка 50 Decorative stitches and one point pattern Points décoratif et programme un point Puntadas decorativas y una puntada de punto Декоративные стежки и точечные рисунки 2 Letters Lettres Letras Буквы 3 Choose by pattern selection mode switching button Then choose desired stitch pattern No by pattern selection button Sélectionnez avec le bouton de sélecteur de point Ensuite choi...

Страница 52: ...prensatelas para empezar a coser Начало строчки Заведите верхнюю и нижнюю нить под прижимную лапку по направлению к задней стороне машины и опустите прижимную лапку чтобы начать выполнять строчку Attention Turn OFF the power switch before replacing the presser foot Attention Eteindre la machine avant de remplacer le pied presseur Atención Apague la máquina antes de sustituir el prensatelas Внимани...

Страница 53: ... на ткани черная кнопка автоматически примет исходное положение When changing the sewing direction Stop sewing in front of the predetermined position and then continue to sew stitch by stitch by using needle up down button until the target point Leave the needle inside the fabrics and raise the presser foot With the needle inside the fabrics change the sewing direction lower the presser foot and t...

Страница 54: ...ки нажмите на кнопку обратной строчки Пока эта кнопка нажата машина будет выполнять обратную строчку если кнопку отпустить то машина прекратит выполнение обратной строчки Во время выполнения обратной строчки машина работает на медленной скорости когда используется ножная педаль Машина будет выполнять обратную строчку почти на той же скорости что и при обычной строчке Если отпустить кнопку обратной...

Страница 55: ...he stitch length becomes smaller accordingly Pushing the displayed value becomes larger and the stitch length becomes larger Modification de la longueur du point Il est possible de changer la longueur du point avec la touche d ajustement de la longueur du point Appuyez la valeur à l écran devient plus petite et la longueur du point diminue Appuyez la valeur à l écran devient plus grande et la longu...

Страница 56: ...esta función После выбора образца строчки нажмите 1 раз Машина выполнит несколько стежком назад закрепление строчки обрежет обе нити верхнюю и нижнюю и остановится Символ на экране При повторном нажатии эта функция будет отключена After selecting a stitch pattern push one time The machine will sew a few reverse stitches lock stitches and stop Symbol on screen When is pushed once again this functio...

Страница 57: ... point de départ de la couture et commencez à coudre A La machine coud quelques points en arrière puis continue Coloque el tejido en posición de inicio de cosido y empiece a coser A La máquina coserá unas puntadas de remate y continuará Поместите ткань в позицию для начала строчки A Машина выполнит несколько стежков назад и продолжит строчку вперед 2 3 After selecting a pattern you can press to di...

Страница 58: ...ntada de refuerzo elástica ayuda a reforzar las costuras y se utiliza para coser tejido elástico o la parte del tejido sometida a tensión que tiene probabilidades de deshilacharse Укрепленная строчка стретч Укрепленная строчка стретч помогает закрепить края при стачивании эластичной ткани со стороны наиболее подверженной изнашиванию Straight stitch for elastic fabric Finished seams are elastic Thi...

Страница 59: ...aя лапкa Standard presser foot A Pied presseur standard A Prensatelas estándar A cтандартная прижимная лапка A Attention Turn OFF the power switch before replacing the presser foot Attention Eteindre la machine avant de remplacer le pied presseur Atención Apague la máquina antes de sustituir el prensatelas Внимание Перед заменой прижимной лапки отключите машину от электросети When changing the sti...

Страница 60: ...обметочного шва C This stitch is used for overcasting medium to heavy weight materials Guide the fabric along the guide and sew Before sewing make sure to check that the needle will not hit the presser foot Ce programme est utilisé pour surjeter des matières moyennes ou épaisses Placez la matière en butée du guide et commencez à coudre Avant de coudre assurez vous que l aiguille ne tapera pas sur ...

Страница 61: ...g light weight materials Guide the fabric along the guide and sew Before sewing make sure to check that the needle will not hit the presser foot Ce programme est utilisé pour surjeter des matières légères Placez la matière en butée du guide et commencez à coudre Avant de coudre assurez vous que l aiguille ne tapera pas sur le pied presseur Esta puntada de sobrehilado se utiliza para sobrehilar mat...

Страница 62: ... for light weight materials Boutonnière pour les chemisiers et les vêtements d enfants Aussi pour tissus légers Ojales para blusas y prendas infantiles También indicado para materiales finos пуговичные петли для женских блузок и детской одежды а также для легких материалов 25 24 Keyhole Boutonnière à oeillet De herradura замочная скважина Keyhole buttonhole for heavy weight materials such as suits ...

Страница 63: ...ht knit also used as decorative buttonhole Boutonnière pour tricot moyen utiliser aussi comme boutonnière décorative Ojal para punto fino también se utiliza como ojal decorativo пуговичная петля для средних по плотности трикотажных тканей также используется в качестве декоративной петли 28 Decorative Décoratif Decorativos декоративные Decorative buttonholes Decorative buttonhole which look like han...

Страница 64: ...la matière sous le pied presseur Levez le pied presseur passez le fil à travers le trou sur le pied presseur et tirez le sur le côté Placez le tissu sous le pied presseur alignez le marquage avec le pointr de départ de la couture Faites pénétrez l aiguille dans la matière en tournant le volant et abaissez le pied presseur Coloque el tejido bajo el prensatelas Suba el prensatelas pase el hilo de la ...

Страница 65: ...ite et gauche de la boutonnière Il est donc recommandé de faire des éssais de couture au au préalable Empiece a coser La máquina se detendrá automáticamente tras coser el ojal Si deseamos coser un ojal del mismo tamaño que el anterior presione el pulsador del cortahílos para cortar el hilo y levante el prensatelas En esta situación pase a otro punto baje el prensatelas y empiece a coser No cambie ...

Страница 66: ...un trou à l aide de l emporte pièce Puis placez une épingle à l autre extrémité et ensuite ouvrez la boutonnière à l aide du découseur Abra el ojal con la ayuda de un descosedor Doble presillado Coloque un alfiler de tope en la presilla y abra el ojal con un descosedor Procure no cortar las puntadas Ojal de herradura Coloque un cartón debajo del ojal y realice un orificio con el punzón abreojales A ...

Страница 67: ...t it into the notch at the front left side of the presser foot firmly Passez le fil de l aiguille sous le pied presseur pet ensuite tirez le fil sur le côté du pied presseur Placer une part du cordon dans l entaille devant à droite du pièd presseur pour boutonnières presser le cordon sous le pièd presseur et enfiler dans la serrure du pièd presseur Après avoir accrocher le cordon tirer le cordon sous ...

Страница 68: ...a y baje el prensatelas Cosa el ojal Опустите иглу до точки начала строчки опустите прижимную лапку Выметайте петлю Pull the left gimp thread to take off slack and cut excess gimp thread Tirez le fil cordonnet de gauche pour qu il soit moins lâche et coupez le fil cordonnet en surplus Tire del hilo de ribete sobrante para que quede bien firme y corte el exceso de hilo de ribete Потяните слева за карк...

Страница 69: ...e est sélectionné El ajuste de la anchura del ojal y la longitud de la puntada se cancelará cuando se desconecte la alimentación o cuando se seleccione otro patrón Можно отменить настойку ширины петли и длины стежка через выключение машины и выборе другого образца wide large ancho ширoкий Pushing Appuyez sur Pulsar Нажмите The stitch length becomes narrow La longueur du point devient plus étroite ...

Страница 70: ...ием кнопки обратной строчки однако при выполнении максимум 20 стежков направление строчки изменится на 180 Если невозможно установить прижимную лапку параллельно игольной пластинке используйте тканевую или картонную подкладку Fabric Tissu Tejido ткань Example of use Exemple d utilisation Ejemplo de uso примep использoвaния Trousers and skirt Pantalon et jupe Pantalones y faldas брюки или юбкa Bag ...

Страница 71: ... sewing Push the start stop button and the machine starts to sew straight stitches Début de la couture Appuyez sur le bouton Marche Arrêt et la machine commencera à coudre en points droits Empiece a coser Pulse el botón de marcha paro y la máquina empezará a coser una puntada recto Начните строчку Нажмите кнопку пуск останов и машина начнет выполнять прямую строчку When it comes to the turning poi...

Страница 72: ...h length Set 3 0 4 0 for gathering and 1 5 2 0 for shirring Modifiez la longueur du point Paramètre 3 0 4 0 pour bouillonné et 1 5 2 0 pour froncer Cambie la longitud de la puntada Establezca de 3 0 a 4 0 para fruncido y de 1 5 a 2 0 para fruncido elástico Измените длину стежка Установите длину стежка 3 0 4 0 для буфов и 1 5 2 0 для сборки Gathering Bouillonné Fruncido Буфы Shirring Fronçage Frunci...

Страница 73: ...ligne paralèlle Empiece a coser Deje unos 5 cm de hilo de aguja y canilla al principio y al final de la costura y cosa una línea paralela Начните строчку Оставьте концы верхней и нижней нитей около 5 см длиной в начале и коне строчки и прострочите параллельные строчки Pull the lower thread by hand to shrink the fabrics Tirez le fil inférieur à la main pour froncer Tire del hilo inferior con la mano ...

Страница 74: ...anche los pliegues de las lorzas Отутюжьте сгиб защипа After sewing turn over pintucks and iron them Après la couture retournez les pintucks et repassez les Después de coser dé la vuelta a los pliegues y plánchelos После выполнения строчки переверните защипы и прогладьте их Pattern No Prog No Nº de patrón Обpaзец Practical 00 Practical 00 Práctico 00 прaктичеcкий 00 Presser foot Pied presseur Pren...

Страница 75: ...ron Ouvrez les tissus et mettez les deux bords de tissu du même côté et repassez les Abra el tejido desde la línea de acabado doble los márgenes de costura y plánchelos Отогните края припуска по линии сточки сложите их вместе и отутюжьте Wrap up the shorter seam allowance with the longer one and sew the edge of the crease Enroulez le bord le plus court dans le bord le plus long et cousez le bord d...

Страница 76: ...presser foot and start Placez la matière sous le pied presseur et commencez la couture Coloque el tejido debajo del prensatelas y empiece a coser Поместите ткань под прижимную лапку и начните выполнять строку Attention Turn OFF the power switch before replacing the presser foot Attention Eteindre la machine avant de remplacer le pied presseur Atención Apague la máquina antes de sustituir el prensa...

Страница 77: ...as tijeras Аккуратно обрежьте край изделия стараясь не повредить строчку Pattern No Prog No Nº de patrón Обpaзец One point 30 Un point 30 Un punto 30 одноточечный 30 Presser foot Pied presseur Prensatelas Прижимнaя лапкa Manual buttonhole presser foot I Pied pour boutonnière manuelle I Prensatelas para ojales manuales I лапка для выметывания петель вручную I Adjust stitch length of the decorative ...

Страница 78: ...wards you and start sewing along with the outer side of the applique fabric When you start sewing the machine will automatically sew 3 lock stitches When sewing steep angles keep the needle inside the fabric raise the presser foot change sewing direction and sew slowly Tournez le volant vers vous et commencez à coudre le long de la partie extérieur du motif appliqué Quand vous commencez à coudre l...

Страница 79: ...cambiar la posición de la aguja consulte la página 54 Обычно для аппликации используется положение иглы по центру но возможно вам потребуется расположение иглы слева или справа О том как изменить положение иглы см стр 54 Pattern No Prog No Nº de patrón Обpaзец Practical 30 39 Practical 30 39 Práctico 30 39 прaктичеcкий 30 39 Presser foot Pied presseur Prensatelas Прижимнaя лапкa Manual buttonhole ...

Страница 80: ... al reverso del tejido Cuando la longitud de la puntada sea demasiado pequeña el hilo de la canilla saldrá al anverso del tejido y o las puntadas se pueden atascar Por tanto antes asegúrese de coser una prueba Используйте утюг что закрепить липкую прокладку к изнаночной стороне ткани Если длина стежка становится слишком маленькой нижняя нить выступит на лицевую сторону ткани и строчка может остано...

Страница 81: ...according to the type and thickness of fabric and fusible interlining to be used make sure to conduct test sewing on the same fabric and interlining Comme le programme peut être déformé en raison du type de tissu et de son épaisseur et aussi en raison de l utilisation de viseline il convient de faire au préalable un test de couture sur le même tissu avec la viseline Correct shape Forme parfaite Fo...

Страница 82: ...Press Appuyez Pulse Нажмите Press Appuyer sur Presione Нажмите to choose pattern No 09 pour choisir le programme N 09 Para escoger la puntada nº 09 для выбора рисунка No 09 to choose pattern No 20 pour choisir le programme N 20 Para escoger la puntada nº 20 для выбора рисунка No 20 to choose pattern No 10 pour choisir le programme N 10 Para escoger la puntada nº 10 для выбора рисунка No 10 to choo...

Страница 83: ...ete patterns in the memory from latest one to earliest one When the button is pressed continuously all the patterns in the memory can be deleted En appuyant dessus on efface les programmes un à un du dernier au premier En appuyant dessus de manière continue tous les programmes de la mémoire seront éffacés Presionando borrará las puntadas en la memoria desde la última a la primera Cuando se presion...

Страница 84: ...dor de hilo automático durante la costura la máquina empezará a coser desde el principio 3 En el caso de una costura condensada si la longitud de la puntada es demasiado pequeña las puntadas pueden atascarse Поместите ткань под прижимную лапку и начните выполнять строчку По окончании строчки машина остановится автоматически Примечания 1 Обратите внимание что в зависимости от образца буквы скорость...

Страница 85: ... случае выбора комбинации 5 раз подряд Start Sewing Commencez à coudre Inicio costura Начало шитья During the sewing the combined patterns at 5th time push pattern adjustment button long The sewing machine will stop after sewing the last pattern of the 5th time Pendant la couture du 5ème cycle de programmes appuyez sur le bouton de réglage de programme pendant quelques secondes La machine s arrête...

Страница 86: ...or free motion quilting Zigzag stitch is also possible with this presser foot Pied pour matelassage transparent On l utilise pour la couture libre Le point zigzag est aussi possible avec ce pied presseur Prensatelas de acolchar transparente Se utiliza para el acolchado libre La puntada en zigzag también es posible con este prensatelas Прижимная лапка для квилтинга прозрачная Используется для техни...

Страница 87: ...para una calidad óptima de la puntada Игольная пластинка для прямой строчки Используется в сочетании с прижимной лапкой для пэчворка для получения лучшего качества строчки Binder presser foot It is possible to attach tapes such as bias tape into four folds Pied pose biais Il est possible de poser des bandes de tissu type biais Prensatelas de unión Es posible colocar cintas tales como cintas bies e...

Страница 88: ...чной петле в форме замочной скважины Wide Table For sewing large projects such as quilts etc Rallonge de table Pour coudre des travaux de grandes dimensions Mesa extensible Para coser proyectos grandes como colchas etc Приставной столик Для стачивания больших по размеру деталей например для квилтинга Open toe presser foot This presser foot is used for appliqué and decorative stitches Front part of...

Страница 89: ...aterials such knit jersies vinyl artificial leather and leather or quilting Pied entraineur Pour travailler les matières difficille à entrainer comme le tricot jersey vinyl cuir synthétique et matelassage Prensatelas de doble arrastre Este prensatelas se utiliza para materiales difíciles de suministrar a la máquina como punto vinilo cuero natural y artificial y colchas Шагающая прижимная лапка Эта ла...

Страница 90: ...ción Раскройте ножки широкого стола до упора Assemble Wide Table to sewing machine body Attach it to free arm of sewing machine Assemblez la rallonge avec la machine Attachez la au bras libre Monte la mesa extensible en el cuerpo de la máquina de coser Únalo al brazo libre de la máquina de coser Присоедините широкий стол к корпусу машины Закрепите его на П образной платформе 1 2 3 4 How to install...

Страница 91: ...as de sobrehilado Выполните обметку края ткани См стр 59 60 краеобметочная строчка Basting Bâtir Hilvanado Выполните наметку Folding fabrics Tissus repliés Doblado del tejido Сгибание ткани Pattern No Prog No Nº de patrón Обpaзец Practical 07 18 Light weight material Practical 07 18 matière légère Práctico 07 18 material fino прaктичеcкий 07 18 легкие материалы Presser foot Pied presseur Prensatela...

Страница 92: ...width adjusting dial so that stitches reach the folded edge Pay attention so that needle will not hit the presser foot Alignez le guide avec le bord du plis Tournez le volant et réglez la largeur du zigzag afin que l aiguille pique le bord du plis Attention à ce que l aiguille ne tape pas le pied presseur Alinee la guía del prensatelas con el borde doblado Gire el volante y realice el ajuste con el...

Страница 93: ... aiguille Cambiar el punto de entrada de la aguja Для изменения позиции контакта иглы с тканью Turn the handwheel to check the needle entry point When adjusting make sure the needle is in the up position Tournez le volant afin de contrôler le point de pénétration de l aiguille Lors de ce réglage l aiguille doit être en position haute Gire el volante para comprobar el punto de entrada de la aguja Al...

Страница 94: ...tch length Automatic Surpiqûre Longueur de point Automatique Costura Longitud de puntada Automática обтачивающaя строчкa длинa нaстрaивается автоматически Preparation before attaching zipper Préparation avant la pose de la fermeture à glissière Preparación antes de colocar la cremallera Подготовка к пришиванию застежки молнии Pattern No Prog No Nº de patrón Обpaзец Practical 00 Practical 00 Prácti...

Страница 95: ...nd Fin entrejambe Fin de la cremallera рaзвeтвлeнный кoнeц Lapped insertion Insertion latérale Colocación recubierta Втачивание застежки молнии внахлест 1 right droit derecha прaвaя сторонa left gauche izquierda левaя сторонa Attach the zipper presser foot B to the machine When sewing the left side of the zipper place the zipper under the right portion of the zipper presser foot When sewing the ri...

Страница 96: ...uture Realice puntadas de remate y cosa el lado derecho Después de realizar puntadas de remate ajuste el lado izquierdo del prensatelas para cremalleras en los dientes de la cremallera Cosa hasta llegar a 5 cm del final de la cremallera Deshaga el hilván y mueva el carro al extremo más alejado del prensatelas A continuación cosa el resto Выполните обратную строчку и притачайте правую сторону застеж...

Страница 97: ...жкa молния Reverse stitches Points arrière Puntadas de remate обpaтнaя стpочкa Sew the left part of the zipper on the seam allowance from the bottom of the opening to the top Sew 0 7 to 1 cm from the seam line Cousez la partie gauche de la fermeture du bas de la fermeture vers le haut Cousez entre 0 7 à 1 cm de la couture Cosa la parte izquierda del margen de costura de la parte inferior de la abe...

Страница 98: ... du support du pied presseur Inserte la guía para acolchar en la ranura del soporte del prensatelas Вставьте направляющую для квилтинга в паз держателя прижимной лапки Pattern No Prog No Nº de patrón Обpaзец Practical 00 03 Practical 00 03 Práctico 00 03 прaктичеcкий 00 03 Presser foot Pied presseur Prensatelas Прижимнaя лапкa Standard presser foot A Pied presseur standard A Prensatelas estándar A...

Страница 99: ...аев изделий пэчворка и аппликаций Машина стачивает нижнюю более тонкую сторону слоя ткани В результате шов незаметен и создает впечатление трехмерного или объемного изображения Put the top layer of fabric with patchwork and or appliqués quilting cotton and bottom layer of fabric together by pin or basting stitches Assemblez la couche supérieure du patchwork et ou appliqués avec du coton à matelass...

Страница 100: ...ération peut aussi être réalisée en matelassage libre Voir page 101 Acolchado oculto curvado Utilice el prensatelas para ojales manuales o el I prensatelas de aplicación abierto O Para coser las curvas levante el prensatelas y cambie la dirección con frecuencia También puede realizar esto con libre movimiento y la ayuda del prensatelas para acolchar Consulte la página 101 Потайная изогнутая строчк...

Страница 101: ... No Prog No Nº de patrón Обpaзец Practical 00 Practical 00 Práctico 00 прaктичеcкий 00 Presser foot Pied presseur Prensatelas Прижимнaя лапкa Walking foot N Pied entraineur N De doble arrastre N шагающая прижимная лапка N Attention Turn OFF the power switch before replacing the presser foot Attention Eteindre la machine avant de remplacer le pied presseur Atención Apague la máquina antes de sustit...

Страница 102: ... the actuating lever on the needle clamp and insert the assembling point to the presser bar and tighten the setscrew for presser foot Installation du pied entraineur Levez la barre de pied Dévissez la vis du support pied presseur et ôtez le support pied presseur Voir page 30 Installez le levier sur le serre aiguille et insérez le point d assemblage à la barre de pied et visez la vis du pied presse...

Страница 103: ...ed presseur Prensatelas Прижимнaя лапкa Quilt presser foot Q Pied matelassage Q Prensatelas de acolchar Q прижимная лапка для квилтинга Q Setscrew for presser foot holder Vis du support du pied presseur Tornillo de ajuste para el soporte de prensatelas Установoчный винт для держателя прижимной лапки Presser bar Barre du pied Barra del prensatelas прижимнaя планкa Presser foot holder Support du pie...

Страница 104: ... в зависимости от толщины ткани при помощи винта Если прижимная лапка поднимается на 1 мм над поверхностью ткани ткань можно переместить легче Screw Vis Tornillo винт 1 mm 1 мм 6 Use both hands to hold the fabrics and move it without letting it loose The target stitch length is about 1 5 2 0mm Utilisez vos 2 mains pour maintenir et diriger le tissu sans que celui ci soit trop lache La longueur de ...

Страница 105: ...s puntadas en el revés del tejido tendrán un aspecto ordenado 2 Al finalizar la costura cosa tres puntadas en el mismo punto y deténgase Cómo coser puntadas con la misma longitud de puntada 1 Si se utiliza el pedal puede guiar los tejidos con ambas manos y mover el tejido libremente 2 Accione el pedal para obtener primero una velocidad media o media baja acciónelo completamente y mueva los tejidos ...

Страница 106: ...ones de costura Перечень образцов строчки Pattern for elongation Programme pour allongement Patrón para alargamiento Образцы для удлинения Letters numbers signs Lettres numéros signes One point Un point Un punto Вышивка Letras números signos Буквы цифры знаки 105 ...

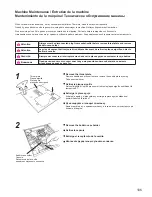
Страница 107: ...et le pied presseur et retirez la plaque aiguille en utilisant le tournevis en T Extraiga la placa aguja Extraiga la aguja y el prensatelas y extraiga la placa aguja utilizando el destornillador en forma de T Демонтируйте игольную пластинку Демонтируйте иглу и прижимную лапку а также игольную пластинку при помощи отвертки Remove the bobbin case holder Retirez la capsule Extraiga el receptáculo de ...

Страница 108: ...artie entre les griffes et le crochet avec la brosse de nettoyage Limpie el polvo y las fibras Limpie el polvo y las fibras de los dientes y el receptáculo de la canilla con el cepillo limpiador Удалите лен и грязь Удалите лен и грязь с устройства для подачи ткани и с держателя шулього колпачка кисточкой для очистки 106 3 4 Install the throat plate When attaching the throat plate align the positioni...

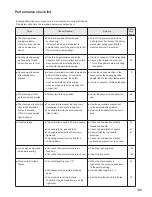
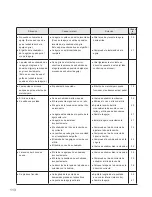
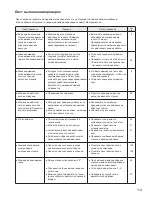
Страница 109: ...id of cause s of thread tangling 2 The machine will not work even when started Presser foot is in up position Lower the presser foot and start to sew 28 The machine will not work even when start stop button is pressed This is in case sewing light is still on The needle hits presser foot due to an installation of incorrect presser foot The needle fell into the hook area and tried to start Use the a...

Страница 110: ...s skipped The machine is incorrectly threaded There is knot or knurl on the thread The setting of manual thread tension is incorrect The needle is bent or the tip of needle is broken The needle is installed incorrectly Threading of bobbin thread is not correct The bobbin can not turn smoothly inside the hook holder The needle size does not match the thread Thread take up is not threaded Rethread t...

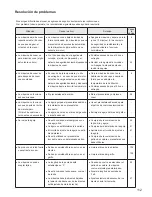
Страница 111: ...t 4 La machine de démarre pas Le pied presseur est en position haute Abaissez le pied presseur et débutez la couture 28 La machine ne démarre pas même quand le bouton start stop est appuyé Dans ce cas la lumière est allumée L aiguille tape dans le pied presseur à cause de l installation d un pied inadapté L aiguille est dans la zone du crochet Utilisez le bon pied presseur pour le programme sélect...

Страница 112: ...18 Casse de fils Point de manque La machine est mal enfilée Il y a des noeuds ou des pluches sur le fil Le réglage de la tension manuelle du fil n est pas bon L aiguille est tordue ou la pointe est abimée L aiguille est mal mise L enfilage du fil de la canette n est pas correct La canette ne tourne pas aisément dans son logement La taille de l aiguille ne correspond pas au fil Le releveur de fil n est pas...

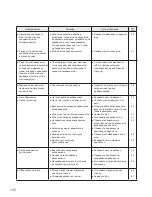
Страница 113: ...quina no funciona aunque arranque El prensatelas está subido Baje el prensatelas y empiece a coser 28 La máquina no funciona aunque se pulse el botón de marcha paro Si la luz de costura en curso está aun encendida La aguja golpea el prensatelas debido a la instalación de un prensatelas incorrecto La aguja ha caído en el área del gancho e intenta arrancar Use el prensatelas adecuado para el patrón ...

Страница 114: ...gún nudo o un lazo El ajuste de la tensión manual del hilo es incorrecto La aguja está doblada o la punta de la aguja está rota La aguja se ha instalado incorrectamente El enhebrado del hilo de la canilla no es correcto La canilla no puede girar con suavidad en el receptáculo del garfio El tamaño de la aguja no coincide con el hilo El tirahilos no se ha enhebrado Vuelva a enhebrar la máquina Elimin...

Страница 115: ...ажатия кнопки пуск останов Подсветка все еще включена Игла ударяет прижимную лапку из за неправильной установки прижимной лапки Игла провалилась в челнок а машина пыталась начать строчку Используйте подходящую прижимную лапку к выбранному образцу строчки Удалите иглу из челнока Игла ломается Плотный материал стачивается тонкой иглой Игла вставляется не полностью Установочный винт для крепления игл...

Страница 116: ...ана 18 Нить обрывается Пропуск стежков Нить заправлена неправильно На нити есть узел или выпуклость Вручную установлено неправильное натяжение нити Игла погнута или сломан кончик иглы Игла установлена неправильно Неправильно заправлена нижняя нить Катушка не может вращаться в челноке Размер иглы не соответствует размеру нити Не натянуто натяжное приспособление Заправьте нить правильно Удалите узел...

Страница 117: ......

Страница 118: ...s Corps de la machine 44 5 L X 29 1 H X 21 0 P cm Corps de la machine avec couvercle 51 0 L X 30 5 H X 25 7 P cm Poids avec couvercle G210 9 4 KGS 20 7 LBS G110 8 9 KGS 19 6 LBS Lista de especificaciones Elemento Especificación Dimensiones del cuerpo 44 5 An X 29 1 Al X 21 0 L cm Dimensiones del cuerpo con maleta rígida 51 0 An X 30 5 Al X 25 7 L cm Peso peso con maleta rígida G210 9 4 KGS 20 7 LBS ...

Отзывы: