JTECH QuikCall 321045B5 Скачать руководство пользователя страница 7

 7 


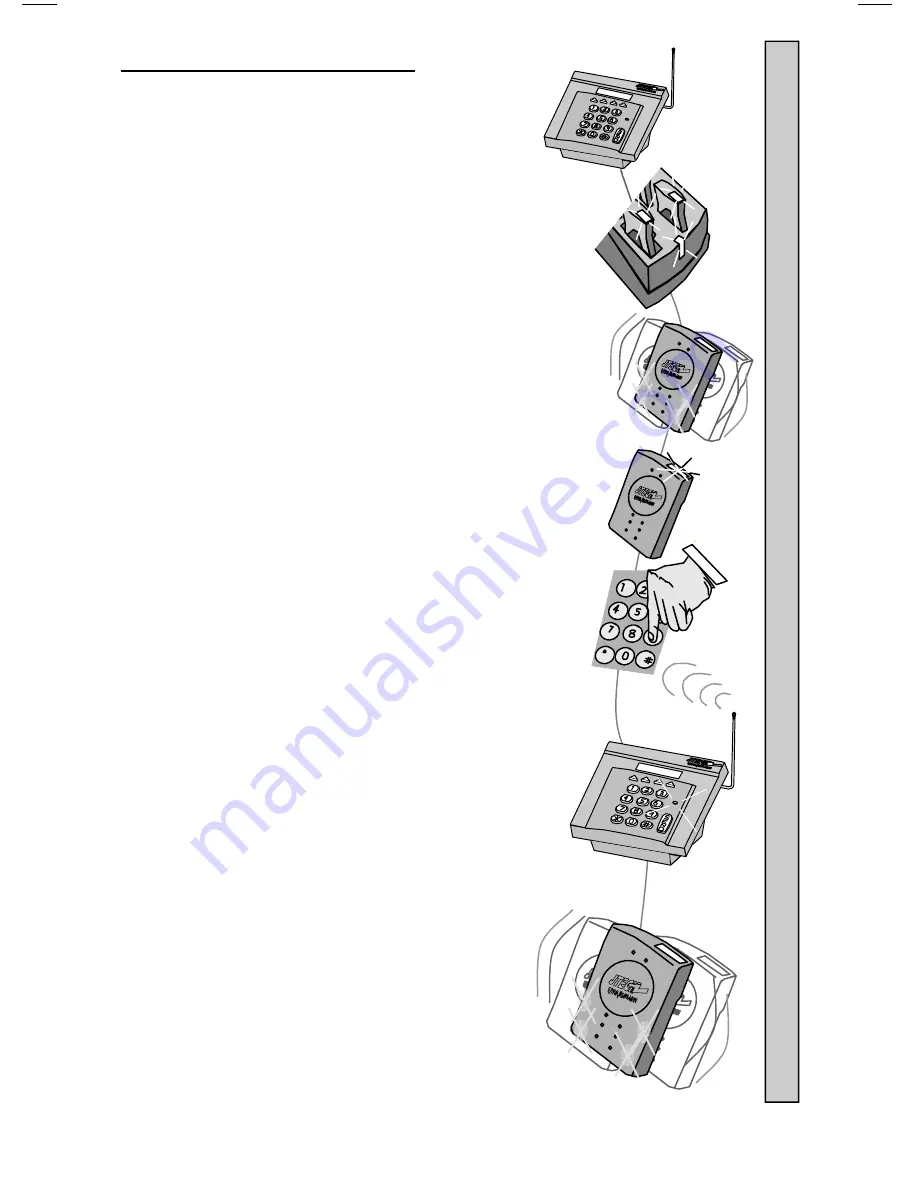
Paging Using a Desktop Controller: 


1. Remove a 

Pager 

from the 

Charger

2. The 

Pager 

will vibrate and it’s LEDs will flash to confirm it 

is ready for use. 

3.  The 

Pager

 charge LED will continue to flash, confirming    

the it is ready to receive a page. 

4.  Enter the number of the 

Pager 

on the Controller. 


5.  Press # or SEND button to send the page. 


6.  The XMIT light on the Controller will turn ON, confirming 

the page is being sent.   


7. The

 Pager

 will vibrate, tone or flash as required. 

8.  See “Enter Pager #” Menu instructions in your 

Desktop Controller 

manual for more 

information. 


             Pag

ing Using a Desktop Controller 

Содержание QuikCall 321045B5

Страница 1: ...Pager and Charger Guide Part Number 321045B5 Premises Pager System QuikCall Pagers...

Страница 2: ...SS 210 statement This device complies with Industry Canada licence exempt RSS standard s Operation is subject to the following two conditions 1 this device may not cause interference and 2 this device...

Страница 3: ...6 343x122x65mm Weight 1 64lbs 0 75kg Charger and 10 Pagers With Clips LxWxH1 13 5x 4 8x 4 343x122x102mm Weight 3 41lbs 1 55kg Charger and 10 Pagers With Promotional Paddles LxWxH2 13 5x 4 8x 8 8 343x...

Страница 4: ...m of the Charger 3 Connect the Power Adapter to the AC Power Cord 4 Plug the AC Power Cord into a 110 240VAC outlet 5 The green LED on the Charger will light ON 6 Once the Charger is powered ON the Pa...

Страница 5: ...both Chargers together 3 Insert the Power Adapter plug into jack on the bottom of the Charger 4 Use the Jumper Wire optional to connect both Chargers together 5 Feed the wires through the guides in th...

Страница 6: ...fully charge within three hours 5 If not returned within 24 hours charging time of up to 8 hours may be required to fully charge batteries 6 When not in the Charger each Pager continues to indicate b...

Страница 7: ...h confirming the it is ready to receive a page 4 Enter the number of the Pager on the Controller 5 Press or SEND button to send the page 6 The XMIT light on the Controller will turn ON confirming the...

Страница 8: ...3 seconds and turn off 7 The Pager will receive a single one second vibration factory setting 8 The light on the panel next to that Pager number will continue to stay ON for 40 seconds factory setting...

Страница 9: ...has been assigned to the TELCO Module installed 6 Listen for a voice message from the telephone that confirms the Controller is ready 7 Within 8 10 seconds using the telephone keypad enter the Pager n...

Страница 10: ...Pager over 2 Push or pull the small plastic tab as shown in below and slide the Clip or Paddle off 3 Slide the new Clip or Paddle on until a click can be heard locking the clip or paddle onto place M...

Страница 11: ...y the user 2 If using a Spring Clip it must be removed to access the battery door screw 3 Use a 1 Philips screwdriver to remove the screw 4 Slide the battery door and Pager Clip off 5 Carefully slip a...

Страница 12: ...isplayed on the interior and exterior of the package s This warranty does not apply to equipment which has been damaged by accident negligence or misapplication or has been altered or modified in any...

Отзывы: