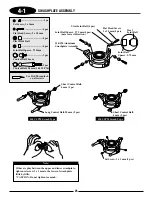
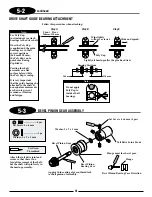
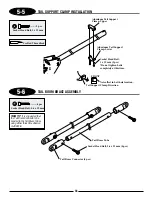

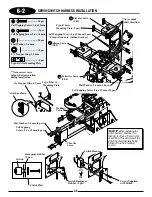


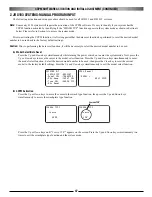
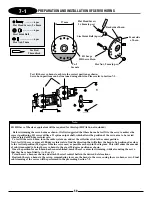


39
... 2 pcs
Rod End
....................... 1 pc
Tail Rod Guide Collar (round)
................... 5 pcs
Tail Rod Guide Collar (square)
Use JB Weld
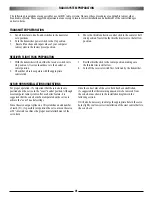
40
1
/
4
"
3/4"
3/4"
Cut unnecessary portion.
Carbon Tail
Control Rod
Steel Rod End
(2 pcs)
Use JB Weld to attach.
Tail Rod Guide Collar
(Round) (1 pc)
Tail Rod Guide
Collar (Square) (5 pcs)
Sand each end of the rod as
shown. It will be necessary
to reduce the diameter
slightly to allow proper
insertion into the steel rod
end and also to allow space
for the JB Weld
®
to contact each part.
Screw on 8 mm
Universal Link (2 pcs)
Cut the carbon tail control rod to the length shown.
JB
W
eld
JB Weld
JB Weld Fillet
42 mm
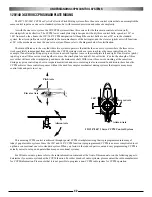
ASSEMBLY PROCEDURE
1) Cut the control rod to the correct length.
2) Sand each end as shown and test fit the two steel
rod ends. Make sure that rod is sanded so that it
is undersized. This will allow the JB Weld to
remain on the rod for proper adhesion.
3) Slide the tail rod guides onto the rod and keep in
place using masking tape on each end of the rod.
4) Thread the universal links onto the steel rod ends as shown.
5) Apply JB Weld epoxy to each end of the rod where it has been
sanded and attach the two steel rod ends. Make an additional
fillet of JB Weld at the back of each steel rod end as shown for
proper
adhesion.
6) Let assembly set on a flat surface until the JB Weld has cured.
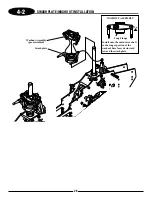
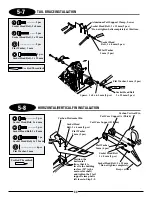
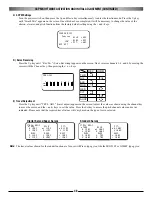
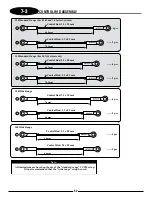
Self Tapping Screw,
2 x 8 mm
(5 pcs)
Tail Rod Guide
(5 pcs)
60 mm 130 mm
140 mm 145 mm 160 mm
TAIL GUIDE SPACING
6-3
TAIL CONTROL ROD ASSEMBLY
Note:
Once this assembly has been
completed, adjust the tail control
rod as needed for proper tail rotor
blade pitch prior to the initial flight.
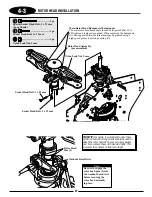
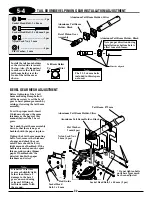
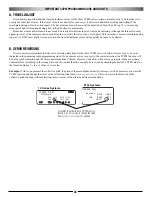
6-4
TAIL CONTROL ROD/TAIL GUIDE ATTACHMENT
TEAM TIP:
Once tail guides are attached to the tail boom, check to insure that the tail control rod will move freely with little
resistance. Rotate the tail guides as needed until the system moves as easily as possible. Once this has been achieved,
apply a small amount of CA adhesive to bond the tail guides to the tail boom. This will prevent the guides from moving
accidentally during flight. Apply oil to the rod and guides after assembly.
Note:
The tail control rod final adjustment will need
to be made prior to the first flight.
Содержание Vigor CS
Страница 64: ...64 E A C D G F DECAL PLACEMENT ...
Страница 65: ...65 B 3 2 5 1 DECAL PLACEMENT ...


