background image


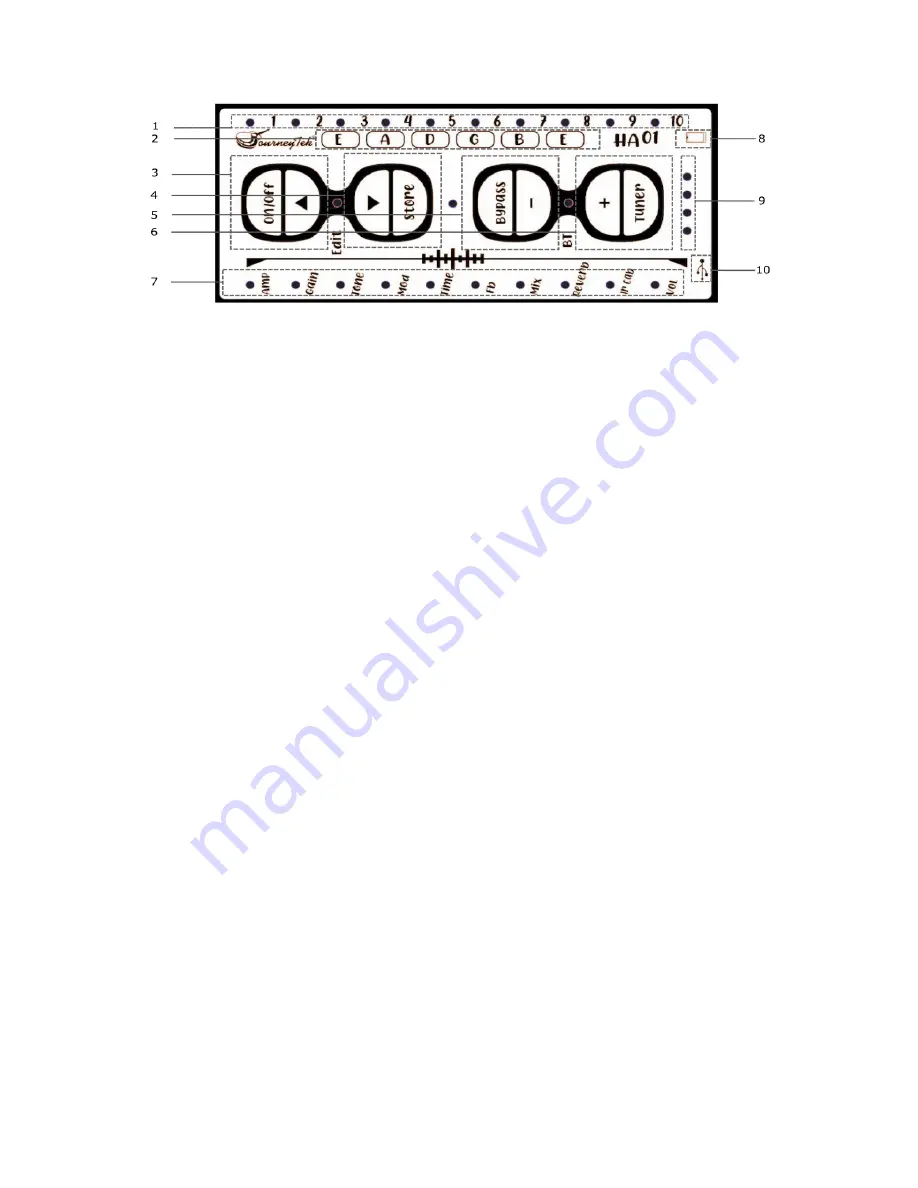
Panel Indicator Guide 


Effect/Parameter/Volume/Tuner Indicator Lights:  

In the PRESET mode, these lights indicate which of the 10 presets you’re using.  

If you adjust the volume with the +/- buttons, it will indicate the volume level adjustment for a short while, 
then return back to indicate your preset.  

a.


In the EDIT mode, it displays the parameter you’ve selected.   

2.


Guitar Tuner Notes:  

a.


The lights above the note names indicate the auto-detected note you’re tuning.  

b.


The lights below from Amp to Vol (in region 7) indicate the intonation of the string. 

3.


On-Off / Left Selection Button:  

a.


Extended press to turn the unit on and extended press to turn it off.  

b.


In the PRESET mode, press to switch to the previous preset.  

c.


In the EDIT mode, press to scroll up when selecting the effects setting. 

4.


Store / Right Selection Button:   

a.


Extended press to STORE a preset.  

b.


In the PRESET mode press to switch to the next preset. 

c.


In the EDIT mode, press to scroll down when selecting the effects setting. 

5.


Bypass / - Selection Button: 

a.


Extended press this button to enter the Bypass function. (clean signal) 

b.


In PRESET mode press to reduce the master volume 

c.


In EDIT mode press to reduce the effect on the module you’ve selected. 

6.


Tuner/+  Button:  

a.


Extended press to enter the tuner mode,  

b.


in PRESET mode press to increase the master volume.  

c.


In EDIT mode press to increase the effect on the module you’ve selected. 

7.


Effects Indicator Lights: 

a.


In PRESET mode these lights indicate the effects applied to the Preset you’ve selected.  

b.


In the EDIT mode they indicate the currently selected effect module.  

c.


In TUNER mode, and lights move toward center as tuning improves. 

8.


Mobile Phone micro-USB to 3.5mm output. 

a.


Use the micro-USB to 3.5mm headphone jack cable with this data port to record on compatible 

devices supporting 3.5mm input for sound recording. 

9.


Battery Indicator: Indicates battery health and charging status. See previous section for details. 

10.


USB Icon/Data/Charging Port:  The micro-USB port to the side of this icon enables digital connectivity 

to your external device or DAW, Charging the unit, and loading 3

rd

 party IR CAB simulations.  

©Copyright 2021 Journey Instruments Limited 

Содержание HA01

Страница 1: ...Passport Guitar Headphone Amp Model HA01 User Manual V1 1...

Страница 2: ...u turn it on 6 EDIT Mode Accessed by Pressing on off3 and 4store buttons together 7 Modules and Effects Detailed Explanation 8 1 AMP Selection 8 2 GAIN Adjustment 8 3 TONE Adjustment 9 4 MOD Modulatio...

Страница 3: ...horus Phaser Delay Hall Reverb Tone and more o 10 Classica IR Cabinet Simulations o Clean bypass for clean recording or monitoring Precision tuner Power Supply DC5v 300mA battery for up to 5 hours of...

Страница 4: ...off when unit is fully charged Bluetooth Connectivity and Control The HA01 enables you to stream audio from a Bluetooth broadcasting device phone tablet computer etc to this unit so you can jam along...

Страница 5: ...5 Bypass Selection Button a Extended press this button to enter the Bypass function clean signal b In PRESET mode press to reduce the master volume c In EDIT mode press to reduce the effect on the mod...

Страница 6: ...ns will illuminate blue when the EDIT Mode is active Preset Mode The Default Mode when you turn it on Illuminated lights to the left of numbers 1 10 at the top indicate the number of the preset you re...

Страница 7: ...hese lights on display Pink dots represent white lights Bypass and Tuner buttons have different functions in different modules For example they browse up down in the Amp or IR CAB module and increase...

Страница 8: ...cription of AMP voices Based on the Above chart if you press Tuner 3 times after entering the AMP mode your interface will look like this and you ll be using Day Tripper OD with an Overdrive Voice 2 G...

Страница 9: ...sing a chorus effect and you continue to press Tuner all of the numbered indicator lights will turn off This means you re in the center position where neither Chorus nor Phaser are activated From this...

Страница 10: ...ated from 1 up to the brightness you ve selected 7 IR Cab Mode The HA01 comes with 10 preset IR Cab simulations To select your IR Cab in the EDIT mode use on off3 and 4store buttons to cycle to the CA...

Страница 11: ...to Preset mode 10 BYPASS Function Direct Dry Signal Extended Press the Bypass button to enter the Bypass mode After entering the Bypass mode the Bypass indicator lights up in blue and the other module...

Страница 12: ...on for 10 seconds then release Wireless Bluetooth connection can t connect to Mac device If connecting for the first time to a newer Mac OS computer 1 Turn off Bluetooth on the Mac 2 Turn on the HA01...

Отзывы: