background image

FMS-1655M

LIT-12013119

15

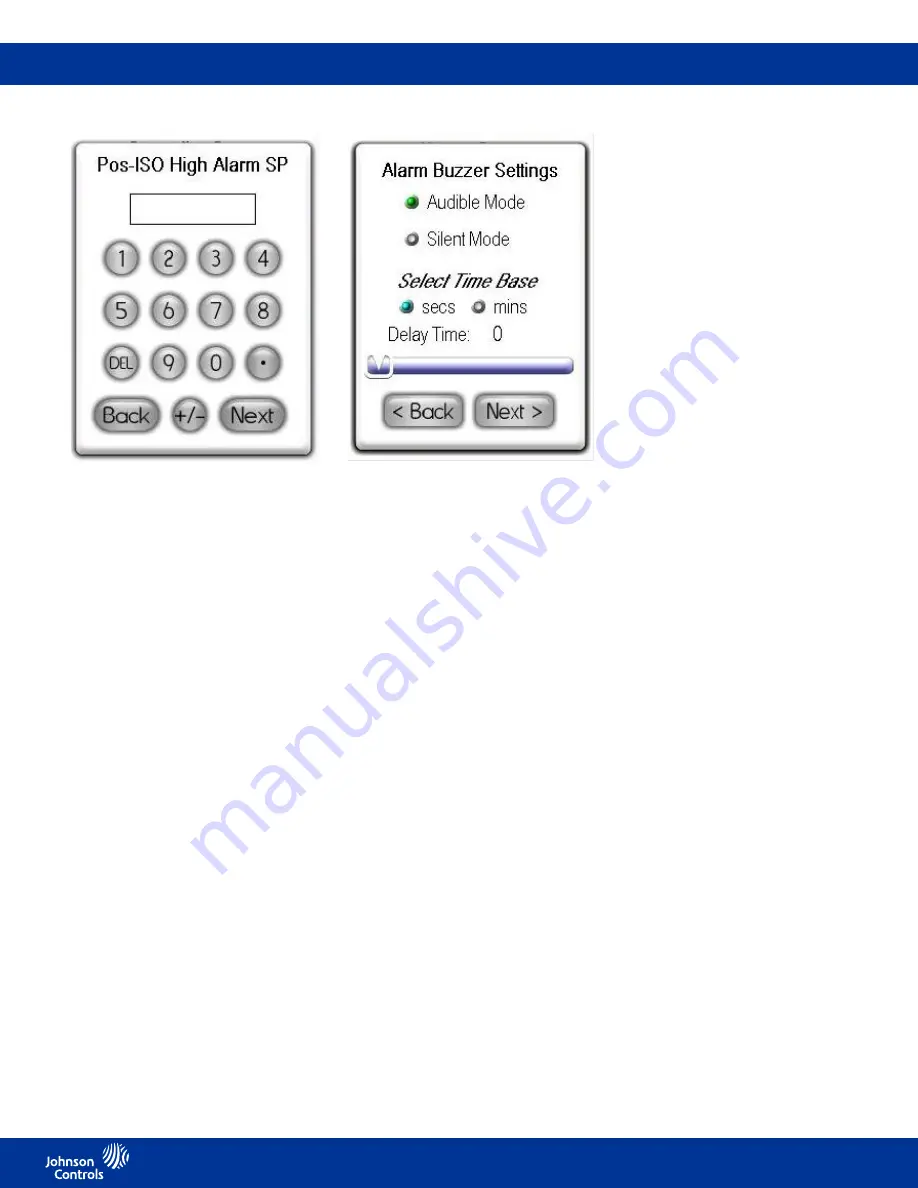
Fig 5. Enter high alarm setpoint for positive 

isolation mode using keyboard popup.

To begin specifying the alarm and warning 

setpoints, select the 

Alarm Limits

 option 

from the 

System Setup

 menu. The user 

is prompted to sequentially enter the high 

alarm and warning limits, followed by 

the low warning and alarm limits, in that 

order. For example, if positive isolation 

mode was selected above, then the 

configuration popup shown in Figure 5 will 

be displayed, prompting the user to enter 

the positive isolation high alarm setpoint 

using the keypad. 

These limits should be specified to 

identify the differential pressure range 

which is considered normal, as well as 

the range which indicates a warning 

condition, and the range which is 

considered critical and indicates an alarm 

condition. 

The figure on page 14 shows the 

relationship of these four alarm setpoints 

and how they relate to the normal 

operating differential pressure of the 
monitored isolation room.


Configuring alarm buzzer 

The FMS-1655M Monitor alarm resources 

provide support for both visual and 

audible alerts. The audible alert option on 

the 

System Setup

 menu allows the alarm 

buzzer settings to be easily configured. 

Selecting this option invokes the 

configuration screen shown in Figure 6. 

Fig 6. Alarm buzzer may be configured for 

audible or silent mode.

The alarm buzzer may be selected for 

one of two modes of operation: audible or 

silent mode. If audible mode is selected, 

a delay may be specified in seconds or 

minutes. If silent mode is selected, then 

the alarm buzzer will not sound whenever 

the unit encounters an alarm condition. If 

audible mode is selected, the user may 

specify an alarm quiet period. This feature 

allows the audible alerts to be suppressed 

between the specified hours every day, 

thereby eliminating the potential for 

nuisance alarms. Hospitals may take 

advantage of this feature to minimize 

nuisance alarms during non-visiting hours 

in patient rooms.

Selecting displayed units 

The FMS-1655M Monitor displays 

differential pressure readings in one 

of two units: inches of water column 

(in WC) or Pascals (Pa). Touching the 

differential pressure reading in the upper 

LCD window of the display will invoke 

the 

Select Engineering Units

 selection 

screen. If the engineering units selection 

is changed, the corresponding alarm 

setpoints are automatically converted to 

the newly selected units.  

Configuring display options 

The 

Display Setup

 menu provides 

support for configuring all of the display 

settings on the FMS-1655M Monitor. 

Options are available for configuring the 

main display, setting the system time and 

date, adjusting the display brightness, and 

setting the Safety Halo

TM

 function. The 

Display Options

 menu item allows the 

main display to be configured as required 

by the specific application. If desired, the 

user may individually enable or disable 

the display of the isolation mode, room 

status, and the time/date at the bottom of 

the screen. 

The Safety Halo

TM 

option on the 

Display 

Setup Menu

 allows the user to disable or 

enable this function as well as setting the 

intensity of the Safety Halo

TM

 brightness. 

A nightly auto-dim feature can be set to 

dim the Safety Halo

TM

 brightness to a 

user-set level at specified hours every 

day. 

The set time and date option on the 

Display Setup

 menu allows the user to 

specify the current time and date that may 

be displayed at the bottom of the main 

display. The FMS-1655M Monitor will 

maintain the time and date as long as the 

unit is not powered down. The time and 

date can be synced to the network master 

clock when the FMS-1655M Monitor is 

connected to the BACnet network.

0.100

Содержание FMS-1655M

Страница 1: ...l apparatus meets all the requirements of the Canadian Interference Causing Equipment Regulations Cet appareil numérique de la Classe A respecte toutes les exigences du Règlement sur le matériel brouilleur du Canada IMPORTANT The FMS 1655M Room Pressure Monitor must be wired to 24 VAC only Wiring the unit to 110 VAC will cause serious damange and void the warranty Risk of Property Damage Ensure th...

Страница 2: ...rning Setpoint Positive Isolation Low Alarm Setpoint Negative Isolation High Alarm Setpoint Negative Isolation High Warning Setpoint Negative Isolation Low Warning Setpoint Negative Isolation Low Alarm Setpoint Audible Alert Operating Mode audible or slient Delay Time Base seconds or minutes Delay Setting 0 60 Alarm Quiet Period Starting Hour 0 23 Alarm Quiet Period Ending Hour 0 23 Engineering Un...

Страница 3: ... Display mounting procedure surface mount 10 Flush thin mount mounting procedure 11 Installation detail view 12 Basic programming 14 Main display screen 14 Configuring Room Pressure Monitor 14 Setting up alarm limits 14 Selecting displayed units 15 Configuring display options 15 Adding password security 16 Cleaning the display 17 Alarm setpoints 18 Setup menu tree 19 ...

Страница 4: ...r Depth 18 bit or 262K colors Backlight Color White Luminous Intensity min 2500 cd m2 FMS 1655M Monitor Surface Mount Enclosure 3 W x 5 H x 1 13 D FMS 1655M Monitor Thin Mount Enclosure 5 W x 8 H x 0 75 D External Remote Sensor Housing 2 3 W x 4 H x 2 7 D Stainless Steel Cover Plate for Flow Tube 2 7 W x 4 5 H x 0 2 D Stainless Steel Cover Plate for Remote Sensor 2 7 W x 4 5 H x 0 2 D Surface Moun...

Страница 5: ...655M LIT 12013119 5 Part Number Guide UNIT FMS Flow Monitor Station FMS 01 Standard remote sensor REMOTE SENSOR S Surface mount T Thin flush mount STYLE SERIES BRAND LB Johnson Controls 1655M BACnet Monitor ...

Страница 6: ...ansformer be split between actuator and controller Doing so will damage the actuator the transformer the controller or all units A single 120 24V 30Va transformer is required for the controller and a separate 120 24V 20Va transformer is required for the actuator This equipment contains electrostatic sensitive components To prevent possible damage take precautions to prevent electrostatic discharge...

Страница 7: ...g in this compartment Note This product should be installed with the manufacturer provided isolated power supply and connected to an electrical circuit protected by a minimum 20A circuit breaker This circuit breaker should be mounted in an approved electrical enclosure located separately but in close proximity to this product 240 VAC 50 60 Hz Blue 1 Amp Slow Blow Fuse Transformer 50 60 Hz ...

Страница 8: ...MS 1655M Monitor provides a single digital input that may be used for monitoring a door switch The configuration of the door switch input is configured for normally closed operation and is active high triggered A SPDT magnetic door switch type is recommended for use with function The user may set up multiple multi level passwords to prevent unauthorized or casual access to the FMS 1655M Monitor co...

Страница 9: ... respectively Route the end of the interface cable with the 3 and 4 pin connector down the wall to the anticipated location of the touchscreen display module 4 Using a suitable length of 2 conductor 20 AWG cable connect the output of the universal isolated power supply module to the power input at the remote sensor module The output of this power supply module is non polarized so the two red wire ...

Страница 10: ...m all 4 conductors of the interface cable are securely attached at the terminal plugs Re connect gray harness between backplate and display module 6 Reconnect the gray harness to the backplate circuit board and attach the display enclosure to the backplate by inserting the tabs at the top of the display into the corresponding slots at the top of the backplate Secure the display enclosure to the ba...

Страница 11: ...wall and discard Be sure to brush off any drywall dust or remnants from the inside surface of the opening to ensure proper adhesion of the retrofit mounting plate 4 Remove the paper backing from the two adhesive strips on the retrofit mounting plate and insert it into the cut opening of the drywall The retrofit plate should be oriented such that the corner notch is located at the lower left corner...

Страница 12: ...all to seal unit penetration Flow Tube When Flow Tube mounting plate is located directly opposite the sensor flow tubing must be cut as short as possible to prevent kinks To Johnson Controls isolation transformer Optional Analog Output Damper Control To optional door switch Wall Section cutaway view Terminal For connection of transmitter to FMS 1655M Monitor Orange wall bracket to be installed fir...

Страница 13: ...ss steel plate and wall to seal unit penetration Terminal For connection of transmitter to FMS 1655M Monitor Flow Tube When Flow Tube mounting plate is located directly opposite the sensor flow tubing must be cut as short as possible to prevent kinks To FMS 1655M Monitor monitor Wall Section cutaway view Rotating clamps secure assembly to wall board Optional Analog Output Damper Control To Johnson...

Страница 14: ...open if door switch is enabled or 2 current differential pressure has drifted outside of the allowable limits of the desired setpoint and are in the caution range A red background indicates that the current differential pressure has reached a critical condition and is outside of the allowable limits of the desired setpoint The FMS 1655M Monitor incorporates a full color touchscreen and includes an...

Страница 15: ...the audible alerts to be suppressed between the specified hours every day thereby eliminating the potential for nuisance alarms Hospitals may take advantage of this feature to minimize nuisance alarms during non visiting hours in patient rooms Selecting displayed units The FMS 1655M Monitor displays differential pressure readings in one of two units inches of water column in WC or Pascals Pa Touch...

Страница 16: ...e FMS 1655M Monitor is able to communicate 11 points of information to the building management system See page 18 for list of BACnet points The network settings are easily configured by selecting the Network Setup option from the Unit Setup menu As an alternate means of remote monitoring a 4 20mA signal representing the room DP is available for connecting to a third party controller on the BMS It ...

Страница 17: ...pping the current room name text brings up an alphanumeric keyboard to quickly change the name of the monitored room Tap anywhere else on the screen enters the Main Setup Menu if no password is stored Otherwise a password must be entered before the Main Setup Menu can be accessed Tapping the units brings up engineering units selection popup to quickly change pressure measurement units Tapping Time...

Страница 18: ...FMS 1655M LIT 12013119 18 Alarm setpoints ...

Страница 19: ...FMS 1655M LIT 12013119 19 Setup menu tree ...

Страница 20: ...FMS 1655M LIT 12013119 20 ...

Страница 21: ...scription Read or Write Analog Inputs AI 1 Analog Input 1 default Differential Pressure Read Only Binary Inputs BI 1 Digital Input 1 Door Switch Read Only Analog Outputs AO 1 Analog Output PID 1 OUT Read Only Analog Values AV 1 Setpoint Differential Pressure Setpoint Read Write AV 2 Low Pressure Alarm Setpoint Read Write AV 3 Low Pressure Warning Setpoint Read Write AV 4 High Pressure Warning Setp...

Страница 22: ...FMS 1655M LIT 12013119 22 FMS 1655M Monitor wiring guide ...

Страница 23: ...respective owners Copyright 2019 Johnson Controls All rights reserved Any unauthorized use or copying is strictly prohibited European Single Point of Contact JOHNSON CONTROLS WESTENDHOF 3 45143 ESSEN GERMANY NA SA Single Point of Contact JOHNSON CONTROLS 507 E MICHIGAN ST MILWAUKEE WI 53202 USA APAC Single Point of Contact JOHNSON CONTROLS C O CONTROLS PRODUCT MANAGEMENT NO 22 BLOCK D NEW DISTRICT...

Отзывы: