background image


- 23 - 

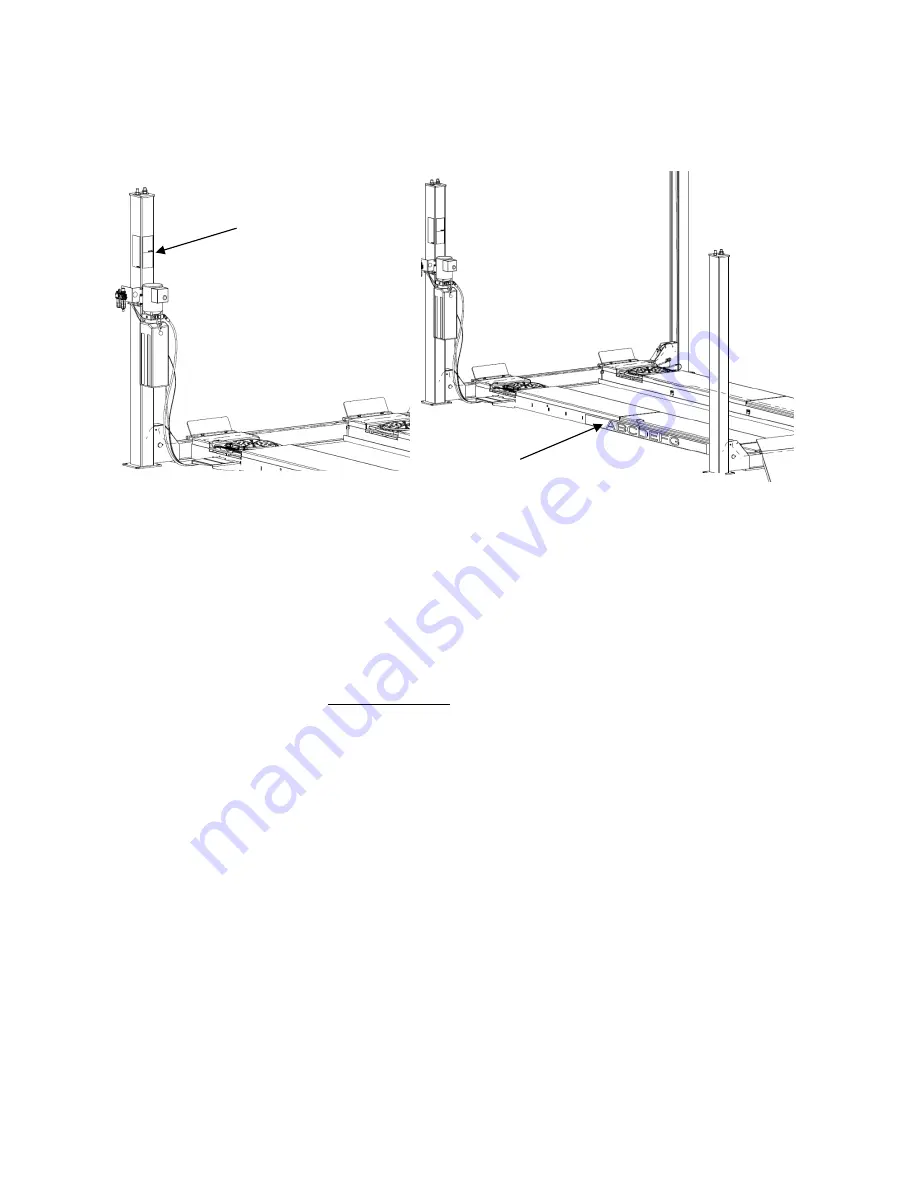
Figure 23 - 

Logo Decal 

Placement 

7.9  DECAL PLACEMENT 


  Clean the column surface before placing any decals. 

  Install safety decals (NOTICE / CAUTION / WARNING) at the power unit as shown in 

Figure 22

 below. An illustration of these safety decals can be found on page 4. 


  Place a logo decal on the outside deck as shown in 

Figure 23

NOTE

: Logo decal may cover some step holes on the side of decks.


8.  OWNER/USER CHECKLIST 

SAVE THESE INSTRUCTIONS

 deliver them to owner/user/employee along with other 

materials furnished with this lift. 
Demonstrate the operation of the lift to the owner/operator and review correct and safe 
lifting procedures using the 

Lifting It Right

 booklet as a guide. 

Complete the Installation Checklist/Warranty Validation questionnaire with the owner. 
Review the terms of the warranty registration card, and return the card and a copy of the 
questionnaires to: 

Snap-on Equipment 

309 EXCHANGE AVENUE 

CONWAY, ARKANSAS, 72032


9.  OPERTATION PROCEDURE 

Safety Notices and Decals 

This product is furnished with graphic safety warning labels, which are reproduced 
on page 3 of these instructions.  Do not remove or deface these warning labels or 
allow them to be removed or defaced. For your safety, and the safety of others, read 
and understand all the safety notices and decals included.


Owner/User Responsibilities 

This lift has been designed and constructed according to ANSI/ALI ALCTV-2017 standard. 
The standard applies to lift manufactures, as well as to owners and employees. The 
owner/employee’s responsibilities as prescribed by ANSI/ALI ALOIM-2013, are 
summarized below.  For exact wording refer to the actual standard provided with this 
manual in the literature pack. 

Figure 22 - 

Safety Decal 

Placement 

Safety Decal 

Logo Decal 

Содержание EELR369A

Страница 1: ...NSTALLING SERVICING OR MAINTAINING THE LIFT SAVE THIS MANUAL INSTALLATION and OPERATION MANUAL 12K 4 Post Lift EELR529A EELR728A EELR369A and EELR369A for Lift EELS900A for Jacking Beam 309 EXCHANGE AVENUE CONWAY ARKANSAS 72032 TEL 501 450 1500 FAX 501 450 1585 EAZ0080V51A FEB 2019 REV B ...

Страница 2: ... for Operation Inspection and Maintenance Appendix G Planned Maintenance Log and the User shall ensure that the lift maintenance personnel are qualified and that they are adequately trained in the maintenance of the lift 4 The Owner User shall maintain the periodic inspection and maintenance records recommended by the lift manufacturer s instructions or ANSI ALI ALOIM 2013 American National Standa...

Страница 3: ...g raised or lowered 12 Never raise vehicle with passengers inside 13 Always stand clear of lift when raising or lowering and observe Pinch points warning 14 Before lowering the lift check area for any obstructions 15 Never attempt to overload the lift The manufacturer s rated capacity is shown on the identification label on the power column 16 Do not override the operating controls or safety mecha...

Страница 4: ... 4 1 2 SAFETY WARNING LABELS FOR 4 POST SURFACE MOUNTED ROLL ON LIFTS SAVE THESE INSTRUCTIONS ...

Страница 5: ...MBLIES 12 7 4 COLUMN INSTALLATION 16 7 5 ANCHOR COLUMNS 17 7 6 CABLE INSTALLATION 18 7 7 POWER UNIT AND AIR BUTTON VALVE ASS Y INSTALLATION 18 7 8 INSTALL FRONT TURNTABLES 22 7 9 DECAL PLACEMENT 23 8 OWNER OPERTOR CHECKLIST 23 9 OPERTATION PROCEDURE 23 10 PARTS LIST 26 10 1 LIFT ASSEMBLY 26 10 2 CABLES 28 10 3 RUNWAY PULLEYS 29 10 4 CROSS BEAM 30 10 5 ALIGNEMNT EQUIPMENT 32 11 ACCESSORY 33 11 1 TU...

Страница 6: ... mm Maximum Lifting Height to runway surface 78 1981 mm Rise Time 74 Seconds Ramp approach angle no shims 10 Air Supply requirements 90 120 PSI Pneumatic Filtration Oil Type Snap on Air Tool oil or equivalent Hydraulic Oil Capacity 3 0 gal 11L Hydraulic Oil Type ISO 32 10 weight hydraulic oil Power Requirements Standard motor 230VAC 1PH 60 Hz 12 5A Shipping Weight 3307lb 1500 kg Maximum Operating ...

Страница 7: ...KETS AND WRENCHES ALLEN KEY SET SCREWDRIVER SET FLOOR JACK OR ENGINE HOIST BOX CUTTER SNIPS to remove packaging RUBBER OR PLASTIC MALLET 5 PACKAGING CONTENTS The lift is packaged to protect it from damage during shipping The two deck assemblies and cross beams are packaged together with the accessory boxes strapped to them Main Components 1 Left Side Deck Assembly complete with hydraulic cylinder ...

Страница 8: ... 8 6 ALIGNMENT LAYOUT Aligner mount holes Figure 2 ...

Страница 9: ...stallation and to ensure that the electrical installation conforms to local building codes Where required it is the user s responsibility to provide an electrical isolation switch located in close proximity to the lift that will enable emergency stop capability and isolate electrical power from the lift for any servicing requirements Recommended clearance around the lift is 3 to 4 feet Ensure clea...

Страница 10: ...s line A Determine the center of the doorway and bay Make a centerline to intersect with line A Make two chalk lines spaced 56 1 8 to the left and right side of the centerline 112 1 4 apart Call these lines B and C respectively These will be the locations of the inside edges of the front tower base plates Make a chalk line spaced 192 7 8 to the back from line A Call this line D This is the positio...

Страница 11: ... belong front left front right etc See Figure 4 Place components in their approximate locations Do not unwind cables at this point Leave cables coiled close to their respective towers Place runways decks about 40 apart and about 3 ft behind line A Figure 4 POWER PACK MOUNT FRONT LEFT TOWER FRONT RIGHT TOWER REAR TOWERS FRONT REAR CROSS BEAM ...

Страница 12: ... cross beams Figure 6 Front Cross beam are marked with FRONT label on the parts Remove the four 4 cross beam pulleys one pulley from each end and the two idler runway pulleys also one pulley from each end The runway pulley pins do not need to be removed just lowered enough to remove the pulleys Figure 10 Starting from the bottom of the pulley stack route cable 4 through the access hole and up out ...

Страница 13: ...d bolts two at each end of each runway being careful not to pinch the air line Leave the poly tubes hanging out the bottom of the cross beam access holes at this time they will be fed in through the runway after the lift is raised The outermost power runway slots should be in line with the outermost holes in the top of the cross beam The idler runway can be installed using the outer or inner sets ...

Страница 14: ...le 2 LEFT FRONT Cable 3 RIGHT REAR Cable 4 LEFT REAR JACK RAIL 1x4x12 4x4x30 Figure 7 Rear Single Stack idler runway Figure 8 Front Single Stack typical for idler and power runways 1 8 THICK WASHER 1 8 THICK WASHER 2 1 8 SPACER REAR ONLY ...

Страница 15: ... Cable 4 Cable 1 Cable 3 Cable 1 Cable 3 Cable 3 Cable 2 Cable 4 Figure 10 Cable Pulley No need to unscrew this bolt No need to fully pull out the pulley shaft just enough to free the pulley Diagonals to be within 1 4 Z Z Side to side distance Z to be identical ...

Страница 16: ...to allow the ladder to be lifted freely Slide power side column onto cross beam until the M8 threaded holes in the side of the beam are just exposed Position slide blocks as shown in Figure 12 and attach with M8 x 16mm lg bolts apply thread locking compound before installing Raise the locking ladder push the column against the slide blocks and lower the ladder into the slide blocks Figure 13 Figur...

Страница 17: ...ny given point Use a level no less than 24 in length to plumb columns Assemble washer and nut to anchor with nut just below impact section of bolt Drive anchor into hole until nut and washer contact base Tighten anchor bolts and recheck column for plumb Re shim as required Torque to 120 foot pounds 163Nm to set anchors NOTE Level bubble should not only be between the lines the bubble should be cen...

Страница 18: ...ut Figure 15 Route the cable in front of safety pulley at all four corners Figure 16 7 7 POWER UNIT AND AIR BUTTON VALVE ASS Y INSTALLATION Install the power unit and the air button valve assembly on the power column Figure 17 Install O Ring end of 45 degree hydraulic elbow 9 16 18 O Ring x 37 Male JIC to power unit output port The hydraulic hose is pre installed to the hydraulic cylinder and secu...

Страница 19: ...regulated to 90 120 psi Failure to provide clean dry lubricated and pressure regulated air will void warranty on pneumatic components Energize air valve assembly and make sure that all air cylinders are working properly Level the runways and crossbeams using laser level and height gauge With the lift resting in its locks place the laser level at appropriate location Place height gauge at all four ...

Страница 20: ... 20 Figure 18 ...

Страница 21: ...oute 4mm Safety Release Poly tube 4mm Safety Release Poly tube Blue 10mm Jack Beam Poly tube Black Tee fitting 4mm Figure 20 Welded Rings All poly tube should route through these rings if available 4mm Safety Release Poly tube Straight fitting 4mm ...

Страница 22: ...e support can be adjusted to level with runway by using the 6 adjustment bolts under the support plate See Figure 21 b Tighten the jam nuts on the adjusting screws after adjusting 4 Verify that the turntable assembly is completely seated in the front alignment pan Gently slide each turntable in the alignment pan left and right to verify that they can be positioned for different car widths a Positi...

Страница 23: ...Review the terms of the warranty registration card and return the card and a copy of the questionnaires to Snap on Equipment 309 EXCHANGE AVENUE CONWAY ARKANSAS 72032 9 OPERTATION PROCEDURE Safety Notices and Decals This product is furnished with graphic safety warning labels which are reproduced on page 3 of these instructions Do not remove or deface these warning labels or allow them to be remov...

Страница 24: ...shall display the lift manufacturer s operating instructions ALI SM 93 1 ALI Lifting it Right safety manual ALI ST 90 ALI Safety Tips card ANSI ALI ALOIM 2013 American National Standard for Automotive Lifts Safety Requirements for Operation Inspection and Maintenance and in the case of frame engaging lift ALI LP GUIDE Vehicle Lifting Points Quick Reference Guide for Frame Engaging Lifts in a consp...

Страница 25: ...stops short of full rise or chatters check fluid level and bleed both cylinders per Installation Instructions When lift is not being used for a period of time over night or weekend lift the runways in the mid to upper position in order to allow air flow under runways and not allow moisture to build on cables and pulleys this will prevent premature failure of components Replace all Safety Warning o...

Страница 26: ... 26 10 PARTS LIST 10 1 LIFT ASSEMBLY Figure 24 ...

Страница 27: ...SSEMBLY 13 EAA0485V14A AB 9367 DLH 1 POWERPACK UNIT 14 B40126 B40126 4 3mm x 38mm LG COTTER PIN 3mm x 38mm LG COTTER PIN 15 40165 B40165 2 PIN 16 EAS2205V10A JZQ7 06 01 00 2 APPROACH RAMP WELDMENT 17 6 4014CN 6 BLIND RIVET D6 4X20L 18 B40168 P 40168 2 4P12 4P14 FLOOR PROTECTOR 19 EAA0485V16A 1 RELEASE VALVE ASSEMBLY 20 EAH0075V12A 2 45 ELBOW FITTING 9 16 9 16 O RING 21 EAA0485V15A B40349 1 HYDRAUL...

Страница 28: ...T ASSY 4 EAA0485V08A 1 STEEL ROPE REAR LEFT ASSY 5 1 23288A 40147 8 HEX NUT 7 8 9 UNC ZINC 7 1 23388A B44015 2 M27 HEX JAM NUT 8 EAS2194V05A 40392 01 00 1 SLEEVE TUBE WELDMENT 9 EAM0155V81A B40473 1 CABLE RETAINER STRAP 10 EAM0155V79A B40474 1 CABLE RETAINER WELD Replace all worn damaged or broken parts with parts approved by Snap on Equipment Contact 1 800 225 5786 Figure 25 ...

Страница 29: ...ITH BUSHING 2 EAM0155V74A B40053 19 PULLY WASHER 3 EAM0155V71A B40055 4 DECK PULLEY SHAFT WELDMENT 4 1 26988A B31188 8 HEX BOLT M8X20 GB T5781 2000 5 EAM0155V88A B40438 R 1 STANDING BUSHING Replace all worn damaged or broken parts with parts approved by Snap on Equipment Contact 1 800 225 5786 Figure 26 ...

Страница 30: ... LOCK SPACER 8 EAA0485V05A B40141 4 AIR CYLINDER ASSEMBLY 9 1 23688A B40466 4 M6 x 35mm LG HEX HEAD SCREW 10 1 27133A B40467 4 M6 NUT GB T41 2000 11 1 22288A B40144 4 NYLON LOCKNUT M6 GRADE 8 GB T 889 1 2000 12 1 04887A B40123 4 CLEVLS PINS WITH HEAD 13 1 06687A B40124 4 D2X10 COTTER PIN GB T91 2000 14 EAM0155V39A B40139 8 HANDLE SPRING 15 EAM0155V75A B40650 11 PULLEY ASSEMBLY 16 EAM0155V74A B4005...

Страница 31: ...ER 22 1 23588A 8 CROSS RECESSED PAN HEAD TAPPING SCREWS GB845 85 ST6 3X12 F H 23 EAM0155V33A JSZ5 5 02 05 4 SAFETY PULLEY 24 1 04987A B40137 4 RETAINING RING 9 GB T 896 86 25 1 17888A 16 SOCKET HEAD CAP SCREW M8 20 GB T70 1 2008 Replace all worn damaged or broken parts with parts approved by Snap on Equipment Contact 1 800 225 5786 ...

Страница 32: ... RETAINER ASSEMBLY 2 40211 40211 196 SLIP PLATE BALL 3 40221 40221 24 EXTENSION SPRING 4 1 27888A 40219 8 LOCK WASHER INTERNAL TEETH 5 40530 40530 2 REAR SLIP PLATE WELDMENT Replace all worn damaged or broken parts with parts approved by Snap on Equipment Contact 1 800 225 5786 Figure 28 ...

Страница 33: ...ACCESSORY ITEM PART DESCRIPTION OPTIONAL QTY 1 EELS900A 6K JACK BEAM OPTIONAL 1 11 3 SHIM KIT ITEM PART DESCRIPTION QTY 6 0739 LIFT SHIM KIT included 32 11 4 WORK STEP ITEM PART DESCRIPTION QTY 1 JBC22119CN00 WORKSTEP ASSEMBLY 2 11 5 DRIVE THROUGHT KIT ITEM PART DESCRIPTION QTY 1 EAK0359V12A APPROCH RAMP KIT OPTIONAL Include two complete set of ramps 1 ...

Страница 34: ...anual for Jack Beam MODEL EELS900A ROLLING JACK Model EELR528A EELR727A Series 4 Post 6000 lbs Capacity 309 EXCHANGE AVENUE CONWAY ARKANSAS 72032 TEL 501 450 1500 FAX 501 450 1585 IMPORTANT READ THIS MANUAL COMPLETELY BEFORE INSTALLING or OPERATING JACK ...

Страница 35: ...sibly worn distorted or damaged Maximum air operating pressure not exceed 150 psi Always wear appropriate eye protection WARNING Lifting capacity of this jack is 6000lbs Hydraulic Pressure at Cap 3770 psi Exceeding this could result in severe personal injury or death When the total lifting capacity of 2 rolling jacks differs from the rated capacity of the lift they are used on the capacity of each...

Страница 36: ...Height above Deck Surface 13 1 8 332 5 mm Power Requirements 20 in3 min flow rate 90 120 psi 6 8 bar Maximum Operating Pressure Rated Load 3915psi 270 bar Shipping Weight 308 Lbs 140 Kg Fig 1 INSTALLATION 1 Place jack assembly on lift rack rails 2 Install Jack Beam air supply kit see details in Appendix B 3 Once side members are adjusted and jack is centered between the rails tighten the 4 hex bol...

Страница 37: ...ed Roll jack forward before moving vehicle off rack Loss of lifting power If for any reason the lift will not raise off the locks or the locks will not retract consult factory authorized personnel DO NOT OVERRIDE ANY SAFETY FEATURE IN AN ATTEMPT TO LOWER THE LIFT Maintenance Daily Inspect jack and its components for damage or excessive wear Replace parts as required See parts list Inspect air hydr...

Страница 38: ... 38 Jack Beam Installation Operation and Maintenance Manual Parts Breakdown ...

Страница 39: ...t 19 RJ6 17CH 4 Wheel 20 RJ6 24CH 4 Nylon Washer 21 RJ6 26A 4 Compression Spring 22 RJ6 25CH 4 Carrier 23 RJ7 5 16 1 Lock 24 RJ7 5 20 1 Lock Pin 24A RJ7 5 35 2 21mm Snap Ring 25 EAM0156V25A 2 Pump Hold Down Plate 27 1 17788A 2 SOCKET HEAD CAP SCREW GB T70 1 2000 M6 20 28 1 22288A 2 M6 Nylon Locknut GR 8 GB T889 1 2000 29 RJ6 09CHA 1 Cylinder Flow Restricted 30 RJ7 5 15 00 2 Side Member Assembly 31...

Страница 40: ... BEAM AIR SUPPLY SYSTEM IMPORTANT READ THIS MANUAL COMPLETELY BEFORE INSTALLING OR OPERATING LIFT Read entire manual before assembling installing operating or servicing this equipment Proper maintenance and inspection is necessary for safe operation DO NOT operate a damaged lift ...

Страница 41: ... 41 LAYOUT VIEW Figure 1 ...

Страница 42: ...nents supplied as shown in Detail B 2 Rout 10mm plastic air hose with hydraulic hose in cloth sheath to underside of power runway 3 Use provided zip ties to secure 10mm air hose to the power runway as shown in Detail C 4 Once routed inside the runway run along the outside wall of the runway until hose can clear hydraulic cylinder 5 Secure other end with zip tie to runway as before 6 Making sure to...

Страница 43: ...h a cable head and two lock nut Detail E Install at driver side deck Bolt Stop Installation Pre Installed 1 Pre Installed at passenger side deck also can be install at driver side deck 2 Locate Ø 5mm holes on the power runway located at 1269mm and 2640mm from the front of the runway as show in Figure 1 3 Move the jacks to the ends of the runways and install Block plate with hex screws Ø 6mm spring...

Страница 44: ... the clamps provided cut the provided Ø6mm OD plastic tubing into lengths shown in Figure 5 before installation and attach fittings by pushing onto end of tubing 2 Route hose with connections as shown in Figure 6 Note different routing for Front or Rear jack location Figure 5 Figure 6 ...

Страница 45: ...POLY TUBE ASSEMBLY 11 EAM0156V12A 2 JB BLOCK PLATE 12 1 20488A 4 HEX SCREW GB T 70 1 2008 M6X12 13 1 04488A 4 FLAT WASHER GB T 848 2002 Ø6 14 1 04588A 4 SPRING WASHER GB T 93 1987 Ø6 15 6 3896CN 1 PNEU T FITTING 1 4 NPT F F M 16 1 10389A 1 TERMINAL BOLT 17 6 3010CN 2 90ELB PNEU 1 4NPT M n10 F PUSH 18 1 25079A 2 NPT1 4 PLUG 19 EAH0075V04A 1 JACK BEAM AIR TUBE 10 mm 4740 20 6 3011CN 1 TEE n10 POLYTU...

Отзывы: