background image


12

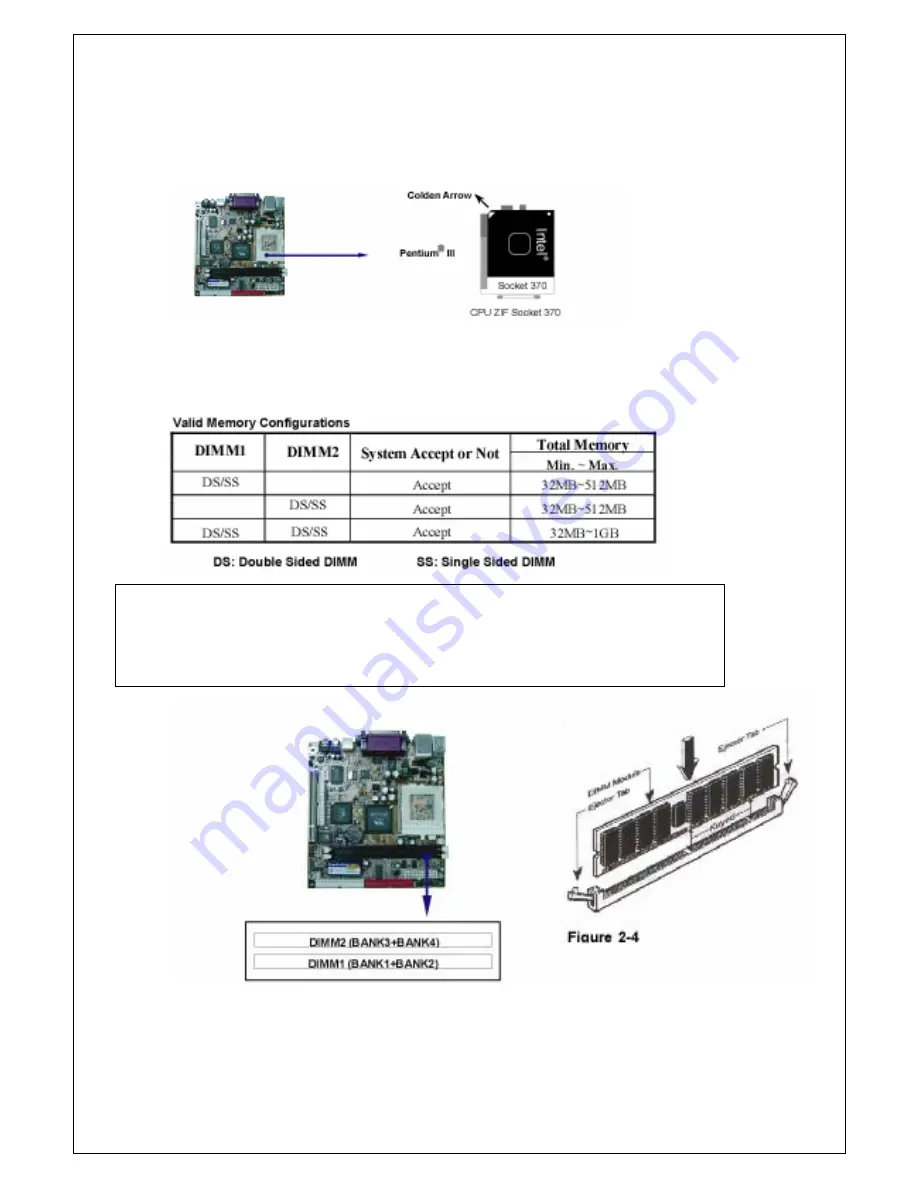
The notched corner should point toward the end of the level. 

Because the CPU has a corner pin for two of the four corners, the CPU will   

fit only in the orientation as shown. 


2-4 Install Memory 

This motherboard provides two 168-pin DUAL INLINE MEMORY 

MODULES (DIMM) sites for memory expansion from 32MB to 1GB SDRAM. 


NOTE! 

Make sure the total installed memory size does not exceed 1GB;   

otherwise,    the system may hang during startup. 


Содержание B 860T

Страница 1: ... MMX are trademarks of Intel Corporation All the names and brands are the property of their respective owners Specifications and Information contained in this documentation are furnished for information use only are subject to change at any time without notice and should not be construed as a commitment by manufacturer ...

Страница 2: ...EMORY 9 2 5 EXPANSION CARDS 10 2 5 1 PROCEDURE FOR EXPANSION CARD INSTALLATION 10 2 5 2 ASSIGN IRQ FOR EXPANSION CARD 11 2 6 CONNECTORS HEADERS 11 2 6 1 CONNECTORS 11 2 6 2 HEADERS 14 2 7 START UP YOUR COMPUTER 18 CHAPTER 3 INTRODUCTION OF BIOS 3 1 ENTER SETUP 19 3 2 GET HELP 20 3 3 THE MAIN MENU 20 3 4 STANDARD CMOS FEATURES 22 3 5 ADVANCED BIOS FEATURES 23 3 6 ADVANCED CHIPSET FEATURES 24 3 7 IN...

Страница 3: ...ILITY 39 4 7 PC CILLIN INSTALL PC CILLIN 2000 ANTI VIRUS PROGRAM 41 4 8 HOW TO DISABLE ON BOARD SOUND 43 4 9 HOW TO UPDATE BIOS 43 USER S NOTICE COPYRIGHT OF THIS MANUAL BELONGS TO THE MANUFACTURER NO PART OF THIS MANUAL INCLUDING THE PRODUCTS AND SOFTWARE DESCRIBED IN MAY BE REPRODUCED TRANSMITTED OR TRANSLATED INTO ANY LANGUAGE IN ANY FORM OR BYANY MEANS WITHOUT WRITTEN PERMISSION OF THE MANUFAC...

Страница 4: ...l goal in providing the proper thermal environment is keeping the processor s temperature below its specified maximum case temperature Heatsinks induce improved processor heat dissipation through increased surface area and concentrated airflow from attached fans In addition interface materials allow effective transfers of heat from the processor to the heatsink For optimum heat transfer Intel reco...

Страница 5: ...BN860T motherboard offers ULTRA DMA 66 100 ATA 100 to provide higher data transfer rate to HDD and to boost the overall system performance The BN860T also has an integrated AC 97 2 1 CODEC on board which is fully competitive with Sound Blaster Pro that gives you the best sound quality and ompatibility VIA VT8601T chipset also includes integrated 3D Graphic Acceleration to provide a lower cost solu...

Страница 6: ...6 1 2 Specification ...

Страница 7: ...7 ...

Страница 8: ...8 ...

Страница 9: ...9 MIC in Connector Phone jack Connector p 14 FDD1 Floppy Driver Connector 34 pin Block p 14 IDE1 Primary IDE Connector 40 pin Block p 15 IDE2 Secondary IDE Connector 40 pin Block p 15 Headers Header Name Description Page JC1 COM2 Headers 9 pin Block p 16 JU1 USB 3 4 Port Headers 10 pin Block p 16 PW ON Power on switch 2 pin Block p 17 RESET Reset switch lead 2 pin Block p 16 PWLED Power LED 2 pin ...

Страница 10: ...oppy cables Front Panel Back Panel cable 6 Connect ATX Power cable 7 Power On and Load Standard Default 8 Reboot 9 Install Operating System 10 Install Driver and Utility 2 2 Checking Motherboard s Jumper Setting 1 CMOS RAM Clear 3 pin JB1 A battery must be used to retain the motherboard configuration in CMOS RAM short pin1 and pin2 of JB1 to store the CMOS data To clear the CMOS follow the procedu...

Страница 11: ...ficient air circulation across the processor s heatsink and theCPU cooling FAN is working correctly otherwise it may cause overheating and damage the processor and motherboard You may install an auxiliary cooling FAN if necessary Before installing a CPU first of all turn off your system and remove its cover Locate the ZIF socket and open it by pulling the lever sideways up away from the socket the...

Страница 12: ...four corners the CPU will fit only in the orientation as shown 2 4 Install Memory This motherboard provides two 168 pin DUAL INLINE MEMORY MODULES DIMM sites for memory expansion from 32MB to 1GB SDRAM NOTE Make sure the total installed memory size does not exceed 1GB otherwise the system may hang during startup ...

Страница 13: ... Expansion Card Installation 1 Read the documentation of your expansion card and make any necessary hardware or software setting such as jumpers for your expansion card 2 Remove the chassis cover and the bracket plate on the slot you intend to use 3 Align the card with slot and insert the card firmly 4 Secure the card in the slot with the screen you remove above 5 Replace the chassis cover 6 Set u...

Страница 14: ...ower Supply is allowed to use soft power on momentary switch that connects from the front panel switch to 2 pin Power On jumper pole on the motherboard When the power switch on the back of the ATX power supply turned on the full power will not come into the system board until the front panel switch is momentarily pressed Press this switch again will turn off the power to the system board 2 PS 2 Mo...

Страница 15: ...S Video Connector 4 pin female JACK1 This connector is for on board TV OUT connection If you connect the system to any external TV device you will find NTSC PAL selection in BIOS Setup 7 Audio and Game Connector J8 J9 Thess connectors are 2 phone Jacks for LINE OUT MIC IN Line out Audio output to speaker MIC IN Microphone Connector 8 Serial Port COM1 J3 COM1 is the 9 pin D Subminiature mail connec...

Страница 16: ...ry IDE Connector 40 pin block IDE2 This connector connects to the next set of Master and Slave hard disks Follow the same procedure described for the primary IDE connector You may also configure both two hard disks to Masters mode by using one ribbon cable on the primary IDE connector and another ribbon cable on the secondary IDE connector Two hard disks can be connected to each connector The firs...

Страница 17: ... Headers 2x9 pin header JP1 1 Power switch PW ON This 2 pin connector connects to the case mounted power switch to power on off the system 2 Reset switch lead RESET This 2 pin connector connects to the case mounted reset switch for rebooting your computer without turning off your power switch This is a preferred way to restart the system 3 Power LED PW LED The Power LED is lit while the system pow...

Страница 18: ... support cooling fans of 350mA 4 2 Watts or less depending on the fan manufacturer The red wire should be positive while the black one should be ground Connect the fan s plug to the board according to the polarity of connector 5 IR infrared module Headers 10 pin JI1 This connector supports the optional wireless transmitting and receiving infrared module To use the IR function you must configure th...

Страница 19: ...0 This header is for the CD ROM Audio connector 7 Line in Headers 4 pin J6 This header is for Line in connector 8 Audio In Out Headers 5 pin J7 The Audio in header is for MIC in connector The Audio out header is for Line out connector ...

Страница 20: ...em case according to the user s manual of your system 4 Turn on your peripherals as the following orders a Your monitor b Other external peripherals Printer Scanner External Modem etc c Your system power For ATX power supplies you need to turn on the power supply and press the ATX power switch which is on the front panel of the case 5 The power LED on the front panel of the system case will be lit...

Страница 21: ...in the Flash Memory on the motherboard This program is a bridge between motherboard and operating system When you start the computer the BIOS program gains control The BIOS first operates an auto diagnostic test called POST Power on Self Test for all the necessary hardware it detects the entire hardware devices and configures the parameters of the hardware synchronization After these tasks are com...

Страница 22: ...ess the keys at the proper time and the system does not boot an error message will display and you will be asked to Press F1 to continue Ctrl Alt Esc or Del to enter Setup 3 2 Get Help Main Menu The on line description of the highlighted setup function is displayed at the bottom of the screen Status Page Setup Menu Option Page Setup Menu Press F1 to pop up a small help window that describes the ap...

Страница 23: ...nP PCI PC Health Status This entry shows your PC health status Frequency Voltage Control This menu is to specify your settings for Miscellaneous Control Load Optimized Defaults Use this menu to load the BIOS default values that are factory settings for optimal system operation performance It is provided for the the skillful users who want to push the motherboard to get better performance The Optim...

Страница 24: ...MOS values modified to CMOS and exit setup Exit Without Saving Abandon all the CMOS values modified and exit setup 3 4 Standard CMOS Features The items in Standard CMOS Setup Menu are divided into several categories Each category includes no one or more than one setup items Use the arrow keys to highlight the item and then use the PgUp or PgDn keys to select the value you want to modify with this ...

Страница 25: ...CBFFF Shadow Disabled CC000 CFFFF Shadow Disabled D0000 D3FFF Shadow Disabled D4000 D7FFF Shadow Disabled D8000 DBFFF Shadow Disabled DC000 DFFFF Shadow Disabled Small logo EPA Shadow Disabled Menu Level Allows you to choose the VIRUS warning feature for IDE Hard disk boot sector protection If this function is enabled and someone attempt to write data into this area BIOS will show a warning messag...

Страница 26: ...ST CLK DRAM Timing by SPD Enabled X SDRAM Cycle Length 3 X Bank Interleave Disabled Memory Hole Disabled P2C C2P Concurrency Enabled Fast R W Turn Around Enabled System BIOS Cacheable Disabled Video RAM Cacheable Disabled Frame Buffer Size 8M AGP Aperture Size 64M OnChip USB Enabled USB Keyboard Support Disabled OnChip Sound AUTO CPU to PCI Write Buffer Enabled PCI Dynamic Bursting Enabled PCI Mas...

Страница 27: ...IR Function Duplex Half X TX RX Inverting Enable No Yes Onboard Parallel Port 378 IRQ7 Onboard Parallel Mode Normal X ECP Mode Use DMA 3 X Parallel Port EPP Type EPP1 9 Onboard Legacy Audio Disabled X Sound Blaster Disabled X SB I O Base Address 220H SB IRQ Select IRQ5 SB DMA Select DMA1 Menu Level Move Enter Select PU PD Value F10 Save ESC Exit F1 General Help F5 Previous Values F6 Optimized Defa...

Страница 28: ...ve energy saving while operating in a manner consistent with your own style of computer use Phoenix AwardBIOS CMOS Setup Utility Power Management Setup Item Help ACPI Function Enabled Power Management Press Enter ACPI Suspend Type S1 POS PM Control By APM Yes Video Off Option Suspend Off Video Off Method V H SYNC Blank MODEM Use IRQ 3 Soft Off by PWRBTN Instant Off State After Power Failure Off Wa...

Страница 29: ...ON PCI Master OFF Power On By PCI LAN Card Disabled Modem Ring Resume Disabled RTC Alarm Resume Disabled x Date of Month 0 x Resume Time hh mm ss 0 7 0 IRQs Activity Monitoring Press Enter Menu Level Move Enter Select PU PD Value F10 Save ESC Exit F1 General Help F5 Previous Values F6 Optimized Defaults F7 Standard Defaults IRQs Activity Monitoring Please refer to section 3 8 2 1 3 8 2 1 IRQs Acti...

Страница 30: ...special components This section covers some very technical items and we strongly recommended that only experienced users should make any change to the default settings Phoenix AwardBIOS CMOS Setup Utility PnP PCI Configurations Item Help PNP OS Installed No Reset Configuration Data Disabled Resources Controlled By Auto ESCD x IRQ Resources Press Enter x DMA Resources Press Enter PCI VGA Palette Sn...

Страница 31: ...m interrupt is assigned a type depending on the type of device using the interrupt PCI VGA Palette Snoop Leave this field at Disabled The settings are Enabled or Disabled 3 10 PC Health Status This section shows the status of your CPU Fan and overall system This is only available when there is Hardware Monitor function onboard Phoenix AwardBIOS CMOS Setup Utility PC Health Status Item Help Current...

Страница 32: ...Auto Detect DIMM PCI Clock Enabled Spread Spectrum Disabled CPU Clock 100MHz Menu Level Move Enter Select PU PD Value F10 Save ESC Exit F1 General Help F5 Previous Values F6 Optimized Defaults F7 Standard Defaults Auto Detect DIMM PCI Clock This item allows you to enable or disable Auto Detect DIMM PCI Clock The settings are Enabled or Disabled Spread Spectrum This item allows you to set the CPU H...

Страница 33: ... menus but do not have the right to change the options When you select this function the following message will appear at the center of the screen to assist you in creating a password ENTER PASSWORD Type the password up to eight characters in length and press Enter The password typed will clear any previous password from CMOS memory You will be asked to confirm the password Type the password again...

Страница 34: ...ms In addition this CD also includes an auto detect software which can tell you which hardware is installed and which driver is needed so that your system can function properly We call this auto detect software MAGIC INSTALL MAGIC INSTALL Supports WINDOWS 95 98 98SE ME NT4 0 2000 Insert the CD into your CD ROM drive and the MAGIC INSTALL Menu should appear as below If the menu does not appear doub...

Страница 35: ...DOR SUPPORT DRIVER IS USED TO FIX COMPATIBILITY ISSUE FOR IDE DEVICES AGPVXD VIA AGPVXD DRIVER IS TO BE INSTALLED IF YOU ARE USING AN AGP VGA CARD VIAGART VXD WILL PROVIDE SERVICE ROUTINES TO YOUR VGA DRIVER AND INTERFACE DIRECTLY TO HARDWARE PROVIDING FAST GRAPHIC ACCESS IRQ ROUTING VIA PCI IRQ MINIPORT DRIVER IS TO BE INSTALLED UNDER WIN98 ONLY IT WILL FIX PCI IRQ ROUTING SEQUENCE INF VIA REGIST...

Страница 36: ...36 ...

Страница 37: ...37 ...

Страница 38: ...38 ...

Страница 39: ...39 ...

Страница 40: ...40 ...

Страница 41: ...41 ...

Страница 42: ...42 ...

Страница 43: ...43 ...

Страница 44: ...rd sound function by pressing PAGE DOWN KEY to Disable 4 9 HOW TO UPDATE BIOS Method 1 Use Magic BIOS to update BIOS in Windows 98 refer to page 40 Method 2 In DOS Mode STEP 1 Prepare a boot disc you may make one by clicking START clicking RUN typing SYS A and clicking OK STEP 2 Copy utility program to your boot disc You may copy it from DRIVER ...

Страница 45: ...tart the computer and type Awdflash A B860Txxx BIN SN PY CC R B860Txxx BIN is the file name of the latest BIOS It may be B860TA03 BIN or B860TB02 BIN SN means don t save the current BIOS data PY means renew the current BIOS data CC means clear the current CMOS data R means restart computer STEP 5 Press ENTER and the BIOS will be updated computer will restart automatically ...

Отзывы: