


19.0 TFT Active Matrix LCD Panel User Manual
English 20
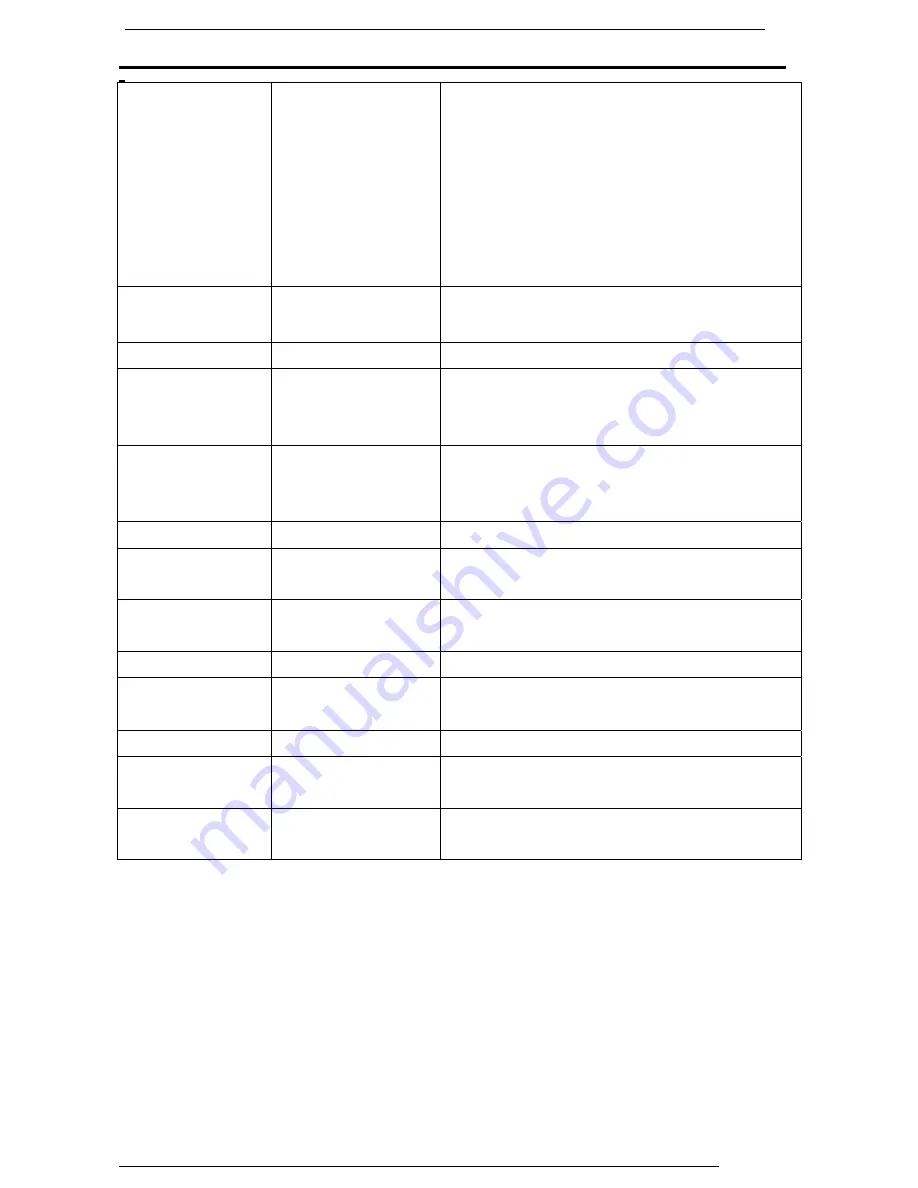
Specification
LCD Panel
Type
Viewing Angle
Contrast Ratio
Brightness
Response Time
Display Colors
Max Resolution
Pixel Pitch
19.0” TFT Active Matrix LCD Display
H:160° , V:150°
700:1(MAX) , 500 : 1(Typical)
250 cd/m
2
(Typical)
8 ms(Typical)
16.7M colors
1280X1024(SXGA) @75Hz
0.294mm(H)x0.294mm(V)
Input Signals
RGB Analog
VGA Level:0.7Vp-p(75
Ω
)
Frequency FH:30~80KHz / FV:50~75Hz
Compatibility
PC
Up to 1280X1024@75Hz(Non-interlaced)
Connector RGB
Analog
Audio IN
*DVI-D
D-sub 15-pins
Stereo Phone Jack
D-sub 24-pin DVI-D connector(optional)
Power
AC input Voltage
Consumption
Power saving mode
100-240V, 50/60Hz(universal)
Active < 48Watt Max
Standby < 5Watt
Internal Speaker
3Wx2(Stereo)
User Interface
LED Indicator
Active - Green
Off - Turn off
Standby
- Orange
Operating
Condition
Temperature
Air Humidity
0°C~45°C
10% ~ 80% R.H.
Dimensions Physical
460mm(H) x 430mm(W) x 210mm(D)
Net Weight
Gross Weight
4.8kg
5.5kg
DDC
DDC1/DDC2B
Compliant
Power
Management
VESA DPMS, EPA Energy Star
Regulation
(Certifications)
CE, FCC, CB, TUV, UL
*Option Function


