10
7.0
Adjustments
Disconnect machine from
power source before making adjustments,
unless indicated otherwise.
7.1
Blade installation and removal
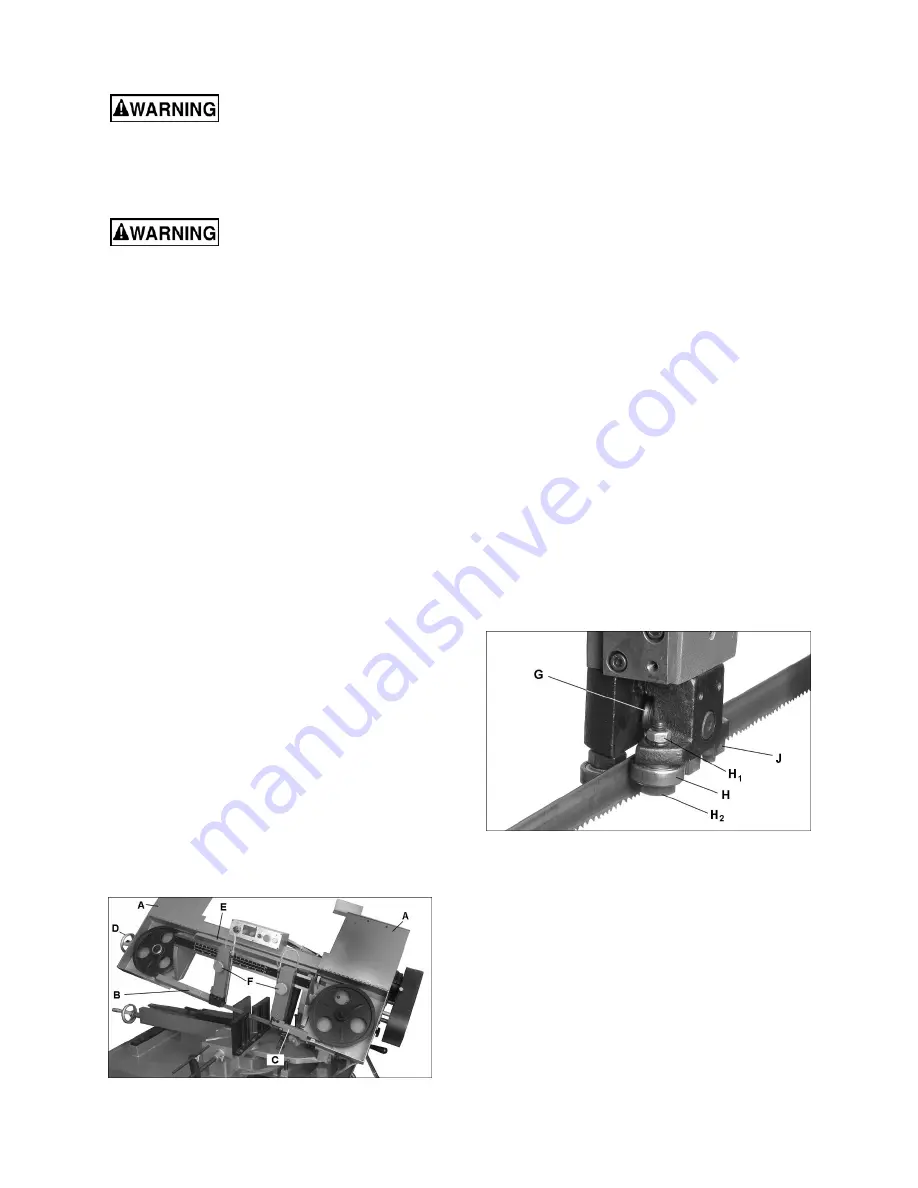
Refer to Figure 7-1.
Always wear leather gloves
when handling blades to avoid injury.
A blade (1in. W x 144in. L) is pre-installed and
tensioned on saw. To replace blade:
1. Disconnect machine from power source.
2.
Close
feed rate knob by turning it clockwise as
far as it will go, then raise bow a little.
3.
Open both wheel covers (A, Figure 7-1) and clean
out any swarf from wheel areas
.
4. Remove blade guards (B, C).
5.
Release blade tension by turning blade
tension
handwheel (D) counter-clockwise.
6.
Remove blade from both wheels and out
of each
blade guide.
7.
Make sure teeth of new blade
are pointing in
direction of travel. If necessary, turn blade
inside out.
8. Position new blade around wheels and through
upper blade guard (E, Figure 7-1). Slide it into
the blade guide bearings with back edge of
blade contacting backup bearing. (see Figure 7-
2). If guide bearing adjustment is needed, see
sect. 7.3
9. Lightly increase tension (D) and position blade
so it rests against shoulder of both wheels.
10. When blade is properly positioned, place full
tension upon it (see
sect. 7.4.1
).
11. Reinstall blade guards (B,C).
12. Jog the On/Off button to ensure blade is
tracking properly. If tracking adjustment is
needed, see
sect. 7.4.2
.
13. Close wheel covers and reinstall their screws.
Figure 7-1
7.2
Bracket adjustment
The blade guide brackets (F, Figure 7-1) must be
set to just clear the workpiece, but should not
interfere with workpiece or other saw components
during bow’s descent.
Loosen knobs and slide brackets into position.
Always tighten knobs before operating machine.
7.3
Blade guide bearing adjustment
The back of blade should ride against back-up
support bearing (G, Figure 7-2) which is positioned
at an angle to provide greater bearing support,
eliminating bearing wear and extending blade life.
The blade should also ride between the two roller
bearings. The front bearing (H) on left hand blade
guide is on an eccentric shaft and can be adjusted
to suit
blade thickness:
1. Disconnect machine from power source.
2. Loosen nut (H
1
) and turn lower nut (H
2
) to
position bearing. Retighten nut (H
1
). Do not
overtighten the bearings against the blade;
when adjusted properly, the bearings should be
able to be rotated with your fingers with only
minor resistance, with the blade stopped.
3. After completing above adjustments, loosen set
screws (J) and adjust both tungsten carbide
guides against surface of blade. Retighten set
screws.
4. Adjust the right hand tungsten carbide guides in
the same manner.
Figure 7-2: blade guide bearing adjustment
7.4
Blade tension and tracking
Refer to Figure 7-3.
7.4.1
Tension
Blade tension has been set by manufacturer at
approximately 1800 kg/cm2 (25,000 psi) for the
supplied blade, but should be verified by the
operator. Turn handwheel (D, Figure 7-3) clockwise;
if collar (K) slips out of position, then blade is
properly tensioned. Continue turning handwheel
until collar re-engages. NOTE: Simply turn
handwheel, do not press on it.
Содержание MBS-1018-1
Страница 18: ...18 12 1 1 MBS 1018 1 MBS 1018 3 Bow Assembly Exploded View...
Страница 22: ...22 12 2 1 MBS 1018 1 MBS 1018 3 Base Assembly Exploded View...
Страница 26: ...26 12 3 1 MBS 1018 1 MBS 1018 3 Electrical Box Assembly Exploded View...
Страница 29: ...29 13 2 Wiring Diagram for MBS 1018 3...
Страница 31: ...31 This page intentionally left blank...
Страница 32: ...32 427 New Sanford Road LaVergne Tennessee 37086 Phone 800 274 6848 www jettools com...


