500 795/Rev D/07-14
Page 24
2.3
Mixing Chamber Assembly
Place the instrument on a flat, stable bench and proceed as follows (see
Figures 2.3.1
and
2.3.2
below):
1.
Take the mixing chamber assembly and ensure that the fluted burner (1) is in place (remove the
retaining tape). Place the mixing chamber and burner assembly inside of the flame photometer and
line up the burner with the bottom of the chimney. Look down the chimney and ensure that the
burner locates centrally in the inner chimney. Screw the locking ring (2) onto the threaded boss
provided and tighten until finger tight, ensuring that the mixing chamber is at right angles to the side
of the instrument.
2.
Fit the nebuliser (3) into the end cap (8) and connect the air tubing to the nebuliser inlet (4).
3.
If natural gas is to be used, remove the restrictor screw (5) fitted into the end of the fuel inlet (6) on
the mixing chamber. The restrictor screw should remain in place if butane, propane or L.P.G. is to be
used as fuel. Keep the restrictor screw in case of any future change in gas supply. Push the fuel
tubing onto the fuel inlet connector (6) this tube can be secured with a metal hose clip.
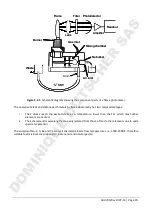
Figure 2.3.1
: Assembly of the mixing chamber, burner and nebuliser.
4.
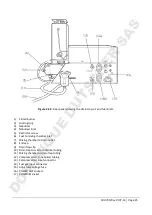
Take the drain trap clip (9) and, with the screw provided, fix to the hole situated at the chimney end
of the rear panel. Fix a length of silicon rubber tubing (10) onto the side port on the drain trap such
that it is long enough to reach either the sink or the waste receptacle to be used. Fit the drain trap
into the clip on the rear panel and run the short piece of tubing (11) from the bottom of the drain
trap to the mixing chamber waste outlet (7) on the bottom of the mixing chamber. This tube can be
pushed on and does not need securing.
DOMINIQUE DUTSCHER SAS


