background image

28

VM9511TS

DVD/DISC AUDIO OPERATION

Instructions for TFT control and Insert/Eject are the same for 
DVD, CD and MP3 operation. Please see the DVD/Disc 
Video Operation section for information about these topics.

The VM9511TS will play music or other audio files from the 
following disc media:

CD-DA

CD-R/RW with MP3 or WMA files

DVD

DVD-R/RW with MP3 or WMA files

Upon inserting a disc with the TFT screen open, the disc and 
track title (if available), along with the track number and 
playing time appear on the screen.

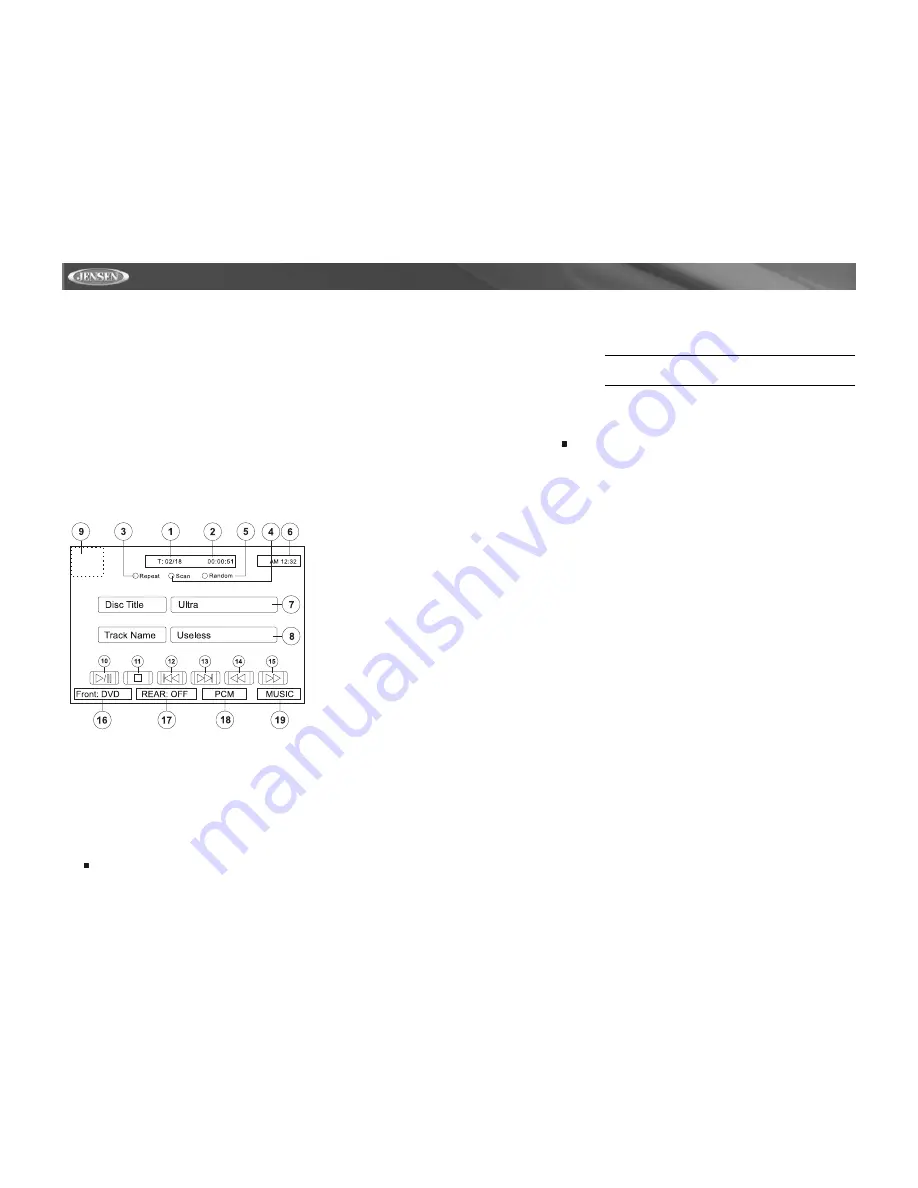
CD Player User Interface

The on-screen indicators and touch key areas for CD 
playback are outlined below.

1.

Current track and total number of tracks on disc

2.

Elapsed playing time

3.

Touch to activate/deactivate Repeat play mode

4.

Touch to activate/deactivate Scan mode

5.

Touch to activate/deactivate Random mode

6.

Current time

7.

Disc Title

8.

Track Title

9.

Touch to return to MAIN MENU

10.

>/||

: Touch to play/pause disc playback

11.

: Touch to stop disc playback

12.

|<<

: Touch to move to previous track

13.

>>|

: Touch to move to next track 

14.

<<

: Touch to rewind current track

15.

>>

: Touch to fast forward current track

16. Front Zone Playing Mode
17. Rear Zone Playing Mode
18. Encoding method of media being played
19. "Surround Music" effect selected

Controlling Playback

Stopping Playback

Press the 

6/STOP

 button (13) on the front panel or the 

/

BAND

 button (20) on the remote control to stop disc play.

To resume playback, press the 

ENTER

 button, or the joystick 

(20), on the front panel or the 

>/||

 button on the remote 

control (18).

Pausing Playback

Press the 

ENTER

 button, or the joystick (20), on the front 

panel or the 

>/||

 button on the remote control (18) to suspend 

or resume disc play.

Moving Through Tracks

Press the 

>>|

 button (19) on the remote control or the 

>

button on the joystick (17) to advance to the next track on the 
disc.

Press the 

|<<

 button (17) on the remote control or the 

<

button on the joystick (16) to move to the previous track.

Repeat Playback

Press the 

4/RPT

 button (11) on front panel or the 

REPT

button (7) on remote control to alter repeat mode according to 
the following:

DVD: Repeat Title, Repeat Chapter, Repeat Off

CD-DA: Repeat Single, Repeat Off

CD-R/RW: Repeat Single, Repeat Off

DVD-R/RW: Repeat Single, Repeat Off

Track Scan Select (CD-DA discs only)

During disc play, press the 

3/SCN

 button (10) on the unit or 

the

SCN

 button (34) on the remote control to play the first 10 

seconds of each track. When a desired track is reached, 
press the

 SCN

 button again to cancel the function and play 

the selected track. 

Random Play Select

During disc play, press the 

5/RDM

 button (12) to play the 

tracks on the disc in a random, shuffled order. In Random 
Play mode, you can Press the 

|<<

 or 

>>|

 button (17, 19) on 

remote control or the 

<

 or 

>

 button (16, 17) on the joystick to 

select a track in random order instead of the normal 

progression. Press 

5/RDM

 again to cancel Random Play 

mode.

NOTE: CD-R and CD-RW will not play unless the 
recording session is closed.

Fast Forward

Press the

 >>

 button (14) on the remote control or the 

/\

 button 

(18) on the joystick to fast forward. Keep pressing and 
releasing the button to increase the rate from “2X” to “4X”, 
“8X”, and “20X”. 

MP3/WMA Operation

This player allows you to play back MP3 and WMA files 
recorded onto CD-R/RW's and DVD-R/RW’s. For CD-RW 
discs, please make sure it is formatted using the full method 
and not the quick method to prevent illegal disc operation.

Up to 999 songs/files can be burned onto a disc for a MEGA 
DVD music mix. Do not exceed this number of songs/files or 
disc readability problems may occur.

MP3 Format Compatibility

The file naming formats listed below are compatible with this 
unit:

ISO 9660 – file name: 12 characters, file extension: 3 
characters

ISO 9660 – file name: 31 characters, file extension: 3 
characters

Joliet – 64 characters

If the file or folder name does not conform to ISO 9660 file 
system standards, it may not be displayed or played back 
correctly.

Use the following settings when compressing audio data for 
your MP3 disc:

Transfer Bit Rate: 128kbps

Sampling Frequency: 48kHz

When recording MP3 up to the maximum disc capacity, 
disable additional writing. For recording on an empty disc up 
to maximum disc capacity, use the "Disc at once" setting.

Playing MP3/WMA Files

After inserting a MP3/WMA disc, files will play in the 
sequence of the “Root’ directory. 

Use the numeric keypad (29) on the remote control to access 
files directly.

Содержание Multimedia AM/FM/DVD Receiver VM9511TS

Страница 1: ...VM9511TS Instruction Manual Manual de Instrucciones Guide d instructions...

Страница 2: ...ntrol Remoto de Multi ZONE 50 Utilizaci n del Monitor TFT 51 Instrucciones de Operaci n 53 Men de Configuraci n de Sistema 55 Operaci n Multi ZONE 57 Operaci n del Radio 58 Operaci n de Radio XM 59 Op...

Страница 3: ...mport ISO DIN mountable Heat management system Incorporates forced air cooling to keep the chip sets operating at nominal temperatures Heavy duty galvanized chassis Multi ZONE Allows front passengers...

Страница 4: ...s iAUX3 READY Sold Separately Can connect to any portable media device or multimedia device using a standard 3 5mm plug Converts 3 5mm auxiliary input to RCA stereo outputs for easy connection to the...

Страница 5: ...3 VM9511TS WIRING DIAGRAM...

Страница 6: ...4 VM9511TS WIRING DIAGRAM MULTIMEDIA CONNECTIONS TERK XMDJEN100 cables sold separately TERK XMD1000 Direct Tuner and antenna sold separately NAV100 sold separately...

Страница 7: ...off the ignition switch and proceed with final mounting of the chassis 1 Connect wiring adapter to existing wiring harness 2 Connect antenna lead 3 Carefully slide the radio into the half sleeve makin...

Страница 8: ...is button to continuously adjust the downward tilt or picture settings 5 DISP Press to display system information on the screen 6 VOL LO DX Rotate to adjust the volume Press and release to enter and o...

Страница 9: ...gle rear zone mode On 0ff 16 DVD Mode Press once to play back the previous chapter track TUNER Mode Press once to auto search for the previous available radio station MENU Mode Press once to move the...

Страница 10: ...function is activated 4 Main Display The main display is an 8 digit 14 segment LCD which displays the time tuning frequency and other text information 5 Channel Disc Display The channel disc display i...

Страница 11: ...9 VM9511TS FRONT ZONE REMOTE CONTROL NOTE Your remote control may differ slightly from the one pictured here The above diagram is for illustrative purposes only...

Страница 12: ...en Continuously adjusts angle of TFT screen ANGLE 12 Continuously adjusts front panel tilt angle Continuously adjusts front panel tilt angle Continuously adjusts front panel tilt angle Continuously ad...

Страница 13: ...display mode CINEMA WIDE NOR MAL or Off Standby Selects display mode CINEMA WIDE NOR MAL or Off Standby Selects display mode CINEMA WIDE NOR MAL or Off Standby Selects display mode WIDE or OFF Selects...

Страница 14: ...ects playing mode for rear zone SUBTITLE 9 Language selection for subtitle 14 Fast forwards the disc content Fast forwards the disc content 17 Selects the previous track chapter for playback Selects t...

Страница 15: ...meter that can be adjusted is brightness BRIGHT To access PICTURE COLOR CONTRAST and TINT you must be in AUX CAMERA or TV Tuner mode NOTE The default adjustment is 0 in PAL mode Tint is unavailable fo...

Страница 16: ...struction Self Protection OPEN Button Pressed Power Reconnected Monitor load ing out hori zontally Monitor is auto matically loaded into unit Monitor fully extended hori zontally Monitor is auto matic...

Страница 17: ...he acoustical characteristics of your vehicle which vary depending on the type of vehicle and its measurements To get the best possible sound quality from your new system be sure to adjust the setting...

Страница 18: ...ton 14 on the remote control to confirm setup DIRECTION BUTTONS Table 7 General Setup Menu Features Setting Options Function Radio USA AM Frequency Spacing 10kHz AM Frequency Band 530kHz 1720kHz FM Fr...

Страница 19: ...tion After entering calibration mode a crosshair appears in a corner quadrant of the screen To begin calibration press and hold the crosshair for one second until it moves to the next quadrant Continu...

Страница 20: ...e for selection depends upon which Front Zone source is selected as indicated in Table 9 To access the rear zone SOURCE MENU touch the top right corner of the screen near the Multi ZONE icon Select th...

Страница 21: ...17 to seek the next available radio station by increasing the tuning frequency Press the button again to stop searching Press and hold the button 17 on the remote control or screen or the button on t...

Страница 22: ...pear on the TFT screen Storing a Station 1 Select a band if needed then select a station 2 Touch and hold an on screen preset button for three seconds The preset number appears at the top of the scree...

Страница 23: ...urn to the Preset Mode While in Preset Mode press and hold an on screen preset button or 1 6 on the unit or remote control to store the channel playing Press the TITLE button 2 to return to the Catego...

Страница 24: ...emote control to stop DVD play Pausing Playback Touch the play pause button on the screen or press the button on the remote control 18 to suspend or resume disc play Slow Motion Playback Press the but...

Страница 25: ...the remote control to toggle available angles of the on screen image Zooming Press the ZOOM button 23 on the remote control to enlarge and pan through the video image using the following options Q1 Q2...

Страница 26: ...he current playing source for the rear zone EQ FLAT The equalizer setting is FLAT Loud Level 1 The Loud option is set to Level 1 loudness General Disc Information Front DVD CD Rear AUXIN Dolby Digital...

Страница 27: ...the remote or by pressing the ENTER joystick button 20 on the unit A submenu appears in a second row with the selected option highlighted in light blue 2 Select a new value by pressing the or buttons...

Страница 28: ...icated steering logic high channel separation and an exceptionally stable sound field Dolby Pro Logic II uses simple servo circuits used to derive the five audio channels Unlike other Surround Effects...

Страница 29: ...tails please refer to the disc description Table 17 Pro Logic II Menu Features Setting Options Function Decode Mode Off Play original audio format Pro Logic II Use Pro Logic II decoding method Pro Log...

Страница 30: ...e Repeat Chapter Repeat Off CD DA Repeat Single Repeat Off CD R RW Repeat Single Repeat Off DVD R RW Repeat Single Repeat Off Track Scan Select CD DA discs only During disc play press the 3 SCN button...

Страница 31: ...4X burning option if available This slower burning speed will help eliminate buffer errors and increase disc reading reliability Also use folders when burning large numbers of songs files to a disc fo...

Страница 32: ...e Repeat Folder Repeat Off Random Playback Press the RDM button 33 on the remote control or touch Random on the screen to activate random playback and play all tracks in random order Moving Through Ch...

Страница 33: ...To exit VIDEO mode press the button 14 on the remote control or MENU button on the iPod NOTE To transmit the video from your iPod to the VM9511TS screen you must set the following options through the...

Страница 34: ...a round search Storing Stations AS Auto Memory Tuning To select the strong stations in the current TV frequency range press and hold the joystick button 20 to activate the Auto Store function The new...

Страница 35: ...and install the NAV100 module All installation and operating instructions will be included with the NAV100 navigation module Once the NAV100 is connected and operating properly the NAVI source mode w...

Страница 36: ...ute malfunction MUTE wire is grounded Check that MUTE connection is not grounded and that it s properly insulated Unit resets itself when engine is off Incorrect connection between ACC and positive ba...

Страница 37: ...able connections Check RCA cables XM source not available Incorrect cable connections Check XM Data cable or Media Module Cable ANTENNA appears on the XM main screen Antenna not connected Check satell...

Страница 38: ...e damaged by foreign objects 5 Do not attempt to use a 3 8 cm CD Single disc in this unit either with or without an adaptor as damage to the player and or disc may occur Such damage is not covered by...

Страница 39: ...of this product that should this product or any part thereof under normal use and conditions be proven defective in material or workmanship within 12 months from the date of original purchase such de...

Страница 40: ......

Страница 41: ......

Отзывы: