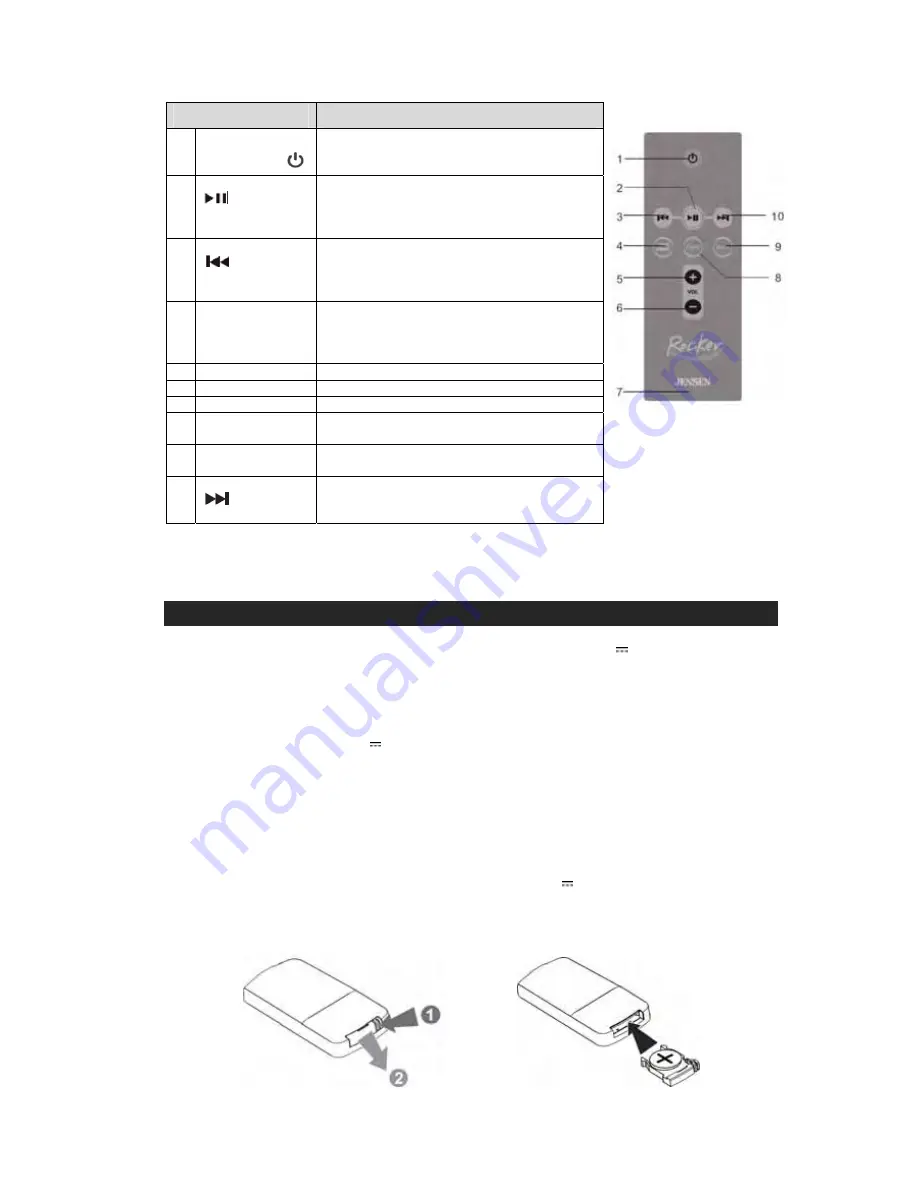
REMOTE FUNCTIONS
Descriptions
1 Power
On/Standby
Button
Press to turn unit on or return the unit to standby
mode.
2 Play/Pause
Button
Press to play or pause the audio output when
using the iPod/Video/Youtube modes of your
Apple device. Note: This feature is not available
when using the “Rocker” App.
3 Skip
Backward
Press to return to the previous track when using
the iPod/Video modes of your Apple device.
Note: This feature is not available when using
the “Rocker” App.
4
Video On/Off
Toggles the video output on and off. The video
out default is set to TV. Press the Video button
to watch movies/Youtube videos on the screen
of your Apple device.
5
Volume Up (+)
Press to increase volume output.
6
Volume Down (-)
Press to decrease volume output.
7
Battery Door
This is the battery compartment door.
8
Function
Button
Press to toggle between iPad and AUX-IN
mode.
9
Mute Button
Press to cut off the audio output from the
speakers. Press again to resume listening.
10 Skip
Forward
Press to advance to next track in iPod/Video
modes of your Apple device. Note: This feature
is not available when using the “Rocker” App.
NOTE:
Only the Power On/Standby Button & Volume (+/-) Buttons on the base unit and the remote will
continue to work when using the optional “Rocker” Application.
GETTING STARTED
POWER SUPPLY SOURCES
This Docking Speaker System operates using the included AC Adaptor with 8V 2900mA (center-positive)
output and is compatible with standard 120V~ 60Hz AC household power.
Note: Do not use a different AC adaptor other than the one included. Your iPad or iPhone may fail to charge
and you could damage the dock and/or the Apple device that is docked. A fire hazard can also occur due to
system overloading.
The remote control works on one 3V type CR2032 lithium battery (Included).
CONNECTING THE UNIT TO THE AC ADAPTOR POWER
Plug the AC Adaptor into the DC Jack on the back of unit. Plug the adaptor into a standard 120V~ 60Hz
AC outlet.
REMOTE CONTROL
Remove the insulation tab from the battery compartment to activate the remote before first use.
When the operation of the remote control becomes intermittent or the effective distance is significantly
decreased, replace the original battery with a new type CR2032 3V lithium battery as follows:
1. Unlock
and slide out the battery holder
from the remote control case.
2.
Replace the weak/dead battery with a new one. Be sure the battery is installed correctly. The
remote will not work if the battery is installed with wrong polarity.
3.
Insert the battery holder back into the battery slot.
4


