background image

6

6

6

6

6

6

When Speed Ice and/or Max Cold are active, the temperature 
displays will not change. After 24 hours, the refrigerator returns to 
the previous temperature set points.
NOTE: If increased ice production is desired at all times, change 
the freezer control to a lower setting. Setting the freezer to a 
colder temperature may make some foods, such as ice cream, 
harder.
Door Ajar Alarm

The Door Ajar Alarm feature sounds an alarm when the refrigerator 
or freezer door is open for 5 minutes and the product cooling is 
turned on. The alarm will repeat every 2 minutes. Close both 
doors to turn it off. The feature then resets and will reactivate 
when either door is left open again for 5 minutes.
NOTE: To mute the audible alarm while keeping the doors open, 
such as while cleaning the inside of the refrigerator, press any 
button on the control panel. The alarm sound will be temporarily 
turned off, but “Door Ajar” will still be displayed on the dispenser 
control panel. 
Disabling Sounds

To turn off all control and dispenser sounds, press and hold 
LIGHT and FILTER at the same time for 3 seconds.

To turn all sounds back on, press and hold LIGHT and FILTER 
at the same time for 3 seconds again.

Dual Evaporator (on some models) 

Some models come equipped with a dual sequential evaporation 
system, which includes two separate evaporators for the 
refrigerator and freezer compartments. 
Dual evaporation results in higher humidity, which helps keep 
foods in the refrigerator from spoiling as quickly and improves 
food quality and freshness in the freezer due to decreased freezer 
burn. In addition, the dual evaporation system helps keep food 
smells in the refrigerator from transferring to ice in the freezer. 
NOTE: The dual evaporation system is always activated when 
your refrigerator is operating. You do not need to press any 
buttons to turn it on.

Convertible Drawer 

Temperature Control

(on some models)

The control can be adjusted to properly chill meats or vegetables. 
The air inside the pan is cooled to avoid “spot” freezing and can 
be set to keep meats at the National Livestock and Meat Board 
recommended storage temperatures of 28° to 32°F (-2° to 0°C). 
To store meat:

Set the control to one of the three MEAT settings to store meat at 
its optimal storage temperature.
To store vegetables: 

Set the control to VEG to store vegetables at their optimal storage 
temperatures. 
NOTE: If food starts to freeze, move the control to the right (less 
cold), toward the VEG setting. Remember to wait 24 hours 
between adjustments.

Crisper Humidity Control 

(on some models)

You can control the amount of humidity in the moisture-sealed 
crisper. Adjust the control to any setting between LOW and HIGH.
LOW (open) for best storage of fruits and vegetables with skins. 
HIGH (closed) for best storage of fresh, leafy vegetables. 

Chilled Door Bin

(on some models)

Cool air from the freezer is directed to the refrigerator door bin 
directly beneath the vents.
NOTE: The dairy compartment and can rack are not associated 
with the Chilled Door Bin feature.

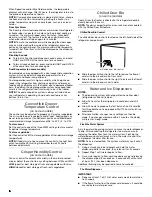
Chilled Door Bin Control

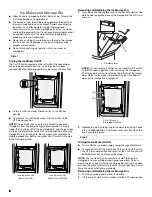
The chilled door bin control is located on the left-hand side of the 
refrigerator compartment.

Slide the door chill control to the left to reduce the flow of 
cold air to the bin and make it less cold. 

Slide the door chill control to the right to increase the flow of 
cold air to the bin and make it colder.

Water and Ice Dispensers

NOTES:

The dispensing system will not operate when either door 
(refrigerator or freezer) is open.

Allow 24 hours for the refrigerator to cool down and chill 
water.

Allow 24 hours to produce the first batch of ice. Discard the 
first three batches of ice produced. Wait 72 hours for full ice 
production.

After reactivation, changes to any settings can then be 
made. If no changes are made within 2 minutes, the display 
will re-enter “sleep” mode. 

Flush the Water System

Air in the water dispensing system can cause the water dispenser 
to drip. After connecting the refrigerator to a water source or 
replacing the water filter, flush the water system. Flushing the 
water dispensing system forces air from the water line and filter, 
and prepares the water filter for use.
NOTE: As air is cleared from the system, water may spurt out of 
the dispenser.
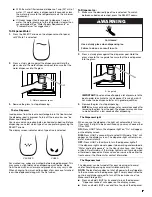
1. Using a sturdy container, depress and hold the water 

dispenser pad for 5 seconds, then release it for 5 seconds. 

2. Repeat Step 1 until water begins to flow. 

3. Once water begins to flow, continue depressing and releasing 

the dispenser pad (5 seconds on, 5 seconds off) until a total 
of 3 gal. (12 L) has been dispensed. 

Additional flushing may be required in some households.

The Water Dispenser

IMPORTANT: 

Dispense at least 1 qt (1 L) of water every week to maintain a 
fresh supply.

If the flow of water from the dispenser decreases, it could be 
caused by low water pressure.

A. Chilled door bin control

A

Содержание JSC23C9EEM

Страница 1: ...stalaci n del filtro de aire 18 Instalaci n del preservador de alimentos frescos 19 Uso de los controles 20 Control de temperatura del caj n convertible 22 Control de humedad del caj n para verduras 2...

Страница 2: ...ONS WARNING To reduce the risk of fire electric shock or injury when using your refrigerator follow these basic precautions SAVE THESE INSTRUCTIONS Plug into a grounded 3 prong outlet Do not remove gr...

Страница 3: ...ilter is installed 1 Place the indicator face down on a firm flat surface 2 Apply pressure to the bubble on the back of the indicator until the bubble pops to activate the indicator 3 Lift open the ve...

Страница 4: ...se if the indicator s rear bubble has not been popped Replacing the Produce Preserver on some models The disposable pouches should be replaced every 6 months when the status indicator has completely c...

Страница 5: ...ettings NOTE To exit without saving changes allow about 60 seconds of inactivity and adjust mode will turn off automatically When adjusting temperature set points use the following chart as a guide Th...

Страница 6: ...to VEG to store vegetables at their optimal storage temperatures NOTE If food starts to freeze move the control to the right less cold toward the VEG setting Remember to wait 24 hours between adjustme...

Страница 7: ...u do not need to apply a lot of pressure to the pad in order to activate the ice dispenser Pressing hard will not make the ice dispense faster or in greater quantities 3 Remove the glass to stop dispe...

Страница 8: ...ice maker will automatically stop ice production but the ice maker On Off switch will remain in the ON up position Removing and Replacing the Ice Storage Bin 1 Press down the release lever and tilt th...

Страница 9: ...t of its packaging and remove the cap Be sure the O rings are still in place after the cap is removed 5 With the arrow pointing up align the new filter with the filter housing and slide it into place...

Страница 10: ...Off Before You Leave 1 Remove all food from the refrigerator 2 If your refrigerator has an automatic ice maker Turn off the water supply to the ice maker at least one day ahead of time When the last l...

Страница 11: ...e been left open The refrigerator seems noisy Refrigerator noise has been reduced over the years Due to this reduction you may hear intermittent noises from your new refrigerator that you did not noti...

Страница 12: ...ted to your cold water supply This can decrease water pressure See Water Supply Requirements Questions remain regarding water pressure Call a licensed qualified plumber Off taste odor or gray color in...

Страница 13: ...installation Allow 24 hours after installation for the water supply to cool completely Recently dispensed large amount of water Allow 24 hours for water supply to cool completely Water not been recent...

Страница 14: ...ese contaminants are not necessarily in your water supply While testing was performed under standard laboratory conditions actual performance may vary The product is for cold water use only The water...

Страница 15: ...SHALL BE PRODUCT REPAIR AS PROVIDED HEREIN Service must be provided by a Jenn Air designated service company This limited warranty is valid only in the United States or Canada and applies only when th...

Страница 16: ...ED HEREIN JENN AIR SHALL NOT BE LIABLE FOR INCIDENTAL OR CONSEQUENTIAL DAMAGES Some states and provinces do not allow the exclusion or limitation of incidental or consequential damages so these limita...

Страница 17: ...eguridad Este s mbolo le llama la atenci n sobre peligros potenciales que pueden ocasionar la muerte o una lesi n a usted y a los dem s Todos los mensajes de seguridad ir n a continuaci n del s mbolo...

Страница 18: ...detr s de la puerta con orificios de ventilaci n la cual est ubicada seg n su modelo a lo largo de la pared interior posterior o del lado izquierdo cerca de la parte superior del compartimiento del re...

Страница 19: ...rvador de alimentos frescos ya est instalado de f brica El preservador de alimentos frescos absorbe el etileno permitiendo que se enlentezca el proceso de maduraci n de varios alimentos frescos A cons...

Страница 20: ...amente se reactivar la pantalla sin cambiar ning n ajuste Toque cualquier bot n del control en el panel del despachador para activar la pantalla La pantalla principal aparecer como se muestra C mo aju...

Страница 21: ...tercera vez Aparecer n Speed Ice Hielo r pido y Max Cold Fr o m ximo en la pantalla Ambas caracter sticas permanecer n encendidas durante 24 horas a menos que se apaguen manualmente Para apagar ambas...

Страница 22: ...sistema de distribuci n no funcionar cuando cualquiera de las puertas la del refrigerador o la del congelador est abierta Deje transcurrir 24 horas para que el refrigerador se enfr e y pueda enfriar e...

Страница 23: ...cesita aplicar mucha presi n a la almohadilla para activar el despachador de hielo Oprimir fuerte no har que el despachador funcione con m s rapidez o produzca mayor cantidad de hielo 3 Retire el vaso...

Страница 24: ...Encendido Apagado ubicado en la pared izquierda de la puerta del congelador es accesible s lo cuando se ha quitado el dep sito de hielo Vea la siguiente secci n para obtener instrucciones para quitarl...

Страница 25: ...cuando la pantalla de estado del filtro de agua cambie a REPLACE Reemplazar NOTA Si el flujo de agua a su despachador de agua o f brica de hielo disminuye notoriamente cambie el filtro m s pronto Se...

Страница 26: ...rador Use una aspiradora con un cepillo suave para limpiar la rejilla las reas abiertas detr s de la rejilla y el rea de la superficie frontal del condensador Vuelva a colocar la rejilla de la base cu...

Страница 27: ...dispositivos m viles Cont ctenos por correo electr nico con sus preguntas o dudas a la direcci n que aparece a continuaci n En los EE UU Jenn Air Brand Home Appliances Customer eXperience Center 553 B...

Страница 28: ...de agua y hielo Temperatura y humedad La temperatura est demasiado caliente Es nueva la instalaci n Deje transcurrir 24 horas despu s de la instalaci n para que el refrigerador se enfr e por completo...

Страница 29: ...to de hielo usando un pa o h medo tibio y s quelos a fondo Para evitar que se atasquen y mantener un suministro fresco de hielo vac e el dep sito y limpie el dep sito y el conducto de salida cada dos...

Страница 30: ...fr a Aseg rese de que el refrigerador est conectado a una tuber a de agua fr a Vea Requisitos del suministro de agua ACCESORIOS Los siguientes accesorios est n disponibles para su refrigerador Para ha...

Страница 31: ...a uso con agua fr a nicamente El sistema de agua deber instalarse conforme a las leyes y normas estatales y locales No use con agua que no sea microbiol gicamente segura o que sea de calidad desconoci...

Страница 32: ...erdo a las instrucciones adjuntas o provistas con el producto la marca Jenn Air pagar por las piezas de repuesto especificadas de f brica para los siguientes componentes para corregir defectos de mate...

Страница 33: ...o reparaci n de este electrodom stico principal aparte de las declaraciones incluidas en esta garant a Si usted desea una garant a con una duraci n m s prolongada o m s completa que la garant a limita...

Страница 34: ...ER Voici le symbole d alerte de s curit Ce symbole d alerte de s curit vous signale les dangers potentiels de d c s et de blessures graves vous et d autres Tous les messages de s curit suivront le sym...

Страница 35: ...u r frig rateur Installation du filtre air sur certains mod les Le filtre doit tre install derri re la porte a rations situ e selon le mod le le long de la paroi int rieure gauche ou arri re proximit...

Страница 36: ...mod les le sachet de conservation pour produits frais est pr install l usine Le sachet de conservation pour produits frais absorbe l thyl ne permettant ainsi un ralentissement du processus de maturati...

Страница 37: ...bouton de commande au mode veille r active uniquement l cran d affichage sans modifier les r glages Appuyer sur n importe quel bouton de commande sur le tableau de distribution pour activer l cran d...

Страница 38: ...ent Pour activer la caract ristique Max Cold refroidissement maximal appuyer une deuxi me fois sur OPTIONS La caract ristique Speed Ice gla ons acc l r s s teint et la caract ristique Max Cold refroid...

Страница 39: ...r froid du cong lateur passe directement dans le compartiment de la porte du r frig rateur situ sous les vents REMARQUE Le compartiment produits laitiers et le porte canettes ne sont pas associ s la c...

Страница 40: ...des gla ons Avant toute distribution de glace s lectionner le type de glace que l on pr f re en appuyant sur les fl ches du bouton SELECT s lection L cran d affichage indique le type de glace s lecti...

Страница 41: ...les trois premi res quantit s de gla ons produites La qualit de vos gla ons d pend de la qualit de l eau fournie votre machine gla ons viter de brancher la machine gla ons un approvisionnement d eau a...

Страница 42: ...jusqu ce qu il s enclenche la position OFF lev e 3 Soulever le devant du bac gla ons et le retirer 4 Replacer le bac gla ons en le poussant compl tement sinon le distributeur ne fonctionnera pas 5 Pou...

Страница 43: ...se d givrent automatiquement Toutefois nettoyer les deux sections environ une fois par mois pour viter une accumulation d odeurs Essuyer les renversements imm diatement IMPORTANT Comme l air circule...

Страница 44: ...entation en eau n est pas coup e 3 Si votre machine gla ons est automatique teindre la machine gla ons REMARQUE Selon votre mod le soulever le bras de commande m tallique la position OFF arr t positio...

Страница 45: ...ench Remplacer le fusible ou r enclencher le disjoncteur Si le probl me persiste appeler un lectricien Les commandes sont elles en marche S assurer que les commandes du r frig rateur sont en marche Vo...

Страница 46: ...idit l int rieur REMARQUE Une certaine accumulation d humidit est normale Essuyer avec un chiffon sec La pi ce est elle humide Ceci contribue l accumulation de l humidit Porte s ouverte s souvent ou l...

Страница 47: ...ux semaines Les mauvais gla ons ont ils t ajout s au bac Utiliser seulement des gla ons produits par la machine gla ons courante La glace a t elle fondu autour de la tige spirale en m tal dans le bac...

Страница 48: ...ion d eau refroidisse compl tement N a t on pas r cemment distribu de l eau Le premier verre d eau peut ne pas tre froid Jeter le premier verre d eau Le r frig rateur est il branch l arriv e d eau fro...

Страница 49: ...t r el peut varier Le produit ne doit tre utilis que pour l eau froide Le circuit d eau doit tre install conform ment aux lois et r glements locaux et ceux de l tat concern Ne pas utiliser pour le fil...

Страница 50: ...s jointes ou fournies avec le produit la marque Jenn Air paiera pour les pi ces de rechange sp cifi es par l usine pour corriger les vices de mat riaux ou de fabrication sur le syst me de r frig ratio...

Страница 51: ...en cas de d pannage ou de r paration n cessaire sur ce gros appareil m nager autre que les responsabilit s nonc es dans la pr sente garantie Si vous souhaitez une garantie plus tendue ou plus compl t...

Страница 52: ...Air Used under license in Canada All rights reserved Usada en Canad bajo licencia Todos los derechos reservados Utilis sous licence au Canada Tous droits r serv s 3 15 Printed in Mexico Impreso en M x...

Отзывы: