background image

Page 38

7. How to change

the orbital motion and reciprocating motion

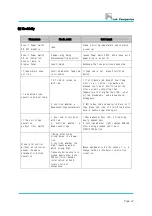
① Carefully remove the Shaking Table(Part 1) after loosing 4pieces of 5mm Wrench

Bolt.

② Remove 4pieces of the Spacer(SI-300/300R : M5X23, SI-600/600R : M5X28) fixed on

the Vibration Frame.

③ Connect the Spacer (referred Page 6) to the Vibrating Frame for linear motion

④ Position the Shaking Table on the Spacer, tight 4 pieces of 5mm Wrench Bolt.

⑤ The basic usage is the same as the orbital motion.

⑥ When changing the Orbital motion or Reciprocating motion. Must change the Spacer.

→ The operator can use the Orbital motion or Reciprocating motion whatever wants.

2

1

Orbital

motion

Reciprocating

Содержание Lab companion SI-300

Страница 1: ...underutilized and idle equipment along with credit for buybacks and trade ins Custom engineering so your equipment works exactly as you specify Critical and expedited services Leasing Rentals Demos I...

Страница 2: ...jects to maintain the product s functions and to use it safely Especially be sure to read Safety Precaution carefully before you use this equipment Please keep this instruction close to the equipment...

Страница 3: ...sufficient points error and omission on the operating instruction Warning mark of the product 1 This operating instruction uses the warning Signal Word for safe operation to prevent the users from acc...

Страница 4: ...t becomes the cause of electric shocks fires and improper operations 5 Please contact the agent or us in case of the component and the consumable parts of the product will be replaced 6 Do not give a...

Страница 5: ...maged contact the delivery service company immediately 2 Keep the condition as it delivered and wait for the confirmation by the carrier 3 Within 15 days submit an application be made in writing to th...

Страница 6: ...npacking the unit check the following components In addition check the features and electric condition Components EA Components EA unit 1 Power Cord 1 Operating instruction 1 Fuse 2 Software CD for co...

Страница 7: ...ition of SI 300R 600R 11 5 Introduction 13 6 Controller instruction 16 7 How to change the orbital motion and reciprocation motion 38 8 Accessories 39 9 Cause of malfunction and its repairs 46 10 Insp...

Страница 8: ...dent line 100V 120V 230V single phase a grounded and polarized 100V 120V 16AWG 12A 1 25SQ 230V 18AWG 10A 0 75SQ 5 Do not install the product in the place that the gas could leak out 6 Do not use in th...

Страница 9: ...he product in a dangerous article area 12 Never put inflammables and explosives in the product A sample may explode in the chamber at a high temperature The explosives are acetic acid ester nitro comp...

Страница 10: ...c shock or fire 6 Do not clean it with a strong cleanser like solvent type and use a soft cloth It may cause fire or modification of the product Clean it with a soft cloth dipping in neutral detergent...

Страница 11: ...ed in the same place below until disusing the product If the safety alerts are damaged please request new labels to an agent or us Caution It shows the caution when opening and shutting the inner clas...

Страница 12: ...mponents is isolated by a magnetic switch leaving only the earth in circuit Details of the fault are displayed indicator codes Audio and visual alarms are set off to alert the user and remain on until...

Страница 13: ...he open cover we are using a translucent acrylic cover and setting a lamp up Programmed auto run function Our integrated controller allows controlling the inner circulating fan speed on three steps Th...

Страница 14: ...r temp LED illuminates with audible Beep sound When the power is shut down Please set the Knob over 15 than the setting value Press the Start Stop switch and then Check the Temp LED illumination 3 Com...

Страница 15: ...s the Microprocessor CPU can be performed Digital PID Auto tuning 12 Chamber Air Out Inner air is out to go through the heater or Evaporator 13 Temperature Sensor With Thin Film PT 100 14 Blower Inner...

Страница 16: ...is for protecting the unit from the momentary overpower When exchanging the Fuse check the main power Model Electric requirements Fuse Quantity Remarks 100V 50 60Hz 2 EA 120V 60Hz AC 250V 10A Slow blo...

Страница 17: ...e operator can use the Temp shaking function simultaneously Know well the operator to perform functions like temp shaking programmed all on the controller in right process 1 PV Display Indicates the p...

Страница 18: ...es when pressing the START STOP Button Heater LED Indicates the heater output Auto tune LED Flahses during Auto tune function Wait on timer LED After setting time indicates starting point of the unit...

Страница 19: ...utton Auto tune Function operates while pressing the button for a second SHAKE SET Button For Checkng the setting and present rpm and entering the new rpm value START STOP Button Starts and Stops the...

Страница 20: ...lue Starts the operation Control of the Temperature This control is for the chamber of the inner temp Controlling the temp other function and programming temp using of the Temp button Method of the se...

Страница 21: ...er button to finish setting Select the temp can be restored in CPU The PV temp will be changed Press Temp button once SV2 is displayed on the PV display Set the desired temp same as No 1 Press Temp bu...

Страница 22: ...n case of the main screen Press the TEMP button twice Press Enter button once to display SV3 On the PV display After checking the SV 2 temp Press Enter button Press START STOP button to reoperate the...

Страница 23: ...Bias on the SV display Use UP button and Down button to move the BIAS value display Displayed the PV on the SV display Set the temp measured by the thermometer Press Enter button to complete the BIAS...

Страница 24: ...n screen Press Timer button twice Off Timer can be set Press Up button and Down button to set the desired time Press button to finish Illuminates W ON LED with Beep sound after setting Cancellation of...

Страница 25: ...rts operation automatically after power is on Use Up button Dwon button Select YES or NO When setting YES the unit starts operation after power is on Fan speed controller function Press TIMER Button f...

Страница 26: ...rating the program Input No 0 Press Up button and Down button to select the desired value Press Enter button to finish the menu SEg L is for deviding the segment If input 3 NO 3 Prgram will repeate fr...

Страница 27: ...nd Temp 3 be set This program function can be set till Prg 9 If input the time 00 00 in Prg3 the program is finished The program will be operated until Prg2 and step 2 Example of Prgrammed Control Inp...

Страница 28: ...minating A T LED Press START STOP butoon illuminating Run LED Auto Tunie will operate with flashing A T LED Auto tune time will be different depends on the circumtance After finishing the Auto tune Th...

Страница 29: ...or rotate without the timer mode Press SHAKE SET button RPM displayed on the PV the previous rpm value displayed on the SV Use Up button and Down button to select the desired rpm Press Enter button to...

Страница 30: ...d Down button Press Enter button to finish the mode Maximum Input time 1 999 hours Whole time MM SS set Set the minute and seconds Press SHAKE SET button three times run S will be appeared on PV displ...

Страница 31: ...E SET button five times bAc S will be appeared on PV display The previous time will be displayed on the SV Use Up button and Dwon button To set the time then Press Button TheB WARD LED illuminates Max...

Страница 32: ...press the START STOP button or The Shaker I O button The whole time set Forward or Backward Action SHAKE LED illumination Forward LED or Backward LED illumination Select the hour or minutes in the who...

Страница 33: ...WARD LED 3 After setting the backward time Press Enter button to iluuminate F WARD LED or B WARD LED 4 Press the START STOP button the shkae operates the forward direction When the speed is a little s...

Страница 34: ...ward time orB WARD Press Enter button to iluuminate F WARD LED or B WARD LED 3 After setting the pause time Press Enter button to iluuminate PAUSE LED 4 Press the START STOP button the shaker operates...

Страница 35: ...until the set time The caution of the Timer Function When using the Timer fuction set each set value then must press Enter button to illuminate Display LED Even if illuminate SHAKE LED the shaker does...

Страница 36: ...ment display Function This Function is for displaying the presnt shaking table When maintaing rpm the display starts a circular movement Forward accelation Forward deceleration Backward accelation Bac...

Страница 37: ...tton with YES on the SV display the Shaker Incubator operates at the same time Set No on the SV display The shaker doesn t operate Even if setting YES on the SV display the Shaker function can be On O...

Страница 38: ...with Shake Set button Reference Page 22 Press SHAKE SET button the shaking table and incubator operates together Temp Controller Incubator only Select No on SV display Press Temp button to set the de...

Страница 39: ...ed on the Vibration Frame Connect the Spacer referred Page 6 to the Vibrating Frame for linear motion Position the Shaking Table on the Spacer tight 4 pieces of 5mm Wrench Bolt The basic usage is the...

Страница 40: ...ries 1 Flask Clamp installed Capacities and Drawings Model SI 300 300R 50 Flask Flask Clamp Location of fixed holes Maximum fixed numbers 28 EA 100 Flask Flask Clamp Location of fixed holes Maximum fi...

Страница 41: ...Page 40 Model SI 300 300R 250 Flask Flask Clamp Location of fixed holes Maximum fixed numbers 13 EA 500 Flask Flask Clamp Location of fixed holes Maximum fixed numbers 9 EA...

Страница 42: ...Page 41 Model SI 300 300R 1 000 Flask Flask Clamp Location of fixed holes Maximum fixed numbers 4 EA 2 000 Flask Flask Clamp Location of fixed holes Maximum fixed numbers 2 EA...

Страница 43: ...Page 42 Model SI 600 600R 50 Flask Flask Clamp Location of fixed holes Maximum fixed numbers 45 EA 100 Flask Flask Clamp Location of fixed holes Maximum fixed numbers 36 EA...

Страница 44: ...Page 43 Model SI 600 600R 250 Flask Flask Clamp Location of fixed holes Maximum fixed numbers 18 EA 500 Flask Flask Clamp Location of fixed holes Maximum fixed numbers 13 EA...

Страница 45: ...Page 44 Model SI 600 600R 1 000 Flask Flask Clamp Location of fixed holes Maximum fixed numbers 7 EA 2 000 Flask Flask Clamp Location of fixed holes Maximum fixed numbers 5 EA...

Страница 46: ...4 EA 2000 1 EA SI 600 600R Flask Max Capacities EA Flask Max Capacities EA 50 25 EA 500 5 EA 100 16 EA 1000 4 EA 250 9 EA 2000 2 EA 3 Test tube rack Setting angle Model 0 60 Platform size SI 300R 2 E...

Страница 47: ...Check the W ON LED is illuminated Release the Timer mode Check the dust on the Condenser Clean the filter opened the Condenser cover The temperature doesn t decrease Check the inner circulation fan sp...

Страница 48: ...op button after currently adjusting than temperature PV higher than 15 red of O T Led disappears and a Beep sound disappears 2 While Run LED and Heater LED are on if they press one time of Start Stop...

Страница 49: ...stops operation by START STOP Check Sync Parameter is no Reference Page 36 37 Select Sync Parameter is yes or Press Shaker I O Switch to operate When the shaker speed is up or down the display has any...

Страница 50: ...Condition Shaker Noise Air Filter Cleaning Vibration Be sure to maintain the unit frequently by a person authorized Make no attempt to service or repair the unit when the power is on Be danger of Do n...

Страница 51: ...1 Wipe the exterior surface with a clean sponge or a soft fabric using a detergent 2 Rinse off with a dry fabric using a tepid water 3 Clean the controller Panel with a dry fabric Do not use sulfuric...

Страница 52: ...Pause Forward Backward Max 59min 59sec Min 10sec Shaking Driving System Brushless DC motor with feedback control Internal Stainless Steel 1 0t External Steel 3 2t 2 0t powder coating Platform Anodize...

Страница 53: ...y warranty in case of as below If the machine is broken due to the Act s of God If the machine is broken due to overuse of voltage If there is some shock to the machine If the outer part is damaged by...

Страница 54: ...rts Model Gross Weight kg External dimension mm W D H How to waste Main body SI 300 74kg 420 740 622 Main body SI 300R 85kg 420 740 622 Main body SI 600 91kg 540 842 622 Main body SI 600R 102kg 540 84...

Страница 55: ...e term of guarantee if as follows Purchase date Serial number A trouble part and trouble state Equipments use environment A use mistake of a user A mistake of treatment of a user and custody Unfair ch...

Страница 56: ...tion Default folder recommended 3 Click Install to start installation 4 Lab Tracer icon will be created on the desktop after successful installation 5 To start Lab Tracer double click the icon Standar...

Страница 57: ...consists of 2 separate windows Window on the top displays set temperatures and actual temperatures and window on the bottom displays output value of heating in a graph mode 2 View menu 2 1 If you cli...

Страница 58: ...ing Status and Parameter in View menu User can monitor operating process through three divided windows Graph Parameter Status 2 2 1 Graph displays Actual temperatures Red line and set temperatures Blu...

Страница 59: ...or not 2 2 3 Parameter displays 1 PV is an actual present temperature 2 SV is a set temperature 3 Heat is an output value of heating element 4 Run Time indicates operating time after you press button...

Страница 60: ...pearance of displayed panel of unit pops up and you can control the unit by the pop up window 17 Set Pattern of Program Run Set Pattern of Program Run and makes unit in a programmable operation Maximu...

Страница 61: ...f not they will not be printed Current page Print a page on the current main screen Selected pages Print selected page s Number of copies Maximum number of copies is 100 by pressing up and down button...

Страница 62: ...regular interval like the preview above If user wants to check a certain point move curser to the point and click Green line with PV and SV will be printed on the copies see above Last Point Delete De...

Страница 63: ...on the left side of window Display All the functions of display window are same as those of main display panel If communication via RS 232 between PC and main body is connected user can control main b...

Страница 64: ...egree and time can be adjusted by one minute Short key Increase temperature by 1 degree Decrease temperature by 1 degree Decrease time by 1 minute Increase time by 1 minute Alt Move an edited point to...

Страница 65: ...ate ii The main body must be set as a Con P mode To convert to Con P mode press and hold the lock button for more than 1 second If you want to operate the unit in Con L mode Local mode press and hold...

Страница 66: ...over 99 hours the unit does not operate in a Program Mode Especially be cautious when you program a pattern repetition Please be aware of specification about program time and temperature If you progra...

Страница 67: ...Page 66...

Страница 68: ...Page 67...

Страница 69: ...uipment Have surplus equipment taking up shelf space We ll give it a new home Learn more Visit us at artisantg com for more info on price quotes drivers technical specifications manuals and documentat...

Отзывы: