jeiko JKS5056 Скачать руководство пользователя страница 28

DECLARATION OF CONFORMITY /// 

The manufacturer under is responsibility declares that the product which is referred this “Instruction 
manual” is comply with the related European Community Directives.   
Complete Conformity declaration shall be provided with specific request


WARRANTY CONDITIONS /// 

This Warranty does not prejudice the customer’s rights as established by Italian Decree 02/022002, no. 
24.Under this warranty the manufacturer offers the customer who applies directly to an approved Sales 
Point a fast, safe and high quality technical re-establishment of the product. This Warranty is valid 
independently from the proof of factory damage encountered at the moment of purchase, except for 
what indicated under section “d” of this text. 

a)Warranty expiry

: 12 months from date of purchase After the first 12 months the Sales Points 

will continue to provide assistance for the following 12 months of legal warranty but under strict 
application of what established by the above mentioned Decree 02/022002, no. 24

b) Warranty Validity

:


In case technical assistance is required the present warranty is valid only if 

accompanied by a valid document and the Warranty Certificate indicating seller’s name, product code 
and date of purchase.


c) Warranty extension

:  Assistance given for damaged product DOES NOT interrupt or modify 

warranty validity which will extend as provided for legally. 

d) Warranty limitations

This warranty covers in no case damage caused by: 
-negligence, inexperience, carelessness during use (non-observance of the user manual); 
-maintenance not defined in the user manual or carried out by non-approved personnel; 
-tampering or alterations to improve product power or efficiency; 
-wrong installation (power supply with different voltage from what indicated in this manual and


on the 

unit rear label); 
-unit improper use; 
-damage caused by component normal wear, shock, falls or damage occurred during transportation. 

e) Costs

When not covered by the present warranty the manufacturer reserves the right to debit the 

customer all charges related to the repairing or substitution of the product. 

f) Manufacturer Responsibility

: The manufacturer declines all responsibilities for possible damage 

caused by the non-compliance with this instruction manual, especially all warnings/indications related 
to product installation, use and maintenance, deriving or caused directly or indirectly by people, objects 
or pets.


How the Warranty Service Support works: 

In case of technical fault found on a product covered by warranty, the manufacturer offers an express 
door to door postage service for collecting and delivering the goods directly to the end user home. This 
service is totally free of charges. For this service please contact Service Support.: 
•    Tel. +39 031 712304•   Fax. + 39 031 782838 
e-mail: 

[email protected]


www.jeiko.eu


11

Содержание JKS5056

Страница 1: ......

Страница 2: ......

Страница 3: ...JKS5056 MANUALE D USO SISTEMA DI VIDEO SORVEGLIANZA SENZA FILI CON TELECAMERA E SENSORE DI MOVIMENTO ...

Страница 4: ...pito per essere utilizzato come SISTEMA DI VIDEOSORVEGLIANZA Per evitare scosse elettriche non utilizzare l apparecchio nelle immediate vicinanze di una vasca da bagno di una doccia di una piscina o di un lavello pieno di acqua e in luoghi dove possa subire urti Le eventuali riparazioni devono essere eseguite solo da specialisti che dispongano dei pezzi di ricambio originali forniti dal fabbricant...

Страница 5: ...ollegare l alimentatore AC DC alla presa di corrente 2 Collegare il jack dell alimentatore alla presa dell apparecchio 3 Assicurarsi che il voltaggio sia uguale a quello riportato sulla targa dei dati caratteristici posizionata sull alimentatore Collegare il rispettivo alimentatore al monitor e alla telecamera 2 ...

Страница 6: ...lazione plug play CONTENUTO DELLA CONFEZIONE Verificare tutti i componenti a seguito rappresentati prima di procedere all utilizzo NOTE DA CONSIDERARE PRIMA DI PROCEDERE ALL INSTALLAZIONE Per ottenere un miglior funzionamento del dispositivo segua i passi specificati a seguito La telecamera dovrà essere posizionata di modo che possa monitorare la massima area Per migliorare la trasmissione evitare...

Страница 7: ...ale 1 IMPORTANTE Per accedere agli interruttori DIP è necessario aprire lo sportello del compartimento batterie premendo e spingendo lo sportello come mostrato a seguito 5 L installazione della telecamera Transmitter è ora completata VISIONE NOTTURNA La telecamera include LED infrarossi che permettono la visione oltre 3 metri di distanza nell oscurità Regoli la luminosità nel monitor per ottenere ...

Страница 8: ...pacco batterie seguendo le istruzioni a seguito riportate 6 La presa per auricolare è posizionata sul lato destro del monitor OTTIMIZZAZIONE DEL SISTEMA WIRELESS Il segnale video da 2 4 GHz passa facilmente attraverso le pareti interiori di casa ma lo stesso segnale potrebbe essere riflessa dai cavi o tubi situati all interno delle pareti Le fonti più comuni di interferente sono provocate da micro...

Страница 9: ...nale i canali che si intende utilizzare SENSORE DI MOVIMENTODELLA TELECAMERA La telecamera è dotata di sensore di movimento Quando il sensore rileva un movimento la spia rossa luminosa posta sulla telecamera lampeggia ed il monito emette un segnale d allarme MODALITA DI FUNZIONAMENTO Il sistema può essere configurato in 3 modi diversi SCAN AUTO o MANUALE Il modo di funzionamento viene selezionato ...

Страница 10: ...ate assegnate telecamere gli interruttori DIP dei canali inutilizzati che si trovano nella parte inferiore del monitor dovranno essere posti in posizione OFF Il tempo di intercambio delle immagini nel monitor é stato programmato a 4 secondi é possibile configurarlo da 2 a 30 secondi Per effettuare la nuova configurazione dovrà premere contemporaneamente i pulsanti AUTO e MANUAL Ogni lampeggio dei ...

Страница 11: ...i 3 Controllare la posizione della telecamera La Telecamera si deve trovare nel raggio d azione del monitor Il Monitor é bianco 1 Verificare se il monitor é acceso ON 2 Se sta usando un adattatore DC dovrà accertarsi che la spina sia stata ben collegata alla corrente 3 Controllare la posizione delle batterie e verificare lo stato della carica delle stesse Interferenze sulle immagini 1 Controllare ...

Страница 12: ...portune disposizioni legislative disposizioni locali e o particolari possono essere richieste presso i competenti uffici del vostro Comune SMALTIMENTO DELLE BATTERIE Disposizioni Internazionali a difesa e tutela dell ambiente impongono che batterie ed accumulatori esausti devono essere gettati in appositi contenitori preposti per la loro raccolta e non dispersi nei comuni rifiuti urbani Questo app...

Страница 13: ...e e favorisce il reimpiego e o riciclo dei materiali di cui è composta l apparecchiatura Lo smaltimento abusivo del prodotto da parte dell utente comporta l applicazione delle sanzioni di cui alla corrente normativa di legge SPECIFICHE Telecamera Transmitter Sistema TV PAL NTSC Sensore d immagine 1 4 CMOS Obiettivo incorporato 4 3mm F1 8 fuoco fisso Risoluzione 360 linee TV orizzontali Rapporto Se...

Страница 14: ...alitativamente ineccepibile La presente Garanzia è operativa indipendentemente dalla prova che il difetto derivi da vizi di fabbricazione presenti all atto dell acquisto dell apparecchio fatta eccezione per quanto previ sto al punto d del presente testo a Durata della garanzia 12 mesi dalla data di acquisto Trascorsi i primi 12 mesi di Garanzia gli interventi in garanzia sull apparecchio saran no ...

Страница 15: ...i tutte le prescrizioni indicate nel manuale d istruzioni e concernenti specialmente le avvertenze in tema d installazione uso e manutenzione dell apparecchio ATTIVAZIONE DEL SERVIZIO DI ASSISTENZA IN GARANZIA Ogni prodotto JEIKO coperto da garanzia al quale sia stato riscontrato un malfunzionamento viene ritirato e riconsegnato tramite corriere convenzionato direttamente al domicilio del consumat...

Страница 16: ... A PARETE Per installare il monito alla parete dovrà realizzare due fori con un trapano elettrico prendendo come riferimento la seguente dima Utilizzare i tasselli e le viti a corredo per fissare il monitor sulla parete 13 ...

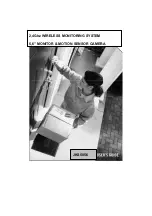
Страница 17: ...JKS5056 2 4Ghz WIRELESS MONITORING SYSTEM 5 6 MONITOR MOTION SENSOR CAMERA ...

Страница 18: ...RVEILLANCE In order to avoid electric shock do not use the product near bathtubs showers swimming pools or wash hand basins full of water or in places where it could be subject to bumps Only experienced technicians must carry out product repairing with original spare parts supplied by the manufacturer Do not use the product in rooms full of gas or where there is a risk of explosion This product ha...

Страница 19: ... Connect the AC DC adapter with the female plug in the wall 2 Connect the jack plug from AC DC adapter to female jack of the unit 3 Ensure that the voltage is as indicated on the rating plate on the AC DC adapter Chose the proper AC DC adapter and connect it to monitor and camera 2 ...

Страница 20: ...use 11 LCD monitor and camera can be wall mounted or table standing 12 One A V input and one A V output available 13 Plug play installation SYSTEM CONTENTS Identify all parts before proceeding with installation THINGS TO BE CONSIDER BEFORE INSTALLATION For best performance follow these simple guidelines The camera should be aimed accordingly to optimize viewing area For best transmission avoid ins...

Страница 21: ... is preset to channel 1 IMPORTANT In order to access the DIP switch in the battery compartment press the battery compartment and pull down as shown in order to easily remove the Camera from the tabletop base 5 The Camera Transmitter installation is now complete NIGHT VISION The Camera includes IR LEDs which allows viewing in the dark up to 10 feet when used with the adapter It can automatically tu...

Страница 22: ...CAMERA SYSTEM The 2 4 GHz signal passes easily through walls but the signal may be reflected by power wires or plumbing inside the wall The most common source of interference is microwave ovens Try to avoid mounting the LCD monitor near a microwave oven or other source of RF interference MULTI CAMERA OPERATION The Wireless monitoring System is designed to work with up to three cameras Additional c...

Страница 23: ...The desired operating mode can be selected using the buttons on the front panel of the LCD monitor SCAN Pressing the Scan button places the system in Scan mode The LCD monitor screen blanks into a standby mode while the system continuously scans the active cameras If used together with our cameras with motion detection function and the camera detects motion the LCD monitor displays picture from th...

Страница 24: ...or press the Manual button The LCD monitor will switch to a different camera each time the Manual button is pressed When used together with our cameras with motion detection function and the camera detects motion the beeper on the LCD will sound To avoid searching channels that do not have cameras assigned to them set the dip switches located on the bottom panel of the LCD monitor for those corres...

Страница 25: ...monitor 2 Make sure the sound is within the microphone range 3 If the units emit a loud wailing sound feeds back try moving the camera away from the monitor or angle the monitor differently POWER Ensure that supply corresponds to the information on the rating label on the bottom of the unit CLEANING MAINTENANCE DISPOSAL CLEANING AND MAINTENANCE Use a soft moist cloth to clean the product without u...

Страница 26: ...rate this from other types of wastes and recycle it responsibly to promote the sustainable reuse of material resources Household users should contact either the retailer where they purchased this product or their local government office for details of where and how they can take this item for environmentally safe recycling Business users should contact their supplier and check the terms and condit...

Страница 27: ...x 234 dot Power Supply DC 9V 2 0 A Brightness 300cd m2 Contrast Rate 150 1 Color Configuration RGB Stripe full color Operating Temperature 10 C 40 C overall Size 160W 135H 26Dmm Signal Source Wireless A V PIR Battery Rechargeable Battery For Monitor Optional Approx 2 hr continuous 3 hrs standby Rechargeable Battery For Camera Optional Approx 10 hr continuous General Operating temperature 10 C to 4...

Страница 28: ...pt or modify warranty validity which will extend as provided for legally d Warranty limitations This warranty covers in no case damage caused by negligence inexperience carelessness during use non observance of the user manual maintenance not defined in the user manual or carried out by non approved personnel tampering or alterations to improve product power or efficiency wrong installation power ...

Страница 29: ...Drilling Template for Wall Mounting Camera s For wall mounting Camera s drill two holes using a 1 4 drill bit and the template below Insert supplied wall anchors into holes and secure Camera to wall with supplied screws 12 ...

Страница 30: ...EMPLATE FOR WALL MOUNTING MONITOR For wall mounting Monitor drill two holes using a 1 4 drill bit and the template below Insert supplied wall anchors into holes and secure monitor to wall with supplied screws 13 ...

Страница 31: ......

Страница 32: ...Reseller stamp Please attached purchase receipt Distributed by Cod JKS5056 Ed 1 2008 Via Bisbino 29 22072 Cermenate CO info jeiko eu www jeiko eu DK DIGITAL ITALIA s r l ...

Отзывы: