background image


  Maintenance Manual 

WBA Series


QA-IF006 R02E Wartungsanleitung WBA_newLogo.doc 
Japan Cash Machine Germany GmbH 

Page  13 of 16 


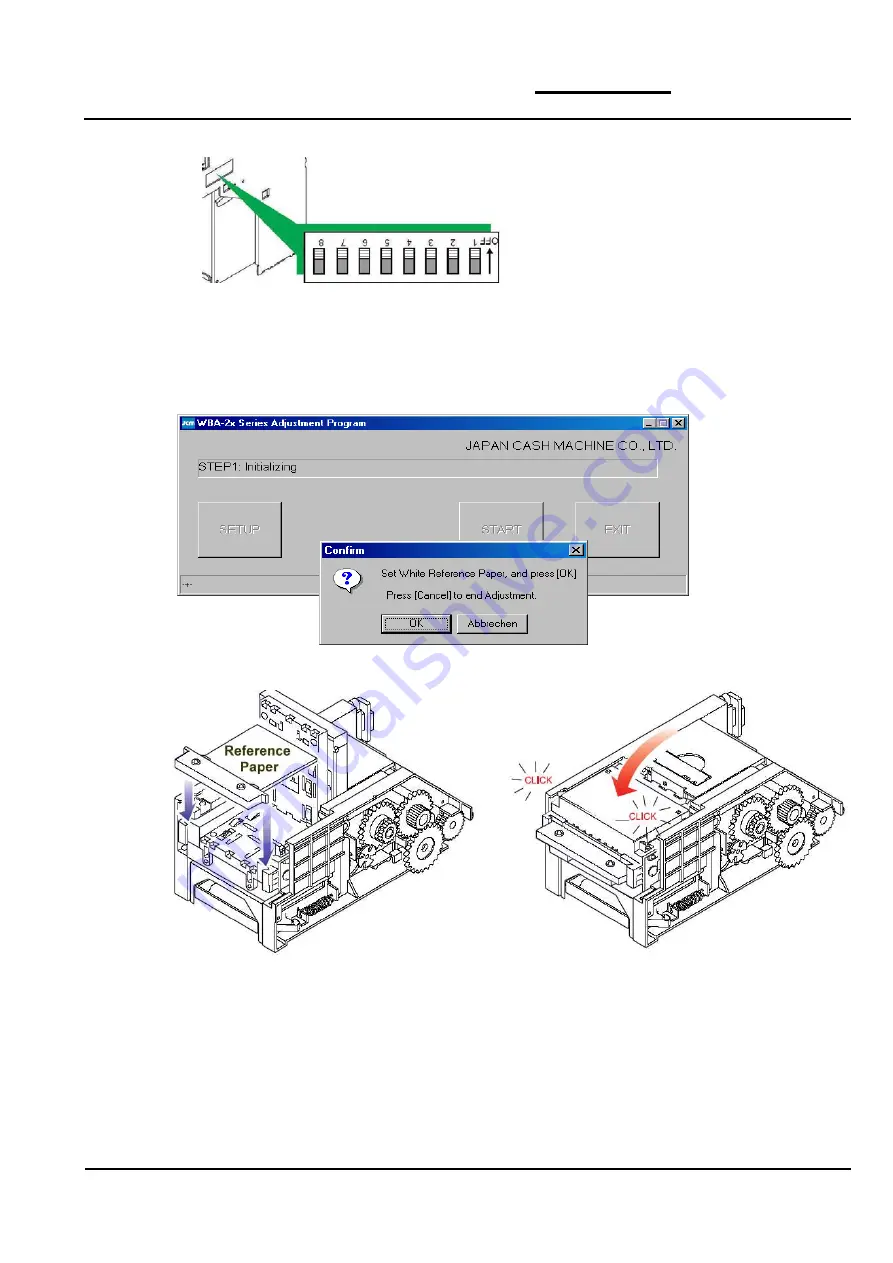
5.  turn off position 8 of the dipswitch. 


6.  start the JCM Adjustment Software Adj20.exe und click on „Start“. 

7.  follow the instructions of the software 


Beispiel: Nach der Initialisierung werden Sie aufgefordert das weiße Referenzpapier einzulegen. 


Содержание WBA Series

Страница 1: ...Maintenance Manual WBA Series Version 2 0 05 2007...

Страница 2: ...ND CLEANING 4 3 DETERGENTS 5 YOU SHOULD USE 5 WHAT YOU SHOULD NOT USE 5 4 MAINTENANCE AND CLEANING INTERVALS 5 CLEANING WITH THE JCM CLEANING CARD 7 THOROUGH CLEANING AND CHECKING IS RECOMMENDED EVERY...

Страница 3: ...Maintenance Manual WBA Series QA IF006 R02E Wartungsanleitung WBA_newLogo doc Japan Cash Machine Germany GmbH Page 3 of 16 1 Parts Bill Acceptor Fig 01 DIP Switch...

Страница 4: ...ece of currency is rejected by the validator One has to keep in mind that the acceptor performs best when its components are clean and undamaged Any dirt or damages can potentially reduce the acceptan...

Страница 5: ...ing would be using our JCM cleaning cards These cleaning cards are designed specifically for cleaning on site It needs to be mentioned however that those cards do not replace thorough cleaning JCM Cea...

Страница 6: ...Japan Cash Machine Germany GmbH Page 6 of 16 Procedure Clean thoroughly all lenses wheels and driving belts note yellow marked areas and check the head unit for potential damages Fig 02 Example for co...

Страница 7: ...ervals Fig 05 Procedure 1 Make sure the machine is switched on and does not malfunction 2 Remove the cleaning card from its packaging and insert it into the acceptor like a normal bill 3 The cleaning...

Страница 8: ...hecking is recommended every eight to twelve months The intervals are shorter under unfavourable conditions Procedure 1 Remove the head as well as the carrying unit fig 06 and 07 Fig 06 Fig 07 2 Check...

Страница 9: ...any GmbH Page 9 of 16 3 Cleaning Make sure the interior of the head and carrying unit is thoroughly cleaned siehe Fig 08 und 09 Dust and dirt need to be removed too Fig 08 Additional procedures Testin...

Страница 10: ...stment There are two kinds of adjustment Quick adjustment und PC supported adjustment Please note Please note the settings of the dipswitch so that they can be repositioned to their original settings...

Страница 11: ...e PC supported adjustment but can be carried out easily and without any additional materials Procedure 1 turn off the electricity 2 turn on DIP Switch No 5 6 7 and 8 fig 10 3 connect the WBA to the po...

Страница 12: ...e reliable results as all sensors are calibrated When possible you should use this method You need the following accessories for the PC supported adjustment MIB232 Black Reference Paper KS 0 White Ref...

Страница 13: ...n Cash Machine Germany GmbH Page 13 of 16 5 turn off position 8 of the dipswitch 6 start the JCM Adjustment Software Adj20 exe und click on Start 7 follow the instructions of the software Beispiel Nac...

Страница 14: ...he magnetic sensors need to be callibrated In order to do this please use the JCM G MAG Tool fig 13 After switching on the MAG tool insert the green board as far as the label WBA 1x 2x into the head u...

Страница 15: ...xe for Quick Adjustment KS 036 Reference Paper 67mm 074370 KS 037 Reference Paper 71mm 075625 KS 038 Reference Paper 77mm 075624 KS 039 Reference Paper 81mm 075626 Black White Only one is needed depen...

Страница 16: ...he acceptor still does not work well please contact our customer support Tabelle I LEDs are flashing when machine is malfuntioning Flashing Description Action 1 Cash box full Remove and empty cash box...

Отзывы:

Похожие инструкции для WBA Series