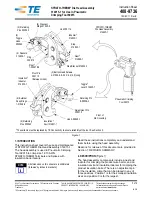
· 7 ·
REF. 60038
INSTRUCTION MANUAL
EN
PRODUCT PRESENTATION
This tool has been designed for lubricating purposes
and can be easily transported and manipulated where
-
ver thanks to its cordless design.
It is equipped with a led work light for an enhanced
visibility in the working area, a safety purge valve to
avoid excessive pressure and clogging, a soft ergono
-
mic handle for a better control and a trigger switch lock-
off button to avoid an accidental starting of the tool.
Besides, the grease output flow rate can be adjusted
to 8 different gears by means of the speed adjustment
wheel.
SAFETY INSTRUCTIONS
WARNING! Read all safety warnings and all ins
-
tructions. Failure to follow the warnings and instruc
-
tions listed below may result in electric shock, fire and/
or serious injury.
•
Check for breakage of parts, damage to switches
and any other conditions that may affect its ope
-
ration.
•
Do not operate the tool in the presence of flam
-
mable liquids, gases or dust.
•
Dress properly. Do not wear loose clothing or
jewelry and tighten long hair.
•
Avoid an accidental starting. Disconnect the
battery from the tool and place the switch in the
locked or off position before making any adjust
-
ments, changing accessories, or storing the tool.
•
Keep the tool and its handle dry, clean and free
from oil and grease.
•
Always wear eye and respiratory protection.
•
Hold the tool by the insulated grip surface when
performing an operation where the tool may
come in contact with the hidden wiring. Contact
with a “live” wire will make exposed metal parts of
the tool “live” and shock the operator.
•
Make sure all keys and adjusting wrenches are
removed from the tool before switching it on to
avoid them to fly away at high velocity.
•
Before using, always inspect the tool and hose
assembly for damage or wear due to high pres
-
sure. If the hose kinks or is damaged, replace it
immediately.
•
Only use the grease recommended in this ma
-
nual.
•
Rupture of components can inject grease into
skin or eyes, causing serious injury or infection.
Seek immediate medical attention.
•
Output can be at high pressure. Do not direct dis
-
charge at yourself or others.
•
Always wear gloves during operation and keep
hands clear of the exposed rubber portion of the
hose.
ASSEMBLY
Installing a grease cartridge
1.
Pull the grease tub handle outwards as far as it
will go, then secure the grease tube rod into the
retaining slot by moving the rod to the side.
2.
Unscrew the grease tub assembly from the grea
-
se gun.
3.
Remove the plastic cap from the grease cartri
-
dge, open one end first, and insert it to into the
grease tube.
4.
Remove the seal from the other end of the grea
-
se cartridge.
5.
Thread the grease tube assembly back into the
grease gun and screw it in securely.
6.
Release the grease tube rod from the retaining
slot and slowly press it back onto the tube.
7.
Use the purge valve to bleed off any air that may
be trapped in the cartridge.
Removing an empty grease cartridge
1.
Pull the grease tub handle outwards as far as it
will go.
2.
Secure the grease tube rod into the retaining slot
by moving the rod to the side.
3.
Gently release the grease tube handle to expel
the empty cartridge from the grease tube.
Filling the grease gun from a bulk container
Preparing the grease gun for suction and filler pump
filling
Make sure the grease gun is empty before starting this
process:
1.
Unscrew the grease tube from the grease gun.
2.
Unscrew the grease tube cap from the tube and
pull out the grease rod.
3.
Using your thumb and forefinger, flip the rubber
seal (GG) from the rear to the front.
par
a
el
ca
rtu
ch
o
de
gr
as
a
par
a
el
lle
na
do
de
sd
ee
l
co
nt
en
edo
ra
gr
an
el
Rubber seal
position
for Filling
from Bulk
Conatiner
GG
For
grease
cartridge
Содержание 60038
Страница 50: ...50 REF 60038 10 C 40 C 40 C 1 2 1 2 3 1 2 1 2 3 5 4 5...
Страница 56: ...56 REF 60038...


