background image

COMEÇAR A COSER  

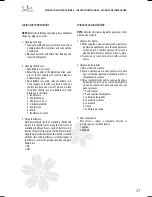
1. Ajuste o pé-calcador de casas e marque o 

comprimento da casa no tecido. Coloque o tecido 
por baixo do pé-calcador com a marca da casa para 
si, mova o suporte A do pé-calcador para si e alinhe 
a marca C com o começo da marca B e baixe o pé-
calcador. 

2.  Seleccione o ponto     , cosa até chegar ao final da 

marca da casa e pare a agulha à esquerda.

3.  Seleccione o ponto     ,   dê 4 a 6 pontos e pare a 

agulha à direita.

4.  Seleccione o ponto        , cosa até ao começo da casa 

e pare a agulha à direita.

5.  Seleccione o ponto    , dê 4 ou 6 pontos e pare a 

agulha à esquerda.

6.  Movimente o tecido, coloque uma agulha por baixo 

da casa para evitar cortar os pontos, e corte a casa 
com a lâmina. 

31

MANUAL DE INSTRUCCIONES  •  INSTRUCTION MANUAL •  MANUAL DE INSTRUÇÕES

STARTING SEWING  

1. Fix buttonhole stitching presser, mark the 

buttonhole length on the fabric, place the fabric 
beneath presser with the buttonhole mark to the 
operator, move slide A on the presser to the operator, 
align mark C at the slide top with the beginning 
mark B and lower the presser.

2.  Select stitch      , make sewing forward till reaching 

front end of buttonhole mark and stop the needle 
at left.

3.  Select stitch      , make sewing for 4 to 6 needles and 

stop the needle at right.

4.  Select stitch       , make sewing to start of buttonhole 

stitch and stop the needle at right.

5.  Select stitch       , make sewing for 4 to 6 needles and 

stop the needle at left.

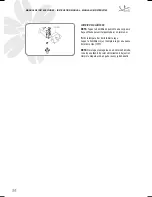
6. Move out the fabric, place a pin on bottom of 

buttonhole to avoid cutting of barring stitch, and 
cut off the buttonhole with the ripping knife. 

NOTE:

 Stitch the buttonhole at fabric margin as 

follows: 

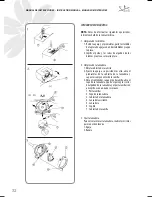
Corded buttonhole  

1. Lift the buttonhole stitching presser, place the 

cord on rear fork of presser, pull the cord forwards 
beneath the presser to front fork of presser, and bind 
the cord at intersection of front fork.
1. Rear fork
2. Front fork

2. Interlocking the buttonhole as above. After stitching 

the buttonhole, move out the fabric and cut off the 
sewing thread.  

3.  Tighten the left cord, move the cord to back of fabric 

with hand needle and then cut off the cord.

NOTA: 

Para fazer uma casa na orla proceda da seguinte 

forma: 

Casa com cordão 

1.  Levante o pé-calcador de casas, coloque o cordão na 

parte traseira do pé-calcador, puxe pelo cordão para 
a frente e por baixo do pé-calcador, e ate o cordão na 
interseccão do garfo dianteiro.
1. Garfo traseiro
2. Garfo dianteiro

2.  Entrelace a casa como se mostra. Depois de coser a 

casa, retire o tecido e corte o fio.  

3.  Aperte o cordão esquerdo, vire o cordão para a parte 

traseira do tecido e corte o cordão.

Содержание MC695

Страница 1: ...MANUAL DE INSTRUCCIONES INSTRUCTION MANUAL MANUAL DE INSTRU ES Mod MC695 695 695...

Страница 2: ...mbiente ENVIRONMENTPROTECTION Dispose the appliance according to the local garbage regulations Dispose the batteries according to the local garbage regulation Never throw it away to the rubbish So you...

Страница 3: ...ccessories Getting ready to sew Changing presser foot Replacement of needle Winding bobbin Inserting bobbin into bobbin case Adjusting top thread tension Sew Starting sewing Caring for your machine Ch...

Страница 4: ...l fabricante como se indica en este manual Nunca haga funcionar este aparato si el cable o el enchufe estuvieran da ados Si no funcionara ade cuadamente si se hubiera ca do o da ado o si se hubiera ca...

Страница 5: ...ncapelocabo Mantenha os dedos das m os afastados das pe as em movimento Necessitam se cuidados especiais perto da agulha Usesempreachapaadequada agulha Usarumachapa erradapoder provocaraquebradaagulha...

Страница 6: ...hilo Prensatelas Aguja Placa de aguja Compartimento de accesorios Asa Portacarrete Volante Interruptor de encendido luz Conector Palanca del prensatelas 1 2 3 4 5 6 7 8 9 10 11 12 13 14 15 16 17 18 1...

Страница 7: ...lever 1 2 3 4 5 6 7 8 9 10 11 12 13 14 15 16 17 18 Alavancaderetrocesso Selectordepontos T rminodoenrolador Enrolador Guiadofiodacanela Alavancaelevadoradofio Guiadofio Tens odofio P calcador Agulha P...

Страница 8: ...ctrica 1 Compruebequeelinterruptordelam quinaest en posici n de apagado 0 2 Inserte el enchufe en la toma de la m quina 3 Inserte el enchufe de la m quina en la toma de corriente 4 Pulse el interrupto...

Страница 9: ...erruptor 3 Tomada el ctrica 4 Tomada de liga o m quina Antes de ligar a m quina certifique se que a voltagem indicada na mesma coincide com a voltagem da tomada el ctrica 1 Certifique se que o interru...

Страница 10: ...para que el porta prensatelas se enganche al pie CAJADEACCESORIOS Sacarlacaja Como se muestra en el dibujo tire de la caja de accesorios hacia la izquierda y ret rela de la m quina La caja de accesor...

Страница 11: ...e auxiliary box and withdraw it from machine The auxiliary box may be disassembled as free arm or as auxiliary desk for sewing Installation Pushtheauxiliaryboxintothemachineandfullyinsert and fix the...

Страница 12: ...guja deber a comprobarse frecuentemente ya que si se desafila o desgasta podr a da ar los tejidos Tama os de aguja adecuadas para costura en general Las agujas finas son para coser telas finas y las a...

Страница 13: ...lmente aperte o parafuso no sentido dos ponteiros do rel gio 1 Parafuso da agulha 2 Dispositivo de seguran a do parafuso A agulha dever ser frequentemente verificada j que seest tortaoudesgastadapoder...

Страница 14: ...l final del hilo tire del extremo del hilo hacia abajo y p selo alrededor del alojamiento del muelle recuperador del hilo 3 Pase el hilo alrededor de la gu a de hilo para el devanado de la canilla 4 C...

Страница 15: ...re a m quina empurreoeixodeenrolamentoparaaesquerdapara asuaposi ooriginalecorteofio 8 Empurre o volante para dentro para engrenar a embraiagem 15 MANUAL DE INSTRUCCIONES INSTRUCTION MANUAL MANUAL DE...

Страница 16: ...a trav s del canal del portacanillas y luego bajo su regulador de tensi n Cuando est correctamente colocado se oir un clic 1 Muelle regulador de la tensi n del portacanillas 4 Mantenga el pestillo abi...

Страница 17: ...na ranhura da parte superior da lan adeira Solte o prendedor para fixar o porta canelas no local a ela destinado 17 MANUAL DE INSTRUCCIONES INSTRUCTION MANUAL MANUAL DE INSTRU ES INSERTINGBOBBININTOBO...

Страница 18: ...soporte de hilo 2 cruzado 1 Soporte de hilo cruzado Paseelhilosuperiorsiguiendolaranurahaciaabajo 3 girando y hacia arriba de nuevo De izquierda a derecha pase el hilo a trav s 4 del agujero de la pa...

Страница 19: ...ulha de frente para tr s 6 A m quina dever ficar com o fio passado como se 7 apresenta no diagrama Threadingthetopthread Place the top thread in spool holder with direction 1 shownindiagram Rotatetheh...

Страница 20: ...con la mano derecha hasta que la aguja est en su posici n m s alta 1 Hilo superior 2 Estire suavemente del hilo superior y coja el hilo de la canilla que aparecer a trav s de la ranura de la placa de...

Страница 21: ...da m quina e por baixo do p calcador deixando aproximadamente 15 cm na parte traseira 21 MANUAL DE INSTRUCCIONES INSTRUCTION MANUAL MANUAL DE INSTRU ES PICKINGUPBOBBINTHREAD 1 Raise the presser foot...

Страница 22: ...ensi n superior en funci n de 1 El grosor y lo compacta que sea la tela 2 Capas de la tela 3 Puntadas Hilosuperiordemasiadoapretado 1 Hilo superior 2 Hilo de la canilla 3 Reducir la tensi n En caso de...

Страница 23: ...er muito pouco tenso rode para baixo o bot o de controlo da tens o para um n mero mais elevado para aumentar a tens o superior 23 MANUAL DE INSTRUCCIONES INSTRUCTION MANUAL MANUAL DE INSTRU ES ADJUSTI...

Страница 24: ...hilos superior e inferior hacia la parte trasera de la m quina baje el prensatelas y comience a coser a lo largo de la gu a Reforzarlaspuntadas Presione el bot n de puntada hacia atr s o de remate par...

Страница 25: ...erandrotatethefabricto1 6cmguide 4 Lower the presser and start sewing as the new direction PONTOSB SICOS Pontoadireito 1 Selec o do ponto A B C 2 Ajuste da tens o do fio 2 6 3 P calcador em Z Come ara...

Страница 26: ...puntada E 2 Ajuste de tensi n del hilo 1 4 3 Prensatelas en Z Util celapararematarbordesdecualquiertela Empiece acosera0 3cmdelbordedelatelayhagaquelaaguja caiga fuera del borde Puntadadetrespuntosen...

Страница 27: ...tens o do fio 1 4 3 P calcador em Z Utilize apararematarorlasdequalquertecido Comece a coser a 0 3 cm da beira do tecido e fa a com que a agulha fique fora das orlas Three pointZ seam 1 Selection of s...

Страница 28: ...la m quina y haga que la aguja pase por la izquierda del trozo de tela doblado Tras coser planche la tela para hacer visible la puntada invisible en el lado bueno PUNTADASDECORATIVAS 1 Selecci n de d...

Страница 29: ...que a agulha passe pela esquerda do peda o de tecido dobrado Ap s coser engome o tecido para tornar vis vel o ponto invis vel no lado do direito DECORATIVESTITCH 1 Selection of pattern G H I J 2 Threa...

Страница 30: ...del ojal y pare la aguja a la derecha 5 Seleccione la puntada d 4 o 6 puntadas y pare la aguja a la izquierda 6 Mueva la tela ponga una aguja debajo del ojal para evitar cortar las puntadas y corte el...

Страница 31: ...3 Select stitch make sewing for 4 to 6 needles and stop the needle at right 4 Selectstitch makesewingtostartofbuttonhole stitch and stop the needle at right 5 Selectstitch makesewingfor4to6needlesand...

Страница 32: ...de la lanzadera 1 Abra la cubierta de la canilla 2 Ajuste la aguja a su posici n m s alta abra el prensatelas de la cubierta de la lanzadera y saque los componentes de la canilla 3 Abra el contenedor...

Страница 33: ...ewithdraw the power plug from socket 1 Cleaning feed dog 1 Take out needle and presser remove screws from needle plate with screw driver and take out the needleplate 2 Brushoutdustandcottonflockfromfe...

Страница 34: ...ue se haya enfriado para evitar quemaduras en las manos Retire la l mpara tras destornillar la tapa Saque la bombilla vieja y reempl cela por una nueva del mismo tipo 15W NOTA No coloque la m quina en...

Страница 35: ...nment by heat source or under direct sunshine Please clean the machine with soft cloth and neutral soap SUBSTITUI ODAL MPADA NOTA Toque somente na l mpada ap s esta ter arrefecido para evitar queimadu...

Страница 36: ......
Отзывы: