background image

x4

Wiring Setup

Capacity

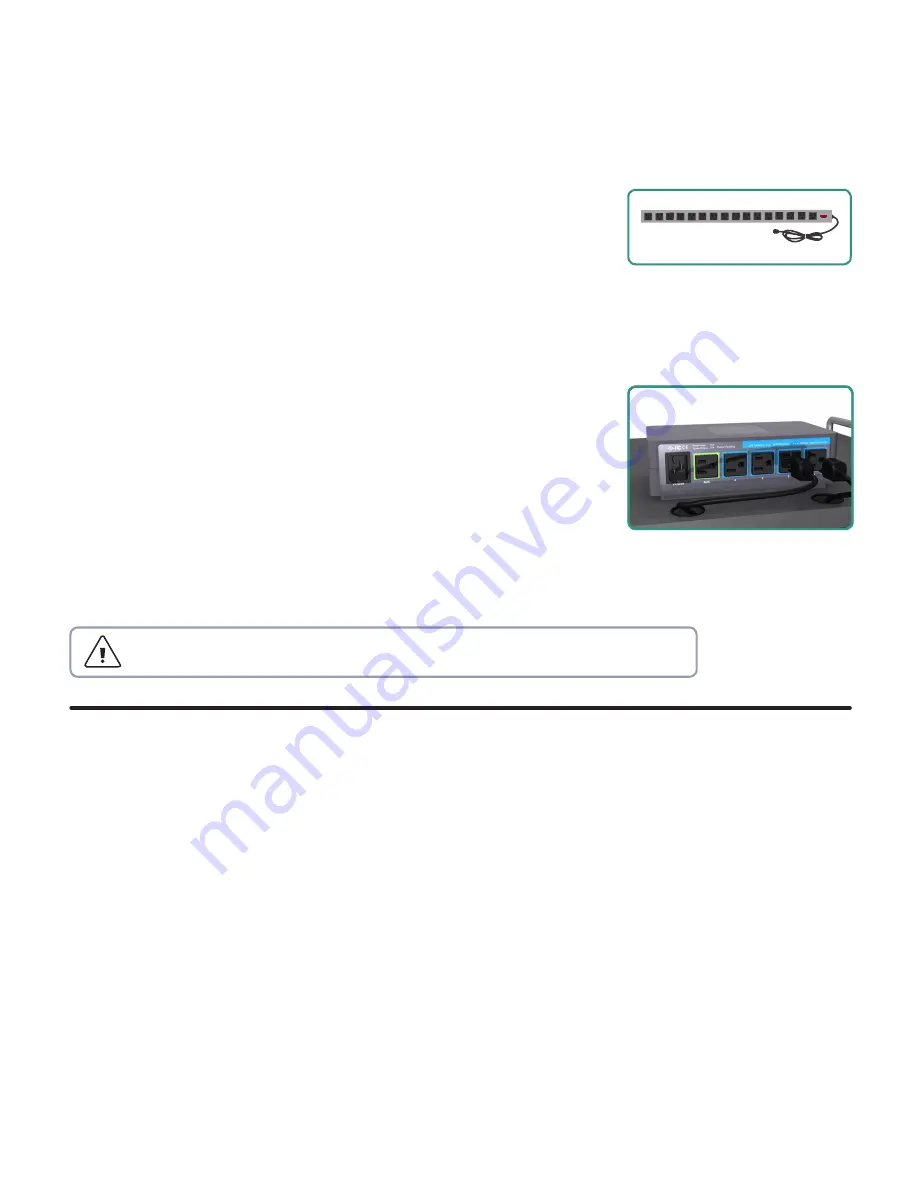
The Intelligent Charging System accommodates up to four power 
strips with up to 16 outlets on each 

(E)

 as well as one auxiliary 

power strip for peripheral devices. The charging outlets on the 
back of the unit are labeled 1

4 corresponding to the numbered 

LED indicators on the front of the unit. This allows the user to view 
the charging status of each power strip.

To wire devices for charging: 

1.

  Plug in one or more power strips into the charging outlets in 

the back of the unit

 (F)

.

2.

  Plug the devices’ manufacturer-supplied charging adapters 

into the power strip(s). 

3.

  Plug the charging system’s main power cable into the power 

connector in the back of the unit. Connect to the wall outlet 
when ready to begin charging. 

For help with integrating the Intelligent Charging System:

Call 866.393.4202 or E-mail [email protected]

Disconnect from power before connecting or disconnecting any cables.

F

E

Using the System with a Network Switch

A network switch can be used with the Intelligent Charging System by connecting it to the 
auxiliary outlet. Pressing the MANAGE button once prepares all connected devices for remote 
management. The system will keep the devices charged when they are turned on for management 
via Wake-on-LAN. If the devices are not fully charged, wait 2

3 hours before starting remote 

management. Press the MANAGE button a second time to stop manage mode and discontinue 
power to the auxiliary outlet.  

Содержание PB-80C24

Страница 1: ...User Manual PB 80C24 Intelligent Charging System...

Страница 2: ...Included Charge Button Power Icon Manage Button AUX Button LED Display Reset Button USB Port Charging Port LEDs Display Tour Front Back Auxiliary Outlet Power Connector Charging Ports...

Страница 3: ...ower is discontinued when batteries reach full charge to conserve energy Best used if all or some devices are left on or are returned at different times Charging continues until it is manually stopped...

Страница 4: ...o the AUX power strip in the back of the cart If the AUX devices must be operational during charging then the system must be in manage mode Be aware that this may lengthen charging time Charging Port...

Страница 5: ...the auto charge is enabled on power up 3 A6 This indicates that the auto manage is enabled on power up Now each time the manage button is pressed the display will cycle through the three settings Once...

Страница 6: ...extra power strip may be added for this purpose Mounted Inside of the Cart Mounted on Top of the Cart Installation Specifications Installation procedures for the Intelligent Charging System vary depe...

Страница 7: ...wer cable into the power connector in the back of the unit Connect to the wall outlet when ready to begin charging For help with integrating the Intelligent Charging System Call 866 393 4202 or E mail...

Страница 8: ...parts or refund the purchase price of the product at JAR Systems LLC s discretion This warranty does not cover accidental damage unreasonable use neglect tampering or other causes not arising from de...

Отзывы: