background image

TIGER

BELT-SANDER FOR WOODEN FLOORS

ED 95

PG. 

10/16

INSTRUCTION MANUAL

CARRYING THE MACHINE

WARNING:

Since the machine is heavy, disconnect the motor before moving it.
Ask for help in lifting the machine and the motor.

MOVEMENT WITH ONE PERSON

In order to make movement easier, the machine can be dismantled into three parts:


motor


suction tube


base with roller

Proceed as follows:

1.

Make sure that the power supply cable is disconnected from the mains and the machine.

2.

Open the belt guard after unscrewing the attachment screw.

3.

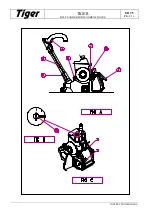
Loosen the belt stretcher using lever 

2  (fig. A)

 and remove the belts.

4.

Loosen knob 

3 (fig. A)

 until the socket washers on the motor support shaft come out of their sites on

the supports.

5.

Remove the motor and take it to the work site.

6.

After lowering lever 

4 (fig. A)

, unscrew and extract knurled knob 

5 (fig. A)

.

7.

Loosen nut 

6 (fig. A)

, slip the tube off and take it to the work site.

8.

Lift the base by taking hold of it at the front and back. Rest the belt guard against the chest and carry
it to the work site.

In order to reassemble the machine after moving it, proceed as follows:

1.

Open the belt guard.

2.

Fit the motor in place and fix it by tightening knob 

3 (fig. A)

.

3.

Fit the belts, stretch them and close the belt guard by tightening the respective screw.

CAUTION:

Excessive belt tension may cause the ball bearings to wear
prematurely.
The roller belt must deflect by 8mm when a load of 30 N is placed in
the middle.
The aspirator belt must deflect by 8mm when a load of 18 N is placed
in the middle.

4.

Fit the suction tube and roller control rod.

5.

Lift the roller using lever 

4 (fig. A)

.

6.

Connect the power cable to the machine and mains.

MOVEMENT WITH TWO PEOPLE

In order to move the machine with two people, proceed as follows:

1.

One operator takes hold of the handle hand-grip.

2.

The second person lifts the machine using handle 

1  (fig. A)

.

Содержание Tiger

Страница 1: ...rting up adjusting or carrying out maintenance operations on this machine may cause damage to persons and or things The operator must be trained to use the machine before starting it up Keep this manu...

Страница 2: ...cteristics 6 Introduction and machine characteristics 6 Instructions for electrical connection 7 Carrying the machine one person two people 10 10 Setting the machine up 11 Machine operation 12 Adjustm...

Страница 3: ...g it up DANGER Sanding wooden floors may lead to an explosive environment The following safety procedures must be applied Cigarettes cigars pipes lighters pilot lights and all other sources of fire ma...

Страница 4: ...t earth may cause electrocution Never disconnect or disable the power supply earth conductor Consult an electrician if the earth conductor is missing or if you suspect that the system is not suitably...

Страница 5: ...during any sanding operation WARNING During sanding operations loud noises may occur which may damage hearing after long exposure Always use acoustic protection during any sanding operation CAUTION I...

Страница 6: ...nnect the power supply cable before starting maintenance operations 8 The machine must always be carried with care since each single part in which the machine can be dismantled is extremely heavy 9 Al...

Страница 7: ...ution Do not cut remove or break the earth pin Do not try to insert a three pin plug into a socket or connector which does not have three holes If the plug does not fit the socket consult an authorize...

Страница 8: ...TIGER BELT SANDER FOR WOODEN FLOORS ED 95 PG 8 16 INSTRUCTION MANUAL...

Страница 9: ...TIGER BELT SANDER FOR WOODEN FLOORS ED 95 PG 9 16 INSTRUCTION MANUAL...

Страница 10: ...ig A 7 Loosen nut 6 fig A slip the tube off and take it to the work site 8 Lift the base by taking hold of it at the front and back Rest the belt guard against the chest and carry it to the work site...

Страница 11: ...ble around the pig s tail support Keep the cable out of the machine s way 5 Open side guard 9 fig C 6 Lower the tensioning roller by turning lever 10 fig C clockwise 7 Insert the abrasive belt and all...

Страница 12: ...g DANGER Dust created by sanding may spontaneously ignite and cause injury or damage Empty the dust bag when it is one third full Empty the dust bag each time after finishing with the machine Never le...

Страница 13: ...direction the roller pressure on the floor decreases 2 By turning the handwheel in an anticlockwise direction the roller pressure on the floor increases WALL EDGE WHEEL In order to avoid damaging the...

Страница 14: ...ake it vigorously to empty out the sanding dust Turn the bag inside out and wash it in a washing machine in cold water in order to prevent the pores from blocking and its ability to collect dust from...

Страница 15: ...elt dirty or faulty roller surfaces incorrect wheel adjustment replace the belt clean the outer surface of the tensioner clean straighten or replace the rubber coated roller correct their position see...

Страница 16: ...concepts general principles for design Technical principles and specification EN 292 Part 2 September 1991 Safety of machinery Electrical equipment of machines Part 1 General requirements EN 60204 1 O...

Отзывы: