BELT-SANDER FOR WOODEN FLOORS
Leopard
INSTRUCTION MANUAL
Page 13
ADJUSTMENT PROCEDURES
PROCEDURE FOR CENTRING THE BELT
When the motor is started up, the belt centres itself automatically.
WARNING:
The belt is in the correct position when it protrudes from the sanding roller by
about 1.5 mm.
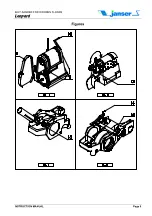
When the belt is first fitted, it may be in the wrong position. In this case, turn screw 12 (fig. C) as follows:
1.
By turning the screw in a clockwise direction, the belt moves outwards.
2.
By turning the screw in an anticlockwise direction, the belt moves inwards
ADJUSTMENT OF THE SANDING PRESSURE
In order to change the pressure of the roller on the floor, adjust handwheel 13 (fig. D) as follows:
1.
By turning the handwheel in a clockwise direction, the roller pressure on the floor decreases.
2.
By turning the handwheel in an anticlockwise direction, the roller pressure on the floor increases.
WALL EDGE WHEEL
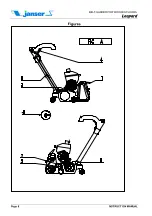
In order to avoid damaging the skirting or wall while sanding along the wall, a small support with idle wheel (fig.
B) has been fitted.
WARNING:
The wall edge wheel is correctly positioned when the machine is about 8 mm from
the wall with the wheel in contact with it.
Before starting work, position the wheel correctly by unscrewing screw 11 (fig. B), moving the support to the
required position and tightening the screw.
WHEEL ADJUSTMENT
(on a plane parallel to the roller axis)
In order to adjust the position of the wheels, proceed as follows:
1.
Turn the machine upside down.
2.
With the tool provided (14 fig. E), check whether the wheels protrude from the basement by an equal
amount. If this is not so:
3.
Loosen nut 15 (fig. E).
4.
Turn the off-centre pin (fig. E) until the wheel protrudes by the same amount as the other wheel.
5.
Tighten nut 15 (fig. E).


