background image

21

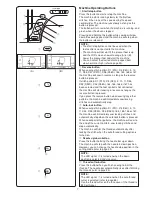
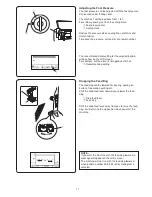
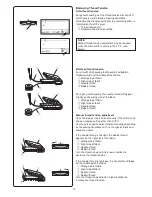
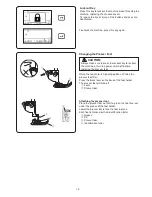
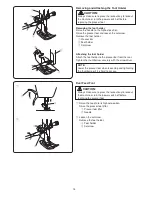
Threading the Machine

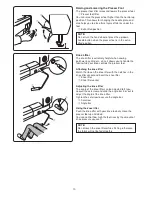
Raise the presser foot lifter to raise the presser foot.
Turn the power switch on.
Press the needle up/down button to raise the take-up 
lever to the highest position.
Press the lockout key or turn the power switch off.
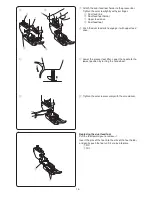
Pass the thread in the order from 

z

 to 

,

.

   CAUTION:

Always make sure to press the lockout key to lockout 
the machine or turn the power switch off before 
threading the machine.

r

y

t

u

i

o

v

b

n


m


,

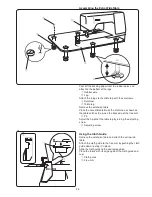
Hold the thread with both hands and pass the thread 
into the guide slot.


q

  Guide slot

x

  Be sure that the thread is pulled down under the notch 

and into the space below the guide slot as shown.


w

 Notch

Hold the thread with both hands and draw the thread 
around the corner of the guide.

    Firmly pull the thread toward you along the right 

channel until the thread snaps.


e

  Corner of the guide


r

  Right channel

c

e

r

x

w

q

z

v

z


x

c

b

n

m

,

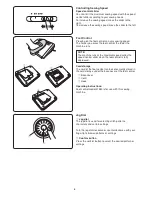
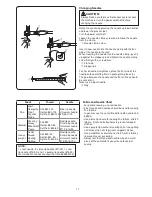
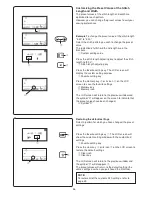
Draw the thread down along the right channel and 
around the bottom of the thread guide plate. Pull the 
thread up along the left channel.


r

  Right channel


t

  Thread guide plate


y

  Left channel

While holding the thread at the spool, firmly draw the 
thread up and to the back of the take-up lever. Draw 
the thread forward to slip it into the eye of the take-up 
lever.


u

  Eye of the take-up lever

Then pull the thread down along the left channel and 
through the lower thread guide.


i

  Lower thread guide

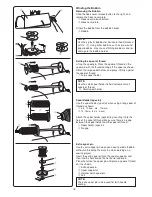
Slide the thread behind the needle bar thread guide 
from the right.


o

  Needle bar thread guide

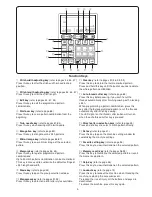
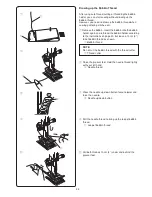
Thread the needle with the needle threader (refer to 
the next page).

Содержание Horizon MC8900 QCP Special Edition

Страница 1: ...Instruction Book...

Страница 2: ......

Страница 3: ...grasp the plug not the cord 10 Keep fingers away from all moving parts Special care is required around the sewing machine needle and or cutting blade 11 Always use the proper needle plate The wrong pl...

Страница 4: ...zag Stitch 46 Multiple Zigzag Stitch Tricot stitch 47 Overcasting Stitch 47 Knit Stitch 48 Double Overcasting Stitch 48 Overlocking Stitch 49 Blind Hemming 50 51 Shell Tuck 52 Buttonholes 53 Square Se...

Страница 5: ...button Auto lock button Needle up down button Thread cutter button Speed control slider Feed balancing dial Knee lifter socket Confirmation button Jog dial Function keys LCD screen Needle clamp screw...

Страница 6: ...Quilting guide bar Cloth guide Bobbin 5 pcs 1 set on the machine Spool holder large set on the machine Spool holder small Spool holder special Spool supporter Felt Extra spool pin Needle case Screwdr...

Страница 7: ...knees or elbows w Free arm Accessories Storage The accessories can be conveniently stored in the foot storage compartment under the top cover and in the extension table Under top cover q Zigzag foot...

Страница 8: ...out the cord from the foot control and insert the pin connector into the jack on the machine z First make sure the power switch q is off x Insert the machine plug w of the power supply cord into the...

Страница 9: ...ill start sewing in reverse as long as the reverse button is pressed If you press the reverse button when sewing any other patterns the machine will immediately sew locking stitches and automatically...

Страница 10: ...aximum speed set by the speed control slider when the foot control is fully depressed Cord storage The cord of the foot control can be conveniently stored in the cord storage under the base cover of t...

Страница 11: ...y refer to pages 30 36 95 99 Press this key to delete the last memorized pattern Press and hold this key until the buzzer sounds to delete the whole pattern combination 2 Auto thread cutter key refer...

Страница 12: ...e the fabric while your knee controls the presser foot Attaching the knee lifter Match the ribs on the knee lifter with the notches in the knee lifter socket and insert the knee lifter q Knee lifter w...

Страница 13: ...be show on the LCD screen For example set the dial at 4 for applique stitches e Recommended setting Dropping the Feed Dog The feed dog can be lowered for basting sewing on buttons free motion quilting...

Страница 14: ...ric e Needle thread r Bobbin thread Turn the thread tension dial to a lower number to decrease the thread tension If the needle thread is too loose the needle thread loops on the underside of the fabr...

Страница 15: ...ever w Presser foot Lockout Key Press this key to lockout the machine when threading the machine replacing the accessories etc To reduce the risk of injury all the buttons and keys are deactivated q y...

Страница 16: ...taching the foot holder Attach the foot holder to the presser bar from the rear Tighten the thumbscrew securely with the screwdriver NOTE Lower the presser foot when loosening and tightening the thumb...

Страница 17: ...l feed link to engage it with upper feed drive b Lower the presser foot lifter Lower the needle to the lowest position by turning the handwheel n Tighten the setscrew securely with the screwdriver Rep...

Страница 18: ...e needle plate release lever and the needle plate will snap off e Needle plate release lever r Needle plate q w e r c Place the straight stitch needle plate on the machine Set the left edge of the nee...

Страница 19: ...ton 80 100 Synthetic 80 100 Blue tip needle Universal needle 9 65 11 75 Medium Sheeting Jersey Broadcloth Fleece Silk 50 Cotton 50 80 Synthetic 50 80 Red tip needle Purple tip needle Universal needle...

Страница 20: ...ding the Bobbin Removing the Bobbin Slide the hook cover release button to the right and remove the hook cover plate q Hook cover release button w Hook cover plate Lift out the bobbin from the bobbin...

Страница 21: ...bin on the bobbin winder spindle t Bobbin y Bobbin winder spindle b Pass the thread to the bobbin Hold the thread with both hands and wind it around the bobbin clockwise several times n Insert the thr...

Страница 22: ...t into the guide path marked 1 Make sure that the thread comes out from the side notch of the bobbin holder e Guide path 1 r Side notch NOTE If the thread does not come out from the side notch rethrea...

Страница 23: ...hands and draw the thread around the corner of the guide Firmly pull the thread toward you along the right channel until the thread snaps e Corner of the guide r Right channel c e r x w q z v z x c b...

Страница 24: ...le eye from behind q Needle up down button w Lockout key e Threader knob r Threader hook x Draw the thread from left to right under the left guide threader hook and right guide Draw the thread around...

Страница 25: ...cording to the instructions on page 20 but leave a 10 cm 4 tail of bobbin thread as shown q Bobbin thread NOTE Do not cut the bobbin thread with the thread cutter w Thread cutter x Raise the presser f...

Страница 26: ...power switch on the LCD screen will show the straight stitch D1 selected Press the mode key and the group selection window will open q Mode key w Group selection window NOTE When the straight stitch...

Страница 27: ...length 1 Recommended presser foot type 2 Foot pressure 3 Tension setting NOTE A message window will be displayed briefly when certain stitch pattern is selected CAUTION Do not press the surface of the...

Страница 28: ...s and next pages to be displayed e Arrow marks c The third page shows the zipper foot E for zipper sewing applications v Pages A1 to A6 and D1 to D5 show step by step instructions on how to engage and...

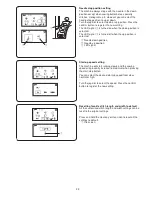
Страница 29: ...he screen brightness can be adjusted from level 0 to 20 The preset level is 10 Turn the jog dial to adjust the screen brightness Press the confirm button to register the new setting Buzzer sound The l...

Страница 30: ...o register the new setting Resumption setting The last pattern sewn before turning the power off can be recalled when turning the power on again by setting the resumption setting on Turn the jog dial...

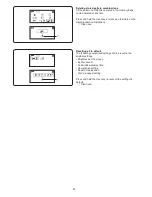
Страница 31: ...sition is selected q Needle down position w Needle up position e LED signal q w e Start up speed setting The machine will start running slowly and the sewing speed will gradually increase to maximum w...

Страница 32: ...to delete all the stored pattern combinations q Clear icon q Resetting all to default The following customized settings can be reset to the original settings Brightness of the screen Buzzer sound Sub...

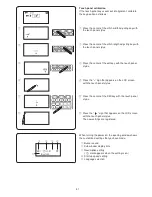
Страница 33: ...touch panel stylus v Press the sign that appears on the LCD screen with the touch panel stylus b Press the center of the D4S key with the touch panel stylus n Press the sign that appears on the LCD s...

Страница 34: ...button and sew several reverse stitches The machine sews in reverse as long as you press and hold the reverse button q Reverse button Press the reverse button once when sewing the lock a matic stitch...

Страница 35: ...e on the needle plate Stop sewing when the front edge of fabric reaches the cornering guide lines Raise the presser foot and turn the fabric 90 degrees Lower the presser foot and begin stitching in th...

Страница 36: ...e key to move the needle bar to the left Adjusting the needle drop position The needle drop position of the straight stitches can be altered by pressing the stitch width adjusting key NOTE The value i...

Страница 37: ...Cloth guide w Free arm q w q Peel off the backing paper from the rubber soles and attach to the bottom of the legs q Rubber sole w Leg Attach the 6 legs to the table top with the setscrews e Setscrew...

Страница 38: ...ng key The LCD screen will display the custom setting window e Favorite setting key Press the memory key r or its icon t on the LCD screen to save the favorite settings r Memory key t Memory icon The...

Страница 39: ...m speed Gently guide the fabric along the seam guide letting the fabric feed naturally When seaming plaid fabrics match the plaids of the upper and lower layers and pin them together Dual Feed Balanci...

Страница 40: ...d When you press the reverse button q at the end of the seam the machine will sew several locking stitches in place then stop sewing automatically q Reverse button Locking Stitch Machine settings q Pa...

Страница 41: ...lasticity and strength are needed to ensure comfort and durability Use it to reinforce areas such as crotch and armhole seams Also use it when constructing items such as backpacks for extra strength K...

Страница 42: ...t A r Foot pressure 5 q e w r q w e r t o i t u y Place the right sides of the fabric together and sew to the end of the opening with a 2 cm 5 8 seam allowance Reverse stitch to lock the seams Manuall...

Страница 43: ...the fold and pin in place Set the stitch length and thread tension back to the original setting q 0 2 to 0 3 cm 1 8 margin w Zipper teeth e Fold r End of the zipper opening t Opening size c Sew throug...

Страница 44: ...he opening 0 7 1 cm 3 8 and turn the fabric 90 degrees 0 0 7 1 cm 3 8 n Stitch through the garment and zipper tape guiding the zipper teeth along the side edge of the foot Stop about 5 cm 2 from the t...

Страница 45: ...em with the guide on the foot Lower the foot and sew 1 2 cm 1 2 1 while pulling both thread to the back e Threads c Stop the machine and lower the needle into the fabric Raise the foot and insert the...

Страница 46: ...th the guide on the foot and lower the foot Sew while guiding the edge of the fold along the guide Open the fabric and press the tuck to one side Loosen the thread tension to 1 and increase the stitch...

Страница 47: ...ng foot PD H to the presser bar by putting the pin on the needle clamp screw q Pin w Needle clamp screw Tighten the thumbscrew firmly with the screwdriver q e w r To sew Hold the fabric taut and depre...

Страница 48: ...e settings q Pattern 9 or 10 w Thread tension AUTO e Presser foot Zigzag foot A r Foot pressure 5 q e w r Adjusting the stitch width The stitch width of the zigzag stitches can be altered by pressing...

Страница 49: ...an adequate seam allowance After sewing trim the seam allowance close to the stitches Overcasting Stitch Machine settings q Pattern 12 w Thread tension AUTO e Presser foot Overcast foot M r Foot pres...

Страница 50: ...sew q Edge of fabric w Guide NOTE The stitch width cannot be changed q e w r w q Double Overcasting Stitch Machine settings q Pattern 14 w Thread tension AUTO e Presser foot Overcast foot M r Foot pre...

Страница 51: ...foot Overcast foot M r Foot pressure 5 q e w r This stitch finishes the edges of fabric similar to a commercial overlocking machine for a professional look Place the fabric edge next to the guide of...

Страница 52: ...foot Adjust the position of the needle swing with the stitch width adjusting key so that the needle just pierces the folded edge of the fabric when the needle comes over to the left side Sew guiding...

Страница 53: ...e in millimeters r e r q r w Press the sign to move the needle to the right Press the sign to move the needle to the left q Left needle drop position w Right needle drop position e Guide on foot r Dis...

Страница 54: ...need to increase the needle thread tension q Folded edge w Right needle drop position If you sew rows of shell stitches space the rows at least 1 5 cm 5 8 apart You can also sew shell stitches on kni...

Страница 55: ...tonhole This buttonhole is used on fine to medium weight fabrics especially for blouses and children s clothes 26 Fine fabric buttonhole This buttonhole is rounded at both ends and is used on fine del...

Страница 56: ...ch or fine fabrics c z x Sewing z Pull open the button holder of the automatic buttonhole foot R and place the button in the button holder Push it tightly against the button q Button holder x Attach t...

Страница 57: ...brics or sewing across hems refer to page 58 NOTE Make sure there is no gap between the slider and front stopper otherwise the buttonhole will be out of position or the left and right lengths will be...

Страница 58: ...few stitches Pull the buttonhole lever down and start sewing m After you finish buttonhole sewing push the buttonhole lever up as far as it will go Place a pin just below the bartack at each end to pr...

Страница 59: ...titch width adjusting key to increase the buttonhole width Press the sign on the stitch width adjusting key to decrease the buttonhole width q Stitch width adjusting key w Narrower buttonhole e Wider...

Страница 60: ...etween buttonhole foot and stabilizer plate Press the needle up down button twice and remove the fabric to the left to draw the needle thread between the foot and stabilizer plate c Place the fabric b...

Страница 61: ...the foot and start sewing while pulling the needle thread lightly to the left After sewing a few stitches free the thread and continue sewing NOTE You do not need to pull down the buttonhole lever If...

Страница 62: ...oint Then press the reverse button w Ending point n Start sewing again and machine sews the back bartack and locking stitches then stops automatically with the needle in the up position m When the but...

Страница 63: ...ed from 0 2 to 2 0 The stitch density can be adjusted from 0 20 to 1 00 q e w r Keyhole Buttonholes Machine settings q Pattern 27 28 or 29 w Thread tension AUTO e Presser foot Automatic buttonhole foo...

Страница 64: ...rom 0 50 to 1 00 for pattern 30 and 0 50 to 2 50 for pattern 32 If the stitch balance of the left and right row is not even correct it by turning the feed balancing dial refer to page 100 q e w r Stre...

Страница 65: ...ook a filler cord on the spur on the front of the foot Bring the ends of cord toward the back and under the foot Bring up the ends of the cord and insert both ends between the ribs and metal plate q S...

Страница 66: ...o the other side q Wrong side of patch w Right side of garment fabric e Right side of patch c Pull out the patch until the right side of the patch is showing Use an iron to press both corner ends unti...

Страница 67: ...16 5 8 away from the hole The corners should be cut rounded off as shown e Right side of patch r Wrong side of garment fabric 0 Place the facing on the wrong side of the garment fabric Mark the 4 corn...

Страница 68: ...the left hole of the button by turning the handwheel with your hand Lower the foot to hold the button in place aligning the direction of the button Raise the needle by turning the handwheel until the...

Страница 69: ...until the machine stops automatically e Reverse button r Required length c Sew another layer of darning over the first layer at a right angle to it NOTE The maximum darning length is 2 cm 3 4 and the...

Страница 70: ...nevenness of darning stitches by pressing the or key of the stitch length adjusting key If the left corner is lower than the right side press the key to correct it and vice versa NOTE The evenness can...

Страница 71: ...wing a shorter tack To sew a tack shorter than 1 5 cm 9 16 first stop the machine after sewing the required length and then press the reverse button The required length has been determined Start the m...

Страница 72: ...oot pressure 5 The fly stitch is a triangle tacking stitch for use on a zipper fly bottom and on the side pockets of men s pants Attach the satin stitch foot F To sew Place the garment under the foot...

Страница 73: ...y q Eyelet gap opens w Eyelet overlaps NOTE The shape can be adjusted within S1 to S3 default setting is S2 The eyelet is used for belt holes etc Sewing Sew until the machine stops automatically Open...

Страница 74: ...t the needle falls off the edge of the applique when the needle swings to the right A The patterns number 50 and 51 have a fixed left needle drop position When you change the stitch width the right ne...

Страница 75: ...ing is to begin Sew down the left side so the right hand stitches fall in the open space q e w Drawn Work Machine settings q Pattern 41 w Thread tension AUTO e Presser foot Satin stitch foot F r Foot...

Страница 76: ...rting to sew Use the thread cutter on the face plate Smocking Machine settings q Pattern 64 w Thread tension AUTO e Presser foot Satin stitch foot F r Foot pressure 5 Stitch patterns can also be used...

Страница 77: ...5 cm 5 8 and press Pin the two edges to paper or tear away backing 0 3 cm 1 8 apart q 0 3 cm 1 8 Sew slowly guiding the fabric so the needle catches the folded edge on each side After finishing sewin...

Страница 78: ...keep a precise 1 4 seam allowance q Guide w Right sides of the fabric w q e w r Open the seam flat with the right side up and sew patchwork stitch along the seam line q Angle scales on the needle pla...

Страница 79: ...lder w Quilting guide bar e Space between seams Quilting Machine settings q Pattern D1 or D1S w Thread tension AUTO e Presser foot Zigzag foot A or Dual feed foot AD r Foot pressure 5 t Quilting guide...

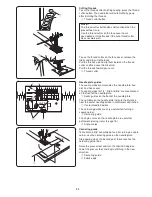
Страница 80: ...e straight stitch needle plate refer to page 16 Loosen the setscrew and remove the foot holder Attach the convertible free motion quilting foot to the presser bar and tighten the setscrew firmly with...

Страница 81: ...quilt layers with your hands Move the quilt layers 3 mm 1 8 or less per stitch q w e r t Free quilting with darning foot PD H Stitch patterns D1 D4 D1S D4S 9 and 10 can also be used for the free moti...

Страница 82: ...ir original length while the stitch density remains the same Elongation ratio Example Pattern number 147 Select pattern number 147 Press the elongation key to select the desired elongation ratio Elong...

Страница 83: ...x v c b b q Insert the extra spool pin into the hole in the foot storage compartment Place a spool of thread on the extra spool pin and fix the spool with the spool holder w Extra spool pin Draw both...

Страница 84: ...first before you sew on the garment Use the zigzag foot A or satin stitch foot F for twin needle sewing Use the threads 60 or finer When changing the sewing direction raise the needle and presser foo...

Страница 85: ...ual tension adjustment may be required when sewing a pattern combination Up to 50 stitch patterns combination can be memoried q z x c v z Select pattern 147 x Press the memory key c Select pattern 151...

Страница 86: ...ern auto lock stitch and stop automatically z Select pattern 147 z x c v x Press the memory key q c Select pattern L S q Auto lock sign w w v Start sewing Pattern 147 and auto lock stitch will be sewn...

Страница 87: ...key after selecting the desired pattern When a pattern in the buttonhole group is selected the machine will cut the threads and stop automatically after the pattern is completed r Buttonhole group Whe...

Страница 88: ...e pattern vertically The horizontal mirror sign is displayed The stitch pattern will be back to normal if the pattern cannot be turned over horizontally w Horizontal mirror sign v Press the mirror ima...

Страница 89: ...mirror image z Select pattern 150 x Press the memory key c Select pattern 150 again v Press the mirror image key to turn over the pattern q Vertical mirror sign b Press the memory key n Start sewing...

Страница 90: ...ern press the startover key to select the pattern you wish to start over from Example Pattern combination 147 151 and 148 z Program the pattern combination 147 151 and 148 Start sewing x Sewing stoppe...

Страница 91: ...ch image indicates stitch counts to be inserted The stitch length and needle drop position of patterns 164 to 167 and 170 are independent from those of the combined pattern Patterns 168 169 and 171 wi...

Страница 92: ...mbination by pressing on the stitch image window q Stitch image window The readout of the total length is a theoretical value and the actual length may vary depending on sewing conditions Press the cl...

Страница 93: ...tton You can also select the desired character by pressing the icon of the font The LCD screen shows the upper case alphabet lower case alphabet upper case European letters 1 and 2 lower case European...

Страница 94: ...etter R c Press the memory key v Press the monogram key b Press the numbers and symbols icon q q n Select letter w m Press the Upper case alphabet icon w Select letter B Press the auto thread cutter k...

Страница 95: ...e space in monogramming press one of the three space icons on the lower right corner of the monogram selection window q Space icons w Small size space e Medium size space r Large size space q w e r Mo...

Страница 96: ...ght Press the left arrow on the edit key to shift the cursor to the left NOTE Arrow signs on the LCD screen indicate that there is the rest of the combination in that direction Once sewing has started...

Страница 97: ...he edit key to shift the cursor under pattern B x Press the clear key Pattern B will be deleted NOTE Pressing and holding the clear key will delete all the programmed patterns and the LCD screen will...

Страница 98: ...needle position B Unified to the right when combining the patterns with the center needle position and the right needle position C Unified to the center when combining the patterns with the left need...

Страница 99: ...just x Press the stitch width adjusting key to adjust the width to 3 5 NOTE To view the stitch settings of each pattern shift the cursor under the desired pattern then press the stitch width or length...

Страница 100: ...s the memory recall key or turn the jog dial to select the desired address q Memory recall key w Memory address q w e r c Press the memory key or memory key icon on the LCD screen The pattern combinat...

Страница 101: ...he LCD screen to recall the stored combination q Memory recall key w Jog dial e Confirm button icon q w e Deleting a stored combination z Press the memory recall key to select the memory address stori...

Страница 102: ...retch stitch pattern Example Pattern 108 Quilt If the pattern is compressed turn the feed balancing dial in the direction of If the pattern is drawn out turn the feed balancing dial in the direction o...

Страница 103: ...ut the bobbin and bobbin holder q Bobbin holder x Clean the bobbin holder with a lint brush Clean the feed dog and auto thread cutter device with the lint brush w Lint brush e Feed dog r Auto thread c...

Страница 104: ...q Thread guide plate q w e x Remove lint and dust from the brush on the underside of the thread guide plate using a lint brush w Brush on the thread guide plate c Clean the area around and under the...

Страница 105: ...alizing after turning the power on Or the thread cutter button is pressed 4 times in a row Connect the foot control and start the machine again Release the foot control Turn the hand wheel to raise th...

Страница 106: ...nd automatic thread cutting mechanism Do not lower the feed dog raise presser foot or shift bobbin winder spindle while the machine is running Contact the service center or the store from whom the mac...

Страница 107: ...ntrol is not connected 2 Thread has been caught in the hook race 3 The presser foot is not lowered 1 The stitch density is not suitable for the fabric being sewn 2 The interfacing has not been used fo...

Страница 108: ......

Страница 109: ......

Страница 110: ......

Страница 111: ......

Страница 112: ...858 850 062 q EN...

Отзывы: