


53
DECORATIVE STITCHES
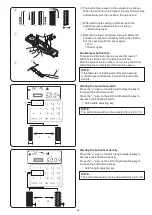
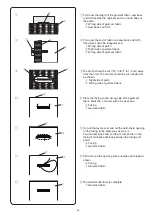
Patchwork
q
Stitch pattern:
MODE 3:
9 and 31
w
Thread tension dial: 3 to 6
e
Presser foot:
Zigzag foot A
Satin stitch foot F
w
z
Attach the zigzag foot A.
Place the patchwork pieces right sides together.
Select stitch pattern 9 in mode 3. Sew while guiding
the edge of the fabric to keep a precise 1/4˝ seam
allowance.
q
Wrong side of fabric
w
Right side of fabric
q
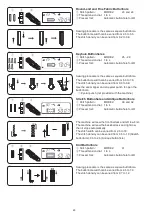
z
x
c
x
Replace the presser foot with satin stitch foot F.
Select the patchwork pattern 31 in mode 3.
The stitch patterns 27-32 in mode 3 can also be used.
c
Press the seam allowance to open. Sew the stitch
pattern on the right side of the garment centering over
the seam line.
4
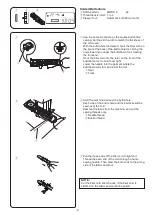
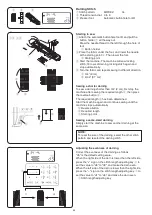
Shelltuck
q
Stitch pattern:
MODE 2:
18
w
Thread tension dial: 6 to 8
e
Presser foot:
Satin stitch foot F
Use a lightweight fabric (tricot, for example).
Fold the fabric in bias as shown and stitch on the fold.
Allow the needle to barely clear the folded edge to create
a shelled edge.
q
Bias
w
Folded edge
e
Right needle drop position
If you sew rows of shell tuck, space the rows at least 5/8˝
(1.5 cm) apart.
You can also sew shell tuck on knits or soft silky woven
fabrics, in any direction.
e
w
w
e
q
w
e
q
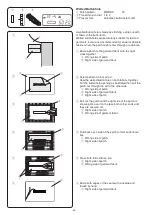
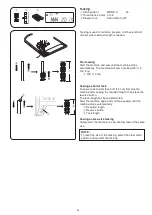
Angle scale on the needle plate
You can easily seam patchwork pieces at the desired
angles without marking, by using the unique angle scales
on the needle plate.
The angle scales are marked at 45°, 60°, 90° and 120°
degrees.
Attach Zigzag foot A when using the angle scale.
Align the edge of the fabric to the 1/4˝ seam guide line.
e
1/4˝ seam guide line
q
e
w
w
Содержание 5270QDC
Страница 1: ...Instruction Book...
Страница 79: ...77 Stitch Chart...
Страница 80: ...78 Stitch Chart...
Страница 81: ......
Страница 82: ......
Страница 83: ...Version 1 00 27 11 2019...
Страница 84: ...809 851 153 EN...