background image

XP30 User Manual 


3-2 

Janam Technologies LLC


You may now go to the main menu and run any application (e.g., note pad).  When a barcode is scanned, 

its data will be entered wherever the cursor is placed. 


Note:

 The ScanWedge function will be disabled if manual scanning is initiated either by a command API or 

by using the Janam Barcode Test program. 


Unlock 2D scanning


All of Janam’s mobile computers can be upgraded in the field to read both 1D and 2D barcodes with a 

simple firmware upgrade (Part Number 2D-XP-1).  With each upgrade, a key code is provided that unlocks 

2D scanning capability on the device.  To purchase an upgrade for your XP30, contact your reseller or 

distributor or Janam customer service.   
 

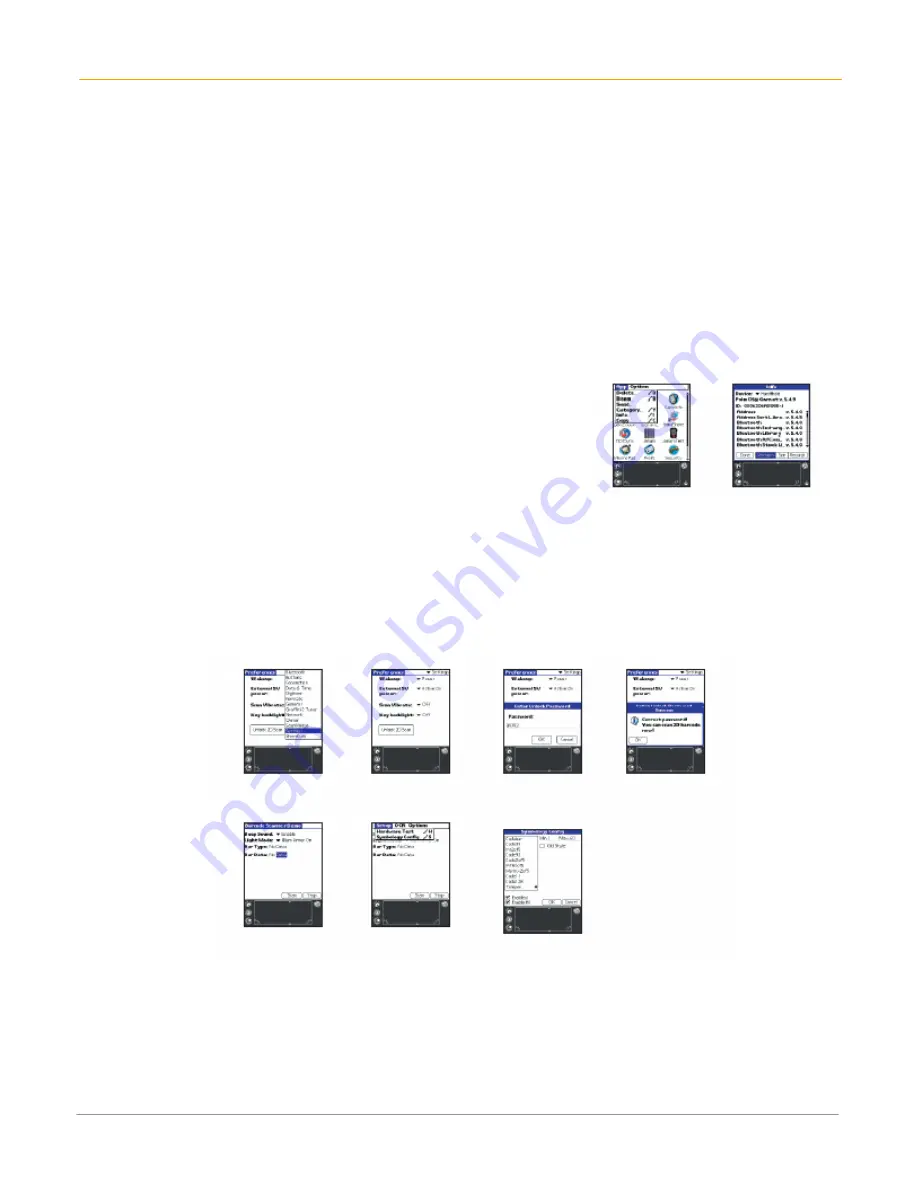
You will need to provide the product imager ID number so the appropriate five-digit key code sequence 

can be assigned.  To access the imager ID number, follow these steps: 


1.


From the 

home

 screen, tap the 

menu

 button or 

date on the 

upper left corner

 of the screen and select 

info

.    

2.


The 

info

 screen will appear.  Press the 

version

 button.   

3.


Write down the 

ID number

 (e.g., 006206A090E-J).   When 

purchasing the upgrade, provide this 12-digit serial number. 

The five-digit key code for enabling 2D scanning on the device 
will be sent to you. 


After receiving your five-digit key code, follow these steps to enable 2D scanning.  

1.


Go to the 

preferences 

screen and select 

settings

2.


Tap the 

unlock 2D scan

 button. 

3.


Enter your 

five-digit key code

, and a 

successful unlock

 notification will appear. 

4.


Select the 

bar code scanner demo

 tab at the top of the screen. 

5.


Tap the 

menu

 button to open 

symbology config

.  You can then select 

enable all

 to enable every type 

of barcode or manually select the barcodes of your choice. 

6.


Press 

OK


Note:

 The unlock code will be maintained in the unit’s system after a soft reset, but it will need to be re-

entered after a hard reset.  Remember to keep a record of your five-digit key code. 

Содержание XP30

Страница 1: ...XP30 User Guide Version 4 June 2008...

Страница 2: ...XP30 User Manual ii Janam Technologies LLC...

Страница 3: ...cate front panel controls 4 1 Locate back panel components 4 1 Tap versus click 4 1 Calibrate the screen 4 1 Use the multi language feature 4 2 Open applications 4 3 Use the interface 4 3 Use menus an...

Страница 4: ...9 1 Launch an application 9 1 Display Janam XP30 application information 9 1 Copy an application to your handheld or desktop 9 2 Beam applications 9 2 Delete applications 9 2 Use card info 9 3 Chapte...

Страница 5: ...Maintenance Regulatory and safety approvals 14 1 FCC and Canadian compliance 14 1 XP Series batch terminal 14 1 XP Series RF terminals with 802 11b and or Bluetooth 14 2 RF regulatory and safety appr...

Страница 6: ...c keypad 2D barcode scanning permanent memory backup of applications and data keypad backlighting user accessible mini SD slot latest WLAN security extra capacity battery and more Hardware features Av...

Страница 7: ...XP30 User Manual 1 2 Janam Technologies LLC Specifications...

Страница 8: ...available hard disk space Video resolution 640x480 and 256 colors 800x600 recommended One available USB port for syncronizing the XP30 using either a Janam cradle or Janam USB syncing charging cable...

Страница 9: ...lus 7 Stylus Slot 8 Hand Strap connector 1 Barcode Scan Window 2 Power On Off 3 Syncing Charging Connector 1 Power On Off 2 Indicator LED 3 LCD 4 Connector 5 Scan Trigger 6 Right Trigger 7 Left Trigge...

Страница 10: ...ry using the single slot or four slot cradle 1 Connect the power supply to the cradle 2 Connect the line cord to the appropriate power supply 3 Plug in the power supply 4 Insert the XP30 into the crad...

Страница 11: ...t fully operate when the battery cover is removed As a result of this feature XP30 devices automatically create a safe state until the battery cover is secured meaning a device will power down until t...

Страница 12: ...s complete will appear Tap the window at the bottom of that screen that says Tap here to start ROM update procedure 4 On the desktop a Removable Drive window will appear Drag and drop the appropriate...

Страница 13: ...ce and perform a soft reset With the cable already plugged into the host computer reconnect the XP30 Perform reset first Sometimes Windows attempts to find the device and the appropriate driver but it...

Страница 14: ...You can turn off the illumination and aimer turn the aimer only on turn on the illumination only or turn on both aimer and illumination Bar type Display only shows the symbology of the barcode scanne...

Страница 15: ...r follow these steps 1 From the home screen tap the menu button or date on the upper left corner of the screen and select info 2 The info screen will appear Press the version button 3 Write down the I...

Страница 16: ...the reset button USB serial connector Connects your handheld computer to a PC via a USB or serial cable or by inserting XP30 into a Janam cradle Tap versus click Tapping is the basic action used to e...

Страница 17: ...ges If your handheld computer has the multi language feature the available languages will be displayed in the digitizer screen Once you have calibrated the digitizer you will be prompted to pick a lan...

Страница 18: ...lets you tap icons or write a ShortCut stroke to initiate a command instead of tapping a command in the menu bar The icons displayed in the command bar vary within each application Command buttons in...

Страница 19: ...the command you want or enter the shortcut for the command in the text input area below the command toolbar For example to choose select all in the edit menu draw the Graffiti 2 command stroke in the...

Страница 20: ...ime 1 Tap the applications launcher icon then tap the prefs icon 2 Tap date and time from the pick list in the upper right corner 3 Tap the set time box on the date and time screen then tap up or down...

Страница 21: ...can increase the automatic shut off setting 1 Tap applications prefs 2 Tap general from the pick list in the upper right corner 3 Change the auto shutoff time by tapping the auto off after in the gen...

Страница 22: ...d desktop e mail connectivity You can use the HotSync feature of this software to back up and exchange data between your handheld computer and your computer Using the Palm Desktop you can do the follo...

Страница 23: ...k 2 Tap any record or new 3 Choose one of the following to display the alphabetic or numeric keyboard Tap abc on the front of your XP30 to display the alphabetic keyboard Tap 123 on the front of your...

Страница 24: ...2 includes symbols made with a single stroke and symbols made with multiple strokes For multi stroke characters a temporary character is displayed after the first stroke to show that the stroke was r...

Страница 25: ...er This requires an additional shift stroke To write letters with accent marks First write the letter stroke on the left side in center for uppercase of the input area Then quickly write the accent st...

Страница 26: ...gging the stylus from the text input area to the top of the screen Use the Graffiti 2 tuner The Graffiti 2 tuner provides alternate strokes for making the T P Y and characters For example you may want...

Страница 27: ...u draw the ShortCut stroke the ShortCut symbol appears at the insertion point To create a ShortCut 1 Tap the application launcher icon 2 Select prefs from the menu 3 Tap ShortCuts in the pick list in...

Страница 28: ...hive tda Memo pad archive mpa Archive formats can only be used with Palm Desktop Use the archive file formats to share information with other people who use Palm Powered handhelds or to create a copy...

Страница 29: ...y visible To switch between applications tap the applications icon or press an application button on the front panel Your work in the current application is automatically saved and displayed when you...

Страница 30: ...ns dialog take effect immediately To change the buttons preferences 1 Tap the applications launcher icon 2 Select all or system from the pick list in the upper right corner 3 Select prefs from the men...

Страница 31: ...n your Palm Desktop typically located in ProgramFiles palmone addons directory Decompress the application into the add on folder before continuing 2 Double click the Palm Desktop icon on your computer...

Страница 32: ...ate with or without a password Without a password private records are hidden until you set the security application to display them With a password you must enter the password to view the private entr...

Страница 33: ...your password at prompt OK IMPORTANT NOTE If you synchronize with your computer before deleting a forgotten password your handheld computer restores private entries the next time you perform a HotSyn...

Страница 34: ...e same time each week Continuous events such as a vacation or three day conference All day events which reflect the default length of the day as set by the user To schedule a timed event for the curre...

Страница 35: ...be sure to tap the event and not the time next to the event Typically a continuous event is an untimed event 2 Tap details 3 Tap the repeat box to open the change repeat dialog 4 Tap day week month or...

Страница 36: ...pick list to change the time unit select minutes hours or days 5 Tap OK 6 Tap the snooze option to dismiss the alarm for a five minute period once an alarm has gone off To dismiss the alarm using the...

Страница 37: ...until the week view appears 2 Tap the left and right navigation controls to move forward or backward a week at a time or tap on a specific day to display the details of an event NOTE The week view als...

Страница 38: ...agenda view to display the day view Check off completed to do list items in the agenda view or click a description of an item to go directly into the to do list application Tap on the pick list and s...

Страница 39: ...es in which you have records To create a new address book entry 1 Press the address book icon 2 Tap new 3 Enter the last name of the person you want to add 4 Tap the first name field to move to it You...

Страница 40: ...edit 3 Tap the pick list next to the label you want to change 4 Select a new label To edit address book entries 1 Tap the entry that you want to change in the Address list 2 Tap edit 3 Tap details 4 S...

Страница 41: ...the remember last category check box to select it To display the all category on returning to the application tap the remember last category check box to clear it 4 Tap OK Use the to do list The to d...

Страница 42: ...eleted They are still in the memory of your device type lower case You must purge completed items to remove them from memory To change priorities and due dates 1 Tap the item that you want to change 2...

Страница 43: ...buttons The calculator includes several buttons to help you perform calculations Clears the last number you entered Clears the entire calculation and enables you to begin a fresh calculation The Plus...

Страница 44: ...pad icon 2 Tap new TIP You can also create a new memo by beginning to write in the text input area in the memo list screen The first letter is automatically capitalized and begins your new memo 3 Ente...

Страница 45: ...of page to move to the top first line of the memo Tap go to bottom of page to move to the bottom last line of the memo To change the order in which memos appear in the memo list 1 In the memo list tap...

Страница 46: ...tapping on the blinking indicator in the upper left corner of the dialog Go to Switches to the application that created the alarm and shows the record that caused the alarm although you may have to na...

Страница 47: ...cause of more than one insistent alarm tapping done closes the reminders list dialog If the reminders list appeared after you tapped the snooze button tap the blinking alarm indicator then tap the don...

Страница 48: ...an application 1 Press the applications launcher icon on the front of your Janam XP30 2 Tap the all pick list in the upper right corner of the screen 3 Tap the Janam XP30 on the menu The applications...

Страница 49: ...icon on your handheld computer 2 Tap the all pick list in the upper right corner of the screen 3 Tap the Janam XP30 on the menu The Janam XP30 applications are displayed on the applications screen 4 T...

Страница 50: ...mation is displayed 2 Tap on the card info tab in the upper left corner of the screen to rename the Janam XP30 3 Select rename card and enter the new name in the rename card dialog 4 Tap rename 5 Tap...

Страница 51: ...of text to select some or all of the information or drag down to select text across multiple lines To use the edit menu The edit menu is available from any screen where you enter or edit text As a ge...

Страница 52: ...me you perform a HotSync operation 4 Tap OK to delete the record To purge records 1 Open the application 2 Choose from the following options Tap menu record purge A confirmation dialog appears Tap inv...

Страница 53: ...categories 1 In the address book to do list or memo pad application choose from the following options Tap the pick list in the upper right corner of the screen and tap edit categories In address book...

Страница 54: ...e look up option to enter the first letters of a name to scroll immediately to that name To find address book records Use the scroll button on the front panel of your device or type the first few lett...

Страница 55: ...t by pick list and select an option 4 Tap OK To sort records in the address book and memo pad 1 Open the application to display the list screen 2 Do one of the following 3 In the preferences dialog ta...

Страница 56: ...have a password assigned 4 Enter your password and then tap show To attach notes You can attach notes to records in all the basic applications except the Memo Pad A note can be up to several thousand...

Страница 57: ...nput area drag a diagonal line from the lower left to upper right to display the command toolbar In the text area write an F the ShortCut for the font command 3 Tap the font style you want then tap OK...

Страница 58: ...the address book button on the front of your device 2 Create a new entry or select an entry in the address list which contains the information you want on your business card 3 Tap record in address v...

Страница 59: ...sfer is complete Receive beamed information To receive beamed information 1 Turn on your handheld computer 2 Point the IR port directly at the IR port of the transmitting handheld computer to open the...

Страница 60: ...smoothly with the cradle when it is inserted properly 2 Connect the cradle to your computer using the appropriate cable 3 On the Janam XP tap applications HotSync icon 4 Tap local cradle cable Windows...

Страница 61: ...etup general 3 Select one of the following options Always available default setting adds HotSync Manager to the Startup folder and constantly monitors the communication port for synchronization reques...

Страница 62: ...te your settings IR HotSync operations Your organizer is equipped with an infrared IR port that supports the IrCOMM implementation of the standards for infrared communication established by the Infrar...

Страница 63: ...the HotSync icon and select IR to a PC handheld 4 Position the IR port of your organizer within a couple of inches of the infrared port of your computer 5 Tap the HotSync icon to start the IR HotSync...

Страница 64: ...nc operation records network information about your computer on your handheld computer With this information your handheld computer can locate your computer when you perform a HotSync operation over t...

Страница 65: ...e security personal 14 Choose WPA PSK or WEP 15 Enter key or pass phrase depending on the security methodology you use 16 Tap OK Dialog box pops up Would you like to connect to NETWORK ESSID NAME now...

Страница 66: ...covery options To change your discovery options 1 Go to the Bluetooth preferences panel by following the steps above 2 Tap on the menu icon in the input area of your screen 3 Click on discovery option...

Страница 67: ...an example of a discovery process where the inquiry phase is in progress no getting name phase yet The discovery setting display address for unnamed is checked so the Bluetooth address is displayed f...

Страница 68: ...e wakeup schedule text box will show 8 00 am to 6 00 pm as the default start and end time 3 Click on the time box to change to a different start and end time The wakeup schedule will appear Select the...

Страница 69: ...d click OK The device named Bob Smith is now paired and added as a trusted device The trusted devices screen has the following buttons Details Tap this button to see the trusted device name remote dev...

Страница 70: ...equipment XP Series batch terminal Regulatory and safety approvals Parameter Specification U S A FCC Part 15 Subpart B Canada ICES 003 Issue 4 European Community Australia EN55022 1998 A1 2000 A2 200...

Страница 71: ...e user should consult the dealer or an experienced radio television technician for additional suggestions The user may find the following booklet helpful Something about Interference This is available...

Страница 72: ...dical devices that meet the IEC specification Microwaves The radio in the XP Series terminal operates on the same frequency band as a microwave oven Therefore if you use a microwave within range of th...

Страница 73: ...gh an authorized dealer Visit Janam s website www janam com for information The socket outlet shall be installed near the equipment and shall be easily accessible GENERAL INFORMATION 1 Before using th...

Отзывы: