


Hatchery Disinfectant Manual
13
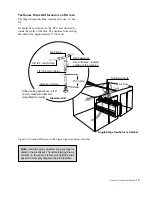
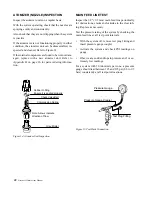
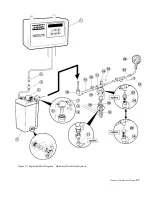
To Dilution Tank
Air Flow
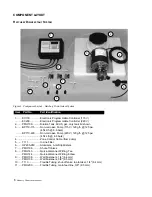
Multi-Stage Incubator
Wall Fasteners
Tee Fitting
3/8" (9.5 mm) Tubing
1/4" (6.4 mm) Tubing
Shut-off Valve - located
outside of the machine
8" (200 mm)
Atomizer Unit
Drilled ceiling panel hole - 5/16"
(8 mm) maximum diameter.
(magnified for clarity)
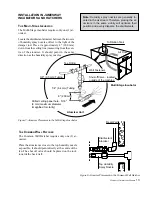
INSTALLATION IN JAMESWAY
INCUBATORS AND HATCHERS
T
HE
M
ULTI
-S
TAGE
I
NCUBATOR
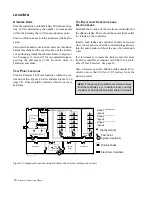
The Multi-Stage incubator requires only one (1) at-
omizer.
Locate the disinfectant atomizer between the two sets
of humidity spray nozzles, offset to the right of the
damper rod. Place it approximately 8" (200 mm)
down from the ceiling line (measuring from the cen-
tre of the atomizer. It should point in the same
direction as the humidity spray nozzles.
Figure 7: Atomizer Placement in the Multi-Stage Incubator
T
HE
C
OMMON
W
ALL
H
ATCHER
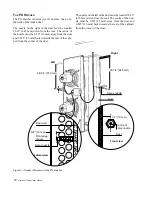
The Common Wall Hatcher requires only one (1) at-
omizer.
Place the atomizer as close to the top humidity nozzle
as possible. It should point directly at the centre of the
fan. The shut off valve should be placed on the roof,
towards the back wall.
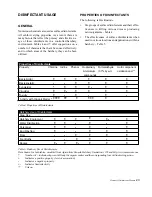
Figure 8: Atomizer Placement in the Common Wall Hatcher
Note: Humidity spray nozzles are generally lo-
cated in the air stream. Therefore, placing the at-
omizers in the same vicinity will optimize their
position and evenly disperse the disinfectants.
Rear Wall
Disinfectant
Atomizer
Top Humidity
Spray Nozzle


