SETTINGS AND OPERATION:
Perform the necessary settings according to the model installed.”
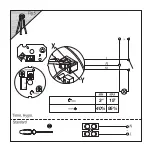
TIMER (see fig. 6)
To set the timer, turn the TIMER” pin clockwise to increase the time (3’- 15’).
The extractor fan will start, activated by the switch. When the switch is deac-
tivated, the fan continues working for the set time and then turns off.”
TIMER-HYGRO (see fig. 7):
To regulate the amount of time on the timer, rotate the ”TIMER”” control knob
clockwise to increase the amount of time (3’ - 15’).
To regulate the level of relative humidity, rotate the ”HYGRO”” control knob
clockwise until reaching the desired level (40% - 95%).
When the level of relative humidity detected exceeds the adjusted or esta-
blished level of humidity, the Hygro function is activated and the fan operates
at top speed.
When the level of relative humidity drops below to the adjusted level, the
appliance continues operating at top speed for the amount of time set on the
timer function before stopping.
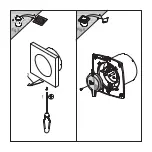
To finish the installation, verify that all the connections have been done co-
rrectly and make sure that the cables are placed correctly.
Make sure that the blades turn freely.
Place the connection cover in the correct position again and ensure that it
cannot be removed without using a tool (see fig. 4).
CLEANING AND MAINTENANCE:
• Before cleaning make sure that the appliance is not connected to the elec-
tric network and prevent it from being reconnected by accident.”
• Clean with a damp cloth regularly.
• The motor, propeller and all components should be inspected periodica-
lly to ensure that they are not dirty and have not suffered any damage. The
frequency of inspections depends on the appliance’s operating conditions.
• Remove the dirt on the propeller and the inner parts of the casing to avoid
imbalances during operation, a decrease in aerodynamic performance and
motor damage.
• The appliance does not require additional maintenance.
Always demand original spare parts for repairs.
THE MANUFACTURER reserves the right to make any technological improve-
ment or modification without prior notification.
Содержание EJ 100 S
Страница 1: ...ES FR EN PT...
Страница 2: ......
Страница 3: ...EJ 100 S EJ 200 S EJ 300 S...
Страница 4: ......
Страница 5: ...40 95 15 3...
Страница 6: ......
Страница 7: ...PULL CORD...


