4
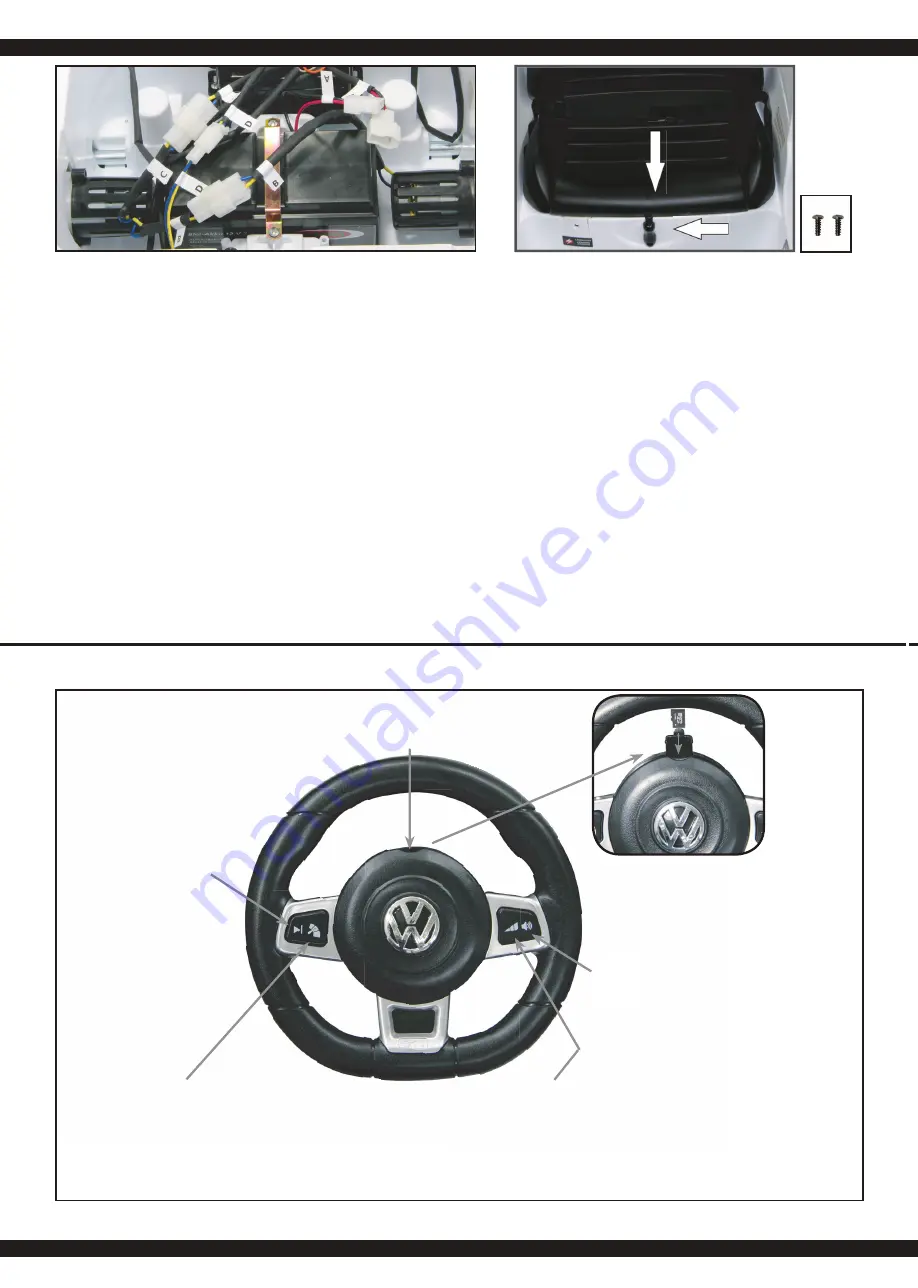
SD Speicherkarte
SD Memory Card
Carte mémoire SD
Scheda di memoria SD
Tarjeta de memoria SD
Hupe
Horn
Klaxon
Clacson
Claxon
Lautstärkeregelung
Volume control
Réglage du volume
regolatore di volume
Control de volumen
Geschwindigkeitsanpassung mit Verzögerung (ca. 3 Sek.)
Speed adjustment with delay (Approx. 3 sec.)
Adaptation de la vitesse avec un retard (Environ 3Sec.)
Regolazione della velocità con ritardo (ca. 3 secondi)
Ajueste de la velocidad con retraso (aprox. 3 segundo)
Musik/Nächstes Lied
Modus wechseln (wie Musik oder SD-Karte)
Music/Next song
(such as music or SD card)
Musique / Morceau suivant
Changer de mode (tel que musique ou carte
SD)
Musica/Canzone successiva
Cambiare modalità (come la musica o la
scheda SD)
Música/Canción sigiente
Cambiar el modo (como la música o la tarjeta
SD)
Einsetzen der SD Speicherkarte
Öffnen Sie die Abdeckung des SD-Kartenslot
am Lenkrad, legen Sie die SD-Karte, wie
im Bild gezeigt ein. Schließen Sie dann die
Abdeckung.
Inserting the SD memory card
Open the SD card slot cover on the steering
wheel, insert the SD card as shown in the
image. Then, close the cover.
Placer la carte mémoire SD
Ouvrir le cache de port de la carte SD sur le
volant et placez-y la carte mémoire comme
indiqué sur l’image.
Inserimento della scheda di memoria SD
Aprire il coperchio dello slot della scheda
SD sul volante, inserire la scheda SD, come
mostrato nel immagine. Chiudere poi il
coperchio.
Inserción de la tarjeta de memoria SD
Abrir la tapa de la ranura de la tarjeta SD
en el volante, inserte la tarjeta SD, como se
muestra en la imagen. A continuación, cierre
la tapa.
DE - Montage
Verbinden Sie nun die Kabel unter dem Sitz. Die Kabelfarbe
zwischen Batterie und Steuerkasten ist rot und schwarz (A).
Die Farbe zwischen dem rechten Motor (B,C) ist blau und gelb,
und dem linken Motor (B) auch blau und gelb. Verbinden Sie
die Steuerleitung (D) mit dem Steuerkasten. Die Stecker sind
dementsprechend markiert und müssen sich ohne großen Kraft-
aufwand zusammen stecken lassen. Bringen Sie den Sitz in die
Einbauposition, haken Sie die hinteren Zapfen in die Nuten ein.
Drücken Sie den Sitz senkrecht auf der Sitzfl äche nach unten (1)
bis er hinten einrastet und sichern Sie den Sitz, indem Sie den
Riegel in eine senkrechte Position bringen (2). Zum Öffnen muss
der Riegel in die waagerechte Position gedreht werden.
Achtung:
Der Sitz ist mit einem Gurt ausgestattet, dieser ist nur zu De-
korationszwecken gedacht und darf nicht zur Absicherung eines
Kindes benutzt werden.
GB - Installation
Now connect the cables under the seat. The cable colour bet-
ween the battery and the control box is red and black (A).
The colour between the right motor (B, C) is blue and yellow,
and the left motor (B) also blue and yellow. Connect the control
cable (D) to the control box. The plugs are accordingly marked
and must be plugged together without great effort. Place the seat
in the mounting position, hook the rear pegs into the grooves.
Press the seat vertically down on the seat (1) until it locks into the
rear and secure the seat by placing the latch in a vertical position
(2). To open, the bolt must be turned to the horizontal position.
Attention:
The seat is equipped with a belt, which is intended for decoration
purposes only and must not be used to secure a child.
FR - Montage
Montage
Connecter les câbles sous le siège. Les câbles entre la batterie
et le boitier de commande ont la couleur rouge et noire (A).
Les câbles du moteur droit (B, C) sont bleu et jaune et ceux du
moteur gauche (B) sont aussi bleu et jaune.
Connecter la ligne de commande (D) au boitier de comman-
de. Les fi ches sont marquées en conséquence et doivent
s’enclencher sans beaucoup d’effort. Placer le siège dans sa
position de montage et accrocher le tenon à l’arrière dans la
rainure. Appuyer alors le siège verticalement vers le bas (1)
jusqu’à ce qu’il ne s’enclenche et sécuriser le siège en mettant
le verrou dans une position verticale (2). Pour déverrouiller
tourner le verrou dans une position horizontale.
Attention:
Le siège est muni d’une ceinture. Ce dernier n’est qu’à des fi ns
décoratives et ne sert en aucun cas de ceinture de sécurité
pour un enfant.
IT - Montaggio
Collegare la batteria (1) con il modello (2), prestare attenzione
alla corretta polarità (rosso -> rosso e nero -> nero). Le spine
devono essere facilmente collegati tra loro senza molto sforzo.
Portare il sedile in posizione di montaggio, agganciare il perno
posteriore nelle scanalature. Premere il sedile verso il basso
fi no a quando si incastra dietro e bloccare la chiusura spingendo
verso sinistra. Per aprire deve spingere la chiusra verso destra
e spingere fuori.
Attenzione:
Il sedile é dotato di una cintura, questo é destinato soltanto a
scopo decorativo e non può essere utilizzata per salvaguardare
un bambino.
ES - Montaje
Conectar los cables de debajo del asiente. El color del cable
entre la batería y la caja de control es rojo y negro (A).
Los colores entre el motor derecho (B,C) es azul y amarillo, y el
motor izquierdo (B) tambien azul y amarillo. Conectar el cable de
control (D) con la caja de control. Los enchufes están marcados
y se deben conectar fácilmente sin gran esfuerzo. Posicionar
el asiento en la posicion de montaje, conectar la clavija trasera
en las ranuras. Presione el asiento vertical en la superfi cie del
asiento hacia abajo (1) hasta que se encaja y fi jar el asiento,
posiconando el perno en una posición vertical (2). Para abrir el
perno se debe girar en posición vertical.
Atención:
El asiento está equipado con un cinturón, esto sólo es para fi nes
decorativos y no se puede utilizar para proteger a un niño.
Lenkrad | Steering wheel | Volant | Volante | Volante
1
2


