4
DE
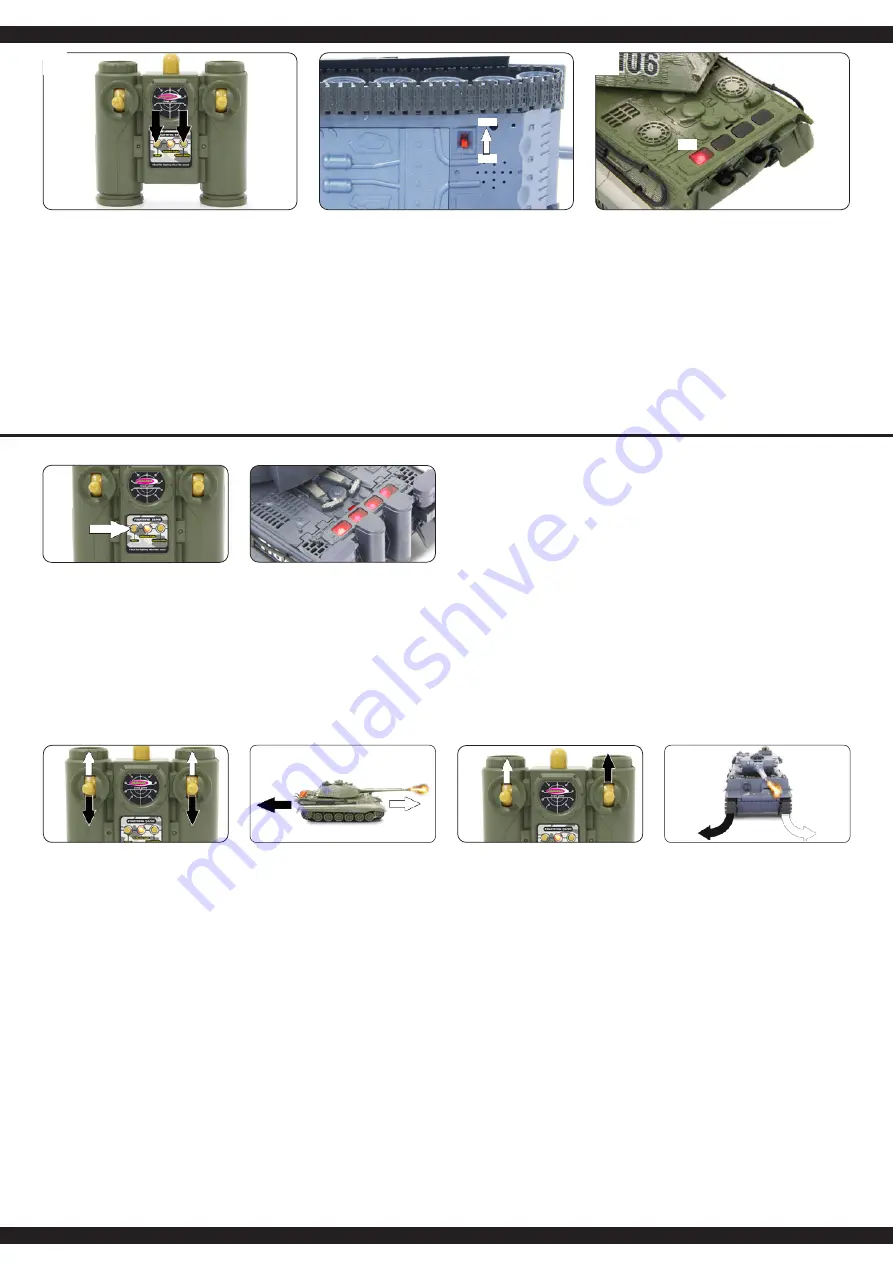
- Binden der Fernsteuerung mit dem Panzer
1. Drücken Sie gleichzeitig den “Start“ und den „Abschuss-
knopf“ Knopf am Sender. Die LED am Sender beginnt zu
blinken.
2. Schalten Sie nun das Modell ein. Die LED am Sender
erlischt, der Panzer gibt ein Signal von sich und
die Power LED (D1) hinten am Panzer beginnt zu leuchten.
3. Wiederholen Sie Schritt 1 und Schritt 2 mit dem zweiten
Panzer.
GB
- Binding the remote control to the tank
1. Press the „Start“ and „Launch“ buttons on the transmitter si
multaneously. The LED on the transmitter will start flashing.
2. Now switch on the model. The LED on the transmitter goes
out, the tank emits a signal and the Power LED (D1) on the
rear of the tank starts to light up.
3. Repeat step 1 and step 2 with the second tank.
FR
- Liaison de la télécommande avec le char de combat
1. Appuyer simultanément sur les touches „Start“ et „Feu“ de
l‘émetteur. La LED de l‘émetteur commence à clignoter.
2. Allumez maintenant le modèle. La LED de l‘émetteur s‘éteint,
le char de combat émet un signal et la LED d‘alimentation
(D1) à l‘arrière du char de combat commence à s‘allumer.
3. Répétez les étapes 1 et 2 avec le deuxième char de combat.
IT
- Binding della trasmittente con il carro armato
1. Premere contemporaneamente i pulsanti „Start“ e „Fuoco“
sulla trasmittente. Il LED sulla trasmittente inizia a
lampeggiare.
2. Ora accendere il modello. Il LED della trasmittente si spegne,
il carro armato emette un segnale e si accende il LED di
alimentazione (D1) sul retro del carro armato.
3. Ripetere il passo 1 e il passo 2 con il secondo carro armato.
ES
- Binding de la emisora con el tanque
1. Pulse simultáneamente las botón „Start“ y „disparo“ en la
emisora. El LED en la emisora comenzará a parpadear.
2. Ahora encienda el modelo. El LED en la emisora se apaga, el
tanque emite una señal y el LED de alimentación (D1) de la
parte posterior del tanque comienza a encenderse.
3. Repita los pasos 1 y 2 con el segundo tanque.
CZ
- Spárování tanku a ovladače
1. Na ovladači stiskněte najednou tlačítka „Start“ a „Launch“.
Kontrolka LED na ovladači začne blikat.
2. Nyní zapněte model. LED kontrolka na ovladači zhasne,
tank vydá signál a kontrolka na zadní části tanku (D1)
se rozsvítí.
3. Opakujte kroky 1 a dva 2 s druhým tankem.
1
1
2
3
ON
OFF
DE
- Bedienung |
GB
- Operation |
FR
- Fonctionnement |
IT
- Funzionamento |
ES
- Funcionamiento |
CZ
- Obsluha
2
DE
2. Vorwärts/Rückwärts
Drücken / ziehen Sie den linken und rechten Knüppel
gleichzeitig nach vorn bzw. hinten, das Modell bewegt sich
vorwärts bzw. rückwärts.
3. Rechts/links
Drücken Sie den linken oder rechten Knüppel nach vorne.
Der Panzer bewegt sich nach links oder rechts.
GB
2. Forward / Reverse
Push forward and backward the left and the right side
lever in the same time an you can push the tank forward/
backward.
3. Right/left
Push / pull only the left / right stick. The tank turns left
or right.
FR
2. Mouvement avant/arrière
Poussez/tirez les manches de droite ou de gauche en même
temps pour avancer / reculer. Le char va avancer/reculer.
3. Droite/gauche
Poussez en avant le manche de droite ou de gauche. Le
char va tourner à droite ou à gauche.
IT
2. Avanti/Indietro
Premere entrambi le levi in avanti per fare andare il modello
avanti e viceversa. Il modello va in avanti oppure dietro.
3. Destra/sinistra
Premere uno delle levi in avanti per fare girare il modello. Il
modello si gira a destra o sinistra.
ES
2. Adelante/atrás
Abraza / arrasta al garrote izquierda y derecha al mismo
tiempo al frente / cara atrás. El carro de asalto se menea al
frente / cara atrás.
3. Derecho/izqierdo
Abraza al garrote izquierdo / derecho al frente. El carro de
asalto se manea al la izqierda / derecha.
CZ
2. Dopředu / Dozadu
Stiskněte páčku plynu dopředu nebo dozadu a model pojede
dopředu nebo dozadu. Uslyšíte také zvuko jedoucího tanku.
3. Doprava/Doleva
Posuňte páčku doleva nebo doprava a model zatočí
požadovaným směrem
3
D1
DE
1. Starten
Drücken Sie den “Start/Stopp“ Knopf am Sender, der
Panzer wird gestartet. Es ertönt ein realistisches Panzerge-
räusch und alle Schadensanzeigen leuchten.
Drücken Sie erneut den “Start/Stop“ Knopf damit das Modell
abgeschalten wird.
GB
1. Starting
Press the „Start/Stop“ button on the transmitter to start the
tank. A realistic tank noise sounds and all damage indicators
light up. Press the „Start/Stop“ button again to switch off the
model.
FR
1. Démarrage
Appuyez sur la touche „Start/Stop“ de l‘émetteur pour
démarrer le char de combat. Un bruit de char de combat
réaliste retentit et tous les indicateurs de dommages
s‘allument.
Appuyez à nouveau sur la touche „Start/Stop“ pour éteindre
le modèle.
IT
1. Avvio
Premere il pulsante „Start/Stop“ sulla trasmittente per
avviare il carro armato. Si sente un rumore realistico del
carro armato e si accendono tutti gli indicatori di danno.
Premere nuovamente il pulsante „Start/Stop“ per spegnere il
modello.
ES
1. Arranque
Pulse la botón „Start/Stop“ en la emisora para activar el
tanque. Un ruido de tanque realista suena y todos los
indicadores de daño se iluminan.
Pulse de nuevo el botón „Start/Stop“ para apagar el modelo.
CZ
1. Nastartování
Pokud chcete zapnout tank stiskněte na ovladači tlačítko
„Start/Stop“. Ozve se realistický zvuk tanku a kontrolky
poškození se rozsvítí.
Pokud chcete model vypnout stiskněte znovu tlačítko
„Start/Stop“.


