3
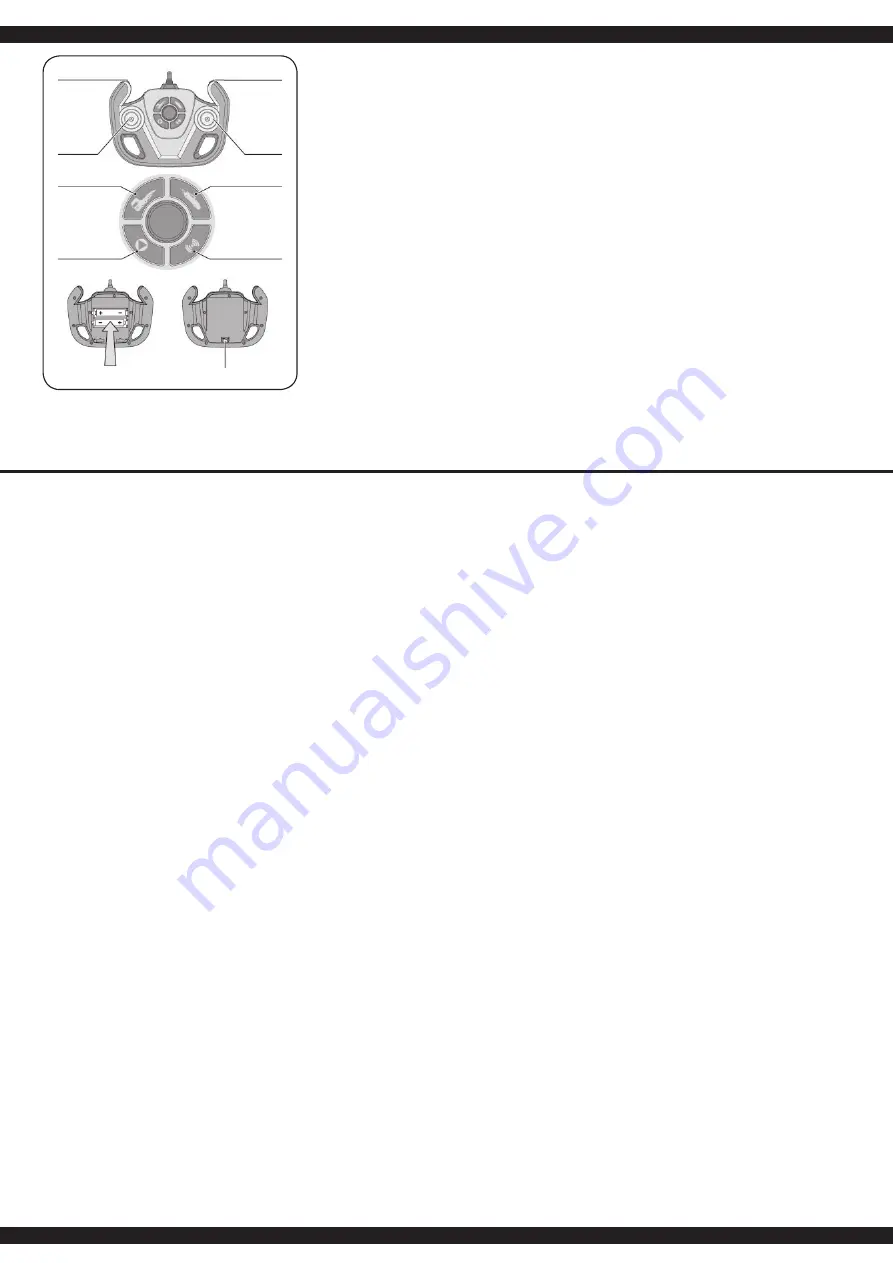
DE - Funktionen der Fernsteuerung
1. Truck: Ladeklappe öffnen
Auto: Schnelle Geschwindigkeit
2. Truck: Ladeklappe schließen
Auto: Langsame Geschwindig-
keit
3. Linker Steuerknüppel
(vorwärts/rückwärts)
4. Rechter Steuerknüppel
(links/rechts)
5. Truck Modus
6. Auto Modus
7. Demo-Funktion (nur Truck)
8. Dual Funktion
9. Batteriefach
10. Ein-/Ausschalter
Batterien einlegen
Auf Polarität achten.
GB - Functions of the Transmitter
1. Truck: Lift landing gear
Car:
Fast speed
2. Truck: Landing gear down
Car:
Slow speed
3. Right control lever (forward/reverse)
4. Left control lever (left/right)
5. Mode truck
6. Mode car
7. Function demo (only Truck)
8. Function dual
9. Battery cover
10. ON/OFF Switch
Fitting the batteries
Observe the polarity.
FR - Fonctions de la radiocommande
1. Camion: Trappe de chargement
l‘ouverture
Voiture: Grande vitesse
2. Camion: Trappe de chargement
la fermeture
Voiture: Vitesse plus petite
3. Manette de commande gauche
(avant/arriére)
4. Manette de commande droite
(droite/gauche)
5. Mode camion
6. Mode voiture
7. Fonction demo (seul. camion)
8. Dual fonction
9. Compartiment pour piles
10. Interrupteurs
Mise en place des piles
Respectant la polarité.
IT - Funzioni del telecomando
1. Camion: Portellone posteriore
apri
Macchina: Velocità rapide
2. Camion: Portellone posteriore
chiudi
Macchina: Bassa velocità
3. Joystick sinistra
(avanti/indietro)
4. Joystick destra (sinistra/destra)
5. Modalità camion
6. Modalità macchina
7. Funzione demo (solo camion)
8. Funzione dual
9. Compartimento batteria
10. Pulsante Accendi/Spegni
Montaggio delle pile
Rispettando la polarità.
ES - Funciónes de la emisora
1. Camión:
Portón trasero abrir
Coche: Acelerar rápidamente
2. Camión:
Portón trasero cerar
Coche: Velocidad lenta
3. Palanca de mando izquierda
(adelante/atás)
4. Planca de mando derecha
(izquierda/derecha)
5. Modo camión
6. Modo coche
7. Función demo (solamente camión)
8. Función dual
9. Compartimiento de la batería
10. Interruptor ON/OFF
Instalación de las pilas
Preste atención a la polaridad
DE - Binden
Vor Einsatz der Modelle müssen die Modelle und der Sender
gebunden werden. Gehen Sie wie folgt vor:
● Schalten Sie zuerst den Truck und das Auto ein. Die
Scheinwerfer und Rücklichter beginnen zu blinken.
●
Schalten Sie nun den Sender ein, die Kontroll-LEDs
beginnen zu blinken, der Bindevorgang ist gestartet. Wenn
die Scheinwerfer, Rücklichter und die Kontroll-LEDs aus
gehen, ist der Bindevorgang abgeschlossen. Das Modell
ist einsatzbereit.
● Wenn die Scheinwerfer und Rücklichter des Trucks weiter
blinken, müssen Sie den Bindevorgang wiederholen.
●
Sollte beim Truck die Scheinwerfer und Rücklichter
beginnen zu blinken, das Modell langsam werden oder
die Kontroll-LEDs am Sender anfangen zu blinken, zeigt
das an, dass die jeweiligen Batterien zu schwach sind.
Wechseln Sie die jeweiligen Batterien aus.
GB - Binding
Before the models are used, the models and transmitter must
be bound. Proceed as follows:
● Turn on the truck and the car first. The headlights and rear
lights start to flash.
● Now switch on the transmitter, the control LEDs start to
flash, the binding process is started. When the headlights,
backlight and the control LEDs switch off the binding
process is completed. The model is ready for use.
● If the headlights and rear lights of the truck continue to
flash, repeat the binding process.
● If the Truck headlights and the rear lights start flashing,
he model becomes slow or the control LEDs on the
transmitter start flashing, which means that the batteries
are too weak. Replace the batteries.
FR - Synchroniser
Avant utilisation le modèle et l‘émetteur doivent être
synchronisés. Suivez pour ce faire les instructions suivantes:
•
Allumer le Truck et la voiture en premier. Les phares et les
feux arrière commencent par clignoter
•
Allumer alors l’émetteur. Les voyants commencent par
clignoter indiquant le début de la synchronisation. La
synchronisation est achevée si les phares, les feux arrière
et les voyants de l’émetteur s’éteignent. Le modèle est
alors prêt pour l’usage
•
Veuillez recommencer le processus de synchronisation si
les phares et les feux arrière continuent par clignoter
•
Si pendant l’usage les phares et les feux arrière du truck
ainsi que les voyants de l’émetteur commencent par
clignoter, ceci indique que les piles concernées sont trop
faibles. Veuillez les remplacer
IT - Binding
Prima di utilizzare i modelli, si deve fare il binding dei modelli
con la radio. Procedere come segue:
● Accendere prima il Truck e poi la macchina. I fari e fanali
posteriori iniziano a lampeggiare.
● Ora accendere la radio, i LEDs di controllo iniziano a
lampeggiare, il processo di binding e iniziato.
Quando i fari, fanali e i LEDs di controllo si spengono, il
processo di binding è stato completato. Il modello è pronto
per l’uso.
● Se i fari e fanali posteriore del Truck continuano a
lampeggiare, deve ripetere il processo di binding.
● Se iniziano a lampeggiare i fari e fanali posteriori, il
modello diventa lento o i LEDs di controllo sulla radio
lampeggiano, ciò indica che le batterie sono troppo deboli.
Sostituire le rispettive batterie.
ES - Binding
Antes de utilizar los modelos, se tiene que hacer el binding de
los modelos con la emisora. Proceder de la siguiente manera:
● Enciende prima el Truck y el coche. Los faros y luces
traseras comienzan a parpadear.
● Ahora encender la emisora, los LEDs de control
comienzan a parpadear, el proceso de binding se inicia.
Si los faros, luces traseras y los LEDs de control se
apagan, el proceso de binding está completo. El modelo
está listo para su uso.
● Si los faros y luces traseras del Truck siguen
parpadeando, tienen que repitir el proceso de binding.
● Si los faros y luces traseras del Truck comienzan a
parpadear, el modelo va lentamente o los LEDs de control
en la emisora comienzan a parpadear, esto indica que
las baterías respectivas son demasiado débiles. Cambiar
las baterías respectivas.
1
3
5
7
9
10
2
4
6
8


