8
DE
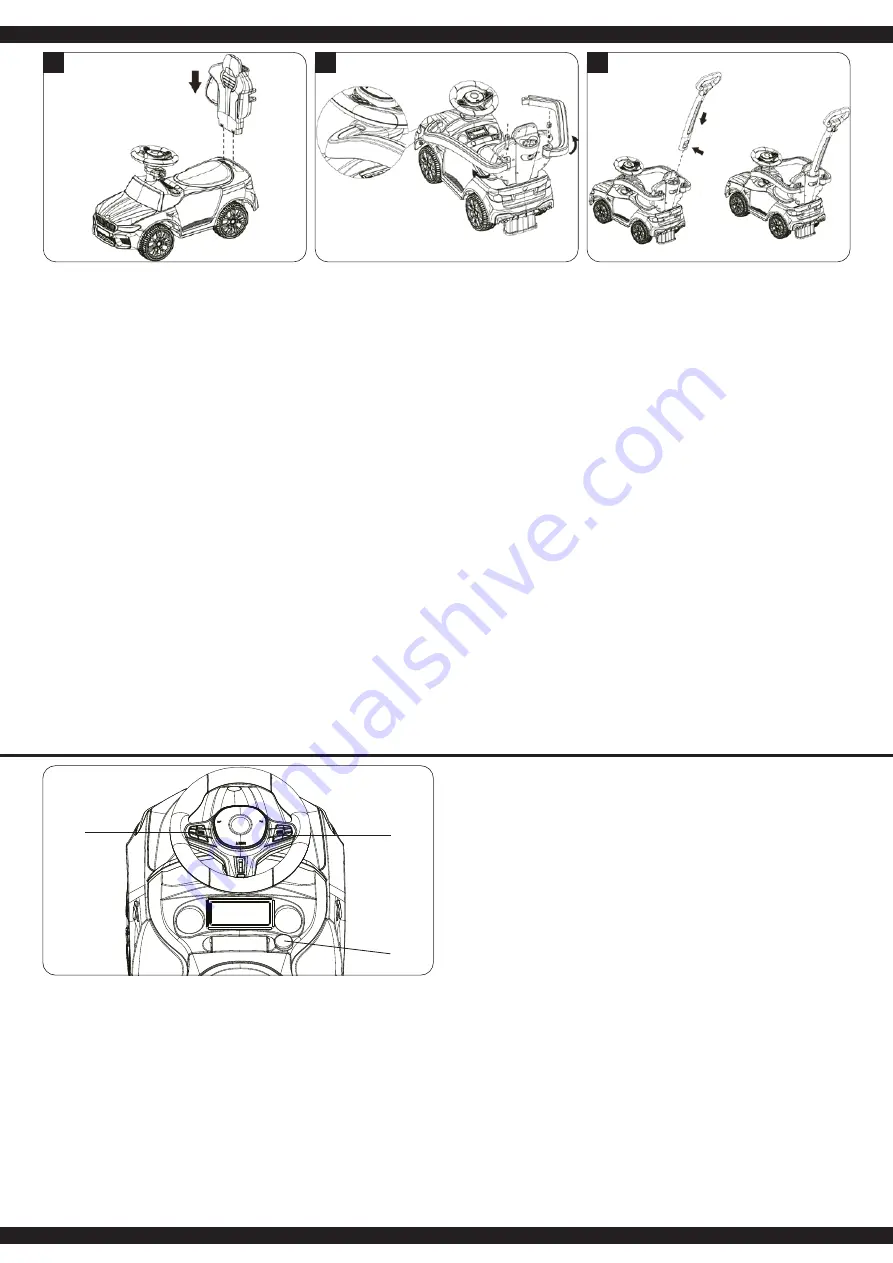
5. Montage Rückenlehne
Stecken Sie die Rückenlehne wie gezeigt an der oberen,
hinteren Position des Rutschers bis sie einrastet.
6. Montage Sicherheitsbügel
● Schieben Sie die Sicherheitsbügel in die Halterungen an
der Rückenlehne, achten Sie darauf dass die Löcher
genau übereinander liege und fixieren Sie alles mit je
einem Sicherungsbolzen.
● Stecken Sie die Sicherheitsbügel vorn am Modell in das
Verschlusselement. Achten Sie darauf, dass sie richtig
einrasten.
7. Montage Schubstange
Stecken Sie die Schiebestange in die vorgesehene Position
der Rückenstütze, bis sie einrastet.
GB
5.
Backrest assembly
Insert the backrest into the designated location at the rear
upper end of the car, until they are locked in place.
6. Handrail assembly
● Slide the safety brackets into the brackets on the
backrest, make sure that the holes are exactly one above
the other and secure each with a safety bolt.
● Insert the safety bar into the locking element at the front
of the model. Make sure that they are the door will
engage properly.
7. Push bar assembly
Insert the push bar to the card slot of the backrest.
FR
5. Monter le dossier
Engagez support arrière dans les pièces de réceptions
jusqu’à entendre le clic de fixation.
6. Montage de l’arceau de sécurité
● Glissez les supports de sécurité dans les supports du
dossier, s‘assurer que les trous soient exactement
superposés et fixez le tout avec une vis de sécurité
chacun.
● Insérez la barre de sécurité dans l‘élément de
verrouillage à l‘avant du modèle. Assurez-vous qu‘ils
s‘enclenchent correctement.
7. Montage du dossie
Enfoncer la tige de poussée dans la position prévue dans le
dossier jusqu’à enclenchement
IT
5. Montaggio dello schienale
Montare lo schienale come indicato alla parte superiore,
posteriore del scooter, fino a quando non scatta in posizione.
6. Montaggio della staffa di sicurezza
● Inserire le staffe di sicurezza nelle staffe dello schienale,
verificare che i fori siano esattamente uno sopra l‘altro e
fissare il tutto con un bullone di sicurezza ciascuno.
● Inserire la barra di sicurezza nell‘elemento di chiusura nel
la parte anteriore del modello. Assicurarsi che si
innestino correttamente.
7. Montaggio del schienale
Inserire l´asta di spinta nella posizione prevista del sostegno
schienale, fino allo scatto.
ES
5. Montaje del respaldo
Montare lo schienale come indicato alla parte superiore,
posteriore del scooter, fino a quando non scatta in posizione.
6. Montatje del soporte de seguridad
● Deslice los soportes de seguridad en los soportes del
respaldo, asegúrese de que los huecos estén
exactamente uno encima del otro y fije todo con un perno
de seguridad cada uno.
● Inserte la barra de seguridad en el elemento de cierre
situado en la parte delantera del modelo. Asegúrese de
que encajen correctamente.
7. Montaje del respaldo
Inserir la barra de empuje en la posición prevista del soporte
del respaldo, hasta que se encaja.
CZ
5. Montáž opěradla
Opěradlo přidělejte na určené místo v zadní části auta,
dokud nezapadne na místo.
6. Montáž bezpečnostních držadel
● Zasuňte bezpečnostní držáky do držáků na opěradlo,
ujistěte se, že otvory jsou přesně jeden výše druhý a
každý zajistěte bezpečnostním šroubem.
● Vložte bezpečnostní ramena do jisticích elementů na
přední části auta u tyče řízení. Zkontrolujte, že jsou
správně zapadlé do polohy.
7. Sestava přítlačné lišty
Zasuňte posunovací zařízení do požadované polohy v
opěradle, dokud nezapadne do drážek.
PL
5. Montaż oparcia
Włóż oparcie w górną, tylną pozycję rowerzysty, jak
pokazano, aż zatrzaśnie się na swoim miejscu.
6. Montaż drążka bezpieczeństwa
● Wsuń wsporniki zabezpieczające w uchwyty na oparciu,
upewnij się, że otwory są dokładnie jeden na drugim i
zamocuj wszystko za pomocą śruby zabezpieczającej.
● Włóż wsporniki zabezpieczające do elementu
blokującego z przodu modelu. Upewnij się, że zatrzasnęły
się prawidłowo.
7. Montaż popychacza
Wsunąć drażek w przewidzianą pozycję oparcia, aż
zatrzaśnie się na swoim miejscu.
NL
5. Rugleuning montage
Steek de rugleuning in de bovenste, achterste positie van
de berijder zoals afgebeeld totdat deze op zijn plaats klikt.
6. Installatie van veiligheidsbeugel
● Duw de borgbeugels in de houders op de rugleuning,
zorg dat de gaten precies op elkaar liggen en zet alles
vast met een borgbout.
● Steek de veiligheidsbeugels in het vergrendelings-
element aan de voorzijde van het model. Zorg ervoor dat
ze goed op hun plaats klikken.
7. Montage van duwstang
Schuif de duwer in de rugleuning in de gewenste positie tot
deze vastklikt.
SK
5. Zostava operadla
Vložte operadlo do hornej, zadnej polohy jazdca podľa
obrázka, kým nezapadne na miesto.
6. Inštalácia bezpečnostnej lišty
● Zasuňte bezpečnostné držiaky do držiakov na operadle,
uistite sa, že otvory sú presne na sebe a všetko upevnite
pomocou bezpečnostnej skrutky.
● Vložte bezpečnostné držiaky do uzamykacieho prvku v
prednej časti modelu. Uistite sa, že správne zapadli na
miesto.
7. Montáž tlačnej tyče
Nasuňte posunovacie zariadenie na operadlo nastavené v
požadovanej polohe, až dokým sa nezaistí.
5
6
7
1
2
3
DE
Funktionen Lenkrad
1 = Hupe
2 = Sound
3 = Ein/Ausschalter
GB
Functions of the steering wheel
1 = Horn
2 = Sound
3 = On/off switch
FR
Fonctions du volant
1 = Klaxon
2 = Sonore
3 = Interrupteur marche/arrêt
IT
Funzioni del volante
1 = Clacson
2 =
Suono
3 = Interruttore on/off
ES
Funciones del volante
1 = Claxon
2 = Sonido
3 = Interruptor on/off
CZ
Funkce volantu
1 = Houkačka
2 = Zvuk
3 = Vypínač
PL
Funkcje kierownicy
1 = Klakson
2 = Dźwięk
3 = Włącznik/wyłącznik
NL
Functies van het stuur
1 = Hoorn
2 = Geluid
3 = Aan/uit schakelaar
SK
Funkcie volantu
1 = Roh
2 = Zvuk
3 = Vypínač zapnutia/vypnutia


