


6
4
4.1
DE
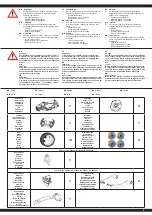
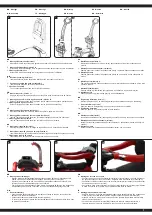
4. Montage Sitz
• Bringen Sie den Sitz in die Senkrechte Einbauposition
(4)
.
• Drücken Sie den Sitz senkrecht nach unten bis die Zapfen in die seitlichen Nuten einhaken.
• Befestigen den Sitz mit einer Schraube
(4.1)
.
GB
4. Assembly of seat
•
Place the seat in the straight mounting position
(4)
,
• Press the seat straight down for the pins to hook into the side grooves.
• Tighten a screw to secure it with a screwdriver
(4.1)
FR
4. Mise en place du siège
• Mettez le siège dans sa position définitive
(4)
,
• Poussez le siège verticalement vers le bas jusqu’à ce que les tétons s’enclenchent dans les
fentes.
• Fixez le avec une vis
(4.1)
IT
4. Montaggio sella
• Montare la sella nel vano predisposto
(4)
,
• Premere la sella sul vano predisposto, incastrando i perni nella scanalatura laterale.
• Fissare il sedile con le vite
(4.1)
ES
4. Montaje del asiento
• Coloque el asiento en posición de montaje
(4)
• Presione el asiento hacia abajo de forma vertical, hasta que los pivotes se coloquen en las
ranuras laterales.
• fijar el asiento con los tornillos
(4.1)
CZ
4. Montáž sedadla
• Umístěte sedadlo do svislé montážní polohy
(4)
.
• Zatlačte sedadlo svisle dolů, dokud svorky nezapadnou do bočních drážek.
• Upevněte sedadlo pomocí šroubu
(4.1)
.
PL
4. Montaż siedzenia
• Umieść fotelik w pionowej pozycji montażowej
(4)
.
• Wepchnij siedzisko w dół pionowo, aż sworznie zahaczą o rowki po bokach.
• Zabezpieczyć gniazdo za pomocą śruby
(4.1).
NL
4. Zetel installeren
• Plaats de zetel in de verticale montagepositie
(4)
.
• Duw de zetel verticaal zo naar beneden tot de clips in de zijgroeven vastklikken.
• Draai de zetel met een schroef vast
(4.1)
.
SK
4. Montáž sedadla
• Sedadlo nastavte do zvislej polohy určenej na montáž
(4)
.
• Sedadlo stláčajte zvisle nadol, pokým strmene nezapadnú do bočných drážok.
• Sedadlo prikrúťte pomocou skrutky
(4.1)
.
DE
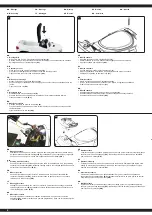
5. Montage Lenkrad
Verbinden Sie das Kabel vom Lenkrad mit dem Kabel am Armaturenbrett. Verbinden Sie nur
ineinander passende Steckverbindungen
(5.1)
.
Installieren Sie das Lenkrad in der vorgesehe-
nen Position und sichern es mit der Sicherungsschraube und der Mutter
(5.2)
.
GB
5. Steering wheel assembly
Connect the cable from the steering wheel to the cable of the dashboard. Only plug matching
connectors into eachother
(5.1)
. Install the steering wheel in the Intended position and secure
it with the locking screwand nut
(5.2)
.
FR
5. Monter le volant
Connecter les câbles du volant à ceux du tableau de bord. Connectez l’ensemble des
connecteurs indiqué tout
(5.1)
.
Installer le volant dans sa position prévue et verrouiller à
l‘aide d‘une vis et de l’écroue
(5.2)
.
IT
5. Montaggio volante
Collegare il cavo del volante con il cavo sul cruscotto. Fare attenzione a collegare solo delle
spine adeguate tra di loro
(5.1)
.
Installare il volante nella posizione prevista e fissarlo con la
vita di bloccaggio e il dado
(5.2)
.
ES
5. Montaje del volante
Conectar el cable del volante con el cableen el salpicadero.
Conecte sólo conectores
adaptado
(5.1)
.
Instalar el volante en la posición programada y fijarlo con el tornillo de fijación
y la tuerca
(5.2)
.
CZ
5. Montáž volantu
Připojte kabel volantu ke kabelu přístrojové desky. Dávejte při tom pozor, abyste připojili pouze
konektory, které do sebe zapadají
(5.1)
. Namontujte volant ve správné poloze a dotáhněte
pomocí šroubu a matice
(5.2)
.
PL
5. Montaż kierownicy
Podłączyć kabel od kierownicy do kabla na desce rozdzielczej. Podłączać tylko złącza, które
pasują do siebie
(5.1)
. Zamontować kierownicę w zamierzonej pozycji i zabezpieczyć ją za
pomocą śruby blokującej i nakrętki
(5.2).
NL
5. Stuurwiel installeren
Sluit de stuurwielkabel aan op de dashboardkabel. Zorg ervoor dat alleen de passende
koppelingen worden aangesloten
(5.1)
. Installeer het stuurwiel In de juiste positie en schroef
het met een schroef en een moer vast
(5.2)
.
SK
5. Montáž volantu
Spojte kábel volantu s káblom palubnej dosky. Pamätajte pri tom, že je potrebné spájať iba
konektory, ktoré do seba zapadajú
(5.1).
Namontujte volant do správnej polohy a dotiahnite ho
pomocou skrutky a matice
(5.2)
.
5.1
5.2
DE
- Montage
GB
- Assembly
FR
- Montage
IT
- Montaggio
ES
- Montaje
CZ
-
Montáž
PL
-
Montaż
NL
- Installeren
SK
-
Montáž