background image

8

GB - Getting Started

Make sure that all parts from the box content are included. Trans-

mitter, Car, Charger, Balancer, battery pack.

The battery pack has to be 

charged before use. Plug 

the  charger  into  a  230V 

outlet. Connect the charger 

to the balancer and the ba-

lancer to the balancer plug 

of the battery The average 

charging time of the empty 

battery is about 5 - 7 hours.

Place  8  pieces  of  AA  batteries  into 

the transmitter. If rechargebale, ple-

ase  also  make  sure  these  are  fully 

charged.

Read  the  chapter  for  usage  of  the 

transmitter and its controls carefully. 

Turn the radio off and make sure all the 

trim buttons on the transmitter are in 

neutral position.

You  have  purchased  a  RTR  model, 

which means it should be ready for 

immediate use after charging all batte-

ries. You need to check the car, electro-

nics and all plastic parts after each use 

to make sure no parts are damaged. Also all the moving parts 

must  be  checked  for  their 

clearance,  bolts  and  screws 

that they are tight.

Now put the battery into the 

battery holder in the vehicle. 

Make  sure  that  the  battery 

holder is secured properly 

with the 2 included clips for 

the battery holder. Now con-

nect the battery to the speed 

control in the model.

Keep the car in the air in case that the motor turns at full power.

Switch the speed control on the On / Off switch. Set the model on 

the ground and test it for proper functioning. Steering right/ left, 

throttle/ brake, forward and backward. If the wheels do not point 

straight forward even though the steering wheel on the trans-

mitter is in neutral, you can adjust it with the trim button on the 

transmitter.

Trim L/R = steering

Trim V/R = forward/backward

Should the wheels rotate forward or backward, even though no 

command was given through the transmitter, then also the thrott-

le needs to be trimmed on the transmitter.

We encourage you now to activate your receiver‘s built-in Failsa-

fe unit. 

On delivery it is turned off. 

Leave  the  throttle  lever  in  neutral  position  (see  chapter  Fail 

Safe). Press the fail-safe button on the receiver until it fl ashes 

and let go to activate. 

Check this principle in an electric vehicle only in the neutral 

position of the throttle, because otherwise the model goes 

into the previously programmed throttle position in a loss of 

the transmitter signal.

Now you can make the fi rst test drive. If this is your fi rst rc car, we 

recommend to drive it on a small test track to familiarise yourself 

with the control of the vehicle and the controls of the transmitter. 

Attention! 

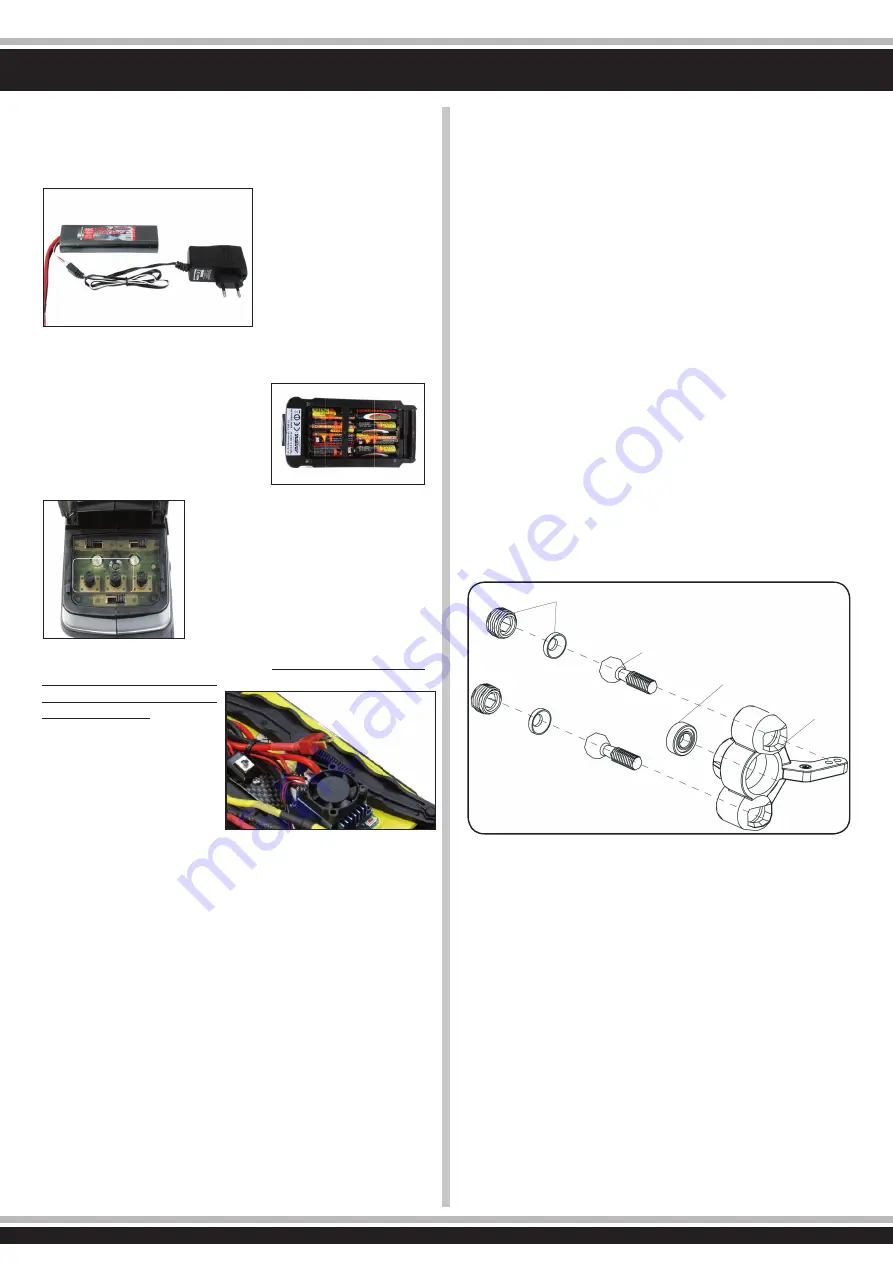
Your vehicle has a pivot front suspension. This has a number of 

advantages. It is very robust and easy to maintain. The set-up of 

the car has been done so the drive shaft will not pop out. As with 

any model, screws and bolts can losen during break-in of the car. 

This can result in tolerance of the drive shaft. The drive shaft can 

then pop out if high pressure is applied. 

The inner ball screw (item No.: 505081) will enable you to adjust 

the tolerance resulting in fi ne adjustments of the track width. For 

best results when setting up the pivot ball for the fi rst time, please 

always adjust the upper and lower pivot in the same way. Fasten 

as far as the pivot can still be pulled up and down easyly but not 

as far that it will pop out if you give full steering angle. The outer 

plastic socket screw (item No.: 505080) is only used for securing 

of the steering knuckle. This should not be too tight, otherwise 

the steering is not smooth and the handling can be adversely 

affected.

Important!

By using LiPo batteries take care that  the undervoltage shut-

down is activated, see page 20 - 23

Otherwise, your LiPo battery can be damaged by deep dischar-

ge. 

We recommend a cut-off voltage of 3 V per cell.

ESC

On/Off

Battery

ESC/Battery
Connector

On/Off

L/R  F/B

Trim

50 5080

50 5081

07 9996

50 5079

Charger

Battery

Содержание 05 3265

Страница 1: ...Notice d assemblage GB Instruction Akron 2 4 GHz R f Ord No 05 3265 Utilisable en Permittend in EU CH FR GB FR Notice d assemblage Akron 2 4 GHz Km h K Km Km m Km Km Km Km h m h m m h m h h m h m h 6...

Страница 2: ...amais sur les voies publiques N utilisez jamais ce mod le sur une surface humide les l ments lectroniques peuvent tre endommag s Si votre voiture le moteur ou l accu devait tre mouill il faut les s ch...

Страница 3: ...area If this model is the first radio controlled model which you are attempting to build or run you should secure the assistance of an experienced model pilot Your local dealer will be able to assist...

Страница 4: ...s ou d chet lectronique 2002 96 CE RoHS interdiction d utilisation de certain produits chimiques dangereux pour la r alisation des composants lectroniques et pour la fabrication du mat riel lectroniqu...

Страница 5: ...ghlights Red Power B3650 Brushless Motor Speed Controller Brushless 60 A Pivot Ball System front Alu chassis Carbon Design Adjustable Suspension Horizontal stearing servo Adjustable oil pressure shock...

Страница 6: ...il de mesure d inclinaison Camber adjusting Tool No 19 0060 Cales de hauteur Height lange No 23 2060 Bande adh sive double Doublesided power tape No 23 0409 20 g Wheel blood Colle pour roue Rim Glue N...

Страница 7: ...Cette fonction est d sactiv e en sortie d usine Vous pouvez activer la fonction Failsafe en laissant le manche des gaz de l metteur en position de neutre voir chapitre Fail Safe et en appuyant sur la...

Страница 8: ...d on the transmitter We encourage you now to activate your receiver s built in Failsa fe unit On delivery it is turned off Leave the throttle lever in neutral position see chapter Fail Safe Press the...

Страница 9: ...ations N anmoins la synchronisation d un r cepteur sur son metteur est une obli gation afin que l ensemble fonctionne L metteur 2 canaux est quip de manches de commandes de grandes qualit s pour les f...

Страница 10: ...l ments d branchez la liaison avec l metteur ou de la prise de charge de votre syst me de transmission puis d branchez le chargeur du secteur Sortez les accus de l metteur et du mod le si vous n utili...

Страница 11: ...ansmitter can be quickly and simply programmed Both channels can be trimmed and the direction changed Fur thermore the transmitter is equipped with a Dual Rate system and a red LED indicates the state...

Страница 12: ...t d signe les diff rents l ments devant tres actionn s GB Binding the receiber to the transmitter As with all modern 2 4GHz R C systems the receiver must be bound to the transmitter to ensure that the...

Страница 13: ...le c Placez le manche des gaz en position de freinage ou ralenti du servo ou du r gulateur Gardez la commande dans cette position d Appuyez sur la touche Setup du r cepteur La LED clignote durant 3 se...

Страница 14: ...switch 6 on the programming panel the direc tion in which the steering moves can be reversed if required In addition the transmitter is equipped with a Dual Rate function When this function is activat...

Страница 15: ...g contre les claboussures la pluie ainsi que de la poussi re Si vous deviez utiliser des accus du type Lipo veillez votre mod le ne peut tre utilis qu avec des accus du type 2 l ments 7 4V Les dommag...

Страница 16: ...eutre De plus il faut ventuellement d sactiver la fonction ABS sur votre metteur GB Using Your ESC Connecting the Receiver Battery Pack and Motor Connect the ESC the receiver the battery pack the stee...

Страница 17: ...rsque la voiture bouge en avant ou en arri re Lorsque vous freinez la LED rouge clignote rapidement c La LED verte s allume d s que le manche des gaz se trouve en position max pour la vitesse avant ou...

Страница 18: ...u pour les voitures ou Truck radiocommand s est soumis de s v res contr les quali t s lors de sa fabrication il est tout de m me possible d avoir un probl me Dans le tableau ci dessous vous trouverez...

Страница 19: ...ez votre metteur et votre r cepteur ainsi que les connections du r gulateur Check both the transmitter and receiver as well as the ESC connecting cable Le moteur tourne dans le mauvais sens The motor...

Страница 20: ...other menu options are accessed in the same manner Rel chez la touche Release button Taste 3 Sek halten Press the button for 3 seconds Taste 3 Sek halten Press the button for 3 seconds Taste 3 Sek hal...

Страница 21: ...8 Basiseinstellungen Default Setting 1 Mode de roulage Drive Mode en avant avec frein Forwards brake on avant arri re avec frein forwards reverse brake on 2 Frein main Drag Brake Force 0 5 10 15 20 25...

Страница 22: ...i ces m caniques et augmente l usure des composants m caniques comme la transmission par exemple 6 Vitesse arri re max Dans ce menu vous pouvez d terminer la vitesse arri re maximale de votre voiture...

Страница 23: ...one The neutral Zone which is the area between forwards and reverse or braking can be set to Narrow Normal or Wide as shown in the illustration below This Zone can be set for both stick or pistol grip...

Страница 24: ...harge pour un accu vide est de l ordre de 2 3 heures en fonction de la capacit de la batterie Temps de charge Le temps de charge est d pendant de la capacit de l accu Exemple Courant de charge 0 8 A h...

Страница 25: ...nts Prot gez les l ments contre des chocs m caniques pincement pression torsion per age N ouvrez ou ne d coupez en aucun cas les accus ne les jetez pas dans le feu et tenez les bonne distance des enfa...

Страница 26: ...e is a risk of getting fire or acid injuries Overcharging too high power or discharging at low level destroys the cell Protect from mechanical stress squeezing pushing bending drilling Never open or c...

Страница 27: ...rack width Track width reduction FR R solution des probl mes Probl me Cause Solution Le mod le ne r agit pas accus pas charg s ou piles vides Chargez l accu changez les piles C bles mal connectez bran...

Страница 28: ...5 50 5074 50 5073 50 5024 50 5145 50 5023 50 5024 50 5076 50 5071 50 5085 07 9989 07 9996 07 0806 No 50 5155 Diff rentiel complet Differencial complete No 50 5155 No 50 5155 No 50 5155 Diff rentiel co...

Страница 29: ...u ce que l axe ne soit plus sous contrainte sur la course compl te du directionnel et que celui ci ne se d croche pas Les vis six pans plastiques des extr mit s 505080 servent assurer la jambe de trai...

Страница 30: ...30 50 5054 50 5097 50 5087 50 5054 07 9989 50 5082 07 9996 50 5028 Assemblage de la fus e arri re Rear shaft assembly Assemblage des amortisseurs Shock assembly 50 5064...

Страница 31: ...31 Assemblage du saver pour servo Buffer assembly Assemblage de la platine radio Buffer assembly 50 5029 50 5029 50 5027 03 3215 07 9841 50 5093...

Страница 32: ...32 Assemblage du moteur Motor assembly 50 5126 22 Z T 50 5026 13 0046...

Страница 33: ...e ci d grader les caract ristiques de tenue de route de votre voiture GB Suspension Settings The following settings are possible toe in toe out A Toe in The responsiveness of the steering is less dire...

Страница 34: ...s haut GB Suspension Settings Front caster high low Less caster Less caster has a worse directional stability but provides a better steering on corner entries High caster A higher caster has a better...

Страница 35: ...e clips Pr tension de ressort moins ou plus de clips Spring tension less or more clip Coude d amortissement arri re haut Coude d att nuation Shock angle Inclinaison arri re Inclinaison avant Toe front...

Страница 36: ...es GB Setting points Pr tension de ressort Spring tension Coude d att nuation Shock angle Coude d att nuation Shock angle Coude d att nuation Shock angle Inclinaison uniquement la vis de l int rieur C...

Страница 37: ...Pr tension de ressort Spring tension Coude d att nuation Shock angle Coude d att nuation Shock angle Coude d att nuation Shock angle Coude d att nuationShock angle FR Points de r glages GB Setting poi...

Страница 38: ...roue avant arri re Wheel axle No 50 5027 Platine radio Radio tray set No 50 5096 Tige directionnelle Steering rod connecting set No 50 5100 Directionnel avant bas Front lower suspension set No 50 508...

Страница 39: ...ain arri re Rear shaft hub No 50 5029 Servo Saver Kit Steering saver No 50 5074 Corps de diff rentiel Differential case set No 50 5028 T ton directionnel Suspension arm shaft No 50 5079 Jambe de train...

Страница 40: ...e Umbrella head machine cross screw No 50 5061 M2 11 Pin No 08 1452 60A R gulateur Speed Brushless Speedcontroller Brushless No 50 5048 M3 10 Vis t le Round head selftapping cross screw No 50 5053 M3...

Страница 41: ...lement billes Ball bearing FR Liste des pi ces de rechanges GB Spare parts No 05 9274 Clip de maintien carrosserie Body clip No 50 5188 Carrosserie Body No 50 5189 Planche de d coration Decals No 03 7...

Страница 42: ...Alu short No 50 5163 Arbre cardan avant Joint front rear No 07 4416 High End 9712 MG Servo Servo No 06 1200 CCX 2 4 Pro Radiocommande Transmitter FR Pi ces tuning et accessoires GB Tuning parts No 13...

Страница 43: ...coll es sur les jantes Tyres glued on rims ST Uphill 100 mm No 05 2871 12 mm No 05 2872 12 mm 1 2OS No 05 2873 R ceptacle directe pour proulement Direct intake for ball bearings Roues coll es sur les...

Страница 44: ...ire attention au diam tre Selon le type de v hicule des changements la carrosserie ou la d viation de direction ou largir l cartement pourraient tre n cessaires GB Product information Bearing for 2WD...

Страница 45: ...our pare choc ou tube de lampe Fonction Lumi re permanente 4 LEDs Fait avec c ble de raccordement Longueur totale 300 mm Left Right pin through mounting e g for impact protection tube frame Function C...

Страница 46: ...46...

Страница 47: ...AT 6840 G tzis Tel 0043 0 5523 52220 Fax 0043 0 5523 522204 E Mail modellbau boeckle aon at Web www modellbau boeckle com Modellflugshop Am Bahndamm 6 86650 Wemding Tel 07151 5002192 Fax 07151 500219...

Страница 48: ...______________ _______________________________________________ Veillez envoyez mon catalogue avec mon nom mon revendeur lors de sa prochaine commande Order the current catalogue with our complete asso...

Отзывы: