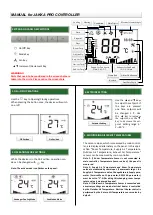
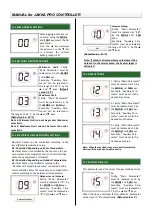

Supply Air Temperature
Room Temperature
Exhaust Air Temperature
Outdoor Air Temperature
5. FAN SPEED SETTINGS
Fan speed can be set to one of
1
-
2
-
3
-
4
-
5
-
Auto
values.
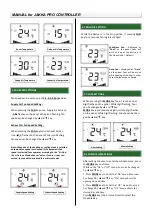
Supply Air Fan Speed Setting :
When pressing the
FAN
key once, Supply Air Fan icon
flashes on the panel. While icon flashing, fan
speed can be changed by
▲
and
▼
key.
Exhaust Air Fan Speed Setting :
When pressing the
FAN
key twice, Exhaust Air Fan
icon
flashes on the panel. While icon flashing,
fan speed can be changed by
▲
and
▼
key.
Note: When one of the heating or cooling mode is selected,
automatic fan speed is activated. If the automatic fan
speed is selected, fans operates according to the
“
Air Qua-
lity or Carbon Dioxide Sensor
”
value. If sensor is not con-
nected, fan speed is decreased to a minimum value.
Supply Speed Setting
Exhaust Speed Setting
6. FAN LOGIC SETTING
While the device is in the On position, if pressing
FAN
key for 5 seconds, fan logic is changed.
Continious Fan :
Displayed as
“
Cont
”
on the panel. Fans will
work as long as the device is in
the On position. ( Default )
Auto Fan :
Displayed as
“
Auto
”
on the panel. Fans will be active
while heating or cooling. In other
cases the fan output is closed.
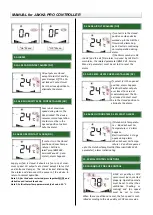
7. CLOCK SETTINGS
When pressing the
MODE
key for 6
-
7 seconds, hour
digit flashes on the panel. While digit flashing, hour
can be changed by
▲
and
▼
key.
MODE
key is pressed once again, minute digit flashes
on the panel. While digit flashing, minute can be chan-
ged by
▲
and
▼
key.
Hour Setting
Minute Setting
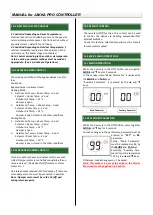
8. SCHEDULE OPERATIONS
After setting minutes, to enter the schdule menu, press
the
MODE
key one times.
While in the "On" or "OF" menu, hour can be changed
by
▲
and
▼
key.
1. Press
MODE
key to enter the
"On" menu. Hour can
be changed by
▲
and
▼
key. "On" menu shows the
opening day and time.
2. Press
MODE
key to enter the
"OF" menu. Hour can
be changed by
▲
and
▼
key. "OF" menu shows the
closing day and time.
Press
MODE
key (one or more times) to select the
schedule day.
MANUAL
for
JAKKA PRO
C
ONTROL
L
ER


