4 MAINTENANCE
GB-14
4.4
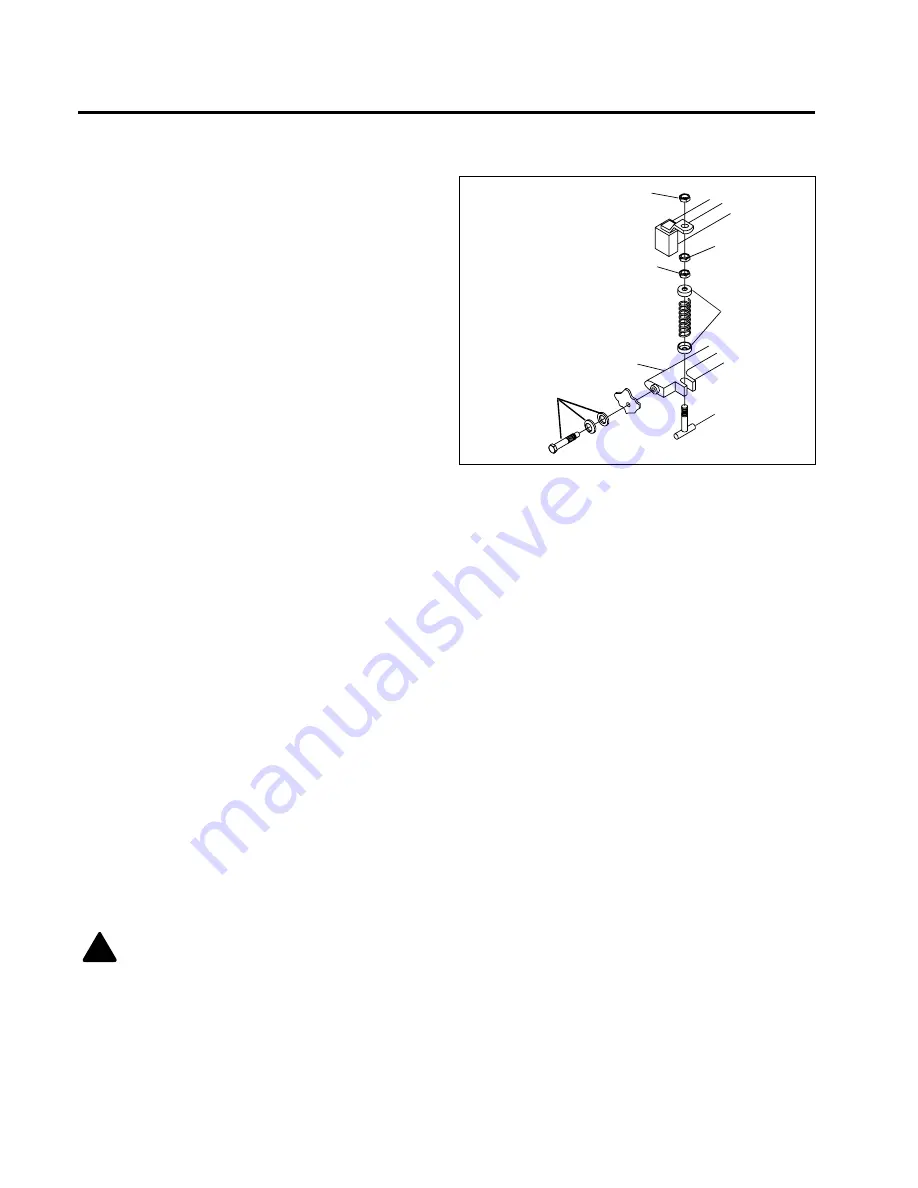
BEDKNIFE SHOE REMOVAL ________________________________________________
1. To remove the shoe
(E)
, loosen nut
(A)
and turn
nuts
(B)
counterclockwise 1/4 turn or more to bring
the bedknife into light contact with the reel blades.
2. Remove mounting hardware
(D)
from both sides of
the shoe.
3. Turn locknut
(C)
counterclockwise until the shoe
ends are relieved of all spring pressure.
4. Rotate shoe ends out from between spring cups
(F)
and rod
(G)
.
5. To replace bedknife shoe, place shoe ends between
spring cups and adjusting rod ends, rotate shoe into
position.
6. Align shoe mounting holes with frame and
reassemble hardware
(D)
.
7. Adjust the bedknife to the reel. Tighten all hardware.
Figure 4A
4.5
BACKLAPPING AND GRINDING _____________________________________________
Check for damage to the bedknife and reel blades.
Refer to Section 3.2.
1. Determine if backlapping or grinding will restore the
proper cutting edge.
2. For optimum performance use a bedknife grinder to
touch-up the blade then reassemble and adjust the
bedknife to the reel as described in Section 3.3.
3. Disengage reel clutch and tip machine back to rest
on the handle.
4. Remove shaft cover and gasket from left side of
reel. Assemble a 3/8-24 bolt and locknut to the end
of the shaft and attach to lapping machine.
a. Apply lapping compound with a long handle
brush along the entire length of the reel, (120
grit is recommended, Section 2.6).
b. Continue lapping and at the same time make a
fine adjustment on the reel and bedknife until
there is a uniform clearance along the full length
of the cutting edges.
5. Carefully and thoroughly remove all lapping
compound from reel and bedknife
before running
the reel in forward direction
.
4.6
TIRES ___________________________________________________________________
1. Keep tire properly inflated to prolong tire life. Check
pressure only when the tires are cool.
2. Use an accurate, low pressure tire gauge.
6 - 8 psi - (41.3 - 55.1 kPa)
A
B
C
F
E
G
D
!
CAUTION: Unless you have the proper training,
tools and experience, DO NOT attempt to mount
a tire on a rim. Improper mounting can produce
an explosion that may result in serious injury.
Содержание PGM 19
Страница 2: ... 2003 Ransomes Jacobsen Limited All Rights Reserved ...
Страница 3: ......
Страница 18: ...5 NOTES GB 18 5 NOTES ...
Страница 19: ......
Страница 35: ...REMARQUES 5 F 19 5 REMARQUES ...
Страница 51: ...NOTITIES 5 NL 19 5 NOTITIES ...
Страница 67: ...ANMERKUNGEN 5 D 19 5 ANMERKUNGEN ...
Страница 83: ...NOTE 5 I 19 5 NOTE ...
Страница 84: ......
Страница 90: ...24 21 8 9 10 11 18 4 3 4 5 6 7 18 20 1 2 19 20 12 13 14 15 16 17 PGM 3 1 Left Chain Cover Serial No All ...
Страница 94: ...28 8 9 6 5 1 2 4 7 21 13 20 19 18 3 4 10 11 12 13 14 15 16 17 PGM 5 1 Right Side Frame Serial No All ...
Страница 100: ...34 10 8 7 4 2 3 1 6 5 21 20 5 6 3 2 4 7 9 11 12 8 13 14 15 16 15 11 17 18 19 PGM 8 1 Traction Rollers Serial No All ...
Страница 102: ...36 17 14 14 15 12 13 10 20 21 11 5 5 3 18 19 23 2 3 1 4 6 7 8 9 22 PGM 9 1 Transport Wheels Serial No All ...
Страница 104: ......
Страница 105: ......


