background image

Installation manual: OASiS security system JA-82KRC-US   

6 / 21 

MKH51400


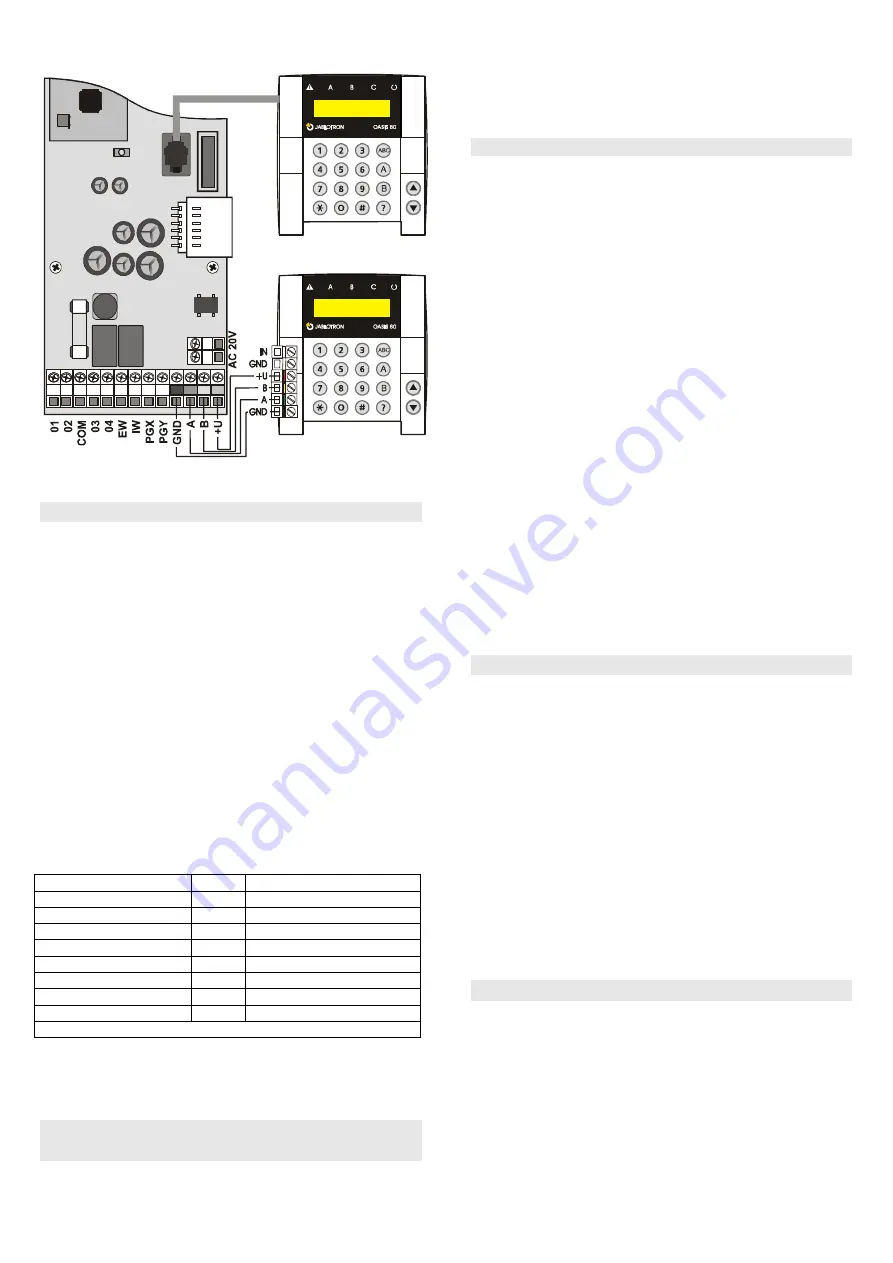
When equipped with a JA-82R module, the control panel also 

allows for a JA-80F wireless keypad connection. 


Modular connection

cable

Control and programming

keypad JA-80E


We  recommend  only  having  a  single  JA-80E  hard-wired 

keypad in the system. 

6.  Back-up battery 

It is possible to use a Jablotron-brand 12V back-up battery in 

the control panel with a capacity of 2.2 Ah. The capacity to use 
depends on the total power consumption of the system and the 
desired back-up period.  

 Euro-standard  EN  50131-1  specifies  a  12  hour  minimum 

back-up time for grade 2 systems. The standby consumption of 
all system devices is shown in 

Table 1


  With a 

2.2Ah

 back-up battery 12 hours of back-up time can 

be realised if current consumption does not exceed 

150mA

This only takes 80% of the battery capacity into account as 
20% has to be reserved for battery aging effects. 

  The  average

  back-up  battery  lifetime 

is

  up  to  5  years 

after  which  it  must  be  replaced.  The  back-up  battery  is 
automatically charged and its condition is monitored by the 
system.  If  the  system  is  being  run  on  only  the  back-up 
battery a technical alarm occurs when the battery is nearly 
discharged.  If  the  voltage  gets  too  low  the  battery  will  be 
disconnected.  After  the  mains  supply  has  been  restored 
battery  charging  starts  again  and  the  system  will  begin  to 
function again. 

Table 1-  standby consumption of system devices


Ensure that the battery is correctly connected (Polarity: RED = 
po, BLACK = negative -).


WARNING

 – the battery is sold charged – to maintain safety, 

avoid shorting out the terminals !!! 


7.  Powering-up  the  control  panel  for  the 

first time 

  First  check  all  the  wiring,  and  if  a  GSM  communicator  is 

installed, insert its SIM card (PIN code disabled).  

  Carefully connect the back-up battery, 

  Carefully  connect  up  the  mains.  A  green  LED  will  start 

flashing on the control panel board. 

  If  a  hard-wired  keyboard  is  connected  it  will  indicate  Service 

mode. If not, the control panel is not set to the factory default 
and should be reset (see section

 9.

). 

7.1. 

Wireless keypad enrollment 

If  no  hard-wired  keypad  is  connected  to  the  control  panel, 

and the wireless keypad was  not supplied as part of a JK kit, 
the  wireless keypad must be enrolled to the control panel as 
follows:   

1.  Have an opened keypad and its battery ready. 
2.  Check that the green LED in the control panel is flashing.  
3.  Short  the  reset  link  in  the  control  panel  for  1  second  (e.g. 

using a screwdriver). This will enter enrollment mode on the 
control panel. 

4.  Install  batteries  into  the  keypad  not  far  from  the  control 

panel. 

5.  The keypad generates a beep sound and enrolls to address 

05 (or 15). After that it indicates “Enrollment 06: Device” (or 
“Enrollment 16: Device”). 

6.  Press  the 

key to exit enrollment mode and “Service” will 

be indicated on the keypad. 

Warning: 

  If the keypad does not enroll, then the control panel settings 

are not the factory-defaults. In this case perform a reset and 
repeat the enrollment procedure. 

  If  you  want  to  assign  the  keypad  to  another  address,  re-

enter enrollment mode  via the “1” key, then use the arrow 
keys  to  select  the  desired  address.  Then  disconnect  the 
keypad battery and reconnect it. 

Recommendation

:  it  is  highly  recommended  to  install  the 

wireless keypad with a magnetic door sensor wired to its hard-
wired  input  terminal.  This  way  the  keypad  will  wake  up  every 
time after opening the door and it will produce entrance delay 
beeps and will be ready to read access cards. It will also save 
money on a wireless door detector.  

8.  Language selection of the keypad 

If  the 

∗ 

  key  is  kept  pressed  during  battery  connection,  the 

internal  keypad  menu  will  be  displayed  allowing  the  selection 
of  the 

desired  language

.  Using  the  arrows,  choose  your 

language and confirm selection by the 

∗ 

 key. 

In this menu the 

door bell function

 can also be enabled or 

disabled  (if  enabled  the  keypad  makes  a  sound  when  its  IN 
input is triggered). 

Notes:


  for  the  JA-80E  wired  keypad  the  power  can  be  connected 

by  connecting  its  cable  or  by  turning  on  the  control  panel 
power  

  if  the  wireless  keypad  has  already  had  its  battery 

connected,  it  is  necessary  to  disconnect  the  battery  for  a 
while before pressing and holding the 

 key 

  the language can be selected for each individual  keypad in 

the  system  (i.e.  different  keypads  can  display  different 
languages  –  for  example  if  foreigners  are  working  in  the 
company) 

9.  Resetting the control panel 

If  you  need  to  return  the  control  panel  to  the  factory-default 

settings perform the following:   

1.  Disconnect the back-up battery and the mains (for example 

by removing the fuse from its terminals). 

2. 

Connect the RESET

 link and leave it connected. 

3.  Connect the back-up battery and the mains. 
4.  Wait till the green 

LED

 starts flashing and then disconnect 

the 

RESET

 link. 

Device 

mA 

Note 

Control panel JA-82K 

10 

No communicator 

Module JA-82R 

20 


Module JA-80C 

15 


Keypad JA-80E 

30 


Keypad JA-80H (N) 

60 

Including a WJ-80 interface  

Communicator JA-80Y 

35 


Communicator JA-80V 

30 


Communicator JA-80X 

15 


Wireless devices are not powered from the control panel. 

Содержание JA-82KRC-US

Страница 1: ...OASiS security system JA 82KRC US 1 21 MKH51400 JA 82KRC US OASiS Control panel installation manual This manual is valid for control panel JA 82KRC US The control panel can be configured by a PC runn...

Страница 2: ...ible alarms 13 12 21 Wireless siren alarm enabled IW and EW 13 12 22 Auto bypass user approval via the key 13 12 23 Final door detectors 13 12 24 Partial setting arming or system splitting 14 12 25 Au...

Страница 3: ...01 to 50 for wireless inputs o The control panel does not allow for the simultaneous connection of both a wired and a wireless input to the same address Connecting to a wired input automatically disab...

Страница 4: ...r Maintenance modes 1 2 Optional system configurations In the European Union region follow the valid standards and rules especially series EN 501 xx The Oasis control panel complies with grade 2 The c...

Страница 5: ...allel resistors see the diagram below o For wiring examples see the below diagram TAMPER SIREN ACTIVATION TAMPER ACTIVATION TAMPER ACTIVATION TAMPER ACTIVATION ACTIVATION DOOR 1 DOOR 2 DETECTOR 1 DETE...

Страница 6: ...control panel for 1 second e g using a screwdriver This will enter enrollment mode on the control panel 4 Install batteries into the keypad not far from the control panel 5 The keypad generates a bee...

Страница 7: ...nection to the control panel possibly due to excessive distance or it could be too close to the control panel closer than 2 meters is not permitted To re enroll a device first disconnect its battery T...

Страница 8: ...multiple control panels in one UC or AC receiver 12 Control panel programming The most convenient way to program the system is to use a PC running OLink software The system can however also be progra...

Страница 9: ...g Entrance delay beeps 35x 351 YES 350 NO YES Setting arming confirmation by wired siren chirp 36x 361 YES 360 NO NO IW terminal only Siren always sounds during audible alarms 37x 371 YES 370 NO YES N...

Страница 10: ...the effect or SET A or SET AB C has the effect or SET ABC or UNSET ABC In a split system a keyfob button pair assigned to section A SET UNSET A B SET UNSET B C SET UNSET ABC 61 nn r s Code card react...

Страница 11: ...alarm PG on excluding Panic Panic A PGX on Panic B PGY on 6 AC dropout PG on Fire PGX on dropout PGY on 7 ON OFF 8 2 seconds pulse The ON OFF and 2 second pulse functions can be controlled from the ke...

Страница 12: ...ter code has no effect on other codes and cards Resets are recorded in the control panel memory and sent to the ARC if used Alarm Receiving Centre previously called a central monitoring station 12 12...

Страница 13: ...Wireless siren alarm enabled IW and EW This setting is for enabling and disabling wireless sirens in the system 3 8 1 wireless sirens enabled 3 8 0 wireless sirens disabled Note This setting has no e...

Страница 14: ...nset immediately after the user sets unsets the system Assigning wireless devices access codes and keyfobs to various sections of the system has no effect in this mode Partial setting is especially su...

Страница 15: ...r or a JA 80V version XA64005 or higher is installed 12 32 Annual check notification This sequence enables the user and installer to be notified of the necessary time for an annual technical check 690...

Страница 16: ...hard wired input terminals in the control panel or enrolled wireless devices r is the reaction index from 0 to 9 see Table 2 s is the section 1 A 2 B 3 C only has an effect if partial setting or syst...

Страница 17: ...rd has a natural reaction i e r 1 then its reaction is set unset set etc the same as reaction r 9 in table 2 A code card can also have an alarm reaction designated to it similar to detectors Factory d...

Страница 18: ...is stored in the non volatile memory of keypads so power disconnection will not erase any stored text Convenient text editing is possible using a PC running OLink software Besides device names keypad...

Страница 19: ...codes and cards from 01 to 50 are erased If a user has both a code and a card then it is possible to program whether both a code and card must be presented to the system for system access or whether o...

Страница 20: ...can be scrolled through with the A indicator showing whether a code is programmed or not and the B indicator showing whether a card is programmed or not 4 To exit this code card display mode press th...

Страница 21: ...st wake it up Install an ordinary magnetic sensor to the entrance door wiring it to the keypad input so that opening the door wakes up the keypad and reports to the control panel Alternatively power t...

Отзывы: