background image

Support: 855-473-7449 or 408-943-4100                                     Email: 

[email protected]

Page 4

3  R20

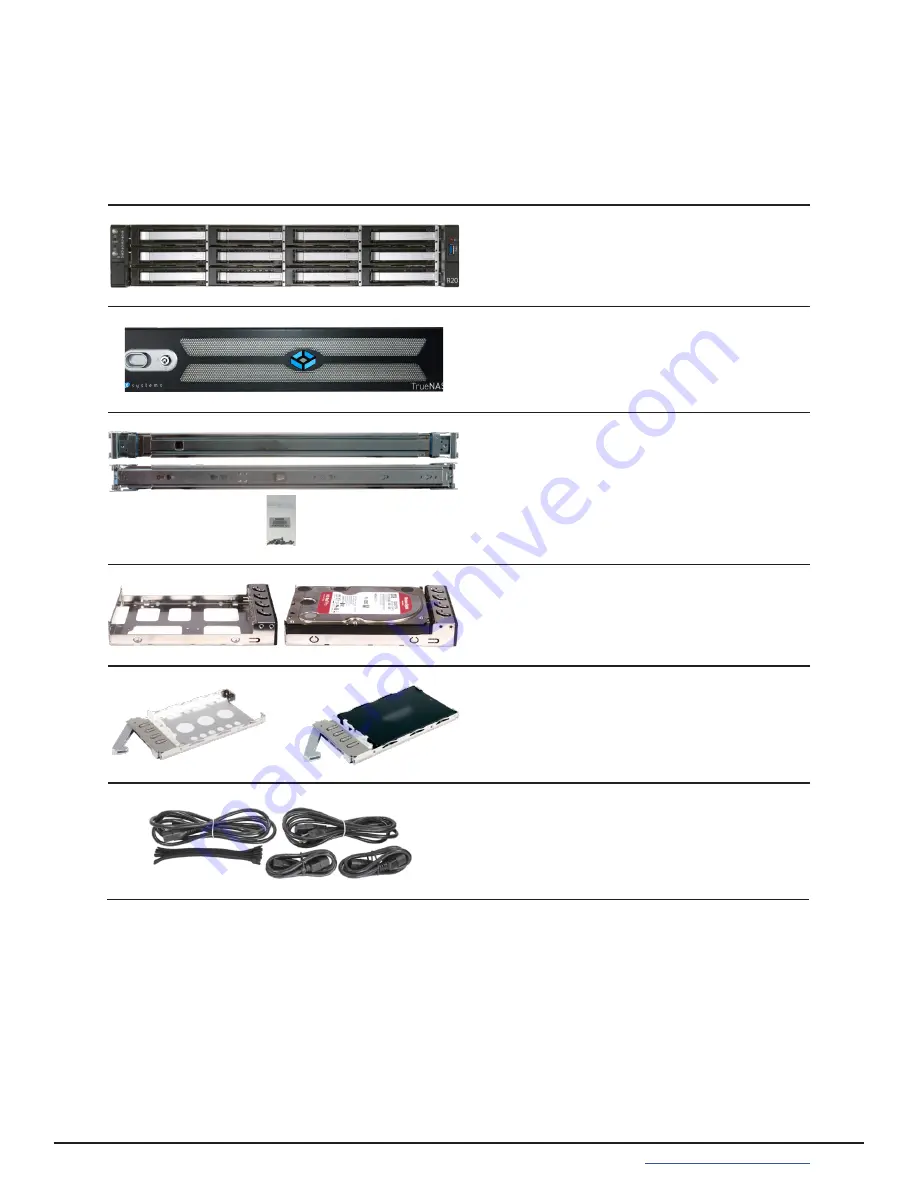
The R20 is a 2U Hybrid Storage Array that has 12 3.5” drive bays and 2 SSD drive bays, redundant power supplies, 

and a single TrueNAS controller. You will find these items when opening the R20 packaging:

3.1  R20 Components

2 SSD drive trays with up to 2 SSDs installed

Locking Bezel

12 3.5” drive trays with up to 12 hard drives 

installed

Set of rackmount rails with mounting hard

-

ware

R20 Hybrid Storage Array

Accessory kit with 2 IEC C13 to NEMA 5-15P 

power cords, 2 IEC C13 to C14 cords, and a 

set of velcro cable ties

Содержание TrueNAS R Series

Страница 1: ...TrueNAS R Series Unified Storage Arrays Basic Setup Guide Version 1 1 ...

Страница 2: ...rence Contents 1 Introducing the TrueNAS R Series 1 1 1 Safety 1 1 2 Requirements 1 2 R10 2 2 1 R10 Components 2 2 2 Ports and Indicators 3 3 R20 4 3 1 R20 Components 4 3 2 Ports and Indicators 5 4 R40 6 4 1 R40 Components 6 4 2 Ports and Indicators 7 5 Racking the R10 R20 or R40 8 5 1 Rack Requirements 8 5 2 Attach the Chassis Rails 8 5 3 Install the Rack Rails 9 5 4 Push the System into the Rack...

Страница 3: ...ernal com ponents 2 Place the system on a clean hard work surface like a wooden tabletop Using an ESD dissipative mat can also help protect the internal components 3 Touch the metal chassis with your bare hand before touching any internal component including components not yet installed in the system This redirects static electricity in your body away from the sensitive internal com ponents Using ...

Страница 4: ...rive bays redundant power supplies and a single TrueNAS controller You will find these items when opening the R10 packaging 16 SSD drive trays with up to 16 drives installed Accessory kit with 2 IEC C13 to NEMA 5 15P power cords 2 IEC C13 to C14 cords and a set of velcro cable ties Set of rackmount rails and mounting hard ware R10 All Flash Storage Array ...

Страница 5: ...nd two USB 2 0 ports 4 Two USB 3 0 ports 5 Two 10Gb SFP networking ports 6 VGA monitor port There are lighted buttons for system ID 1 and power 4 There is also a USB 2 0 port 2 and lights for network and controller activity 3 The back panel has the power supplies and connection ports The right side of the R10 front panel has buttons ports and indicators for controlling the system ...

Страница 6: ...ingle TrueNAS controller You will find these items when opening the R20 packaging 3 1 R20 Components 2 SSD drive trays with up to 2 SSDs installed Locking Bezel 12 3 5 drive trays with up to 12 hard drives installed Set of rackmount rails with mounting hard ware R20 Hybrid Storage Array Accessory kit with 2 IEC C13 to NEMA 5 15P power cords 2 IEC C13 to C14 cords and a set of velcro cable ties ...

Страница 7: ...he system to a rack 5 The right ear has a single USB 3 0 port 6 The fault indicator is on during the initial power on self test POST and off during normal operation It also turns on if the TrueNAS software issues an alert For details about software alerts and how to configure them see Alerts in the TrueNAS Documentation Hub The back panel has the power supplies and connection ports 1 Power supplies...

Страница 8: ...U All Flash Storage Array that has 48 SSD drive bays redundant power supplies and a single TrueNAS controller You will find these items when opening the R40 packaging R40 All Flash Storage Array Locking Bezel Set of rackmount rails with mounting hardware Accessory kit with 2 IEC C13 to NEMA 5 15P power cords 2 IEC C13 to C14 cords and a set of velcro cable ties ...

Страница 9: ... lighted buttons for power 1 and system ID 2 There are also fault 3 and network activity 4 indicators Both ears have hinged covers over screw holes for securing the system to a rack 5 The right ear has a single USB 3 0 port 6 The fault indicator is on during the initial power on self test POST and off during normal operation It also turns on if the TrueNAS software issues an alert For details about...

Страница 10: ...ed before attaching to a system Slide the chassis rail forward until the metal catch stops it in place Push in the catch and continue to slide the chassis rail forward until it is free of the rack rail PUSH SLIDE Take the chassis rail and align the end stamped FRONT with the front of the system Fit the rail keyholes over the mounting pegs on the side of the system and slide it into place Use one o...

Страница 11: ...ver the front of the rack by pushing on the spring plate to open the clip The rail kit also includes two retention screw hole extenders that can be screwed into the middle rail attach point With the front of the rail installed extend the back of the rack rail towards the equivalent attach points on the rear rack post Make sure the rail remains level from front to back Follow this process to instal...

Страница 12: ...the same drive trays The general drive install and tray insertion procedures for each type of drive tray are described in this chapter 6 1 SSD Drive Trays R10 R20 R40 To install an SSD drive tray into a system align the tray with an opening on the chassis and slide it forward until the locking arm begins to swing closed Gently swing the locking arm forward until it latches into place To remove a d...

Страница 13: ...egins to swing closed Gen tly push the arm into place to seat the tray and secure it in the system No tools are required to install a drive in a full size hard drive tray Make sure the drive connectors are pointed out the back of the tray and push the drive side screw holes into the fixed retention pegs on one side of the tray Con tinue to push the other side of the drive down into the flexible re...

Страница 14: ... drive trays To attach the locking bezel align the right side of the bezel with the attach points on the right ear and push the left side of the bezel into the attach points on the left ear until it clicks into place Removing the bezel requires sliding the front latch to the right and pulling the bezel forward 1 To lock the bezel in place insert the key and rotate the lock to the left 2 ...

Страница 15: ...lies and a single TrueNAS controller You will find these items when opening the R50 packaging R50 Hybrid Storage Array Set of fixed rackmount rails 3 NVMe drive trays with up to 3 drives installed Accessory kit with 2 IEC C13 to NEMA 5 15P power cords 2 IEC C13 to C14 cords a set of velcro cable ties and bags with installation hardware Up to 48 hard drives depending on the purchase shipped separat...

Страница 16: ... It also turns on if the TrueNAS software issues an alert For details about software alerts and how to configure them see Alerts in the TrueNAS Documentation Hub The back panel has the NVMe drive bay case fans power supplies and connection ports 1 NVMe drive bay fan and status indicators 2 Power Supplies 1 and 2 3 System fans 4 Serial port 5 1Gb Ethernet Out of Band Management port and two USB 2 0...

Страница 17: ...ach the final three cage nuts to the next three descending attach points Attach another six cage nuts to the same attach points on the other rear rack rail Cage nuts are attached to holes in the rack posts with the nut on the inside of the rack and wings pointed horizon tally Attach four cage nuts in the rack front posts two on each side The top cage nut is placed one attach point down from the to...

Страница 18: ... tab will fit into the empty rack space between the cage nuts Use the included M5 screws to attach the rail to the cage nuts Follow this pro cess for the other rail Two people at minimum should lift the R50 Align the grooves on the sides of the system with the rails and slide the system forward until it is flush with the front of the rack Use four M5 screws to secure the system to the rack M5 Scre...

Страница 19: ...rives use detachable trays to mount and secure the drive in the system 8 4 1 Handling the Primary Drive Bay To secure the drive bay and prevent it from accidentally opening tighten the captive thumbscrews on the front of the system 1 The included key can also lock the drive bay and prevent unauthorized access 2 Open the drive bay by unlocking the front 1 loosening the captive thumbscrews 2 and usi...

Страница 20: ...s Slide the blue release tab 1 on a slot cover and lift 2 Gently grasp the inner tray and slide it up until it clicks into place 3 Take the hard drive and align the connectors facing downwards into the system The power and SATA connectors are typically aligned to the left side of the tray 1 Slide the drive into the tray push in the plastic release tabs on each side of the tray and push the tray do...

Страница 21: ...free from the system The bottommost drive bay is not used in the R50 8 4 4 Replacing NVMe Drives To remove a drive from an NVMe tray push on the drive from the bottom of the tray until the drive pops out of the side retention pegs on the drive tray To install a new drive in an NVMe tray align the drive connectors with the back of the tray Push the screw holes on the side of the drive into the fixe...

Страница 22: ...or the first boot so that the system BIOS can be configured to your specific needs and the initial TrueNAS web interface IP address can be viewed The system is installed with the optimal BIOS and IPMI firmware out of the box DO NOT UPGRADE your system s BIOS and IPMI firmware When all other ports are connected finish by plugging in both power cables Each system has a retention clip that can be use...

Страница 23: ...des numerous articles designed to help you configure and use the software It is available by clicking Guide in the TrueNAS web interface or going directly to https www truenas com docs The TrueNAS Documentation Hub also provides an online version of this Guide and documentation of other iXsys tems products at https www truenas com docs hardware 10 Connecting to the TrueNAS Web Interface Powering o...

Страница 24: ...Support 855 473 7449 or 408 943 4100 Email support ixsystems com Page 22 ...

Отзывы: