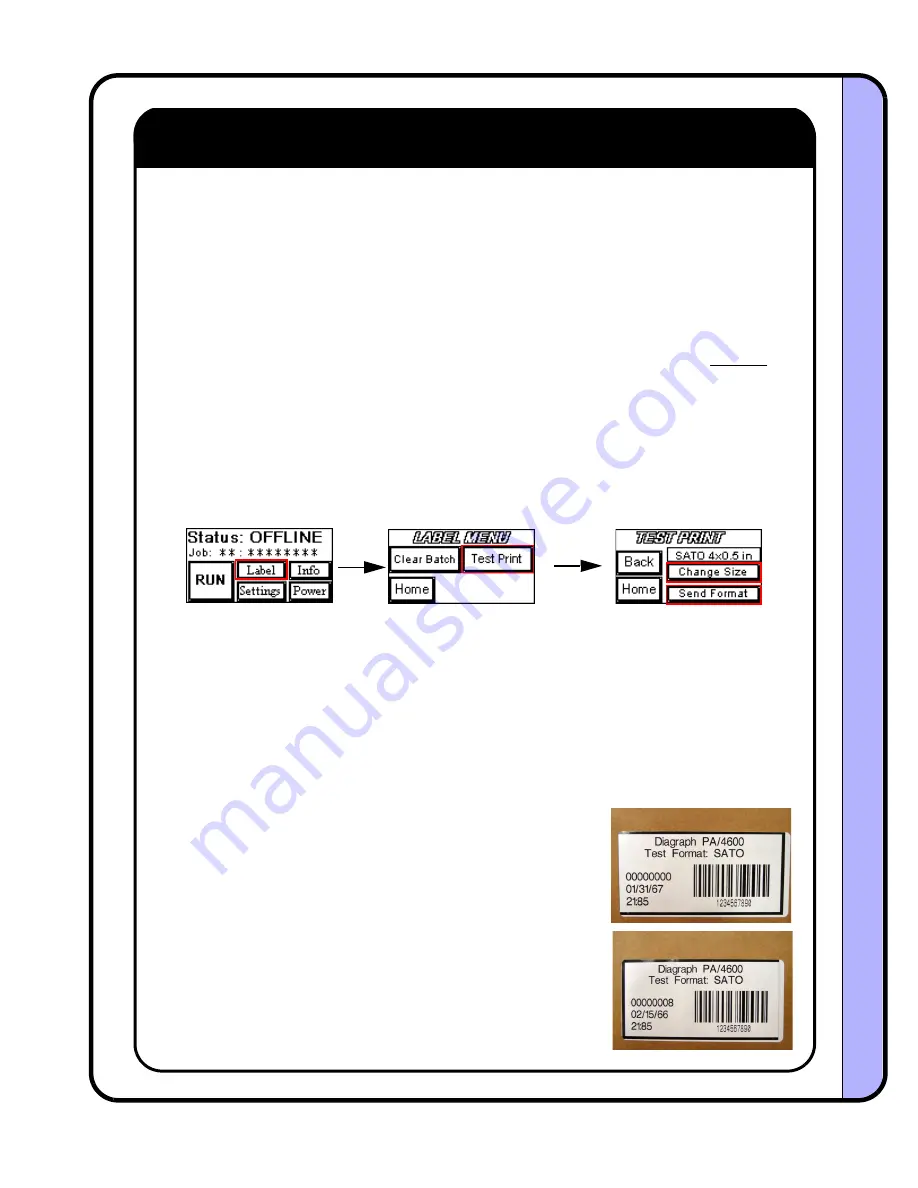
Step 12 - Test Print
Goal:
Verify communications between the applicator and the printer
Goal:
Optimize the printer image offset on the label, print darkness, presentation of the label out of
the printer (pitch), and print quality.
•••• Sub-Step (a) ••••
Begin by setting the desired baud rate in the printer, and in the PA/4600 or PA/6000. Typically,
applications run well at 19,200 baud since this rate allows more immunity to signal noise and can
allow greater cable distances. For applications that demand higher throughput, higher serial speeds or
Ethernet may be required. Select the baud rate for the system from the menu seen on
•••• Sub-Step (b) ••••
Send a test print format to the printer by entering the Label Menu and select Test Print. Select the
correct label format size to send by pressing the Change Size button. The format choices are for fixed
sizes, but other label sizes will work with these as well, just use the test print size smaller than the
actual label length. Label widths smaller than 4 inches can be used, but some of the format
information will not be seen on the label.
Map:
The format contains some sample text, barcode, incrementing 8 digit counter, a time and date stamp,
and a box border. If the printer is not equipped with a time/date clock option, the information in these
fields will be some default text.
•••• Sub-Step (c) ••••
After selecting the correct format size and printer option, press the Send Format button. If the printer
does not show a batch quantity on its display, or if there is a Framing Error, the baud rate is incorrect
or the cabling to the printer has a problem. Once the quantity is displayed, press Run from the home
screen to print the label.
•••• Sub-Step (d) ••••
Make corrections to the print based on the results of the test print. On
the right, the top label is shown with a vertical and horizontal offset of
0,0. Correct the image presentation on the format by using the printer
menu selection of Print Offset. The bottom label shows the change in
print, once the horizontal offset was set to 10mm. Notice that the right
border is now visible on the corrected label (bottom view).
Other adjustments made through the printer include: print darkness,
label pitch, print speed, and time/date setting. Once the test label
looks centered and clear, proceed to the next step.
Image shifted left
Image corrected to right
Diagraph - an ITW Company PA/4600 & PA/6000 User Manual
Setup
Page 22
Setup
Содержание Diagraph PA/4600
Страница 1: ...PA 4600 PA 4600 PRINTER APPLICATOR PRINTER APPLICATOR PA 6000 PA 6000 4600 010 Revision G ...
Страница 47: ...Diagraph an ITW Company PA 4600 PA 6000 User Manual Maintenance Page 46 Maintenance ...
Страница 48: ...Diagraph an ITW Company PA 4600 PA 6000 User Manual Maintenance Page 47 Maintenance ...
Страница 49: ...Diagraph an ITW Company PA 4600 PA 6000 User Manual Maintenance Page 48 Maintenance ...


